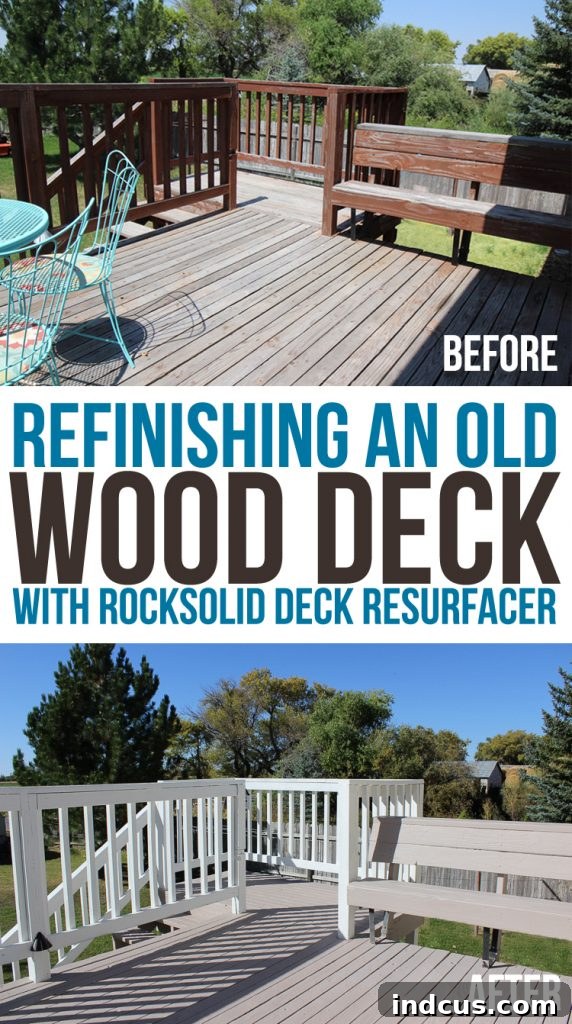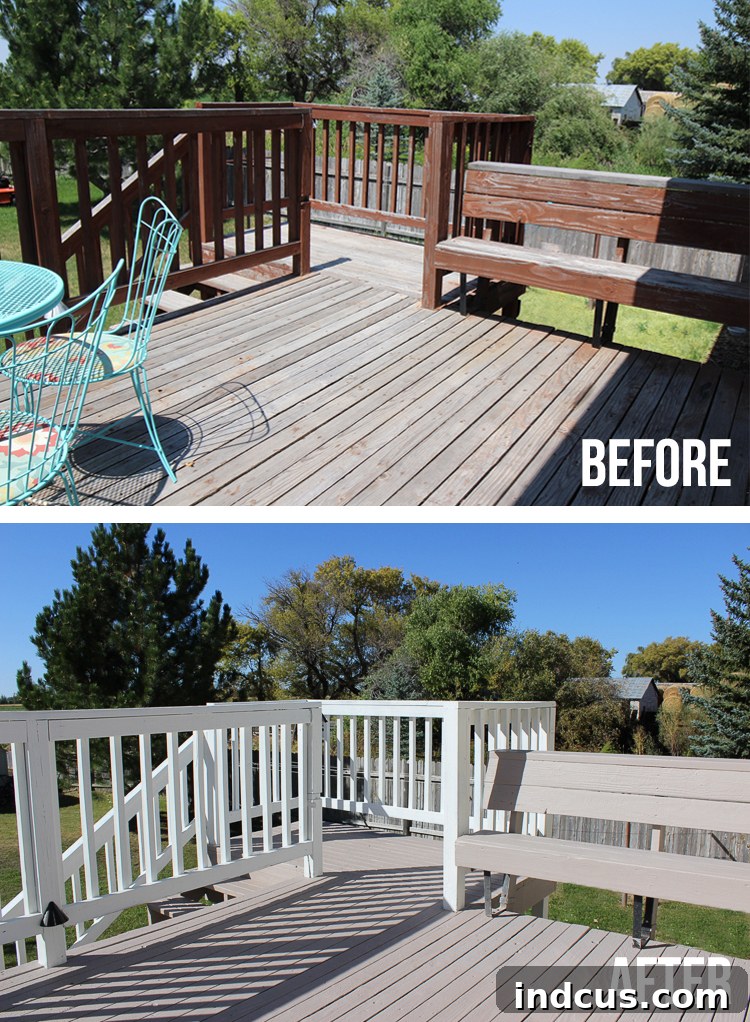
Revitalizing a neglected outdoor space can profoundly transform your home’s appeal and functionality. Our personal journey began with a massive two-story wooden deck that had been overlooked for years, falling into a state of severe disrepair. The once vibrant stain had almost entirely eroded, leaving the wood exposed, splintered, and deeply weathered. What was originally a beautiful feature of our home had become an eyesore, deterring us from utilizing our spacious backyard. We knew that to fully enjoy our property, a significant deck makeover was absolutely essential. Through dedicated effort and the innovative RockSolid 20X Deck Resurfacer, we embarked on a comprehensive DIY deck restoration project that brought our outdoor living area back to life, proving that even the most damaged decks can be saved.
Our large, beautiful backyard was a primary reason we fell in love with our home, yet the deteriorating deck prevented us from truly enjoying it. The thought of relaxing or entertaining guests on a splintered, worn-out surface was simply unappealing and frankly, a safety concern. This realization solidified our commitment to invest the necessary time and effort into a thorough deck remodeling project. We were determined to reclaim this valuable outdoor space and transform it into a central hub for family gatherings, quiet relaxation, and entertaining friends. Our goal was not just to repair, but to create a durable, attractive, and long-lasting extension of our living area.
We extend our sincere thanks to our friends at Rust-Oleum for their invaluable support and sponsorship of this post. During a blogging conference, they introduced us to their range of innovative deck products, and we immediately recognized their potential to rescue our old, sad deck. Their solutions provided the perfect fit for tackling the extensive damage and bringing our vision for a rejuvenated deck to fruition, offering specialized products that address the unique challenges of weathered wood deck restoration.
If you find yourself facing a similar challenge with a worn-out, weathered deck, you’re not alone. This detailed guide will walk you through the entire process of restoring an old wood deck, from essential structural repairs and meticulous cleaning to the final application of a durable resurfacer. Follow these proven steps to transform your outdoor space and create a beautiful, functional area you’ll love for years to come. Our experience will help you navigate common pitfalls and achieve a professional-looking result for your own DIY deck project.
Essential Materials for Your Comprehensive Deck Restoration Project
Successful DIY deck resurfacing begins with gathering the right tools and products to ensure each step is performed effectively and efficiently. Here’s a comprehensive list of what you’ll need to tackle your deck transformation, along with a brief explanation of each item’s importance:
- Power Washer: This tool is absolutely crucial for deep cleaning, removing years of embedded dirt, grime, mold, mildew, and loose wood fibers. It provides the foundational clean necessary for proper adhesion of subsequent coatings. (We rented ours from Home Depot, a cost-effective solution for tools you don’t use frequently).
- Rust-Oleum RockSolid Deck and Patio Cleaner: This powerful, specialized cleaner works in conjunction with power washing to thoroughly remove residual contaminants, stubborn stains, and invisible residues that can hinder the performance of your resurfacer. It ensures the wood surface is optimally prepared.
- Zinsser Bulls Eye 1-2-3 Spray Primer: An essential step for preventing rust on exposed nail heads and screws. This primer creates a barrier, stopping unsightly rust bleed-through and ensuring a consistent, long-lasting finish, especially critical under opaque topcoats.
- Rust-Oleum Deck Start Wood Primer: A vital primer specifically formulated to promote exceptional adhesion for solid topcoats. Its unique composition simplifies prep work by often eliminating the laborious and time-consuming need to strip off old, failing stain or paint, saving you significant effort.
- RockSolid 20X Deck Resurfacer Roller Cover: This specialized roller is designed with a unique nap to effectively spread the notably thick consistency of the 20X Resurfacer. Using the correct roller ensures even application and optimal coverage, preventing inconsistent texture or missed spots.
- RockSolid 20X Deck Resurfacer: The cornerstone of this project, this innovative coating is engineered to fill cracks, seal splinters, and encapsulate damaged wood, creating an extremely durable, anti-slip, and aesthetically pleasing new surface that can withstand harsh elements.
Step-by-Step Guide to Achieving a Flawless Deck Makeover
Step 1: Thorough Inspection and Structural Deck Repair
Before applying any coatings, a thorough inspection and repair of your deck’s structural integrity is paramount. This initial phase ensures not only safety but also provides a solid, stable foundation for the new finish. We discovered significant rot and breakage, particularly with our stairs. The stringers, which are critical structural components, were severely compromised, necessitating their complete replacement. Ignoring such damage can lead to dangerous safety hazards and drastically shorten the lifespan of your entire deck restoration project. Investing time in these foundational repairs prevents future headaches and ensures your deck is structurally sound.
Beyond the stairs, we also identified and meticulously replaced several damaged deck boards and a few side pieces that had succumbed to rot and decay. This attention to detail in addressing all compromised wood is absolutely crucial for a lasting and safe result. Our deck previously housed a hot tub, which was surrounded by a small windbreak fence. We decided to strategically remove this partition to create a more open, unified space that seamlessly integrated with the rest of our expansive backyard. You can still spot a remnant of the old partition in the accompanying photo, highlighting the extent of the structural and aesthetic changes we undertook to optimize our outdoor living area. Prioritizing these essential DIY deck repairs not only enhances safety and structural integrity but also significantly improves the overall aesthetic appeal and longevity of your deck restoration.
Step 2: Deep Cleaning with a Powerful Power Washer
Once all necessary repairs are meticulously complete, the next critical step in your wood deck restoration is a thorough and systematic power wash. This powerful process effectively removes years of accumulated dirt, grime, stubborn mildew, algae, and loose wood fibers, creating a pristine, clean canvas for your new coating. We began by carefully spraying in between the deck boards to dislodge any debris trapped in the crevices, then systematically went back across the tops of the boards with consistent, overlapping strokes. The transformation was truly astonishing; the power washer instantly revealed the underlying, cleaner wood, making our deck look significantly younger and more vibrant than it had in years.
Beyond its undeniable practical benefits, power washing proved to be an incredibly satisfying and enjoyable part of this DIY project. There’s something uniquely gratifying about watching years of neglect literally wash away, revealing the cleaner, brighter wood underneath. Remember to always use appropriate pressure and maintain a consistent distance to avoid damaging the wood, moving with steady, even passes. Always prioritize safety by wearing protective eyewear and closed-toe shoes during this step. This deep clean is absolutely foundational; without it, even the best deck resurfacer won’t adhere properly or deliver the long-lasting results you expect, potentially leading to premature peeling or failure of the new coating.
Step 3: Comprehensive Scrubbing with a Specialized Deck Cleaner
Even after a thorough power washing, a deeper, chemical clean is often necessary to truly prepare the wood for optimal coating adhesion. Once the deck has sufficiently dried from the power wash (this is crucial to avoid diluting the cleaner), it’s time to scrub the entire surface with Rust-Oleum RockSolid Deck and Patio Cleaner. This product is specifically formulated to penetrate and remove stubborn stains, embedded mildew, and invisible residues that a power washer alone might miss, ensuring a truly pristine surface for your deck resurfacing project.
To apply, simply mix the concentrated cleaner with water according to the precise directions on the package, typically in a large bucket like those found at Home Depot. Then, pour the solution evenly across a manageable section of the deck surface and use a sturdy outdoor push broom to thoroughly scrub the cleaner into the wood grain. This mechanical action ensures the cleaner penetrates deep into the wood and effectively lifts embedded dirt and contaminants. After scrubbing, rinse the deck thoroughly with clean water, making sure absolutely no cleaning solution residue remains. Allow the deck to dry completely, ideally for 24-48 hours depending on humidity, before proceeding to the next steps. This meticulous cleaning guarantees that your deck resurfacer will bond effectively and last for many years.
Step 4: Priming Exposed Nail Heads for Rust Prevention
Once your deck is meticulously clean and completely dry, it’s time for a crucial priming step often overlooked in many DIY deck projects. Before applying any main primer or resurfacer, it is essential to use Zinsser Bulls Eye 1-2-3 Spray Primer to coat all exposed nail heads and screws. This protective measure is vital for preventing rust formation, which can otherwise bleed through your pristine topcoat over time, creating unsightly orange or brown stains and severely compromising the overall finish and longevity.
This step is particularly effective and recommended when you plan to use an opaque topcoat, such as RockSolid 20X Resurfacer, as the white primer will be completely covered and disappear beneath the final color. However, it’s important to note that if you opt for a semi-transparent stain or sealant, this method would not be suitable, as the primer would show through and alter the intended aesthetic. For solid resurfacers, ensuring rust prevention at the nail head level guarantees a pristine, uniform, and professional-looking finish, protecting your investment and maintaining the beauty of your deck makeover for years to come.
Step 5: Applying Rust-Oleum Deck Start Wood Primer
With the deck thoroughly cleaned, meticulously dry, and all nail heads protected, the next essential step in your deck restoration project is to apply Rust-Oleum Deck Start Wood Primer. This innovative product is specifically engineered to work seamlessly with any solid topcoat, significantly simplifying the often-arduous preparation process. One of its greatest advantages is that it eliminates the labor-intensive and time-consuming task of stripping off old, faded, or failing stain, making your deck resurfacing project far more manageable and efficient.
This primer plays a crucial role in promoting superior topcoat adhesion, ensuring that your RockSolid 20X Resurfacer bonds securely and effectively to the wood. This robust bond is vital for preventing premature peeling, cracking, and blistering, thereby significantly extending the life and beauty of your finish. Therefore, it is a step you absolutely should not skip, as it forms the critical link between your prepared wood and the final coating. Interestingly, this primer has a unique and helpful quality: it applies white, making it easy to see where you’ve covered, but it conveniently dries clear, so it won’t interfere with your final color. It even has a distinct scent reminiscent of classic school glue! Deck Start Wood Primer is a foundational element for achieving a professional, durable, and long-lasting deck transformation.
Step 6: Applying RockSolid 20X Deck Resurfacer for Ultimate Protection
Now for the main event: meticulously applying the RockSolid 20X Deck Resurfacer to all horizontal surfaces of your deck. This highly specialized coating is the ultimate solution for weathered deck restoration, uniquely designed to meticulously fill in existing cracks in the wood, effectively seal splinters, and encapsulate damaged or deteriorated wood fibers. The result is a smooth, revitalized, and incredibly durable surface that can withstand years of foot traffic and harsh environmental conditions. Its consistency is notably thick – imagine a really good, substantial milkshake – which directly contributes to its incredible durability, crack-filling capabilities, and textured finish.
For our deck, we opted for the color “Brownstone,” a versatile greige (gray-beige) shade that offered a significant aesthetic upgrade. While it provided a fresh look, in retrospect, I might have chosen “Winchester.” This color offers a similar underlying tone but is a few shades darker, which I believe would have created a more striking and desired contrast against our home’s exterior. Personal preference certainly plays a significant role in color selection, and Rust-Oleum offers an extensive range of aesthetically pleasing options to match any home’s style. You can explore the full spectrum of available RockSolid 20X Resurfacer colors directly on the Rust-Oleum website to find your perfect match and envision the possibilities for your deck makeover.
To ensure a successful and flawless application of this unique product, keep the following crucial tips and techniques in mind:
- Thorough Mixing is Key: Due to its inherently thick nature and the presence of aggregates, the product requires exceptionally thorough mixing before application. Use a heavy-duty drill paddle attachment to achieve a consistent, lump-free texture. Improper mixing can lead to inconsistent color and performance.
- Specialized Roller Cover: The 20X Resurfacer’s unique thickness necessitates the exclusive use of a specialized roller cover. This roller is precisely engineered to spread the ideal amount of product onto the deck surface, ensuring even coverage, optimal texture, and avoiding excessively thick patches or thin spots.
- Edge and Gap First: Always begin the application process by meticulously using a paintbrush to “cut in” along the edges of your deck and to paint carefully between the deck boards. This ensures complete coverage in hard-to-reach areas and creates clean lines before you transition to using the roller for the main, broader surfaces.
- Batch Mixing for Color Consistency: If your large project requires more than one bucket of 20X Resurfacer, it is highly recommended to “box” them – that is, mix them together in a larger container before starting application. This critical practice helps to blend any slight color variations that can occur between manufacturing batches, preventing noticeable differences on your finished deck and ensuring a uniform appearance.
- The Critical “Drip Patrol”: This is a crucial, often underestimated, and mandatory step! For approximately 20 minutes after applying the product, you MUST be on vigilant “drip patrol.” Because of its extreme thickness, the resurfacer can form significant drips, particularly along the edges and underside of your deck. Walk around with a paintbrush and diligently wipe away any drips as they form. Continue to check for new drips as the product begins to set and cure. Ignoring this step can result in hardened, unsightly drips that are extremely difficult, if not impossible, to remove later without damaging the finish.
- Effortless Cleanup: One of the major conveniences and time-savers of 20X Resurfacer is its incredibly easy cleanup. Simply use warm water and soap to clean tools and spills, which significantly simplifies post-project tidying and saves effort.
While the deck surface received the robust RockSolid 20X treatment, we opted for a different and strategic approach for our deck railings. Spraying them with a high-quality exterior latex paint using our trusty paint sprayer was a very deliberate decision. We knew that hand-brushing such extensive and intricate railings would have been an incredibly time-consuming, laborious, and potentially frustrating task. This choice not only saved us a tremendous amount of time and physical effort but also allowed for a smoother, more professional, and more consistent finish on the vertical surfaces. We absolutely adore the crisp contrast of the freshly painted white railings against the new “Brownstone” deck surface, creating a fresh, modern, and visually appealing aesthetic for our entire outdoor space. If you don’t have access to a paint sprayer, RockSolid 6X Deck Coat is an excellent alternative product recommended for railings and other vertical surfaces, offering robust protection and a beautiful finish that complements the 20X Resurfacer on horizontal areas.
The Astonishing Before & After: Our Deck Transformation Unveiled
After weeks of dedicated effort, meticulous planning, and careful application, the most rewarding part of any extensive deck restoration project is finally seeing the dramatic before-and-after results. Our two-story deck, once a source of neglect, frustration, and even embarrassment, has been completely revitalized and transformed into a stunning, inviting outdoor oasis that we now eagerly anticipate using.
This particular photo powerfully illustrates the significant positive impact of removing the old hot tub windbreak structure. The space now feels remarkably more unified, open, and expansive, seamlessly integrating with our large backyard. What was once a confined and compartmentalized area is now a sprawling, continuous, and inviting extension of our home’s living space, perfect for entertaining or simply relaxing in the open air.
The strategic decision to paint the railings a crisp white truly elevates the entire aesthetic of the deck. The stark, clean contrast against the new “Brownstone” deck color is striking and deliberate, imparting a decidedly modern, fresh, and sophisticated look to the entire structure. It’s amazing how a seemingly simple color choice for complementary elements can so profoundly impact the overall feel and visual appeal of a newly resurfaced deck, turning an ordinary space into something extraordinary.
We now envision spending countless joyful hours enjoying this transformed outdoor living area. The once omnipresent risk of painful splinters is completely gone, replaced by a smooth, comfortable surface. The entire space exudes a fresh, clean, and incredibly inviting ambiance, making it a true extension of our indoor living. It genuinely feels like a brand new deck and a cherished part of our home, perfect for creating lasting memories with family and friends.
This extensive project, tackling a substantial 700+ square foot two-story deck that was in truly awful, dilapidated condition, took us considerably longer than initially anticipated. We dedicated approximately five full Saturdays and several weeknights to its completion, often working late into the evening. It was undoubtedly an exhausting endeavor, requiring significant physical commitment, unwavering patience, and a fair amount of problem-solving.
However, the payoff has been immense and deeply gratifying. We absolutely adore our “new” deck and the enhanced enjoyment it brings to our home and lifestyle. We are eager to observe firsthand how the RockSolid finish withstands the harsh and often brutal conditions of an Idaho winter and will provide a comprehensive update on its long-term durability and performance after enduring the elements.
DECK UPDATE: 7 Years Later (2024) – A Long-Term Review
After seven years of continuous use and relentless exposure to the harsh elements of an Idaho climate, our deck is once again in need of a significant refresh. While the RockSolid 20X Deck Resurfacer initially provided a much-needed and dramatic aesthetic and functional transformation, we’ve observed considerable peeling and flaking over time, making future reapplication or complete removal a challenging and labor-intensive prospect. The product, designed for extreme durability and adhesion, has bonded very strongly, which unfortunately means that its removal to properly prepare for a new coating will be a particularly difficult and arduous task. This long-term insight is crucial for anyone considering a similar deck resurfacing solution.
Considering the long-term maintenance requirements, the desire for a more permanent solution, and a commitment to reduced future upkeep, our plans for the future of our deck have significantly evolved. We are now planning a more extensive and comprehensive overhaul for the summer of 2025. This ambitious project will involve pouring a durable, low-maintenance concrete slab for the lower level, creating a resilient and contemporary foundation that eliminates wood maintenance concerns. For the upper portion of the deck, we intend to utilize high-quality Trex composite decking and install new vinyl railings, aiming for a modern, highly durable, and virtually maintenance-free finish that will provide lasting beauty and functionality.
Reflecting on the RockSolid 20X Deck Resurfacer, my recommendation comes with a nuanced and balanced perspective. It certainly bought us seven years of increased functionality and significant aesthetic improvement, which I genuinely appreciate, especially given the terrible, almost unsalvageable condition of the deck initially. It’s debatable whether the old deck was salvageable through any other traditional means at that particular time without a complete rebuild. Therefore, if you possess an extremely old, severely weathered deck that you ultimately plan to replace entirely – perhaps with composite materials or a new construction – but need an interim, temporary solution to significantly extend its life and make it usable and attractive, then this product could be a viable and effective option. It provides a temporary but significant improvement and a few years of reprieve. However, if your long-term goal is a truly permanent, very low-maintenance solution where you expect the coating to last for many decades without significant peeling or difficult removal processes, then I would strongly advise exploring alternative, perhaps more durable, decking materials or coating systems designed for such longevity.
Before embarking on your own deck resurfacing project, we highly recommend visiting Rust-Oleum’s comprehensive product FAQ pages. Their detailed resources offer a wealth of helpful tips, expert tricks, and essential information to ensure your success with this transformative home improvement endeavor. Thoroughly understanding product specifications, application guidelines, and preparation requirements will pave the way for a smoother, more effective, and ultimately more rewarding deck restoration experience.