
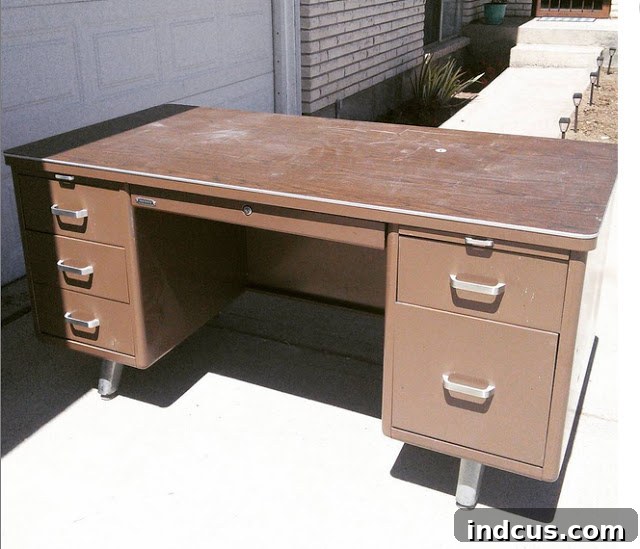
Revitalizing a Vintage Tanker Desk: A Golden Makeover for My Craft Room
Every creative soul dreams of a dedicated space that inspires imagination and productivity. For me, that dream manifested as a quest for the perfect craft room desk. I envisioned a piece that was not only robust and functional but also oozed character and charm. My hunt concluded serendipitously at a local thrift store, where I stumbled upon an absolute treasure: a vintage tanker desk. Priced at an unbelievable $30, its sturdy metal frame and ample storage immediately caught my eye, and I knew instantly it was destined for a new life in my burgeoning craft haven.
This industrial-era workhorse, with its solid construction and surprisingly smooth-gliding drawers, including a dedicated filing drawer perfect for organizing my ever-growing collection of paper scraps, was a functional marvel. However, its original drab, institutional aesthetic screamed “government office” rather than “creative sanctuary.” It was clear this venerable piece needed a dramatic transformation, a complete aesthetic overhaul to align with the vibrant energy I wanted for my craft room. Thus began an ambitious DIY desk makeover, an adventure that taught me a great deal about patience, perseverance, and the often-unpredictable nature of metallic spray paint.
Embarking on the Golden Transformation: My DIY Desk Makeover Journey
My vision for this vintage tanker desk was bold and bright: I wanted to transform its dull metal exterior into a gleaming, luxurious gold. I imagined it as the radiant centerpiece of my craft room, reflecting light and inspiring creativity. For this ambitious project, I selected Rustoleum American Accents 2x Ultra Cover spray paint in a captivating gold shade. This particular paint promised exceptional coverage and a super shiny finish, attributes I thought would be perfect for achieving the glamorous look I envisioned. What followed was a humbling, yet ultimately rewarding, lesson in the nuances of spray painting large metal surfaces.
Navigating the Spray Painting Saga: Lessons Learned and Triumphs Achieved
While the allure of a metallic gold finish was undeniable, the application process proved to be far more challenging than anticipated. Let me be unequivocally honest: painting a giant metal desk with metallic gold spray paint is an endeavor fraught with potential pitfalls. The very qualities that make metallic paint so appealing – its reflective particles and high sheen – are precisely what make it notoriously difficult to achieve an even, streak-free finish. I must confess, I encountered significant setbacks, royally screwing up not once, but twice, during the initial painting attempts. This experience alone warrants a separate, detailed guide on “How Not To Spray Paint,” but for now, I’ll share the key takeaways from my journey.
One of the primary difficulties lay in achieving consistent coverage. The shiny flakes within the metallic paint tend to highlight every imperfection, every slight overlap, and every inconsistent spray pattern. This resulted in an uneven, patchy appearance that was far from the smooth, luxurious gold I was aiming for. Furthermore, metallic finishes, especially highly reflective ones, act like magnets for fingerprints and smudges, making careful handling and a meticulous approach crucial throughout the drying process. Had I known then what I know now, I would have approached the project with a different strategy, emphasizing meticulous preparation and a more refined technique.
For anyone contemplating a similar project, allow me to impart some hard-won wisdom. Firstly, surface preparation is paramount. Thoroughly cleaning the desk to remove all grime, grease, and dust is non-negotiable. A light sanding to create a ‘tooth’ for the paint to adhere to, followed by a good quality metal primer, would have provided a much better foundation. Secondly, patience is your greatest ally. Instead of trying to achieve full coverage in one or two heavy coats, opt for numerous thin, even coats, allowing each layer to dry completely before applying the next. This layered approach minimizes drips and streaks, building up the color gradually. Maintaining a consistent distance and smooth, sweeping motions with the spray can is also critical. Finally, while I didn’t use one, a clear protective topcoat would have been invaluable for protecting the finish and reducing the visibility of fingerprints. Despite these learning curves and the moments of utter frustration, my determination to see my vision through never wavered.
And yet, despite the wrestling match with the spray cans and the initial frustration, the final result was nothing short of spectacular. I truly love how my desk ultimately turned out. The golden hue infuses my craft room with warmth and elegance, elevating the entire space. It’s a testament to the fact that even with challenges, perseverance in DIY projects can lead to incredibly satisfying outcomes.
A Golden Gem and its Practical Perks
Now, this magnificent vintage tanker desk truly shines as a golden gem within my craft room. Its once utilitarian appearance has been completely transformed into a statement piece that exudes both style and functionality. One aspect I consciously decided to retain was the original faux wood laminate top. While a fresh coat of paint or a new surface might have seemed appealing, I carefully considered the rigorous demands of a busy craft space. This desk is destined for a lot of wear and tear – glue spills, paint splatters, cutting, and various crafting mishaps. The durable, original laminate top, with its proven resilience, felt like the most practical and long-lasting choice to withstand the creative chaos that is sure to unfold on its surface. It’s a testament to balancing aesthetics with real-world utility.
A Coordinated Companion: The Matching Vintage Chair Makeover
No desk transformation would be complete without a complementary seating arrangement. To match the desk’s radiant new look, I also gave a vintage metal chair a golden makeover. This chair, a cherished hand-me-down from my mom, who originally snagged it for a mere $8 at a yard sale, held sentimental value. I loved its classic lines and comfortable design so much that I was initially hesitant to paint it, fearing I might diminish its inherent charm. However, encouraged by the desk’s successful transformation, I took the plunge. And guess what? I love it even more now that it’s gleaming in gold! The unified metallic finish creates a cohesive and luxurious feel, tying the entire workspace together.
Personal Touches and Decorative Delights
Beyond the major furniture pieces, it’s the carefully curated details that truly bring a craft room to life. The cow print pillow on my newly gilded chair, for instance, is absolutely *in love* with its surroundings. Okay, confession time: I haven’t actually sewn it yet; it’s currently just a fabric wrap around a pillow form for the sake of these pictures. BUT, I adore it, and once I get my sewing machine and supplies fully set up in my organized craft space, I am absolutely making this cutie pie official. It adds a playful yet chic touch to the industrial elegance of the desk and chair.
And what’s a craft desk without some inspiring decorative goodies? Perched atop the desk, you’ll find a striking stag print, which is actually just a piece of scrapbook paper I discovered at Hobby Lobby. It was only $1 and, crucially, it was gold – an absolute no-brainer for my golden themed space! This budget-friendly find adds a touch of sophistication and personality without breaking the bank. Alongside it are some of my DIY creations: the chic geometric storage dishes. I previously shared a tutorial on how to make these stylish and functional vessels, and they’re proving to be incredibly useful for organizing small craft supplies while maintaining a sleek, modern aesthetic. The ease of their creation combined with their elegant shape makes them perfect additions to any organized workspace.
The craft room is steadily coming along, transforming from a mere concept into a tangible, inspiring reality. Each completed project, each carefully placed item, brings me closer to the fully realized creative sanctuary I envision. Yay, yay, double yay for progress and the joy of DIY!
Before & After: A Visual Testament to Transformation
The power of a DIY makeover is truly brought to life when you see the stark contrast between the “before” and “after.” My vintage tanker desk, once a drab relic of a bygone era, has been reborn as a radiant, golden focal point, ready to inspire countless hours of crafting. This transformation is a powerful reminder of the potential hidden within pre-loved items and the satisfaction that comes from breathing new life into them with a touch of paint and a lot of heart.
Conclusion: Embracing the DIY Journey and the Joy of Creation
This vintage tanker desk makeover was more than just a painting project; it was a journey of discovery, a test of patience, and a celebration of creativity. From scouting thrift stores for unique finds to grappling with the challenges of metallic spray paint, every step contributed to the character and story of this transformed piece. My craft room now boasts a desk that is not only robust and functional, perfectly suited for storing my paper scraps and other crafting essentials, but also a stunning reflection of my personal style. It’s proof that with a clear vision, a willingness to learn (even from mistakes!), and a splash of gold, you can turn an ordinary, overlooked item into an extraordinary, inspiring centerpiece. The satisfaction of creating a space that genuinely feels like “me” is immeasurable, and I can’t wait to dive into countless creative projects at my new, gleaming golden desk.







