
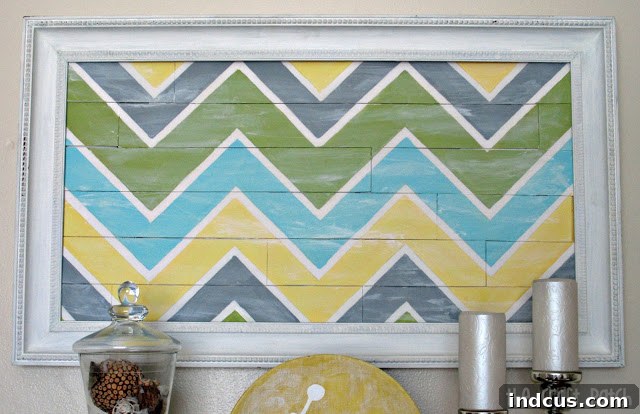
Transform Your Living Room: Creating Stunning Faux Pallet Art on a Budget
There’s an undeniable joy that comes with slowly but surely transforming a living space into a sanctuary that truly reflects your personal style. My own living room has been a delightful canvas for my recent decorating endeavors, and I’m incredibly eager to unveil the full, finished room with you all. However, as many DIY enthusiasts know, some projects are beholden to the whims of the weather. For me, that means a few significant painting tasks must patiently await the arrival of spring, or at the very least, a significant warming trend that lifts us well above freezing temperatures. In the interim, I’m excited to share some smaller, yet impactful, decorating triumphs that have already brought so much character to the space.
One of the initial challenges in my living room makeover was a prominent wall situated above my server. I knew it required a substantial piece of art – something bold, eye-catching, and capable of anchoring the entire room’s aesthetic. My previous piece, a vibrant lime green canvas art, had served its purpose admirably, gracing the wall for a good while. But as design tastes evolve and rooms take on new personalities, sometimes a change is simply necessary. The lime green piece was ready for a new home elsewhere in the house, making way for a fresh focal point.
The Perfect Canvas: Repurposing a Long-Loved Frame
My quest for new wall art didn’t start from scratch; I already possessed a fantastic foundation: a large, sturdy frame. This frame, a true testament to the beauty of repurposing, had been a serendipitous find eight or nine years ago, rescued from a pile of items destined for the thrift store. When I first acquired it, it was a rather ornate gold frame, encasing a cowboy painting, all surrounded by a somewhat jarring crimson velvet matte. I confess, it was undeniably… tacky! But I saw its potential beyond the dated facade. Years ago, I gave it a new lease on life with a fresh coat of crisp white paint, transforming it into a versatile piece that adorned a nursery wall, then elegantly transitioned to decorate our master bedroom. Now, it was time for its third act, ready to embrace a new artistic expression that would perfectly complement my evolving living room design.
But the burning question remained: what masterpiece would fill this beloved frame?
Beyond Wood: The Inspiration Behind Faux Pallet Art
I envisioned something with character, something that exuded a modern rustic charm while seamlessly weaving together the diverse color palette of the room. After much deliberation and brainstorming, the concept of faux pallet wood art emerged as the ideal solution. I loved the texture and visual interest that pallet art brought to a space, but the practicalities of working with actual reclaimed wood were daunting. Real wood is often heavy, can be challenging to cut and assemble neatly, and might not always fit precisely into an existing frame without significant modifications. I needed something that offered the aesthetic appeal of pallet wood without all the inherent difficulties. This led me to a creative and remarkably budget-friendly alternative.
The finished piece truly captures the essence of pallet art, boasting a distinct texture and visual depth that belies its true material. The secret? It’s not made of wood at all! My innovative solution was to use foam core – a material typically reserved for school projects or presentation displays. And here’s the best part: I sourced my foam core from none other than Dollar Tree! Yes, you read that right. The sheer excitement of finding such a versatile and affordable material for this project was immense. For those unfamiliar, foam core comes in large, poster board-sized sheets but possesses a much greater rigidity due to its foam interior sandwiched between two layers of paper. While you can certainly find higher-quality foam core at dedicated craft stores or office and art supply shops, I simply couldn’t resist the unbeatable price point and the thrill of a true dollar-store DIY.
Why Foam Core is Your DIY Best Friend for Large Wall Art
The decision to utilize foam core for this ambitious project wasn’t just about cost savings; it was a strategic choice driven by several practical advantages that made it the perfect medium for my faux pallet art:
- Unbeatable Affordability: Without a doubt, foam core is dramatically more cost-effective than purchasing actual wood planks, especially for a piece of this size. This allowed me to create a substantial decorative item without breaking the bank, a crucial aspect of any successful budget-friendly home decor project.
- Perfect Thinness: Its slender profile was ideal for fitting seamlessly into my existing picture frame. I didn’t have to worry about the art being too thick or protruding beyond the frame’s depth, which can often be an issue when working with real wood.
- Remarkably Lightweight: Given the large scale of the art, keeping the weight down was a priority. Foam core is incredibly light, making the finished piece easy to handle, transport, and most importantly, simple and safe to hang on the wall without requiring heavy-duty hardware.
- Effortless to Cut: Unlike wood, which requires power tools or significant manual effort and specialized saws, foam core can be cut with remarkable ease using just a craft knife and a straight edge. This not only speeds up the process but also makes it accessible to DIYers of all skill levels, eliminating the need for complex woodworking tools.
These combined benefits made foam core an absolute game-changer for achieving the desired aesthetic without any of the typical drawbacks associated with traditional materials. It was, quite simply, the perfect material for my project.
Crafting Your Faux Pallet Masterpiece: A Step-by-Step Guide
Bringing this vision to life involved a few straightforward steps that any enthusiastic DIYer can tackle. The key was in careful planning and embracing the material’s unique properties.
Step 1: Planning and Cutting Your “Planks”
My first step was to transform the large sheets of foam core into individual “planks” that would mimic the look of real wood. I began by determining the desired width for each plank. For my large frame, I decided on uniform widths to maintain a clean, consistent look, but the beauty of DIY is that you can customize this to your preference. Using a long ruler and a sharp craft knife, I meticulously cut the foam core sheets into these equal-width strips. Precision here is key for a polished finish, so taking your time with multiple light passes of the knife rather than trying to cut through in one go helps achieve clean, straight edges. Once I had a collection of uniform strips, I then cut them into varying lengths. This intentional variation in length is crucial for creating that authentic, seemingly random, staggered pattern characteristic of traditional pallet wood constructions. I laid them out on a large flat surface, experimenting with different arrangements until I found a configuration that was aesthetically pleasing and well-balanced within the dimensions of my frame.
Step 2: Assembling the Backing and Gluing
To provide stability and a solid foundation for my faux planks, I used extra pieces of foam core as a backing. This not only reinforced the structure but also provided a surface to securely attach all the individual planks. Once I was satisfied with the arrangement of my varied-length planks, I began the assembly process. I carefully lifted each plank, applied hot glue to its underside, and firmly pressed it onto the foam core backing. Hot glue is an excellent choice for foam core as it sets quickly, providing an immediate strong bond. While I worked, I made sure each plank was snugly fitted against its neighbors, maintaining tight seams to enhance the illusion of a solid piece of wood art. The backing allowed me to create a robust, singular piece that was easy to handle and fit into the frame.
A peek at the back reveals the honest, if somewhat chaotic, reality of my gluing process. I admit, neatness isn’t always my top priority when the back won’t be seen, but the hot glue created an incredibly strong and durable bond, ensuring the entire piece would hold together perfectly within the frame. My “neat and tidy” comment was, of course, a playful jest. What matters is the structural integrity and the final aesthetic!
Step 3: Painting the Chevron Design
With the “planks” securely assembled, it was time for the creative flourish: adding the chevron design. I opted for readily available craft paints, choosing colors that harmonized with my living room’s palette. To achieve crisp, clean lines for the chevron pattern, painter’s tape was my best friend. I carefully measured and taped off the zigzag pattern across the entire surface of the assembled foam core, ensuring all angles were consistent and sharp. This step is crucial for defining the geometric precision of a chevron. Once the tape was in place, I applied the craft paint, working in thin, even coats to prevent oversaturation. This leads me to an important lesson learned during this project:
I did encounter a minor challenge during the painting phase: I had to be mindful not to apply too much paint or get the foam core overly wet. Excessive moisture caused the outer paper layer of the foam core to bubble slightly in a few spots. However, given my intention for a rustic, somewhat weathered look for the “pallet” art, this imperfection wasn’t a problem at all. In fact, it arguably enhanced the desired aesthetic! After the paint was completely dry, I simply smoothed out any lingering bubbles and applied a tiny bit of extra glue to re-secure a few edges that might have lifted. These minor touch-ups were imperceptible once the art was framed and hung, contributing to its charming, handmade appeal.
The Grand Reveal: Integrating Art into Your Space
The moment I placed the finished faux pallet art into its repurposed white frame and hung it above the server, the transformation was undeniable. The large scale and bold chevron pattern instantly became the focal point of that wall, drawing the eye and adding a dynamic energy to the living room. The chosen colors within the chevron design truly succeeded in tying together various elements of the room, creating a cohesive and harmonious atmosphere. It adds a touch of modern farmhouse appeal, perfectly balancing sophistication with a relaxed, inviting vibe. This piece not only fills a significant visual void but also tells a story of creative problem-solving and budget-friendly decor.
Embrace Your Inner DIYer: Tips for Your Own Project
This project is a perfect example of how you can achieve high-impact decor without a high price tag or advanced carpentry skills. If you’re looking to add a unique, personalized touch to your home, I highly encourage you to consider similar DIY approaches:
- Repurpose, Repurpose, Repurpose: Always look at what you already have or what you can find cheaply. That old frame gathering dust in the attic or a thrift store gem could be the perfect foundation for your next project.
- Think Outside the Box with Materials: Don’t limit yourself to traditional art supplies. Foam core, cardboard, fabric scraps – the possibilities are endless when you get creative with materials.
- Embrace Imperfections: Especially when going for a rustic or handmade look, minor “flaws” can often add character and authenticity. Don’t let the pursuit of perfection deter you from starting.
- Plan Your Design: Even simple patterns like a chevron benefit from pre-planning and measuring. Use painter’s tape for crisp lines and save yourself frustration.
- Enjoy the Process: The satisfaction of creating something beautiful with your own hands is truly rewarding.
So there you have it – the “cheater’s way” to create impactful “pallet” art, demonstrating that with a bit of ingenuity and affordable materials, you can craft stunning decorative pieces that elevate your home’s aesthetic. This project has certainly brought me closer to achieving my dream living room. I hope this little peek into my decorating journey inspires you to embark on your own creative endeavors. Stay tuned for more snippets of my living room transformation, and eventually, the grand reveal once those pesky painting projects are finally completed this spring!







