

Unleash the Fun: Master the Art of Crafting a Super Loud Paper Popper!
Ready for an exhilarating blast from the past, or perhaps a delightful new discovery? Today, we’re diving into the incredibly simple yet immensely satisfying world of paper poppers! This classic craft offers an instant burst of fun, transforming a plain sheet of paper into a source of impressive sound. Whether you’re looking for a quick activity for kids, a nostalgic trip down memory lane, or just a unique way to surprise your friends, learning how to make a paper popper is a skill worth acquiring.
The beauty of the paper popper lies in its ingenious design. With just a few strategic folds, you harness the power of air pressure to create a surprisingly loud “POP!” It’s a fantastic demonstration of basic physics, and the best part is, you don’t need any special tools or materials – just a regular piece of paper and your own two hands. Get ready to impress and entertain!

What Exactly is a Paper Popper and How Does it Work?
A paper popper is a cleverly folded piece of standard copy paper designed to create a sharp, distinct popping noise. The magic happens when the folded paper is swiftly moved downward, causing air to become trapped and rapidly compressed within a specific chamber created by the folds. This compressed air then forces its way out, generating a miniature sonic boom – the satisfying “POP!” you hear.
It’s an incredibly simple concept, yet the effect is always a delightful surprise, especially for those who’ve never encountered one before. What makes this craft truly stand out is its reusability. Unlike firecrackers or balloons that pop once, a well-made paper popper can be used repeatedly, delivering countless pops as long as the paper remains intact and doesn’t tear. This makes it an eco-friendly and budget-friendly source of entertainment. The only prerequisite? A steady grip and a swift arm motion. We’ll guide you through every single step, ensuring you master the art of both folding and popping your paper creation.
Gather Your Supplies: The Simplicity of Paper Poppers
One of the most appealing aspects of making paper poppers is the minimal material requirement. All you truly need is a single, ordinary piece of copy paper. That’s right, the same paper you use for printing documents or doodling is perfect for this exciting craft. You don’t need fancy origami paper, specialized tools, or adhesives.
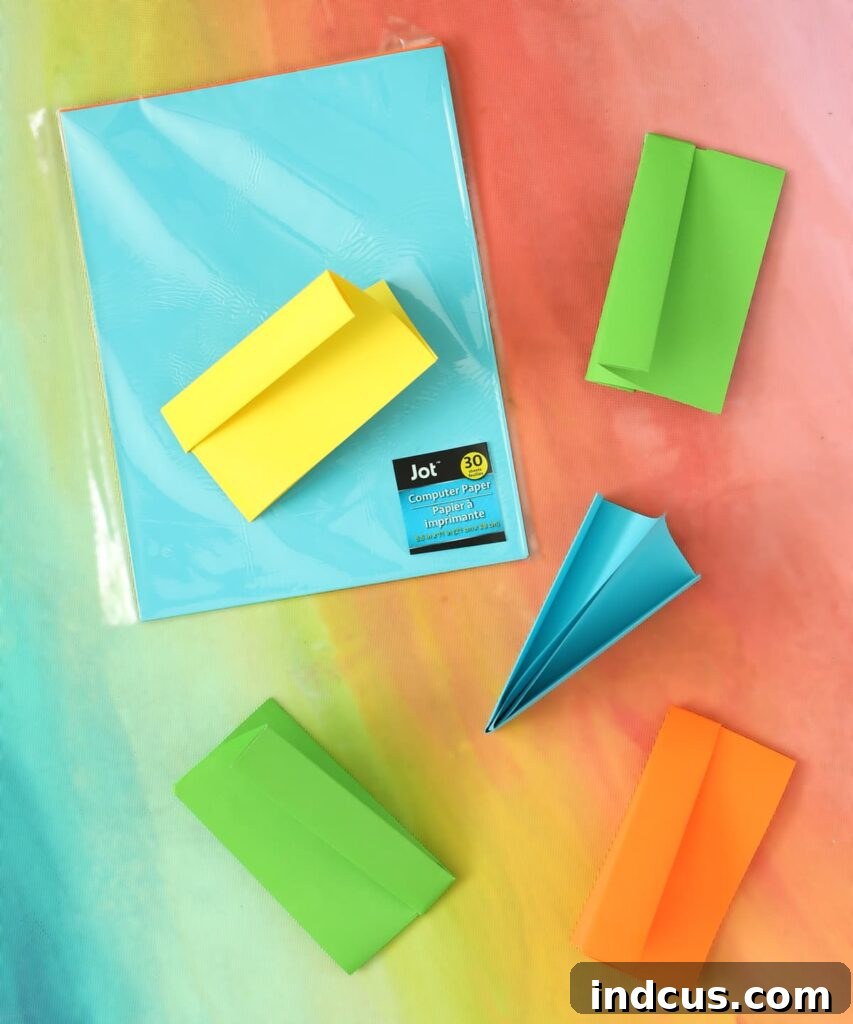
While any standard 8.5″ x 11″ (A4 also works well) piece of paper will do, you can certainly experiment with different types to see if they alter the sound or durability. For instance, slightly thicker paper might produce a deeper pop and last longer, while thinner paper might be easier to fold but more prone to tearing. Personally, I’ve found that a pack of colorful computer paper, like the kind readily available at stores like Dollar Tree, works wonderfully. Not only does it perform perfectly, but the vibrant colors add an extra layer of fun to your popping sessions!
Detailed Step-by-Step Instructions: Folding Your Paper Popper
Now for the exciting part – transforming that flat sheet into a powerful popping device! Follow these clear and easy instructions carefully. Precision in your folds will contribute significantly to the popper’s effectiveness and longevity.
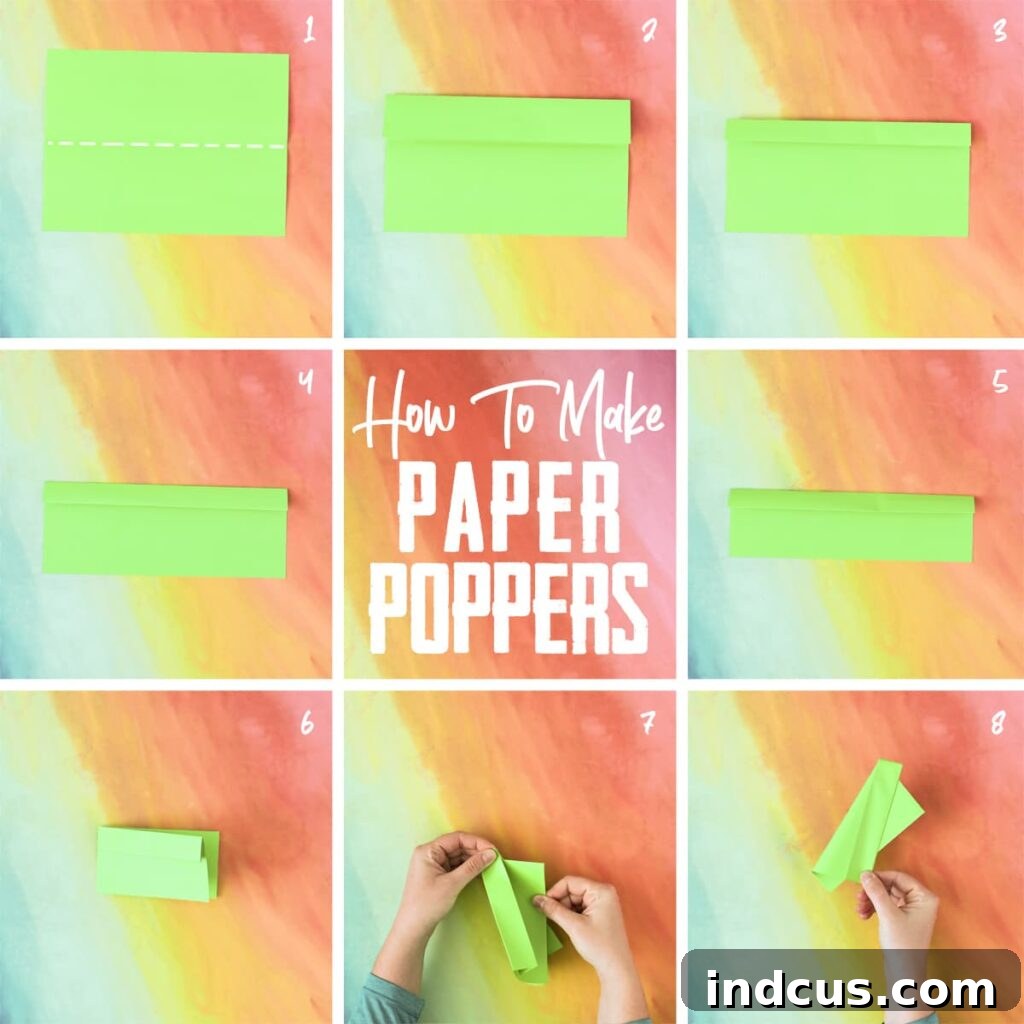
- Prepare Your Paper: Begin with an 8.5″ x 11″ piece of paper laid out in a portrait orientation (the longer sides vertical). Fold it in half lengthwise, often referred to as a “hot dog” fold. Press down firmly to create a crisp crease. Then, open the paper back up. This central fold line will serve as a crucial guide for the subsequent steps.
- First Top Fold: Take the top edge of the paper and fold it down precisely to meet that center folded line you just made. Ensure the edge aligns perfectly with the crease. This creates your first parallel fold.
- Second Top Fold: Repeat the previous step. Fold the newly formed top edge down again to the center line. You should now have a distinct, multi-layered “bar” running across the top section of your paper. This bar is vital for the popping mechanism.
- Fold the Bar Over (First Time): Take the entire bar you just created and fold it over on itself. This means the top edge of the bar will meet the bottom edge of the bar. This action begins to thicken the structure that will trap air.
- Fold the Bar Over (Second Time): For added strength and to create the necessary air pocket, fold that thick bar over on itself a second time. At this point, you should have a very sturdy, multi-layered strip at what was originally the top of your paper. This dense strip is key to the loud sound.
- Fold the Paper in Half Sideways: Now, take the entire paper and fold it in half from side to side (a “hamburger” fold, but with the length still being the dominant dimension). Make sure that the visible, thickened part of the bar remains on the outside of this fold. The aim is to encapsulate the bar within the new fold.
- Prepare for the Pop: Orient the paper so the thick bar is on the left side and the open ends of the paper are facing you, pointing downwards. Gently grab the bar at its top folded end with one hand. With your other hand, pull down on the opposite side of the paper. As you do this, you’ll notice that the bottom corners of the paper will naturally begin to stick out, forming two distinct pointy flaps.
- Secure Your Grip: Align those two bottom corners that are now sticking out. Pinch them firmly together between your thumb and your first finger. Your grip here is crucial for delivering a powerful pop. Make sure your grip is tight and secure, encompassing both layers of the paper at the corners.
Congratulations! You’ve successfully folded your paper popper. Now comes the exciting part: making it produce that satisfying sound!
How to Make Your Paper Popper Produce a Thunderous Pop!
You’ve done the hard work of folding, now let’s make some noise! The technique for popping your paper popper is simple, but it does require a bit of practice to get the loudest, most satisfying sound.
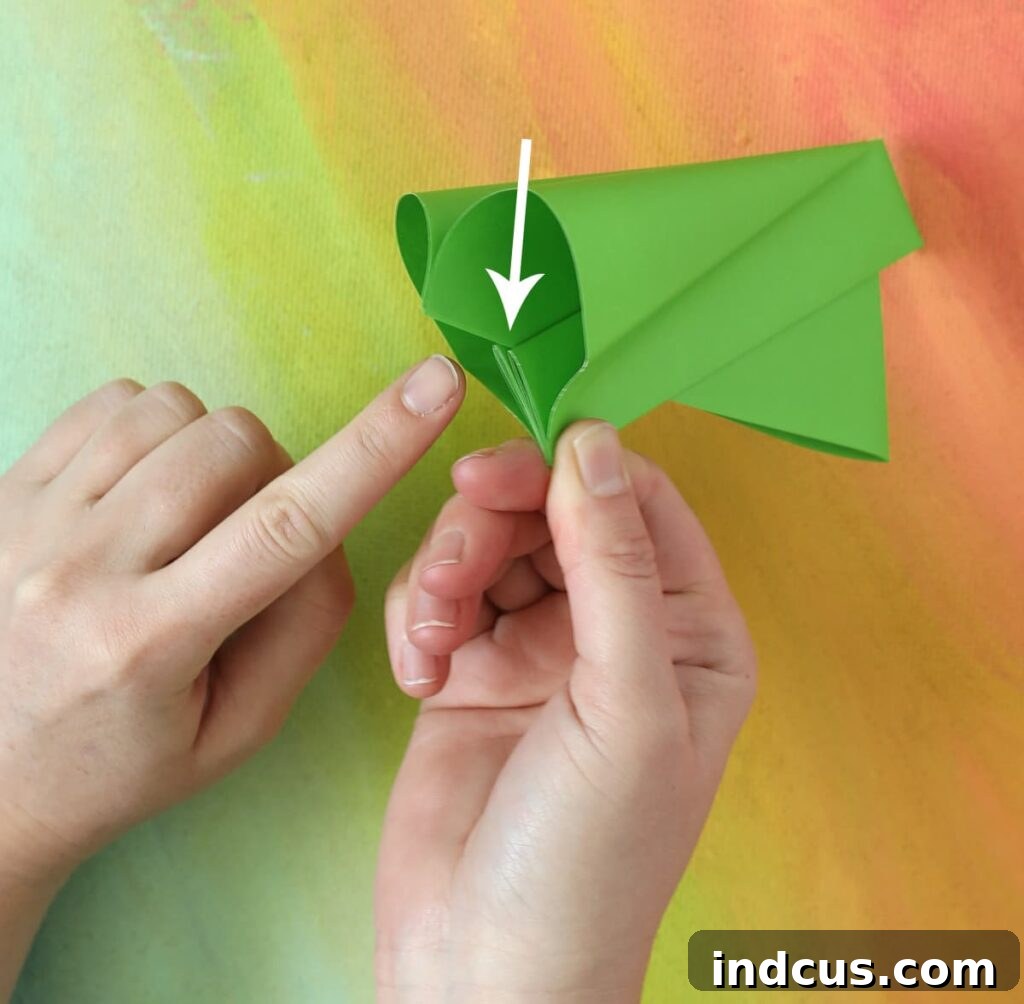
First, ensure your paper popper is correctly configured for the pop. With the two pointy flaps firmly pinched between your thumb and forefinger, observe the moving center part and the corner of the bar. They should be positioned to allow air to be trapped and then violently expelled. The image below provides a visual cue for the correct alignment and grip:
The Popping Technique:
- Maintain a Firm Grip: Keep a very firm hold on those two pointy flaps. A loose grip will absorb much of the force and result in a weaker pop, or no pop at all.
- Ensure Clear Space: Look around you! Make sure you have plenty of clear space in front of you and above you. You’ll be swinging your arm downwards, and you don’t want to hit anything or anyone.
- The Downward Swing: With a quick, decisive, and forceful downward motion of your entire arm, bring the paper popper down. Imagine you’re trying to chop through the air. The speed and snap of your wrist at the bottom of the swing are key here. The momentum will cause the folded layers to separate momentarily, trapping and then expelling air with a fantastic “POP!”
If your first few attempts don’t yield a loud pop, don’t worry! It often takes a little practice to get the hang of the right technique. Focus on a quick, sharp swing and a very firm grip. The harder and faster you swing, the louder the pop will be!
Why Paper Poppers are an Amazing Activity
Isn’t it incredible how a simple piece of paper can bring so much joy? Paper poppers are more than just a fleeting amusement; they represent a fantastic blend of creativity, physics, and good old-fashioned fun. Here’s why they are such a beloved activity:
- Simplicity and Accessibility: Requiring only a single sheet of paper, this craft is accessible to everyone, everywhere. No expensive kits or hard-to-find materials needed.
- Instant Gratification: The entire process, from folding to popping, takes just a few minutes. This makes it a perfect activity for short attention spans or when you need a quick burst of entertainment.
- Teaches Basic Physics: Without even realizing it, kids (and adults!) learn about air pressure, force, and sound waves. It’s a hands-on science experiment disguised as a toy.
- Develops Fine Motor Skills: The precise folding required helps to refine fine motor skills and hand-eye coordination, especially for younger crafters.
- Reusable Fun: Unlike many disposable toys, a well-made paper popper can be popped hundreds of times before it wears out, offering excellent value and extended play.
- Stress Relief: There’s something undeniably satisfying about that crisp, loud pop. It can be a fun way to release a little energy or tension.
- A Great Party Trick: Master the paper popper, and you’ve got an instant conversation starter or a fun party favor that will surprise and delight guests of all ages.
I am a big fan of paper poppers because they truly embody the spirit of simple, effective fun. They prove that you don’t need complex electronics or elaborate setups to create something truly enjoyable and engaging.
Troubleshooting: What if Your Paper Popper Isn’t Popping?
While making a paper popper is straightforward, sometimes it might not pop as loudly as you expect, or not at all. Don’t get discouraged! Here are some common issues and their solutions:
- Loose Folds: The most common culprit. Go back through the folding steps and ensure every crease is sharp and firm. Sloppy folds won’t create the necessary air chamber.
- Incorrect Grip: If your grip on the two pointy flaps is too loose, the energy from your swing will be absorbed by your hand rather than transferred to the paper. Pinch those corners tightly!
- Weak or Slow Swing: The pop is a result of rapid air compression. A slow or gentle swing won’t generate enough force. You need a quick, decisive downward motion. Imagine cracking a whip!
- Not Enough Space: Ensure you have ample room to swing your arm freely without hitting anything. Constrained movement can reduce the force of your swing.
- Ripped or Soft Paper: If the paper is flimsy, wet, or has been used too many times and started to rip, it won’t hold the air pressure effectively. Try making a new one with fresh, crisp paper.
- Incorrect Alignment: Double-check that the “bar” and the moving center part are correctly positioned just before the swing, as shown in the visual aid.
Practice makes perfect! Try adjusting your grip, the speed of your swing, and ensuring all folds are as crisp as possible. You’ll soon be making the loudest pops in town!







