
The Ultimate Guide to Homemade Laundry Soap: Save Money & Clean Smarter
In a world where everyday expenses seem to constantly rise, finding ingenious ways to save money without compromising on quality is a true win. Among the many DIY discoveries that promise to simplify and economize our lives, one stands out as a genuine game-changer: homemade laundry soap. This isn’t just another fleeting trend from the vast ocean of online tips; it’s a tested, proven method that offers remarkable benefits, transforming a mundane chore into an opportunity for significant savings and a more sustainable lifestyle. From countless Pinterest experiments, this particular recipe has consistently ranked as an all-time favorite, not merely for its cost-effectiveness but for its sheer simplicity and unparalleled effectiveness.
Why Homemade Laundry Soap is a Game Changer for Your Home and Wallet
Before diving into the “how-to,” let’s explore why this homemade laundry soap earns its esteemed spot as a top DIY hack. The benefits extend far beyond just saving a few dollars; they encompass efficiency, environmental consciousness, and peace of mind.
Unmatched Cost-Effectiveness
One of the most compelling reasons to switch to homemade laundry detergent is the drastic reduction in your household budget. Commercial detergents, often laden with fillers and excessive packaging, can be surprisingly expensive over time. The raw ingredients for homemade soap, however, are incredibly affordable and readily available at most supermarkets or big-box stores. A single batch, made from just a few common items, can last for an astonishingly long time – often more than a year for an average household. Imagine buying laundry detergent once a year instead of every few weeks! This translates into hundreds of dollars saved annually, freeing up funds for other essentials or luxuries.
Astonishing Longevity and Concentration
If you’re accustomed to pouring copious amounts of liquid detergent or scooping large quantities of powder for each load, prepare to be amazed. Homemade laundry soap is incredibly concentrated. Unlike commercial varieties that often contain a significant percentage of water or inert fillers, this DIY version is pure cleaning power. As a result, you only need a tiny scoop per load – typically a tablespoon or less – making each batch last significantly longer than any store-bought alternative. This remarkable longevity is a testament to its efficiency and the absence of unnecessary additives.
Simplicity in Making, Superior in Cleaning
Another myth surrounding DIY projects is that they are complex and time-consuming. This homemade laundry soap recipe shatters that misconception. The process is remarkably straightforward, requiring minimal effort and no specialized equipment. You don’t need to be a seasoned crafter or a chemistry expert to whip up a batch. And despite its simple preparation, this soap is a powerhouse cleaner. It effectively tackles dirt, grime, and odors, leaving your clothes fresh and clean without the harsh chemicals found in many commercial products. It’s a testament to the idea that sometimes, simpler truly is better.
The Journey: From First Batch Success to Recipe Refinement
My own journey with homemade laundry soap began with a classic “Pinterest Test” – an experiment to see if a popular online claim truly held up. The first batch, meticulously crafted, proved to be an undeniable success. It was cheap, easy, incredibly long-lasting, and delivered fantastic results. This initial triumph cemented its place as one of my all-time favorite DIY finds. You can revisit the original post for a detailed account of that initial success HERE.
After an impressive year and a couple of months, the original batch finally ran out – a true testament to its incredible longevity! This milestone prompted a trip to WalMart, where all the necessary ingredients were conveniently located together in the laundry aisle. This time, however, I decided to embark on a little experimentation. Instead of Fels Naptha, I opted for Zote soap, and I chose to omit the Oxyclean. My reasoning? A simple desire to try something new, and honestly, the Zote soap smelled delightful and came in a charming pink color – sometimes, the simplest reasons guide our DIY adventures!
Elevating the Process: Two Game-Changing Tips for Easy Preparation
While the initial process was already simple, I received invaluable tips from fellow DIY enthusiasts that made the second batch even easier to prepare. These two hacks are essential for anyone looking to streamline their homemade laundry soap production:
1. The Microwave Softening Technique for Effortless Grating
Grating hard bar soap can be a tedious and arm-aching task. This brilliant tip changes everything. By microwaving the Zote (or Fels Naptha) soap for approximately 30 seconds, you achieve a miraculous softening without melting it completely. The soap transforms from a solid, resistant block into a pliable, almost butter-like consistency. This seemingly minor step drastically reduces grating time and effort, making the process a zillion times faster and far more enjoyable.
2. The “Shake-to-Mix” Method: Say Goodbye to Soap Clouds
Traditional methods of mixing dry laundry soap ingredients can often lead to a fine, irritating cloud of powder that chokes and lingers in the air. This second tip eliminates that discomfort entirely. Instead of attempting to stir or whisk the ingredients in an open container, simply dump all the grated soap and powders into your designated laundry container, close the lid tightly, and shake vigorously. The shaking motion effectively combines all the ingredients without releasing any irritating dust, ensuring a much more pleasant and mess-free preparation experience.
Understanding the Power: Why a Small Scoop Does So Much
One of the most frequently asked questions about homemade laundry soap concerns its usage: “How much do I actually need?” The answer often surprises people, especially those accustomed to using generous amounts of commercial detergents. For a normal load of laundry, the scoop I use is remarkably small – roughly equivalent to a tablespoon.
The reason such a small amount is sufficient lies in the purity and concentration of the homemade blend. Commercial detergents often contain an array of fillers, brighteners, fragrances, and other additives that do little for actual cleaning but add volume. These fillers dilute the active cleaning agents, prompting consumers to use more product per load. Our homemade version, however, contains no such unnecessary additions. It’s a powerful concoction of actual cleaning agents, meaning a little goes a very long way. For particularly large or heavily soiled loads, you might opt to add a slightly larger scoop, but for everyday laundry, that small amount truly does the trick.
The Unexpected Update: A Lesson in Laundry Chemistry and Preference
While the initial excitement for the Zote-based second batch was high, prolonged use revealed some important insights. After nearly a year of using this second formulation, I concluded that it simply didn’t perform as well as the original Fels Naptha and Oxyclean blend. This candid observation is crucial for anyone embarking on their own DIY journey – experimentation is great, but sometimes the original recipe reigns supreme.
Why Fels Naptha and Oxyclean are Superior
My experience revealed two key areas where the Zote-based recipe fell short:
- Dissolving Power: Fels Naptha, in my experience, dissolves more effectively in both hot and cold water. The Zote sometimes left a subtle residue, particularly on darker fabrics, indicating that it wasn’t fully dispersing during the wash cycle. This is a critical factor for achieving truly clean and residue-free laundry.
- Cleaning Efficacy: The original recipe, especially with the addition of a generic store-brand Oxyclean (or similar oxygen booster), simply possessed more cleaning power. It tackled tough stains and odors with greater reliability, leaving clothes feeling fresher and looking brighter. The Oxyclean component, even a generic version, adds an essential boost for breaking down tough dirt and maintaining fabric brightness without harsh bleaches.
The Verdict: When it comes time to make the next batch in a few months, I will unequivocally switch back to the Fels Naptha. I will also reintroduce the generic store-brand Oxyclean back into the mix. This experience reinforced the value of the original recipe and served as a valuable lesson: sometimes, the tried-and-true formula, even after attempting improvements, remains the best. My enthusiasm for homemade laundry soap remains undimmed; it’s simply a matter of refining the best possible combination of ingredients for optimal results.
Your Go-To Homemade Laundry Soap Recipe (The Optimized Version)
Based on extensive testing and refinement, here is the robust, cost-effective, and highly efficient homemade laundry soap recipe that I wholeheartedly recommend:
Ingredients:
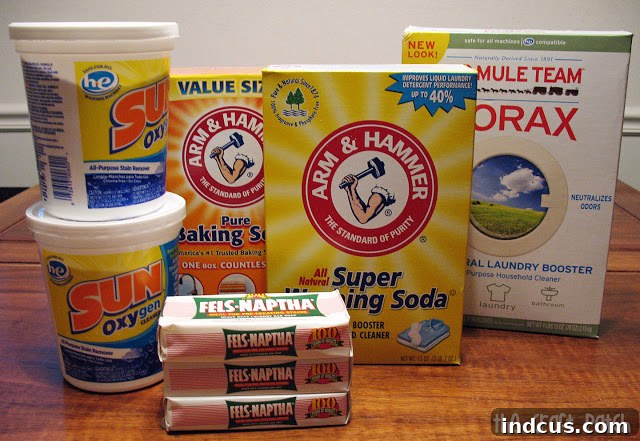
- 1 bar Fels Naptha laundry soap (ensure it’s Fels Naptha for superior dissolving and cleaning)
- 1 cup Borax
- 1 cup Washing Soda (not baking soda)
- 1/2 cup generic store-brand Oxyclean (or a similar oxygen-based laundry booster for enhanced cleaning power)
Instructions:
- Prepare the Soap: Microwave the bar of Fels Naptha soap for about 30 seconds. This will soften it significantly, making it much easier to grate.
- Grate the Soap: Using a box grater or food processor, grate the softened Fels Naptha soap into fine flakes.
- Combine Dry Ingredients: In a large, airtight laundry container (like a repurposed detergent bucket with a secure lid), add the grated Fels Naptha soap, Borax, Washing Soda, and generic Oxyclean.
- Mix Thoroughly: Close the lid tightly on the container. Shake vigorously for a minute or two, ensuring all ingredients are thoroughly combined. This method prevents the creation of dusty soap clouds and mixes everything uniformly.
- Store: Keep your homemade laundry soap in its airtight container in a cool, dry place.
How to Use:
- For a normal load of laundry, use 1 tablespoon of the homemade laundry soap.
- For larger or heavily soiled loads, you may use up to 1.5 to 2 tablespoons.
- Add the soap directly to the drum of your washing machine before adding clothes, or dissolve it in a cup of hot water first for cold washes to ensure optimal dispersion.
- This recipe is generally safe for both standard and high-efficiency (HE) washing machines, as it produces very low suds. However, always consult your machine’s manual if you have concerns.
Frequently Asked Questions About Homemade Laundry Soap
Is homemade laundry soap safe for HE washing machines?
Yes, this recipe is generally safe for HE machines. It produces very low suds, which is ideal for HE washers that require minimal sudsing detergents. Always use the recommended small amount.
Can I add essential oils for scent?
Absolutely! If you prefer a scented laundry, you can add about 15-20 drops of your favorite essential oil (like lavender, lemon, or tea tree) to the dry mix after shaking, and then give it another quick shake to distribute. Alternatively, add a few drops directly to the wash cycle or onto a wool dryer ball.
What about hard water?
The Borax and Washing Soda in this recipe are excellent water softeners, which can be particularly beneficial if you have hard water. They help to boost cleaning power and prevent mineral buildup on clothes and in your machine. If you have extremely hard water, you might consider adding an extra half-cup of Borax or washing soda.
How long will a batch last?
For an average family, one batch of this homemade laundry soap can last anywhere from 9 months to over a year, depending on laundry frequency and load size. Its concentrated nature is truly impressive!
Will it remove tough stains?
The combination of Fels Naptha, Borax, Washing Soda, and Oxyclean is surprisingly powerful. For exceptionally tough stains, you may want to pre-treat with a commercial stain remover or create a paste from the homemade soap and a little water to apply directly to the stain before washing.
Embrace the DIY Laundry Revolution!
Discovering homemade laundry soap has truly been a life-changing experience, transforming not just my cleaning habits but also my perspective on household expenses. It’s incredibly satisfying to know exactly what goes into your laundry detergent, to reduce your environmental footprint by minimizing plastic waste, and most importantly, to save a significant amount of money over time. This DIY solution proves that sometimes, the simplest methods are the most effective, economical, and environmentally friendly. I encourage you to embark on this journey yourself – you’ll be amazed at the results and the positive impact it has on your home and wallet. Say goodbye to expensive commercial detergents and hello to a smarter, cleaner, and more sustainable way to do laundry!







