
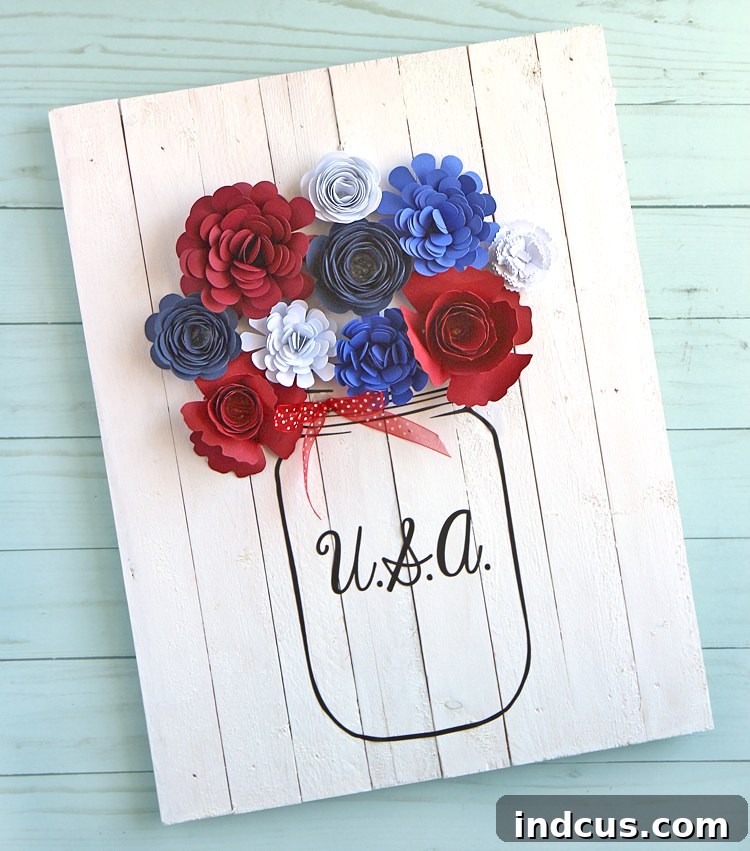
DIY Patriotic Pallet Wood Sign with Rolled Paper Flowers: An Easy Fourth of July Craft Tutorial
As the days grow longer and the scent of summer fills the air, thoughts inevitably turn to festive celebrations. While it might seem a touch early to start planning for patriotic decor, consider this your head start! This delightful DIY pallet wood sign, adorned with charming rolled paper flowers, is not only incredibly easy to create but also versatile enough to brighten your home from Memorial Day right through to the Fourth of July and beyond. Why wait when you can infuse your space with a touch of handmade patriotic charm right now?
Crafting offers a wonderful way to personalize your home decor, and this project is designed for everyone, regardless of their crafting experience. Imagine the satisfaction of displaying a beautiful piece you made yourself, celebrating the spirit of freedom and festivity. This sign isn’t just a decoration; it’s a conversation starter, a symbol of handmade love, and a fantastic way to prepare for summer holidays.
One of the best features of this project is its simplicity. We’re taking the hassle out of woodworking by starting with a pre-made pallet sign. This clever shortcut means you can jump straight into the fun parts: painting, designing, and assembling. It’s a true time-saver that allows you to achieve that coveted rustic farmhouse look without needing a workshop full of tools. Ready to dive into this joyful crafting experience and create a unique piece of home decor? Let’s gather our supplies and begin!
Essential Materials for Your Patriotic Pallet Sign
Before we embark on our creative journey, let’s ensure we have all the necessary components. Gathering your materials beforehand streamlines the crafting process and allows for an uninterrupted flow of creativity. Most of these items are readily available at craft stores or online, making this project accessible to all.
- Pallet Wood Sign (9″x15″): The foundation of our project. A pre-assembled sign saves immense time and effort, providing a rustic base perfect for a farmhouse aesthetic. The 9×15 inch dimension offers a great canvas for the Mason jar and flower arrangement.
- White Chalk Paint + Paint Brush: Chalk paint is fantastic for achieving a soft, matte finish with excellent coverage. It adheres well to wood and offers the option of a subtle whitewash or a more opaque look, depending on the number of coats.
- Black or Navy Blue Craft Vinyl: This durable vinyl will be used for creating the striking outline of our Mason jar and the patriotic text. Permanent vinyl ensures your design stays crisp and vibrant for years.
- Transfer Tape: An essential tool for smoothly transferring your intricate vinyl designs from the backing paper to the pallet sign, ensuring perfect placement and adhesion.
- Red, White, and Blue Cardstock: The vibrant colors of our rolled paper flowers will come from this sturdy cardstock. Choose shades that complement your patriotic theme. The weight of cardstock is ideal for holding the shape of the rolled flowers.
- Hot Glue Gun + Glue Sticks: For securely attaching your delicate paper flowers and any other embellishments to the wooden sign. A good hot glue gun makes the assembly quick and robust.
- Mason Jar Silhouette Cut File: This digital file is crucial if you’re using an electronic cutting machine like a Silhouette. It provides the perfect outline for your vinyl Mason jar.
- Rolled Paper Flower Cut Files (Daisy and Chrysanthemum): These cut files will guide your cutting machine to create the spiral shapes needed for crafting beautiful rolled paper flowers. Having a variety of designs adds depth and texture to your floral arrangement.
Step-by-Step Guide to Crafting Your Patriotic Sign
Now that you have all your materials assembled, it’s time to bring your vision to life. Follow these detailed instructions to create a stunning piece of patriotic home decor that will be admired by all.
Step 1: Preparing Your Pallet Sign with Chalk Paint
Begin by giving your pallet sign a beautiful base coat of white chalk paint. Chalk paint is an excellent choice for this project as it adheres well to wood without much preparation and dries quickly to a lovely matte finish. For a subtle, rustic whitewashed look that allows some of the wood grain to show through, apply a single, thin coat. If you prefer a more solid, opaque white background that provides full coverage, simply apply a second coat after the first has completely dried. Ensure even strokes with your paintbrush to achieve a smooth and consistent finish. Allow ample drying time between coats and before proceeding to the next step, typically about 15-30 minutes, or as per paint manufacturer instructions. This initial layer sets the stage for your entire design, so take your time to get it just right.
Step 2: Designing and Cutting Your Mason Jar Vinyl
Next, it’s time to bring out your electronic cutting machine, such as a Silhouette Cameo. Download the Mason jar cut file from the Silhouette Design Store, as listed in the materials section. Once imported into your design software, you’ll likely see a few extra decorative elements; carefully remove these, leaving only the crisp, dark outline of the Mason jar. This ensures a clean and classic silhouette. Resize the jar image to approximately 9 inches tall – this dimension perfectly complements the 15-inch height of your pallet sign, creating a balanced focal point. Before cutting, adjust your machine’s settings specifically for craft vinyl to ensure a clean, precise cut. A test cut on a small scrap piece of vinyl is always a good idea to confirm your settings are perfect.
Step 3: Weeding the Excess Vinyl
After your cutting machine has worked its magic, you’ll be left with your Mason jar design cut into the vinyl sheet. Now comes the “weeding” process, which involves carefully removing all the excess vinyl that is not part of your final design. Using a weeding tool (a hook or a pair of fine-tipped tweezers works wonders), gently peel away the outer vinyl, leaving only the clean Mason jar outline on the backing paper. Take your time with this step, especially around intricate curves, to avoid tearing the design. Patience here ensures a professional-looking result. This step might seem tedious, but it’s crucial for achieving a sharp, defined image on your sign.
Step 4: Applying the Vinyl Mason Jar to Your Sign
With your Mason jar design cleanly weeded, it’s time to transfer it to your painted pallet sign. Carefully cover the entire vinyl design with transfer tape, pressing down firmly to ensure the vinyl adheres well to the tape. Slowly peel the transfer tape (with the vinyl attached) away from the backing paper. If any part of the vinyl doesn’t lift, press the tape back down and rub firmly again. Once lifted, center the Mason jar design onto your pallet sign, taking care to align it both horizontally and vertically for a balanced look. Smooth the design onto the wood using a squeegee or even a credit card, working from the center outwards to eliminate any air bubbles. Once firmly adhered, slowly and carefully peel back the transfer tape at a sharp angle. If any part of the vinyl lifts with the tape, simply press it back down with your finger and continue peeling. You’ll be left with a perfectly placed vinyl Mason jar.
Step 5: Cutting Your Rolled Paper Flowers
Now for the beautiful focal point: the rolled paper flowers! Download the various rolled paper flower designs (like Daisy and Chrysanthemum, or others you prefer) from the Silhouette Design Store, as specified in the materials list. Open these files in your cutting machine’s software. Choose your red, white, and blue cardstock, which will bring the patriotic theme to life. Adjust your machine’s cut settings specifically for cardstock – this is crucial to prevent tearing and ensure clean cuts. Experiment with cutting flowers of varying sizes and shapes; a mix of dimensions and styles will add visual interest and a more organic feel to your floral arrangement. The goal is to have a vibrant collection of spirals ready to be transformed into exquisite 3D flowers.
Step 6: Crafting the Rolled Paper Flowers
This step is where the magic happens! To transform your paper spirals into stunning 3D flowers, start by taking one cut spiral. Find the outer end of the spiral and gently wrap it tightly around a thin object, such as a pencil, a quilling tool, or even a bamboo skewer. Begin rolling the paper towards the center, ensuring you keep the flat bottom edge of the spiral even and aligned as you roll. This consistency is key to forming a stable base for your flower. Continue rolling until you reach the center circle of the spiral – this circle will become the bottom base of your flower. Once rolled, allow the flower to slightly loosen to create a more natural, petal-like appearance. Apply a generous amount of hot glue to the central bottom piece, then firmly press your rolled flower petals onto this glued base. Hold it for a few seconds until the glue sets. Repeat this process for all your paper spirals, creating a bouquet of beautiful red, white, and blue blooms. Practice makes perfect, and you’ll soon find your rhythm in creating these charming embellishments.
Step 7: Adding the Finishing Touches and Embellishments
With your rolled paper flowers complete, it’s time to arrange them within your vinyl Mason jar. Experiment with different placements until you achieve a visually appealing “bouquet.” Once satisfied, use your hot glue gun to securely attach each flower to the sign within the jar outline. Feel free to overlap them slightly for a fuller, more dynamic look. To further enhance the patriotic theme, cut out the word “U.S.A.” (or any other word like “Home,” “Love,” or “Freedom”) from the same black or navy blue craft vinyl you used for the Mason jar. I created my word using the “KG Eyes Wide Open” font in Silhouette’s Design Studio for a charming, handwritten feel. Apply this vinyl text in the same manner as the Mason jar – weed, use transfer tape, apply, and peel. Finally, consider adding a small bow tied from patriotic ribbon to the neck of the Mason jar for an extra touch of charm. These final details truly bring your sign to life and make it uniquely yours.
Watch the quick video tutorial below to see how seamlessly this entire craft comes together:
[Video Placeholder: Imagine a captivating video demonstrating each step of this fun craft, from painting the pallet to assembling the delicate rolled paper flowers and applying the vinyl designs. This visual guide would undoubtedly inspire and assist crafters in bringing their patriotic vision to life.]
Why Choose DIY for Your Patriotic Decor?
Opting for DIY patriotic decor, especially projects like this charming pallet sign, offers numerous benefits beyond just saving money. Firstly, it allows for unparalleled personalization. You get to choose the exact shades of red, white, and blue, the specific flower designs, and the perfect font for your text, ensuring your decor perfectly matches your home’s aesthetic and your personal style. Secondly, crafting is a wonderfully therapeutic activity. The process of creating something beautiful with your own hands can be incredibly relaxing and satisfying, offering a welcome break from daily stresses. Lastly, handmade decor often carries a unique story and charm that mass-produced items simply cannot replicate. Each little imperfection or personal touch adds character, making your patriotic sign a truly special piece in your home.
Tips for Crafting Success
- Patience is Key: Especially with vinyl application and flower rolling, taking your time ensures a polished finish. Rushing can lead to wrinkles or misalignments.
- Test Cuts: Always perform a small test cut with your cutting machine before cutting your main designs, especially when working with new materials or complex shapes. This helps to calibrate settings perfectly.
- Good Lighting: Work in a well-lit area, particularly during the weeding phase, to easily spot and remove all excess vinyl.
- Variety in Flowers: Don’t be afraid to mix and match different flower sizes and styles. This adds depth and visual interest to your “bouquet.”
- Secure Gluing: Use enough hot glue to secure the flowers firmly, but not so much that it oozes out and becomes visible. A steady hand and careful application are essential.
Customization Ideas for Every Season
While this sign is bursting with patriotic charm, its core design is incredibly versatile. By simply changing the colors of your cardstock flowers and the word on your Mason jar, you can adapt this craft for virtually any holiday or season:
- Spring Delight: Use pastel pinks, yellows, and greens for the flowers, and add words like “Bloom” or “Spring” to the jar for a fresh, welcoming feel.
- Summer Vibes: Bright yellows, oranges, and teals for the flowers with “Sunshine” or “Hello Summer” on the jar would create a cheerful summer display.
- Autumn Harvest: Rich reds, oranges, browns, and deep yellows, with “Fall” or “Grateful” on the jar, would make a cozy addition to your fall decor.
- Winter Wonderland: Whites, silvers, and icy blues for the flowers, and “Snow” or “Joy” on the jar, can transform it into a beautiful winter decoration.
- Everyday Home Decor: Choose colors to match your existing home decor, and add words like “Family,” “Gather,” or “Welcome” for a personalized year-round display.
Displaying Your Masterpiece
Once your patriotic pallet sign is complete, it’s ready to take its place of honor in your home. It makes a charming addition to a mantelpiece, a wall gallery, or as a welcoming accent on an entryway table. The rustic appeal of the pallet wood combined with the delicate beauty of the paper flowers creates a unique texture and visual interest. Consider pairing it with other patriotic elements like small flags, antique books, or even fresh flowers in a real Mason jar to create a cohesive and festive display. Its compact size also makes it perfect for adding a touch of holiday spirit to smaller spaces, ensuring that even the coziest corners of your home can celebrate with style.
This adorable Fourth of July craft is not just a seasonal decoration; it’s a testament to the joy of handmade creativity. It’s a fun, versatile craft that’s just oozing with cuteness and the spirit of celebration. So go ahead, unleash your inner crafter, and add this charming piece to your summer home decor!







