
Embarking on a new home journey often begins with envisioning possibilities, and for us, the very first project was to reclaim an often-overlooked and underutilized area: a small, awkward space at the top of our stairs. Many homes, especially split-entry designs, feature these little nooks that seem to defy conventional purpose, often becoming catch-all zones or simply remaining empty. Our goal was to transform this architectural anomaly into something not just functional, but truly indispensable. This isn’t just about renovation; it’s about smart design and maximizing every square foot of your living environment, significantly enhancing your home’s storage solutions and overall flow.
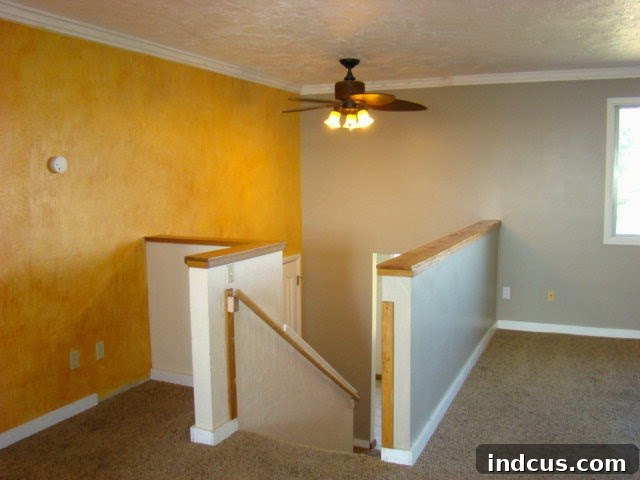
Before we dive into the exciting transformation, let’s take a moment to appreciate the “before” state. Here’s a photo from the original home listing, showcasing the space in its raw, uninspired form, which many homeowners might recognize in their own split-entry properties:
As you can see, there was this rather peculiar, almost cubby-like indentation to the left. It wasn’t quite big enough for a dedicated seating area, too open for a closet, and simply stood as an isolated, undefined spot. Its proximity to the kitchen, however, immediately signaled its potential as valuable real estate, begging for a more purposeful existence. Imagine the possibilities that could unfold if this space, currently collecting dust, could contribute meaningfully to the home’s daily rhythm. Optimizing such an area can dramatically improve a home’s overall functionality and appeal, making it a key component of any thoughtful home renovation strategy focused on creating clever storage solutions and enhancing living spaces.
To give you a clearer perspective of this challenging space, here’s another view, this time looking up from the bottom of the steps. This angle truly highlights the expansive, yet oddly shaped, nature of the area we aimed to conquer, emphasizing the wasted potential of this particular split-entry landing:
From Awkward Nook to Dream Pantry: Our Vision for Kitchen Storage
After much deliberation and dreaming, the decision was made: we would convert this overlooked area into a magnificent walk-in pantry! The mere thought of it brought a symphony of joy, and I can almost hear angels singing with anticipation. For years, the battle for kitchen cupboard space has been a constant struggle, with items stacked high, pushed to the back, and often forgotten. The prospect of having a dedicated, spacious pantry to store all our food items, small appliances, and household essentials is truly exhilarating. This transformation promises to revolutionize our kitchen organization, bringing order and efficiency to our daily routines and solving our persistent kitchen storage challenges. A well-designed walk-in pantry is more than just storage; it’s a game-changer for any busy household, offering unparalleled convenience and visibility for meal prep and household management.
Imagine being able to simply walk into a brightly lit space, where every jar, can, and box is neatly arranged on shelves, instantly visible and easily accessible. No more rummaging through cluttered cabinets or buying duplicates because you couldn’t find what you already had. This isn’t just about adding storage; it’s about creating a streamlined system that saves time, reduces waste, and makes meal preparation a more enjoyable experience. For anyone struggling with limited kitchen storage, converting an unused space into a functional walk-in pantry is an ultimate home improvement dream come true, significantly enhancing kitchen productivity and overall home aesthetics, proving that creative DIY solutions can transform any home.
Phase 1: Demolition – Clearing the Path for Progress and Space Transformation
With our vision firmly in mind, the first crucial step was demolition. This stage, while seemingly destructive, is essential for clearing the slate and preparing for the new structure. Our initial targets were the two half-walls that awkwardly defined the cubby, along with the wooden banister that ran alongside them. Armed with tools and determination, we carefully dismantled these existing structures, ensuring we caused no unnecessary damage to surrounding areas. The removal of these elements immediately opened up the space, allowing us to visualize the true potential of the soon-to-be walk-in pantry, marking the real beginning of our DIY home renovation project.
This process involved precise cuts and careful removal, making sure to avoid any hidden wiring or plumbing. It was a messy but incredibly satisfying part of the project, as each piece removed brought us closer to the open concept needed for the pantry’s foundation. This initial phase can often feel daunting, but it’s a critical foundation for any successful home renovation project, especially when transforming an existing structure into something entirely new and functional. The feeling of seeing the space finally open up, free from its restrictive old form, was incredibly motivating and reinforced our belief in the project’s potential to enhance our home’s functionality and storage capacity.
Here you can see the initial stages of demolition, with the half-walls being cut down. The removal of these features was pivotal in creating an expansive area for the pantry’s footprint. This not only cleared the physical space but also cleared the mental block that came with trying to work around the old, inefficient layout. This stage truly marks the beginning of the transformation from an underutilized landing to a highly efficient storage hub, demonstrating how effective space planning starts with clearing out the old to make way for the new.
With the half-walls completely gone, the space immediately felt larger and more adaptable. This cleared canvas was exactly what we needed to start framing the new pantry. It’s amazing how much difference removing a few non-load-bearing walls can make in terms of perceived space and functional possibilities. This was a crucial step in our journey to create the ultimate walk-in pantry, setting the stage for the structural and electrical work that followed, and illustrating the potential for dramatic home makeovers from simple structural changes.
Phase 2: Electrical Engineering – Powering the Pantry for Optimal Functionality
Following demolition, the project shifted gears to address the critical electrical work. This was no small feat, as the existing wiring presented a rather peculiar setup. The light switch located on the main yellow wall controlled a fan, while a separate switch on one of the now-removed half-walls was responsible for the fan’s light. This unconventional configuration was not only inconvenient but also a perfect example of outdated home wiring that needed a modern update for optimal functionality and safety, especially when considering a new dedicated space like a walk-in pantry.
My incredibly talented husband took on the challenge of re-routing the wires. His goal was to consolidate these disparate controls, allowing both the fan and its light to operate from a single, intuitive switch. More importantly, this phase included running new lines and installing a dedicated light fixture inside the new pantry room itself, complete with its own control switch. This attention to detail ensures that the pantry will be brightly lit, making it easy to find items regardless of the time of day. Electrical modifications require precision and a thorough understanding of current building codes, making it one of the more complex, yet vital, aspects of any home renovation, particularly for ensuring long-term safety and usability.
The extent of this electrical overhaul was significant. To access and reconfigure the existing wiring, my husband had to make a precise cut into the yellow wall. This meticulous work allowed him to properly connect the new electrical boxes and install the ceiling light, which will illuminate our future pantry. Ensuring proper wiring and adequate lighting is paramount for both the safety and usability of any new space. Without a well-planned electrical system, even the most beautiful pantry would fall short on functionality. This stage truly highlights the dedication and skill required to transform an ordinary space into an extraordinary one, creating a safe and well-lit environment for our future storage needs and emphasizing the value of expert DIY skills in home improvement.
The image above clearly shows the meticulous electrical work in progress, with new wiring routed through the framing. You can spot the carefully made cut in the yellow wall, providing access to the existing wires, as well as the newly installed electrical boxes and the ceiling light fixture. This detailed work is the backbone of a functional pantry, providing both light and the potential for future outlets if needed. It’s a testament to the fact that effective home renovation often involves significant behind-the-scenes work, laying the groundwork for the visible improvements to come and ensuring that every aspect of your new pantry is thoughtfully planned and executed.
Phase 3: Framing and Entry – Defining the New Walk-In Pantry Space
With the electrical groundwork laid, the next exciting phase involved framing in the walls for our new walk-in pantry. This is where the outline of the space truly begins to take shape, transforming an open concept into defined rooms. My husband meticulously constructed the skeletal structure of the new walls, ensuring they were plumb, square, and robust enough to support the future shelving and drywall. Precision in framing is absolutely critical, as it dictates the final dimensions and integrity of the pantry. Every stud was carefully measured, cut, and secured, turning the abstract idea of a pantry into a tangible architectural feature and a solid foundation for our ultimate kitchen storage solution.
Simultaneously, we installed the door frame, marking the official entry point to our soon-to-be organized haven. Choosing the right door, both in terms of style and swing, is an important detail for a walk-in pantry. We opted for a design that complements our home’s aesthetic while maximizing internal wall space for shelving. The installation of the door truly solidified the identity of the space. What was once an undefined, awkward landing at the top of the stairs, seemingly devoid of purpose, was suddenly transformed into a distinct and highly functional room. The sense of accomplishment at this stage was immense, as we watched our vision physically materialize, bringing us closer to our dream of a perfectly organized home.
This image perfectly captures the dramatic transformation: the walls are framed in, and the door is in place. You can clearly see how a previously unusable and awkward space has now evolved into one of the most functional and promising spots in our entire house. This framing provides the essential structure that will hold all the shelving and organization elements, making the pantry a truly efficient storage solution. It’s a powerful visual reminder of how creative thinking and dedicated effort can unlock hidden potential within your home, converting overlooked corners into areas of unparalleled utility and beauty, especially when aiming for optimal kitchen and home organization.
The Road Ahead: Finishing Touches and Shelving Design for the Ultimate Pantry
While the major structural elements are now complete, our walk-in pantry project is still a work in progress, brimming with exciting finishing touches. The next steps involve the meticulous process of drywall installation, followed by taping and mudding to create seamless walls. Texturing the drywall will add a refined finish, and then, of course, the eagerly anticipated painting phase. Choosing the right paint color for a pantry is crucial; a light, bright shade will enhance visibility and make the space feel larger and cleaner. Each of these steps contributes significantly to the overall aesthetic and durability of the pantry, transforming it from a mere framed structure into a beautiful and functional space that will serve our family for years to come.
Perhaps the most exciting, and arguably the most critical, phase still awaiting us is the design and construction of the shelving. This is where the true magic of organization will happen! I envision robust, floor-to-ceiling shelves along both the yellow wall and the back wall, creating an efficient L-shaped layout that maximizes every inch of vertical storage space. The design of these shelves needs careful consideration to accommodate a variety of items, from large bulk purchases to smaller canned goods and spices. The aim is to create a highly customizable system that can adapt to our evolving storage needs, making our walk-in pantry a flexible and long-lasting organizational asset, a true testament to smart pantry design and maximizing kitchen storage.
However, I’m currently pondering a few crucial design decisions for the shelving. What is the optimal distance between shelves to accommodate different sizes of items without wasting vertical space? Should I incorporate some taller, narrower slot spaces specifically for brooms, mops, and our vacuum cleaner? These details are paramount in ensuring the pantry is not just visually appealing but also supremely functional. Effective pantry design is all about thoughtful planning, considering both current needs and future flexibility. I’m eager to hear from fellow home renovators and organization enthusiasts who have tackled similar projects!
Do you have a walk-in pantry? What are your favorite features? Are there any design elements you would change if you had the chance? Your insights and suggestions would be invaluable as we finalize our shelving plans for this DIY pantry project. Sharing experiences helps everyone create better, more efficient home spaces, so please share your best pantry organization tips and tricks!
A Few Final Thoughts and Gratitude for Our Home Renovation Journey
As we approach the final stages of this inspiring home renovation, two thoughts consistently bring a smile to my face. Firstly, I absolutely cannot wait to bid farewell to the last vestiges of that “horrid nacho cheese colored wall.” A fresh, clean coat of paint will dramatically brighten the area, making the entire space feel crisp and inviting, a perfect backdrop for our new, organized pantry. It’s truly amazing how much a simple color change can impact the mood and perceived cleanliness of a room. This aesthetic upgrade will be the icing on the cake for our home renovation, elevating the entire atmosphere around our new walk-in pantry.
Secondly, and perhaps most importantly, I must sing the praises of my incredible husband. When I say “we” are working on this project, the reality is that HE has meticulously handled almost all of this intricate work himself. From the precise demolition and complex electrical re-routing to the sturdy framing and door installation, his dedication and skill have been truly remarkable. My role has been primarily that of an enthusiastic assistant: handing him tools, diligently vacuuming up drywall bits, and holding the level steady. He is, without a doubt, a true stud! His tireless efforts are bringing our walk-in pantry dream to life, and I am endlessly grateful for his talent and hard work. This DIY walk-in pantry project is a testament to what can be achieved with vision, determination, and a lot of skilled labor, creating a truly functional and beautiful addition to our home.







