
Effortless Doorknob Replacement: Conquering the Rectangular Latch Challenge for a Seamless Home Aesthetic
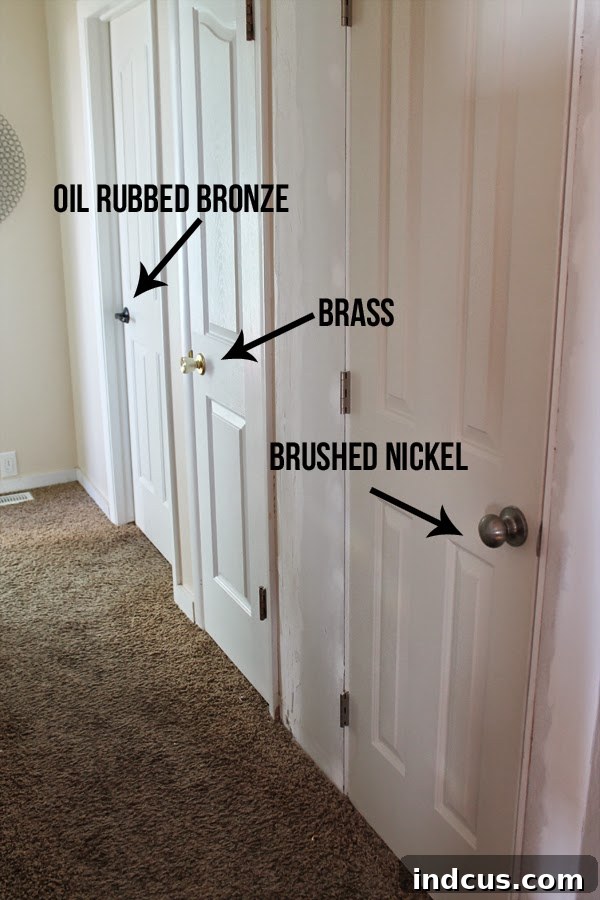
Every homeowner embarking on a DIY journey understands the satisfaction of a cohesive aesthetic. Sometimes, however, even the smallest details can disrupt that harmony. In our recent home improvement project, the addition of a new pantry door unexpectedly threw our hallway’s design into disarray. Suddenly, we found ourselves staring at not two, but three distinct styles of doorknobs adorning our passageway. This visual inconsistency wasn’t just a minor oversight; it was a glaring flaw that, for anyone with an eye for detail, was simply unacceptable. The desire for uniformity became paramount, driving us to seek a solution to unify our home’s hardware and restore visual tranquility to our living space.
The Common DIY Dilemma: Mismatched Door Hardware and Unexpected Hurdles
Driven by the vision of a perfectly matched hallway, we promptly invested in a set of new doorknobs for the five doors flanking the new pantry entrance. The initial excitement was palpable, fueled by the expectation of a straightforward doorknob replacement project. Typically, switching out old doorknobs for new ones is considered one of the simplest home improvement tasks, involving little more than unscrewing a few parts and attaching the replacements. We anticipated a quick and easy upgrade, eager to share the simplicity of this common DIY task. However, as is often the case with home projects, a seemingly minor detail quickly escalated into an unexpected challenge that threatened to derail our plans and test our patience.
When Standard Doorknob Swaps Encounter a Rectangular Latch Problem
Upon attempting to install the elegant new doorknobs, we immediately encountered the unforeseen obstacle: a fundamental incompatibility between the new hardware and our existing door preparations. The new doorknobs featured a modern, rectangular latch mechanism, a sleek design choice that, unfortunately, clashed directly with the traditional round holes pre-drilled into our doors. This wasn’t merely a matter of a slightly different screw placement; it was a significant structural mismatch that rendered the standard installation methods useless. The discovery was profoundly discouraging, transforming a simple anticipated upgrade into a frustrating roadblock. For a moment, the entire project seemed insurmountable, leading to a period of complete despondency and a temporary halt to our home improvement efforts. It was a classic DIY moment where excitement quickly gave way to the realization that specialized tools or techniques would be required.
Discovering the Game-Changer: The Ryobi Door Latch Installation Kit
Just when the dream of perfectly matching doorknobs seemed out of reach, a stroke of luck, or rather, resourceful shopping, changed everything. While at Home Depot sourcing materials for the pantry project, my husband stumbled upon a truly ingenious solution: the Ryobi Door Latch Installation Kit. This specialized tool, priced at an incredibly affordable $10, was specifically designed to address the very problem we faced – adapting existing door preparations for new, modern hardware. It was an instant revelation, transforming our frustration into renewed hope and demonstrating that often, the right tool is all it takes to overcome what appears to be an insurmountable DIY challenge.
The Ryobi Door Latch Installation Kit is a testament to thoughtful design, engineered to simplify complex door hardware installations. One side of this versatile tool features a robust blade precisely shaped to match the contours of a new rectangular latch. This innovative design eliminates the need for imprecise hand-chiseling or guesswork, ensuring that the initial cut for the latch mechanism is perfectly clean and accurate. This feature alone promises to save countless hours of meticulous work and prevent potential damage to the door, making the transition from an older, round latch style to a newer, rectangular one remarkably straightforward and efficient.
Beyond shaping the latch opening, the other end of the Ryobi kit offers an equally essential function: a smaller, integrated blade designed for carving out the mortise. This chisel-like attachment allows users to meticulously sculpt the door’s edge, creating a shallow recess that ensures the latch faceplate sits perfectly flush with the door’s surface once installed. Achieving a flush fit is crucial not only for the aesthetic appeal of the new doorknob but also for its smooth and reliable operation. This dual-purpose design makes the Ryobi Door Latch Installation Kit an indispensable tool for anyone upgrading their door hardware, turning a potentially difficult and messy job into a precise and professional-looking finish.
Step-by-Step Guide: Seamless Doorknob Upgrade with the Right Tool
Equipped with this fantastic new tool, we were ready to tackle the doorknob replacement project with renewed confidence. Here’s a detailed breakdown of the steps we followed to transform our mismatched hallway doors into a vision of coordinated elegance, demonstrating how this simple kit truly streamlines the process of upgrading your door hardware.
1. Removing Your Old Doorknob: The Initial Easy Step
The first stage of any doorknob upgrade is the removal of the existing hardware. This is generally the most straightforward part of the process, requiring minimal effort. Using a screwdriver, typically a Phillips head, we simply undid the screws holding the old doorknobs in place. Most doorknobs are secured by two visible screws on the handle plate, which, once removed, allow the entire mechanism – including the interior and exterior handles, the spindle, and the latch faceplate – to be gently pulled away from the door. It’s a quick task, usually taking only a minute or two per door, and serves as the foundational step before preparing the door for its new, modern counterpart.
2. Transforming the Latch Hole: Precision Cutting for the New Hardware
With the old doorknob successfully removed, the real work for the Ryobi Door Latch Installation Kit began. This is where the tool truly shines, addressing the critical incompatibility issue. We carefully positioned the kit’s rectangular blade over the existing round latch hole, ensuring it was perfectly aligned with the door’s edge and the intended placement of the new latch. Once in position, we applied firm pressure and gave the tool several decisive whacks with a rubber mallet. The sharp blade of the Ryobi kit cut through the door material with surprising ease and precision, carving out clean, crisp edges that perfectly accommodated the new rectangular latch. This process instantly transformed the irregular round opening into the precise, square mortise required for the updated hardware, making what was once a daunting task remarkably simple and accurate.
3. Creating a Flush Finish: Chiseling the Mortise
After shaping the main latch opening, the next crucial step was to create a recess for the latch faceplate to sit flush with the door’s edge. This is achieved using the chisel side of the Ryobi Door Latch Installation Kit. We carefully used this blade to carve out the shallow area around the newly formed rectangular hole. It’s important to approach this step with a gentle hand and a watchful eye, especially if your doors are made from softer materials like MDF, as ours were. During my initial attempt, I confess I got a little overzealous, ripping some of the MDF beyond the intended lines. However, this served as a valuable learning experience. With each subsequent door, I refined my technique, using lighter taps and frequently checking my progress, which resulted in perfectly clean and precise mortises without any additional goof-ups. This step ensures that the installed doorknob looks professional and operates smoothly without any protruding edges, which is key for a high-quality finish in any door hardware upgrade.
4. Installing Your New Doorknob: The Satisfying Final Touches
Once the door’s edge was perfectly prepared with the newly shaped latch hole and the flush mortise, it was time for the satisfying installation of the new hardware. We began by sliding the new rectangular latch mechanism into its perfectly fitted opening. The precision achieved with the Ryobi kit meant the latch slipped in without any struggle, aligning flawlessly with the screw holes. We then secured the latch with its accompanying screws, ensuring it was snug and stable. Following this, the interior and exterior doorknob assemblies were attached, typically by inserting the spindle through the latch and securing the handles with their designated screws. A final check for smooth operation—ensuring the latch retracted and extended freely when the knob was turned—confirmed a successful installation. The transformation was remarkable, with each door now boasting a sleek, modern doorknob that looked as if it had been custom-fitted from the start.
As for the minor imperfections from my learning curve on the first door, a small amount of wood filler and a touch of matching paint easily concealed any stray rips in the MDF. This quick fix seamlessly blended the area, leaving no trace of the initial mishap and reinforcing the idea that even minor DIY mistakes can be easily rectified with a little care. The end result was a flawlessly integrated new doorknob, ready to serve its function and contribute to the hallway’s refreshed aesthetic. This small detail underscores the importance of patience and the availability of simple finishing techniques in achieving a truly polished home renovation outcome.
Achieving Home Harmony: The Power of a Simple Tool and DIY Confidence
The discovery and successful application of the Ryobi Door Latch Installation Kit truly saved our doorknob replacement project. What began as a frustrating mismatch and a seemingly complicated problem was resolved by a single, affordable, and incredibly effective tool. All five doors in our hallway now proudly display perfectly matching doorknobs, presenting a clean, unified, and aesthetically pleasing look that finally brings harmony to our home’s interior. This entire experience stands as a powerful reminder that even the most daunting-looking home improvement challenges often have simple, ingenious solutions waiting to be discovered. It reinforces the value of specialized tools in making complex tasks accessible to the average homeowner, transforming potential headaches into satisfying DIY triumphs. If you’re considering a doorknob upgrade, especially if you’re transitioning to rectangular latches, don’t let a round hole deter you – the right tool can make all the difference, averting any potential “twitching crisis” and leaving you with a beautifully updated home.
Upgrading your door hardware is an effective and relatively inexpensive way to refresh the look and feel of your home. Whether you’re aiming for a modern update or simply seeking to unify disparate styles, encountering a rectangular latch on a round hole door doesn’t have to be a project stopper. With the right preparation and the innovative Ryobi Door Latch Installation Kit, what might seem like a complex carpentry job becomes a manageable and satisfying DIY endeavor. Embrace these small changes; they collectively contribute to a more cohesive and enjoyable living environment. Happy DIYing!







