
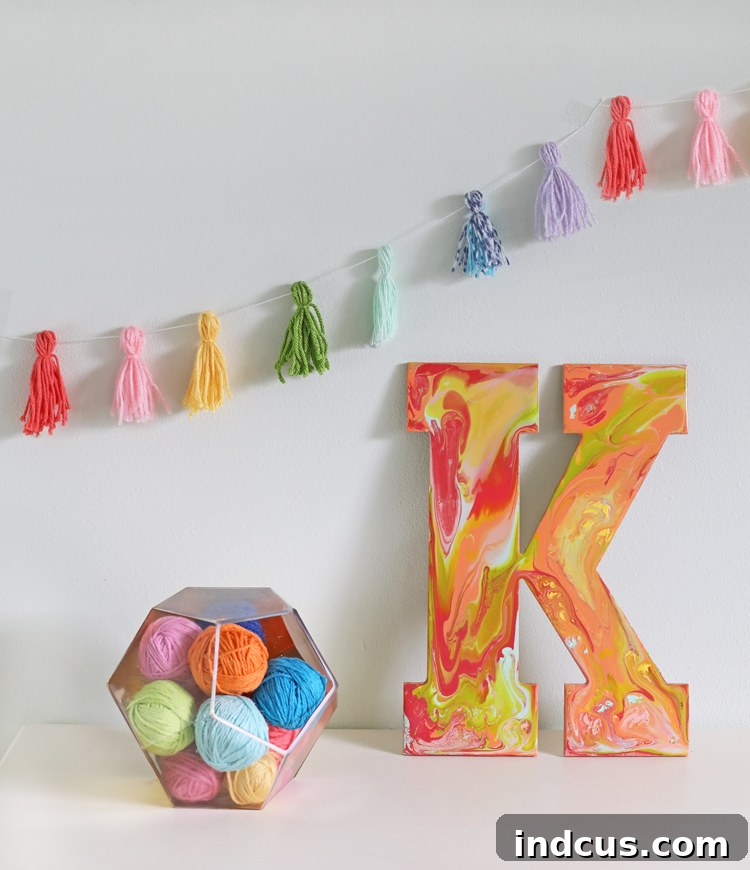
Master Acrylic Pour Painting: Your Ultimate Guide to Mesmerizing Fluid Art
The enchanting world of acrylic pour painting, often known as fluid art, has taken the internet by storm, captivating artists and enthusiasts with its unique, unpredictable beauty. There’s an undeniable allure to watching colors swirl and merge into breathtaking, one-of-a-kind designs that can never be precisely replicated. If you’ve been intrigued by this fascinating art form and eager to dive in, you’ve come to the right place. This comprehensive guide will demystify the process, revealing everything you need to know to create your very own stunning acrylic pour masterpieces. Get ready to unleash your inner artist and discover the magic of paint and pour!
This comprehensive guide is brought to you with support from our generous sponsors at Hobby Lobby, making creativity accessible to all.
What Exactly is Acrylic Pour Painting?
At its core, paint pouring is an innovative technique where instead of using traditional brushes to apply paint, you allow gravity and the natural flow of liquid acrylics to do the artistic heavy lifting. By carefully pouring specially prepared paints onto a surface, you enable them to move, swirl, and spread organically, creating mesmerizing patterns, intricate cells, and captivating abstract designs. The beauty lies in the spontaneity; each pour is a unique experiment, yielding cool, unpredictable, and truly original results every single time.
Why Immerse Yourself in Fluid Art?
- Unleash Creativity: It’s a fantastic way to explore abstract art without needing traditional painting skills.
- Stress Relief: The fluid motion of the paint can be incredibly meditative and therapeutic.
- Unique Creations: Every piece is a singular work of art, impossible to duplicate, making each project incredibly special.
- Accessibility: With a few key supplies and a basic understanding, anyone can start creating beautiful art.
- Versatile: Apply this technique to canvases, wooden objects, pottery, jewelry, and more, transforming everyday items into vibrant art.
Essential Supplies for Your Pour Painting Journey
Embarking on your fluid art adventure requires a few crucial materials. Gathering these supplies before you begin will ensure a smooth and enjoyable crafting experience. Most of these items are readily available at craft stores like Hobby Lobby.
- Acrylic Craft Paint: Choose your favorite colors! Craft acrylics are perfect for beginners due to their affordability and wide range of hues. Consider their consistency; some brands are thicker than others, which can affect the flow.
- Liquitex Pouring Medium: This is a non-negotiable item. It’s the secret sauce that transforms regular acrylics into fluid masterpieces.
- Small Paper Cups: Essential for mixing individual paint colors with the pouring medium and for layering paints in dirty pours. You’ll need several!
- Stir Sticks: Coffee stirrers, popsicle sticks, or even plastic spoons work perfectly for thoroughly mixing your paint and medium.
- Rubber Gloves: Acrylic pour painting can get messy! Gloves protect your hands from paint and the pouring medium, which can be irritating to sensitive skin.
- Drop Cloth or Plastic Sheeting: Absolutely crucial for protecting your workspace. Paint will drip, and it will drip everywhere.
- Something to Elevate Your Project: Painter’s triangles, small blocks, or even upside-down cups allow paint to drip off the edges of your canvas or object freely.
- Your Chosen Surface: Canvas, wood panels, ceramic tiles, pottery, glass, and even jewelry blanks are excellent choices for pour painting.
- Optional: Silicone Oil/Treadmill Oil: A few drops can help create those stunning “cells” that many fluid artists adore.
- Optional: Heat Gun/Torch: Used sparingly and carefully, a small culinary torch or heat gun can bring cells to the surface and pop tiny air bubbles.
Understanding Pouring Medium: The Heart of Fluid Art
The pouring medium is arguably the most vital component in acrylic pour painting. It’s a specialized clear liquid designed to extend the drying time of acrylic paint, making it more fluid and allowing it to spread, swirl, and interact without drying too quickly. Without it, acrylic paint would be too thick and would dry almost instantly, preventing the beautiful movement and cellular effects characteristic of fluid art.
When mixed with acrylic paint, the pouring medium performs several key functions:
- Enhances Flow: It thins the paint to an ideal consistency for pouring without diminishing color intensity.
- Extends Drying Time: Gives the paint ample time to move and merge on the surface before setting.
- Prevents Muddying: Helps colors maintain their distinct identities, preventing them from blending into a single, muddy hue.
- Creates a Durable Finish: Once dry (typically after 24-72 hours, depending on thickness), the acrylic paint mixed with pouring medium forms a hard, glossy, and durable finish.
You can readily find the Liquitex pouring medium I used in the fine art aisle at Hobby Lobby, among other reputable art supply stores. Always follow the manufacturer’s recommended ratio for mixing with your chosen acrylic paints for the best results, as ratios can vary slightly between brands and desired effects.
Exploring Core Pour Painting Techniques: Clean Pour vs. Dirty Pour
There are numerous ways to execute an acrylic pour, but two fundamental techniques form the foundation for most fluid art projects: the “Clean Pour” (or Puddle Pour) and the “Dirty Pour.” We’ll walk through both with practical examples.
Technique 1: The Clean Pour (Decorating a Wooden Initial)
The clean pour involves pouring individual colors onto your surface, allowing them to flow and blend naturally. This method often results in more distinct color separation and organic lines.
Step-by-Step for a Wooden Initial:
- Prepare Your Paint: In separate small cups, mix your chosen acrylic paints with the pouring medium. A good starting ratio is usually 1 part paint to 2 parts pouring medium, but adjust until the consistency is like warm honey – thin enough to flow, but thick enough to hold some shape. Stir thoroughly to avoid lumps.
- Set Up Your Workspace: Place a drop cloth down. Elevate your wooden initial on painter’s triangles or similar objects to allow paint to drip off freely.
- Begin Pouring: Choose a starting point on your initial. Gently pour small puddles or lines of your first color. Then, strategically pour your next colors alongside or on top of the previous ones. You can pour one color directly into another, or pour around existing puddles.
- Tilt and Flow: Once you have a sufficient amount of paint on your surface, gently tilt the initial in various directions. This movement will encourage the paint to spread, cover the entire surface, and create captivating patterns as colors merge and overlap. Ensure all edges are covered.
- Allow to Dry: Once satisfied with the design, carefully transfer the elevated initial to a level, dust-free area to dry completely for at least 24-48 hours. Avoid touching it during this time.
Want to see the clean pour technique in action? This video demonstrates how I used the paint and pour technique to decorate a wooden initial. Observe the fluidity and the stunning glossy finish achieved.
Watch the video: “Paint and Pour Wooden Initial” to see the step-by-step process of decorating a wooden initial using the clean pour technique. This video illustrates how a glossy finish is achieved through acrylic pour painting.
Isn’t the result amazing? Here’s a close-up so you can truly appreciate the beautiful sheen and intricate details.
Technique 2: The Dirty Pour (Transforming a Clay Pot)
A “dirty pour” is an exciting variation where you layer all your chosen paint colors into a single cup before pouring. This method often leads to more dramatic, unexpected blends and unique cell formations.
Step-by-Step for a Clay Pot:
- Prepare Your Paints: Mix your desired acrylic colors (e.g., green, blue, turquoise, and gold) with pouring medium in separate small cups, ensuring a consistent, fluid texture for each.
- Create Your “Dirty” Cup: Take a larger, empty cup. Begin layering your prepared paints into this single cup. Pour one color, then the next directly on top, and so on. Avoid stirring; you want distinct layers. You can vary the amount of each color for different effects.
- Prepare the Pot: As with the letter, ensure your workspace is protected and the clay pot is elevated to allow for dripping.
- Execute the Dirty Pour: Once all colors are layered in your “dirty” cup, choose how you want to pour. You can either slowly tilt the cup and let the paint flow out, or quickly “flip” the cup upside down onto the pot, then lift it. For a rounded surface like a pot, a slow, controlled pour is often more manageable.
- Manage the Flow: Pouring onto a 3D object like a pot presents a unique challenge, as the paint naturally wants to run off the sides. You may need to gently guide the paint with a gloved finger to cover any missed spots or areas where the paint is too thin. Continuously rotate the pot and gently tilt it to encourage even coverage.
- Prevent Excessive Drips: As the paint settles, continuously run your gloved finger around the open rim of the pot to keep it clear from heavy drips and maintain a clean edge.
- Drying: Place the pot on a level surface (still elevated) and allow it to dry for a full 24-72 hours. Ensure it’s in a dust-free environment.
See the dirty pour technique applied to a clay pot in this next video. It showcases the challenges and rewards of painting on a rounded, 3D surface.
Watch the video: “Paint And Pour Clay Pot” to learn how to apply the dirty pour technique to a rounded surface, adding pizzazz to a plain clay pot and managing paint flow.
Advanced Tips and Troubleshooting for Beginners
My initial experiences with paint pouring taught me invaluable lessons. Here’s a collection of “live and learn” advice to help you avoid common pitfalls and achieve fantastic results from your very first pour.
Essential Paint Pouring Tips for Beginners
- Always Wear Rubber Gloves: Seriously, this is a must! The pouring medium can be irritating to sensitive skin, and acrylic paint is difficult to remove once dry. Protect your hands to fully enjoy the process.
- Mix, Mix, Mix Thoroughly: Under-mixed paint is a common issue. Ensure your acrylic paint and pouring medium are combined completely. Any unmixed blobs will appear chunky and disrupt the smooth flow and finish of your artwork. Stir until the mixture is uniform and silky smooth.
- Estimate Generously on Paint: You’ll almost always need more paint than you anticipate, especially when covering larger surfaces or ensuring full edge coverage. For reference, one 8-ounce bottle of pouring medium was barely enough for my two projects (the letter and the pot). It’s always better to have too much than too little.
- Let Gravity Be Your Guide: Resist the urge to over-manipulate the paint once it’s on the surface. The more you interfere, poke, or swirl with sticks, the more muddled your final design is likely to become. Embrace the organic movement; do like Elsa and just let it go!
- Start with Flat Surfaces: If it’s your first time trying acrylic pour painting, I strongly suggest starting with a flat surface like a canvas or a simple wooden sign. These are much easier to control and learn on than challenging 3D objects.
- Consider Your Color Palette: For harmonious results, especially as a beginner, start with fewer colors that are naturally complementary or next to each other on the color wheel. While I loved my multi-color letter, a simpler palette (e.g., just pinks, oranges, and yellows) might have created an even more cohesive and serene design. This is, of course, a personal preference, so feel free to experiment!
- Protect Your Workspace Extensively: Use a giant piece of cardboard, a plastic tablecloth, or a dedicated drop cloth as your work surface. Paint drips can get out of control quickly, and having a disposable or easily cleanable barrier will save you a lot of headache.
- Elevate Your Project: Always prop the item you’re painting up off your cardboard or protective surface. Painter’s triangles, small plastic cups, or wooden blocks work perfectly, allowing excess paint to freely drip off the sides without sticking to your work surface, ensuring a clean finish.
- Choose the Right Technique for the Surface:
- Clean Pouring (individual cups): This technique generally works better on 3D surfaces where you might want more control over color placement and distinct variations.
- Dirty Pouring (layered in one cup): Often yields more dynamic and abstract results, making it excellent for flat surfaces like canvases.
- Patience is Key for Drying: Let your project dry for a full 24-72 hours, depending on the thickness of the paint. Touching it prematurely can ruin the design, leave fingerprints, or compromise the glossy finish. Place it in a level, well-ventilated, dust-free area.
- Achieving Cells: If you’re aiming for those iconic “cells,” experiment with a few drops of silicone oil or treadmill oil mixed into your individual paint cups. After pouring, a gentle pass with a small kitchen torch or heat gun (held at a safe distance and moved quickly) can help activate cell formation and pop air bubbles.
- Sealing Your Artwork: Once completely dry, consider applying a varnish or sealant (e.g., clear acrylic spray or resin) to protect your fluid art from dust, UV damage, and everyday wear, giving it a professional, lasting finish.
Ready to Dive into the World of Fluid Art?
Now that you’ve journeyed through the fundamentals of acrylic pour painting, from understanding essential supplies to mastering core techniques and absorbing valuable tips, are you ready to create your own fluid art masterpiece? What surface are you most excited to transform? Do you envision a controlled clean pour or a vibrant, unpredictable dirty pour? I’d love to hear about your creative aspirations! Leave a comment below or send me a direct message on social media to share your experiences and show off your incredible pour painting creations. Happy pouring!







