
Are you captivated by the rustic charm and cozy elegance of farmhouse style? Perhaps you, like countless others, found your inspiration in popular home design shows, falling head over heels for their inviting aesthetic. Farmhouse decor isn’t just a trend; it’s a timeless style that brings warmth, simplicity, and a touch of nostalgia into any home. One of the easiest and most impactful ways to infuse this beloved style into your living space is through thoughtful, handcrafted pieces.
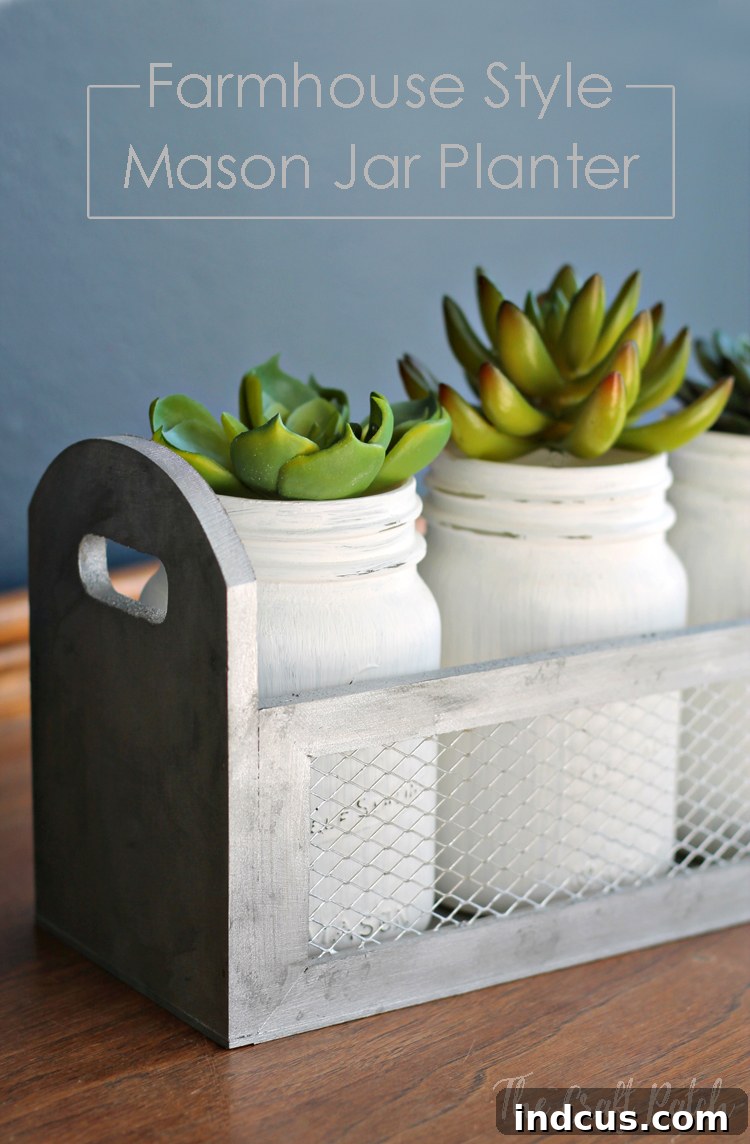
Today, we’re diving into a delightful DIY project that perfectly embodies the farmhouse spirit: a custom-built mason jar planter. This versatile creation, featuring a faux zinc finish on a wooden caddy and charming white-painted mason jars, serves as an exquisite centerpiece, a welcoming entryway accent, or a stylish organizer for any room. It’s a project that combines rustic appeal with functional beauty, allowing you to display your favorite flowers, succulents, or greenery in true farmhouse fashion.
The Enduring Appeal of Farmhouse Decor and DIY
Farmhouse style is celebrated for its emphasis on comfort, practicality, and natural elements. It conjures images of simpler times, inviting us to create a serene and welcoming sanctuary within our homes. Think distressed finishes, natural wood, galvanized metals, and the quintessential mason jar – all contributing to an aesthetic that feels both authentic and aspirational. Creating your own decor, especially a piece like this farmhouse mason jar caddy, amplifies this feeling. DIY projects offer a unique blend of personal satisfaction, cost-effectiveness, and the opportunity to tailor items precisely to your taste and existing decor.
This particular project taps into several key elements of farmhouse design. The unfinished wood box provides a natural base, while the faux zinc finish mimics the look of vintage galvanized metal, a staple in farmhouse homes. The classic mason jars, transformed with a coat of chalk paint, become charming vases or holders. Together, these elements create a cohesive piece that exudes rustic elegance, proving that you don’t need a professional designer to achieve a stylish, magazine-worthy look.
Transforming Your Space with a Farmhouse Centerpiece
Imagine this charming planter gracing your dining room table, filled with fresh-cut hydrangeas or vibrant faux succulents. Picture it on your entryway console, offering a warm welcome with a cluster of eucalyptus branches. Its adaptability makes it suitable for almost any setting. From adding a touch of greenery to your kitchen island to organizing small items in a bathroom or home office, this farmhouse planter seamlessly integrates into various decor schemes, enhancing the aesthetic appeal wherever it’s placed. It’s not just a decorative item; it’s a statement piece that speaks volumes about your appreciation for handcrafted beauty and classic style.
Beyond its decorative function, this planter offers immense versatility in terms of what you can display. Whether you prefer the lively beauty of real flowers, the low-maintenance appeal of artificial plants, or the charming organization of craft supplies, the mason jars provide the perfect vessel. This project is also highly customizable, allowing you to experiment with different paint colors, distressing techniques, and embellishments to truly make it your own. Let’s gather our supplies and start crafting this beautiful addition to your home.
Materials Needed for Your DIY Farmhouse Planter
Crafting your own farmhouse-style mason jar planter is a straightforward and enjoyable process that requires just a few readily available materials. Sourcing these items is often half the fun, as many can be found at local craft stores, hardware stores, or even online with ease. Here’s a detailed list of what you’ll need to begin your project:
- Three 16oz Mason Jars: These iconic jars are the quintessential farmhouse staple. The 16oz (pint-sized) jars are ideal for holding various floral arrangements or small items, offering a classic aesthetic.
- Unfinished Wood Box: Look for a rectangular wooden box designed to hold three mason jars snugly. An unfinished box is perfect as it provides a blank canvas for your paint and faux finishing techniques. Many craft stores carry these specific “mason jar caddies” or similar wooden organizers.
- White Chalk Paint: Chalk paint is a decorator’s dream for farmhouse projects. It provides excellent coverage with a beautiful matte, velvety finish that’s easy to distress if desired. It adheres well to various surfaces, including glass, often requiring minimal to no priming.
- Metallic Silver Craft Paint: This will be the base for our faux zinc or galvanized metal effect. Choose a metallic silver that offers a subtle sheen, mimicking the look of aged metal.
- Gray Craft Paint: A medium to dark gray craft paint will be used to create the weathered, oxidized look characteristic of genuine zinc or galvanized finishes. This will add depth and realism to your faux finish.
- Foam Paint Brush: Foam brushes are excellent for applying smooth, even coats of paint, especially on glass and wood. They are inexpensive and easy to clean (or dispose of). Having a couple on hand for different colors can be helpful.
- Paper Towels or an Old Rag: Essential for dabbing and blending the gray paint to achieve the weathered metal effect.
- Optional: Fine-Grit Sandpaper: For light distressing on the mason jars or wood box if you prefer a more aged look.
- Optional: Clear Matte Sealer/Topcoat: To protect your finished project from wear and tear, especially if it will be frequently handled or used in areas with moisture.
Step-by-Step Instructions: Crafting Your Farmhouse Masterpiece
With your materials gathered, it’s time to embark on the creative journey of transforming simple components into a stunning farmhouse decor piece. Follow these detailed steps to achieve a professional-looking result.
Step 1: Preparing and Painting the Mason Jars
Before you begin painting, ensure your mason jars are clean and dry. Wash them thoroughly with soap and water, then let them air dry completely. Any residue can prevent the paint from adhering properly. Once dry, place them on a protected surface, such as newspaper or a drop cloth.
Using your foam brush, apply an even coat of white chalk paint to the exterior of each mason jar. Chalk paint is known for its excellent coverage, but glass can sometimes be tricky. Aim for thin, even strokes to avoid drips and streaks. Allow the first coat to dry completely, which typically takes 15-30 minutes depending on humidity and paint thickness. Once dry, apply a second coat to ensure full, opaque coverage. You may even opt for a third coat if you desire a perfectly solid, crisp white finish. Let the jars dry thoroughly after the final coat. For a slightly distressed farmhouse look, you can lightly sand certain areas with fine-grit sandpaper after the paint has cured.
Step 2: Applying the Metallic Base Coat to the Planter Box
Next, turn your attention to the unfinished wood box. Ensure it is clean and free of dust or debris. Using a clean foam brush, apply a generous, even coat of metallic silver craft paint to the entire exterior surface of the box. This metallic silver paint will serve as the underlying “metal” layer for our faux zinc finish. Cover all sides, edges, and the top rim thoroughly. Much like the mason jars, this step might require two coats to achieve complete and uniform coverage, especially if the wood is very porous. Allow the first coat to dry completely before applying the second. Patience here is key, as a fully dry base coat is crucial for the next step.
Step 3: Creating the Faux Zinc Weathered Metal Effect
This is where the magic happens and your planter box truly takes on its farmhouse character. Once the metallic silver base coat is completely dry to the touch, it’s time to apply the gray craft paint to create that authentic weathered metal or faux zinc look. Rather than painting it on smoothly, you’ll be dabbing and blending.
Dip a crumpled piece of paper towel or an old rag into a small amount of the gray craft paint. Dab off any excess paint onto a scrap piece of paper or cardboard so that the paper towel is barely damp with paint. Then, lightly and irregularly dab the gray paint over the metallic silver surface of the planter box. The goal is not to cover the silver entirely, but to create a textured, mottled effect that mimics the oxidation and wear of aged metal. Vary your pressure and dabbing motion to achieve a natural, non-uniform finish.
If you find that you’ve applied too much gray paint in any one area, don’t panic! Simply go over that spot again with a clean piece of paper towel lightly dabbed in metallic silver paint to lighten it and blend it back in. Continue layering and blending the gray and metallic silver paints until you achieve a weathered, rustic appearance that you are satisfied with. There’s no right or wrong here; it’s all about personal preference and creating a look that feels authentic to you. This layering technique adds incredible depth and dimension to the finish, making it truly unique.
Step 4: Final Drying and Optional Sealing
Once you are happy with the faux zinc finish on your planter box, allow all the paint layers to dry completely. This might take several hours, or even overnight, depending on the paint thickness and environmental conditions. Ensure both the mason jars and the wooden box are fully dry before assembling and decorating. For added durability and to protect your beautiful faux finish, especially if the planter will be exposed to moisture or frequent handling, consider applying a clear matte sealer or topcoat. This step will help preserve the paintwork and ensure your farmhouse planter remains a cherished piece for years to come.
Styling Your Farmhouse Mason Jar Planter
Now that your stunning farmhouse planter is complete, the real fun begins: styling it to perfectly complement your home! This versatile piece offers endless possibilities for showcasing greenery, florals, or even practical items. Here are some inspiring ideas for what you can put in your new favorite decor accent:
Classic Floral Displays
- Fresh Flowers: For a vibrant and natural touch, fill your mason jars with seasonal fresh flowers. Hydrangeas, as seen in one of the examples, are a farmhouse favorite, offering voluminous blooms. Lilacs, peonies, daisies, or tulips also make charming arrangements.
- Faux Flowers: If you prefer a low-maintenance option that stays beautiful all year round, high-quality faux flowers are an excellent choice. Look for realistic silk hydrangeas, lavender, sunflowers, or cotton stems to maintain the farmhouse aesthetic.
- Dried Botanicals: For an enduring rustic look, consider dried floral arrangements. Lavender, eucalyptus, wheat stalks, or even dried baby’s breath can add texture and a lovely, understated charm.
Lush Greenery and Succulents
- Succulents: Whether real or artificial, succulents are a quintessential farmhouse choice. Their unique textures and resilient nature make them perfect for a stylish, modern farmhouse look. You can plant small succulents directly into the jars (ensuring proper drainage if real) or use faux succulent arrangements for ease.
- Eucalyptus Branches: These popular branches offer a beautiful muted green color and a delightful aroma (if fresh). They add height and a touch of organic elegance.
- Herbs: For a kitchen or dining area, consider planting small potted herbs like rosemary, basil, or mint in the jars. This brings both beauty and functionality to your space.
Seasonal and Holiday Decor
The beauty of this planter is its ability to adapt to different seasons and holidays with a simple swap of its contents:
- Spring: Fill with pastel-colored eggs, small bunny figurines, or delicate spring blossoms.
- Summer: Display seashells, sand, small flags, or vibrant summer flowers.
- Fall: Incorporate mini pumpkins, gourds, colorful leaves, pinecones, or corn husks.
- Winter/Holidays: Adorn with small ornaments, fairy lights, faux snow, candy canes, or sprigs of evergreen and cranberries.
Functional and Creative Uses
Beyond traditional plant displays, your farmhouse caddy can serve many purposes:
- Kitchen Utensil Holder: Perfect for holding spatulas, whisks, and other cooking tools on your counter during a buffet or everyday use.
- Desk Organizer: Keep pens, pencils, scissors, and other office supplies neatly arranged.
- Bathroom Storage: Ideal for cotton balls, Q-tips, toothbrushes, or makeup brushes, adding a touch of rustic charm to your vanity.
- Candle Holders: Place battery-operated pillar candles or small votives inside the jars for a safe and cozy ambiance (avoid open flames in painted jars without proper ventilation).
Customization Ideas for a Personal Touch
While the faux zinc and white mason jar look is classic, don’t hesitate to personalize your planter even further. Here are some ideas:
- Different Paint Colors: Experiment with other farmhouse-friendly colors for the mason jars, such as cream, light gray, pale blue, or even a distressed black. For the wood box, consider a natural wood stain instead of paint, or a distressed muted green.
- Stenciling or Lettering: Add stenciled words like “HOME,” “FARM,” “LOVE,” or a family initial to the front of the wood box or directly onto the mason jars.
- Handles or Hardware: Attach small decorative metal handles to the sides of the wood box for an authentic caddy look.
- Textural Accents: Wrap twine, jute, or burlap around the necks of the mason jars for added rustic texture.
- Distressing Techniques: After painting the jars and box, use fine-grit sandpaper to lightly sand down edges and raised areas, revealing the original surface underneath for an authentically aged appearance.
Care and Maintenance
To ensure your beautiful farmhouse mason jar planter remains a staple in your decor for years to come, a little care goes a long way. If you’ve sealed your project, gently wipe the wooden box with a damp cloth when cleaning. For the painted mason jars, avoid harsh scrubbing or submerging them in water for extended periods, especially if not sealed, to prevent paint chipping. If using real plants, use liners or smaller pots inside the jars to prevent direct soil and water contact with the painted surface.
Conclusion: Embrace Your Inner Designer
Creating this farmhouse mason jar planter is more than just a craft project; it’s an opportunity to infuse your home with personalized style and handcrafted charm. It’s a testament to the beauty of simplicity and the enduring appeal of farmhouse design. Whether you’re a seasoned DIY enthusiast or just starting your creative journey, this project offers a rewarding experience with a stunning outcome. Its versatility ensures it will be a beloved piece, evolving with your decor through seasons and trends.
So, gather your supplies, unleash your creativity, and enjoy the process of bringing this charming farmhouse accent to life. Once completed, step back and admire your handiwork – a beautiful, functional, and uniquely yours farmhouse mason jar planter ready to brighten any corner of your home. We encourage you to try this project and experience the joy of creating something beautiful with your own hands. Happy crafting!







