
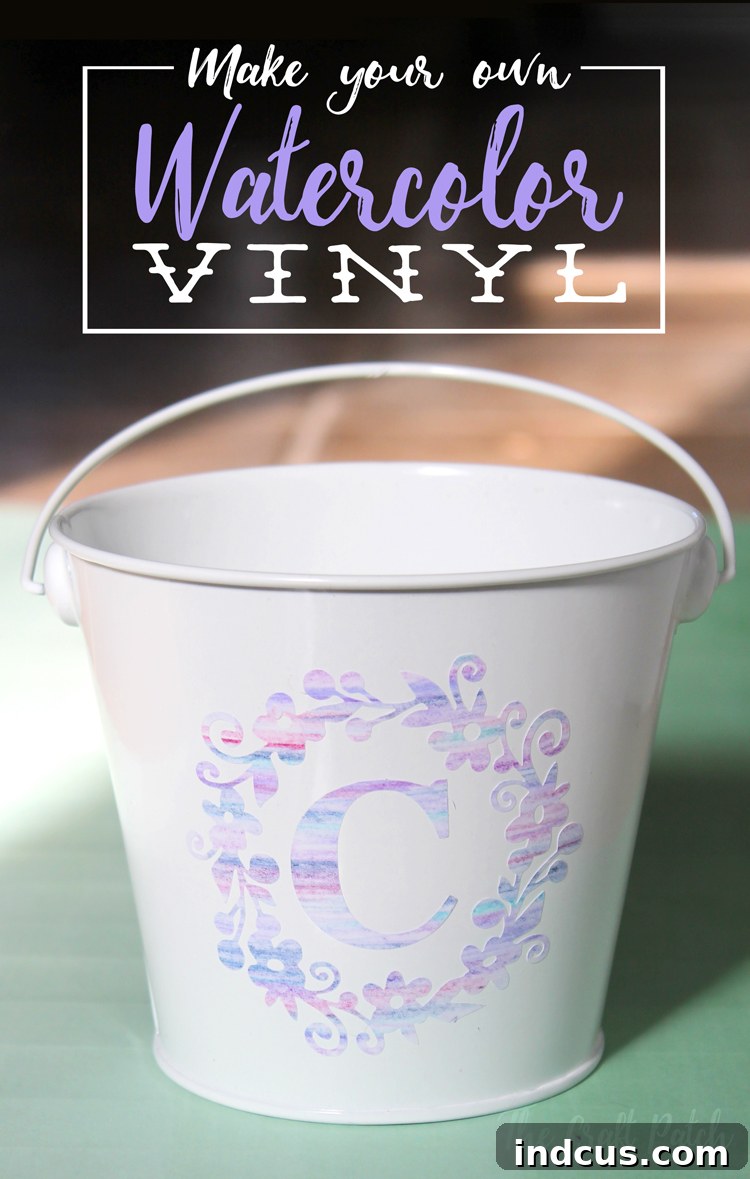
The enchanting allure of watercolor art has captivated hearts for centuries with its soft, diffused colors and ethereal quality. Many of us dream of creating such beautiful pieces, but often find ourselves daunted by the perceived difficulty of traditional watercolor painting, or simply lack the specialized paints and brushes. What if we told you that you could achieve that coveted watercolor aesthetic without ever picking up a paintbrush, and even without owning a single tube of watercolor paint? Imagine creating stunning, custom designs with a delicate, painted look, all from the comfort of your craft room.
This innovative guide will unveil a surprisingly simple yet incredibly effective method to infuse the magic of watercolors into your projects. We’re talking about transforming ordinary white craft vinyl into a canvas of dreamy, blended hues, all thanks to the versatile power of colored pencils, soft pastels, and the precision of your Silhouette or Cricut cutting machine. This technique is perfect for crafters of all skill levels, allowing you to produce unique, professional-looking items that truly stand out. Whether you’re crafting personalized gifts, adding artistic touches to home decor, or simply exploring new creative avenues, this faux watercolor vinyl method opens up a world of possibilities. Get ready to unlock a new dimension of crafting, where the beauty of watercolor meets the durability and precision of vinyl.
Dive into this tutorial and discover how easy it is to bring a touch of painterly elegance to your next DIY project. We’ll walk you through each step, ensuring you have all the knowledge and tips to master this delightful technique. Prepare to be amazed by what you can create!
Embracing the Faux Watercolor Vinyl Technique: Why It’s a Game-Changer for Crafters
For many enthusiasts of DIY and handmade crafts, the desire to create items with a bespoke, artistic flair is paramount. The traditional art of watercolor, while undeniably beautiful, often comes with a steep learning curve and requires specific supplies that might not be readily available to everyone. This is where the faux watercolor vinyl technique truly shines, presenting itself as an accessible and rewarding alternative. It’s a game-changer for several compelling reasons, making it a must-try for anyone looking to add a unique touch to their creations.
Accessibility and Ease of Use
One of the primary benefits of this method is its incredible accessibility. You don’t need any prior painting experience or specialized artistic skills. If you can color with pencils and smudge a pastel, you can master this technique. This lowers the barrier to entry significantly, allowing even novice crafters to achieve stunning, painterly effects that would otherwise require years of practice.
Cost-Effectiveness and Resourcefulness
Forget investing in expensive watercolor paint sets, various brushes, and specialized papers. This technique leverages common craft supplies that many creative individuals already have on hand: white craft vinyl, colored pencils, and chalk or oil pastels. This resourcefulness makes it an economical choice for those who want to produce high-quality, artistic crafts without breaking the bank.
Unmatched Versatility for Countless Projects
The applications for faux watercolor vinyl are virtually limitless. From personalized gift tags and greeting cards to custom mugs, tumblers, wall decals, and even unique accents for scrapbooks or journals, this technique can elevate a wide array of projects. The vinyl base provides durability, allowing your beautiful “watercolor” designs to adorn surfaces where traditional paper watercolors might be impractical. This versatility means you can infuse a consistent, elegant aesthetic across all your crafting endeavors.
Precision Meets Artistic Expression
The combination of hand-drawn colored pencil and pastel effects with the precision of a craft cutting machine like a Silhouette or Cricut is truly remarkable. While you hand-apply the artistic elements, your cutting machine ensures that your designs are perfectly cut, no matter how intricate. This blend of freehand artistry and technological accuracy results in a polished, professional finish that sets your creations apart. You get the organic beauty of watercolor with the crisp edges and perfect shapes that only a cutting machine can provide.
Personalization and Unique Appeal
In a world of mass-produced items, handmade gifts and decor carry a special significance. The faux watercolor vinyl technique allows for deep personalization, enabling you to choose specific colors, patterns, and designs that resonate with the recipient or match your desired aesthetic. Every piece you create will be unique, bearing the subtle nuances of your hand-drawn artistry, making it a truly one-of-a-kind treasure.
By embracing this innovative method, you’re not just making a craft; you’re creating a piece of art that blends traditional aesthetics with modern crafting convenience. It’s a testament to how creativity can thrive by finding new ways to utilize familiar tools and materials, producing breathtaking results that defy expectations.
Gathering Your Essential Crafting Toolkit: Materials for Faux Watercolor Vinyl
Before embarking on your faux watercolor vinyl journey, assembling the right materials is crucial. Thankfully, the beauty of this technique lies in its simplicity and the fact that it utilizes readily available craft supplies. Here’s a breakdown of what you’ll need, along with tips for selecting the best options to ensure your project’s success:
- White Craft Vinyl: This is your canvas. Opt for a high-quality, smooth white vinyl. The white background is essential as it allows the colors to pop and mimics the light base of watercolor paper. You can choose between removable or permanent vinyl depending on your project’s intended longevity and surface. For temporary decorations or if you anticipate needing to reposition, removable vinyl is ideal. For items like mugs or outdoor decals, permanent vinyl offers better durability. Expressions Vinyl is a reputable brand offering excellent options.
- Colored Pencils in Several Coordinating Colors: Good quality colored pencils with strong pigmentation are key. They will form the base of your “watercolor” design. Having a range of coordinating colors will allow you to create beautiful gradients and depth. Consider sets that offer a good blendability, as you’ll be layering and blending these colors. Brands like Prismacolor or Faber-Castell are known for their vibrant pigments and smooth application, but any artist-grade colored pencils will work wonderfully.
- Chalk or Oil Pastels: These are the secret ingredient for achieving that soft, diffused watercolor effect. Both chalk and oil pastels work well, each offering a slightly different texture and blending quality. Chalk pastels tend to be drier and blend into a powdery finish, while oil pastels are creamier and can create a more vibrant, painterly smudge. Choose a few colors that complement your chosen colored pencil palette. You’ll use these sparingly to add a hazy, blended look.
- Craft Cutting Machine (e.g., Silhouette Cameo or Cricut): While not used for the coloring part, your machine is indispensable for precision cutting your prepared vinyl into intricate designs. Ensure your machine is in good working order and you have the appropriate cutting mat and blade.
- Blending Tools: Cotton balls, cotton swabs, or even your clean fingertips are excellent for softening and blending the pastels. Have a few on hand to avoid color contamination.
- Design Software: You’ll need the software associated with your cutting machine (e.g., Silhouette Studio, Cricut Design Space) to create or import the design you wish to cut from your custom-colored vinyl.
- Weeding Tools: Essential for removing excess vinyl once your design is cut, revealing your beautiful artwork.
- Transfer Tape: To accurately apply your finished vinyl design to your project surface.
Having these materials ready will streamline your crafting process and allow you to focus on the creative aspects of bringing your faux watercolor vinyl designs to life. Each component plays a vital role in achieving the desired soft, artistic finish that mimics traditional watercolors so beautifully.
Step-by-Step Guide: Crafting Your Faux Watercolor Vinyl Masterpiece
Now that you have all your materials gathered, it’s time to unleash your creativity and transform plain white vinyl into a vibrant, watercolor-inspired work of art. This process is both relaxing and incredibly rewarding, allowing for personal expression at every turn. Follow these steps to create your own unique faux watercolor vinyl designs:
Step 1: Preparing Your Vinyl Canvas
Begin by cutting a piece of white craft vinyl to a manageable size, slightly larger than your intended design. Ensure the surface is clean and free of dust or oils, which could hinder color application. You can lightly secure the vinyl to a flat, stable surface with painter’s tape to prevent it from shifting while you work, though holding it steady with one hand usually suffices.
Step 2: Laying Down Your Base Colors with Colored Pencils
This is where the magic begins. Select your coordinating colored pencils and start applying color to the vinyl. The key here is a soft touch; you’re not trying to create opaque blocks of color. Instead, use light, gentle strokes to layer the colors. Think about the flow and diffusion of watercolor paint on paper. You can:
- **Create Linear Designs:** As in the example, soft, parallel lines or crisscrossing patterns can mimic brushstrokes.
- **Draw Organic Shapes:** Experiment with circles, waves, swirls, or abstract blobs, allowing colors to overlap and blend naturally.
- **Build Gradients:** Start with a light shade, then gradually add darker tones over it, creating a smooth transition between colors. The vinyl’s slick surface allows for easy layering and blending with pencils.
Don’t be afraid to experiment with pressure; varying your pressure will create lighter and darker areas, adding depth to your design. Keep layering and blending your colored pencils until you are happy with the intensity and overall design. Remember, the goal is a soft, somewhat translucent appearance, not a solid, opaque coloring.
Step 3: Introducing the Watercolor Effect with Pastels
Once your colored pencil base is in place, it’s time to bring in the chalk or oil pastels to achieve that signature watercolor blend and diffusion. Take a small piece of pastel (or rub a cotton swab onto the pastel to pick up color) and lightly apply wisps of it over the colored pencil areas. Focus on the transition points between colors or areas where you want a softer, blurred look.
Immediately after applying the pastel, take a clean cotton ball, cotton swab, or even your fingertip, and gently smudge and blend the pastel into the colored pencil. Use small, circular motions and a very light hand. The pastel will soften the harsh lines of the colored pencil and create a hazy, cloud-like effect, mimicking the way water spreads pigment. Be careful not to over-blend; a little goes a long way. If you find you’ve added too much pastel, you can often gently lift some of the color with a clean, dry cotton ball or a kneaded eraser.
Step 4: Refining Your Artwork (Optional)
Step back and assess your creation. Do you want more depth? Add another layer of colored pencil. Do you need more softness? Apply a tiny bit more pastel and blend. This iterative process allows you to fine-tune your design until it perfectly captures the watercolor aesthetic you envisioned. Allow the vinyl to sit for a few minutes, especially if you used oil pastels, to let the colors settle.
Step 5: Precision Cutting with Your Craft Machine
Now that your vinyl is a canvas of beautiful, blended colors, it’s ready for your cutting machine. Carefully place your custom-colored vinyl onto your cutting mat, ensuring it adheres well without wrinkles. Load the mat into your Silhouette or Cricut machine.
In your machine’s design software, load or create the design you wish to cut. Make sure your cut settings are appropriate for the type of vinyl you are using (e.g., regular craft vinyl, not heat transfer). A standard vinyl setting with a clean, sharp blade usually works well. Perform a test cut if you’re unsure. Once the settings are correct, send your design to cut.
Step 6: Weeding and Applying Your Faux Watercolor Design
After your machine finishes cutting, carefully remove the vinyl from the mat. Using your weeding tools, remove all the excess vinyl around and within your design. Take your time with this step to ensure all small pieces are removed, revealing your intricate artwork.
Finally, apply transfer tape over your weeded design, pressing firmly to ensure it adheres. Slowly peel the transfer tape, lifting your faux watercolor vinyl design off its backing. Position your design onto your desired project surface, press down firmly, and then carefully peel back the transfer tape, leaving your unique, watercolor-inspired vinyl decal in place. Voila! You have a lovely, unique look!
Unleashing Creativity: Project Ideas and Applications for Faux Watercolor Vinyl
The beauty of this faux watercolor vinyl technique lies not only in its ease but also in its incredible versatility. Once you’ve mastered the art of coloring and blending on vinyl, a world of creative possibilities opens up. Here are some inspiring project ideas where your unique faux watercolor vinyl designs can truly shine:
Personalized Gift Tags and Labels
As demonstrated in the original example, this technique is perfect for creating exquisite, personalized gift tags. Imagine a beautifully colored tag for a secret sister gift, or unique labels for homemade treats, jams, or candles. The watercolor effect adds a touch of bespoke charm that makes any gift feel extra special and thoughtfully prepared. You can match the colors to the gift’s contents or the recipient’s favorite hues, like the vibrant purple tin shown.
Custom Home Decor Accents
Elevate your living space with custom-designed wall decals, picture frame accents, or decorative elements for vases and planters. A large floral design with soft watercolor blends could create a stunning focal point on a wall, or delicate geometric patterns could adorn a simple glass vase, transforming it into an art piece. You could even create personalized quotes or phrases with a unique artistic backdrop for bedroom or office decor.
Unique Drinkware and Kitchen Items
Personalize mugs, tumblers, water bottles, and even storage canisters with your faux watercolor vinyl. A swirling blend of blues and greens could evoke a serene ocean feel on a travel mug, or bright, playful colors could make a child’s water bottle truly their own. Just ensure you use permanent vinyl for items that will be washed, and always handwash to preserve your beautiful artwork.
Handmade Cards and Stationery
Take your card-making to the next level by incorporating faux watercolor vinyl cutouts. Whether it’s an intricate floral design for a birthday card, a whimsical shape for a baby shower invitation, or an elegant monogram for thank-you notes, the unique texture and color blend will make your stationery unforgettable. You can layer the vinyl over cardstock for a multi-dimensional effect.
Journal Covers and Planner Decorations
Add an artistic touch to your daily journaling or planning routine. Cut intricate patterns, inspiring words, or abstract designs from your colored vinyl and apply them to the covers of notebooks, journals, or planners. This instantly personalizes your everyday items and makes them a joy to use. Small vinyl elements can also be used inside planners for decorative flair.
Seasonal and Holiday Decorations
From delicate snowflake designs with icy blue and silver blends for winter holidays to vibrant floral patterns for spring wreaths, this technique is perfect for creating custom seasonal decor. Imagine ghost or pumpkin shapes with eerie, blended purples and oranges for Halloween, or festive ornaments with shimmering reds and greens for Christmas. The possibilities are endless for making your holiday celebrations uniquely yours.
The beauty of faux watercolor vinyl lies in its ability to marry the soft, expressive quality of traditional art with the crisp, clean precision of modern cutting machines. Each project you undertake will not only be a testament to your creativity but also a cherished, personalized item that brings joy to both the maker and the recipient.
Tips for Success in Your Faux Watercolor Vinyl Projects
To ensure your faux watercolor vinyl projects turn out beautifully every time, keep these practical tips in mind:
- **Practice on Scraps:** Before committing to a large piece of vinyl, experiment with color combinations and blending techniques on smaller scraps. This helps you get a feel for how the pencils and pastels interact with the vinyl.
- **Start Light, Build Up Color:** It’s easier to add more color than to remove it. Begin with light layers of colored pencil and pastel, gradually building up the intensity until you reach your desired vibrancy and depth.
- **Experiment with Color Combinations:** Don’t be afraid to try unusual color pairings. Some of the most stunning watercolor effects come from unexpected blends.
- **Use a Light Hand for Blending:** When blending with pastels and cotton balls, apply very gentle pressure. Too much force can remove the colored pencil layers beneath or create uneven patches.
- **Clean Blending Tools Regularly:** If you’re using cotton balls or your fingers, swap them out or clean them between colors to avoid muddying your blends.
- **Protect Your Workspace:** Pastels can be a bit messy. Lay down a protective sheet or newspaper to keep your work surface clean.
- **Store Finished Vinyl Flat:** If you’re not immediately cutting your design, store the colored vinyl flat to prevent creasing, which could affect the applied colors.
Conclusion: Embrace Your Inner Artist with Faux Watercolor Vinyl
Who knew achieving that dreamy watercolor aesthetic could be so accessible and enjoyable? This innovative faux watercolor vinyl technique bridges the gap between traditional artistry and modern crafting, allowing you to create stunning, painterly designs without the need for specialized painting skills or expensive art supplies. We’ve explored how simple it is to transform plain white vinyl into a canvas of soft, blended hues using just colored pencils, pastels, and the precision of your craft cutting machine.
From personalized gift tags like the delightful purple-themed creation for a secret sister at the SNAP conference, to intricate home decor accents and custom stationery, the possibilities for expressing your creativity are truly boundless. This method offers the perfect blend of artistic freedom and meticulous detail, ensuring every project you undertake is both unique and professional-looking. So, gather your materials, follow these easy steps, and prepare to be inspired by the beautiful results you can achieve. Don’t let a lack of traditional watercolor experience hold you back any longer. Dive into the world of faux watercolor vinyl and unleash your inner artist!







