
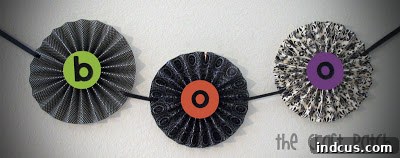
Welcome to a world of charming craftsmanship and simple elegance! Have you ever wanted to create stunning decorations that are both easy on the wallet and incredibly satisfying to make? Join us as we dive into the delightful craft of making accordion-folded paper flowers – a project that promises endless creative possibilities and a touch of handmade charm for any occasion. Inspired by a wonderful Ladie’s Night at a local craft shop, we’re thrilled to share this straightforward tutorial that transforms ordinary scrapbook paper into beautiful, versatile floral accents. Get ready to impress your friends, decorate your home, or create memorable gifts with these adorable, easy-to-make paper blossoms!
Unlock Your Creativity: The Enduring Charm of DIY Accordion Fold Paper Flowers
Paper flowers have captivated crafters and decorators for centuries, offering an accessible and sustainable way to add beauty to our lives. Among the vast array of paper flower techniques, the accordion fold stands out for its simplicity, speed, and the surprisingly intricate results it yields. Whether you’re a seasoned crafter looking for a quick project or a beginner eager to dip your toes into the world of DIY decorations, these paper flowers are an absolute joy to create. They demand minimal materials, require no complex skills, and yet offer a stunning visual impact that belies their humble origins. From festive banners to elegant home accents, these handmade paper flowers are a testament to the magic that unfolds when paper meets imagination.
Why Choose DIY Paper Flowers for Your Next Project?
Beyond their aesthetic appeal, crafting your own paper flowers comes with a myriad of benefits. Firstly, they are incredibly cost-effective. Utilizing scrapbook paper, which is often found on sale or in your existing craft stash, allows you to create high-impact decor without breaking the bank. Secondly, the versatility is unmatched. You can customize every aspect – from the paper’s pattern and color to the size and embellishments – ensuring your creations perfectly match your theme or decor. Unlike fresh flowers, paper flowers last indefinitely, making them ideal for long-term displays, gifts, or keepsakes. They are also hypoallergenic, mess-free, and an environmentally conscious choice. This tutorial will empower you to craft beautiful, durable decorations that reflect your personal style, bringing a unique touch to any space or celebration.
What You’ll Need: Gathering Your Crafting Essentials
Before we embark on this exciting crafting journey, let’s gather all the necessary materials. For each individual circular paper flower, you will need the following:
- Two 2×12 inch strips of identical scrapbook paper: The foundation of your flower. Choose a paper that is not too thick (heavy cardstock can be difficult to fold) nor too thin (like printer paper, which might lack structure). Scrapbook paper, typically 65-80lb weight, is perfect. The identical design ensures a cohesive look, but feel free to experiment with complementary patterns for a more dynamic effect. Think about the final aesthetic – vibrant colors for a party, muted tones for home decor, or seasonal patterns for holiday themes.
- Two 2-inch circles of coordinating paper: These circles serve a dual purpose: they act as the “caps” that hold your accordion pleats together and provide a neat, finished center for your flower. Choose a paper color or pattern that complements your main strip paper. You can cut these by hand, use a circle punch, or even employ a cutting machine for perfect circles.
- Hot glue gun and glue sticks: Essential for quickly and securely attaching the central circles. Hot glue provides an instant bond, crucial for holding the paper pleats flat. Always exercise caution when using a hot glue gun, especially around children. As an alternative, strong craft glue or double-sided tape can be used, though they may require longer drying/setting times.
- Clear tape: Standard clear Scotch tape works wonderfully for joining your paper strips. Ensure it’s strong enough to hold the strips securely without detaching during the folding process. Washi tape, while decorative, might not offer the same level of adhesive strength required for this step.
- Scoring tool (optional but highly recommended): This tool is a game-changer for achieving crisp, professional-looking folds. Whether it’s a dedicated scoring board with a bone folder, or a scoring blade attachment on your paper cutter, it helps create deep indentations in the paper, making folding effortless and precise. If you don’t have one, you can lightly score with the back of a butter knife and a ruler, but be gentle to avoid tearing.
- Scissors or paper cutter: For precise cutting of your paper strips and circles. A paper cutter is ideal for creating perfectly straight edges on your 2×12 inch strips.
Step-by-Step Guide: Crafting Your Accordion Paper Flower Masterpiece
1. Preparing Your Paper Strips with Precision Scoring
The first step to a perfect accordion flower is preparing your paper strips. Take your two 2×12 inch scrapbook paper strips. This is where your scoring tool truly shines! Scoring involves creating a visible crease line on your paper, which guides your folds and makes them incredibly sharp and uniform. Using your scoring board or paper cutter with a scoring blade, create lines every half inch along the entire length of both strips. Consistency is key here; precise 1/2-inch intervals will ensure your pleats are even and your flower folds beautifully. If you’re scoring by hand, use a ruler and a bone folder (or the dull side of a knife) to gently press along the lines. This meticulous preparation prevents ragged folds and ensures your finished flower has a clean, professional appearance. Once scored, gently fold each strip along these lines, alternating the direction of the fold (like an accordion or fan), until both strips are fully pleated.
2. Forming the Foundation: Taping Your Strips into a Circle
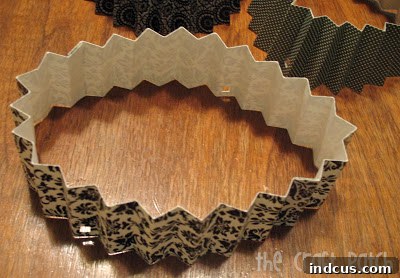
Now that your strips are beautifully pleated, it’s time to assemble them into a cohesive unit. Take your two 2×12 inch accordion-folded strips. Using a small piece of clear tape, securely join the short end of one strip to the short end of the other, forming one long, continuous pleated strip. Ensure the pleats align perfectly at the seam. Next, bring the two remaining short ends of this long strip together, forming a complete circle. Overlap the last pleat from each end and tape them firmly together. This creates a pleated paper ring or cylinder. Make sure the tape is secure and the connection is strong, as this ring will be under a bit of tension during the next crucial step. The goal is to have a robust, closed circle of evenly spaced accordion pleats.
3. The Magic Moment: Collapsing Your Circle into a Flower
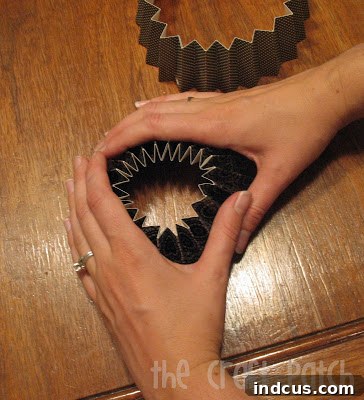
This is arguably the most exciting part of the process – watching your pleated ring magically transform into a flat, circular flower! Hold the paper ring upright. Now, gently squeeze one edge of the paper circle towards the center. As you apply pressure, the opposite edge will naturally ‘pop’ outwards, and the entire pleated structure will collapse downwards and flatten out into a beautiful, radial flower shape. It’s like watching a fan gracefully fold itself. This action pulls all the pleats inward towards the center, creating the characteristic accordion flower appearance. If it doesn’t lay perfectly flat on the first try, gently adjust the pleats and press down evenly until your flower is fully open and flat. This step is a delightful revelation of the accordion folding technique.
4. Securing the Shape: Attaching the Central Circles
Once your accordion flower has collapsed into its flat, circular form, it’s essential to secure it so it maintains its shape. This is where your two 2-inch coordinating paper circles come into play. Apply a small amount of hot glue to the center of one of your coordinating circles. Carefully center this circle over the collapsed pleats on one side of your paper flower and press down firmly. Hold it in place for a few seconds until the glue sets. Flip your flower over and repeat the process on the other side with the second coordinating paper circle. These circles act as anchors, holding all the pleats neatly in place and preventing the flower from springing back into its ring shape. They also give your flower a polished, finished look, covering the central joint where all the pleats meet.
5. Embellish and Personalize: Unleashing Your Creativity
Your accordion paper flower is now structurally complete, but the real fun begins with embellishment! This is where you can truly let your imagination soar and customize your creation to suit any theme, occasion, or personal taste. The possibilities are truly boundless.
Ideas for Embellishing Your Paper Flowers:
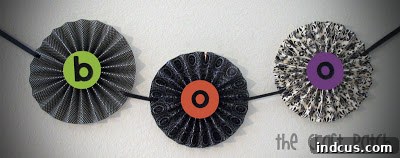
- Festive Banners: Just like the “Boo” banner that inspired this tutorial, these flowers make exceptional banner elements. Punch a small hole on two opposite sides of each flower (or simply glue them onto a ribbon) and string them onto a ribbon, twine, or jute string. Spell out names for birthday parties, “Happy Holidays” for seasonal decor, or create thematic banners for baby showers, graduations, or anniversaries. The versatility in colors and patterns allows for endless banner combinations.
- Home Decor Accents: Elevate your living space by incorporating these charming flowers. They can be arranged in a bowl as a unique centerpiece, adhered to a wreath for added texture and color, or even used to create a stunning dimensional wall art display. Imagine a cluster of these flowers in varying sizes and shades adorning a blank wall, adding depth and artistic flair.
- Party & Event Enhancements: From birthday parties to weddings, paper flowers are a fantastic addition. Use them as captivating table scatters, unique place card holders, or as delightful cupcake toppers (attach them to a toothpick). They can also be integrated into balloon garlands or used to decorate gift tables, adding a cohesive and celebratory touch to your event.
- Gift Toppers & Tags: Forget generic bows! A handmade accordion paper flower makes for a truly special gift topper. Attach it directly to wrapped gifts or use it as an elaborate tag. You can even write a message on the back of the central circle for a personalized touch.
- Personalized Touches: Go beyond just paper. Adorn the center of your flowers with glitter, rhinestones, pearl stickers, buttons, or small charms. Layer a smaller, contrasting paper circle or a die-cut shape in the center. For a truly unique touch, consider printing a small photo to adhere to the center for a sentimental keepsake. The possibilities for customization are limited only by your imagination!
Think about the season or occasion: vibrant reds and greens for Christmas tree ornaments, warm oranges and browns for Fall wreaths, delicate pastels for a baby’s nursery, or bold, bright colors for a summer celebration. Each choice transforms the flower’s personality, making it a truly adaptable piece of decor.
Scaling Your Creations: Making Bigger or Smaller Flowers
One of the most appealing aspects of this paper flower craft is its incredible scalability. You are not limited to the 2×12 inch strip size; you can easily adjust the dimensions to create flowers that are significantly larger or delightfully miniature. However, there’s a crucial tip to remember when upsizing your flowers to ensure they fold correctly and maintain their beautiful shape.
If you wish to make larger flowers, simply cut your paper strips wider (e.g., 3×12 inches, 4×12 inches, or even 6×12 inches) and potentially longer if you want a fuller flower. The key consideration for larger flowers is the number of strips you use. For a standard 2-inch wide flower, two 12-inch strips taped together (making a 24-inch circumference) work perfectly. However, for wider strips, the circumference of the circle becomes much larger, and the tension needed to collapse it flat increases. Therefore, for wider strips (e.g., 3 inches or more), you will typically need three or even four 12-inch strips taped together to form the circle. This provides more pleats and sufficient paper length to allow the flower to collapse evenly and lay flat without tearing or struggling. Experiment with your chosen paper width and length, and adjust the number of strips until you achieve the desired effect. For smaller flowers, you can reduce both the width and length, perhaps using 1×8 inch strips, and two strips will likely suffice.
Pro Tips for Perfect Paper Flowers
- Invest in a Scoring Tool: While not strictly mandatory, a scoring board or scoring blade makes a world of difference in the crispness and uniformity of your folds, leading to a much more professional-looking finished product.
- Experiment with Paper: Don’t be afraid to try different types of paper. While scrapbook paper is ideal, you could use patterned cardstock (if not too thick), old book pages for a vintage look, or even decorative wrapping paper for unique textures and designs.
- Safety First with Hot Glue: Always be mindful when using a hot glue gun to avoid burns. Small dots of glue are usually sufficient and prevent excess glue from oozing out.
- Embrace Imperfection: Remember, crafting is about enjoyment and self-expression. Don’t stress if your first flower isn’t absolutely perfect. Each creation is unique, and with practice, your skills will naturally improve.
Conclusion: Your Journey into DIY Paper Crafting
And there you have it – a comprehensive guide to crafting stunning accordion-folded paper flowers! We hope this tutorial has ignited your creative spark and provided you with all the knowledge to create beautiful, versatile decorations. From humble paper strips to captivating floral accents, this project is a testament to the joy and simplicity of DIY crafting. Whether you’re making a festive banner, decorating for a special event, or simply adding a touch of handmade warmth to your home, these paper flowers are sure to delight. So, gather your materials, unleash your creativity, and start folding. Happy crafting!







