
Your Ultimate Guide to Stress-Free Carpet Installation: Transforming Your Home
The final touches of our craft room remodel are almost complete, and the excitement is palpable! The recent carpet installation has truly transformed the space, adding a layer of comfort and style that makes the room feel incredibly inviting. While the full room reveal isn’t quite ready yet, I’m thrilled to share a sneak peek at the stunning results later in this post, along with a detailed walkthrough of my entire carpet shopping and installation experience.
As a first-time carpet buyer, navigating the process felt a bit daunting initially. There were so many options, so many steps, and so much to learn. That’s why I’ve put together this comprehensive guide: to demystify the journey for you. Whether you’re upgrading an old floor, finishing a new build, or simply exploring options for a cozier space, this guide will walk you through everything you need to know, from selecting the perfect carpet to understanding the installation day itself. By the end, you’ll be well-equipped to make informed decisions and enjoy a smooth, successful carpet upgrade.
Why Upgrade Your Flooring with New Carpet?
Beyond aesthetic appeal, new carpet offers a wealth of benefits that can significantly enhance your living environment. Understanding these advantages can help solidify your decision and guide your selection process:
- Unparalleled Comfort: There’s nothing quite like the soft, warm feeling of carpet underfoot. It adds a luxurious comfort to any room, making spaces like bedrooms, living rooms, and yes, even craft rooms, more enjoyable and relaxing.
- Enhanced Insulation: Carpet acts as an excellent insulator, helping to retain warmth in your home during colder months and reducing energy bills. It also provides a thermal barrier that can keep rooms cooler in warmer climates by preventing heat transfer from the subfloor.
- Superior Sound Dampening: Hard surfaces can create echo-filled rooms, but carpet effectively absorbs sound. This feature is particularly beneficial in multi-story homes, busy family rooms, or spaces where quiet concentration, like a craft room, is desired. It reduces ambient noise and creates a more peaceful atmosphere.
- Improved Air Quality: While some might think carpet traps allergens, modern carpets are designed to trap dust, pollen, and other airborne particles, holding them until they can be vacuumed away. This can actually improve indoor air quality compared to hard surfaces where particles remain airborne. Regular vacuuming is key.
- Safety and Slip Resistance: Carpet provides a softer landing in case of falls, which is a major advantage for homes with children, the elderly, or pets. Its non-slip surface also reduces the risk of slips and trips.
- Aesthetic Versatility: With an immense variety of colors, patterns, textures, and pile heights, carpet offers endless design possibilities. It can be a foundational element that ties a room together, complementing your decor and reflecting your personal style.
Step 1: Selecting the Perfect Carpet – A Foundation for Your Home
Choosing the right carpet is arguably the most crucial step in the entire process. It’s an investment in your home’s comfort, style, and longevity. My experience at Carpet One was incredibly insightful, largely due to their knowledgeable staff who guided me through the vast array of options. They truly understood the nuances of different carpet types and materials, which is invaluable when you’re making such a significant decision.
Understanding Carpet Types and Materials
Before diving into colors and patterns, it’s essential to understand the basic types and materials available:
- Carpet Types:
- Loop Pile: Known for its durability and resistance to crushing, loop pile carpets like Berber are ideal for high-traffic areas. The loops can be uniform or varied, creating different textures.
- Cut Pile: This is the most popular style, where the loops are cut, creating an upright pile. Examples include Saxony (velvety smooth), Frieze (shaggy, hides footprints well), and Plush (dense, formal look).
- Cut and Loop: A combination of cut and looped yarns, creating sculpted patterns and textures.
- Carpet Materials (Fibers):
- Nylon: Extremely durable, resilient, and resistant to wear and tear. Excellent for high-traffic areas and comes in many colors.
- Polyester: Known for its luxurious feel, vibrant colors, and good stain resistance (especially against water-soluble stains). Less resilient than nylon.
- Olefin (Polypropylene): Highly resistant to moisture, mildew, and fading. Often used for outdoor carpets or basements. Less durable and resilient than nylon.
- Wool: A natural fiber prized for its softness, durability, and natural stain resistance. It’s also eco-friendly but typically comes at a higher price point.
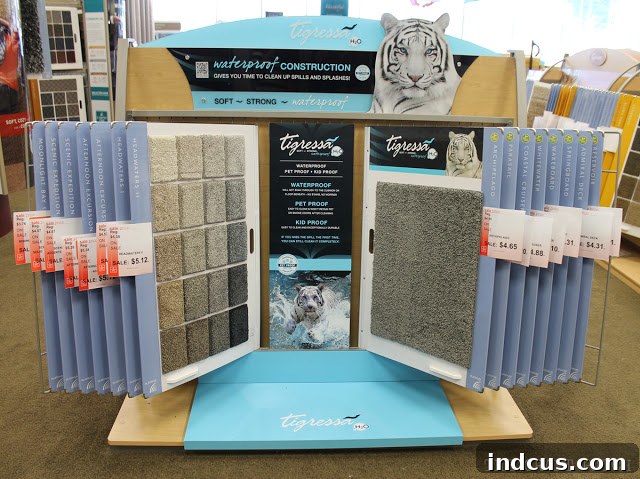
- Triexta (SmartStrand/Tigressa H2O): This is what I specifically sought out! Triexta fibers, like those in Tigressa H2O, offer exceptional durability, permanent stain resistance (often built into the fiber, not just a treatment), and softness. They are a fantastic choice for homes with kids and pets, as highlighted in this review. Its water-resistant backing is a game-changer for moisture-prone areas or accident-prone households.
The Importance of Samples and Lighting
Having a specific carpet in mind, like the Tigressa H2O, made narrowing down the initial choices much easier. However, even within a specific product line, there are numerous styles and colors. After selecting a medium-length loop style within a comfortable price range, Carpet One provided us with a sample board. This step is absolutely critical!
Taking samples home allows you to:
- Observe in Different Lighting: Carpet colors can look drastically different under fluorescent store lights versus your home’s natural light or evening lamps.
- Match Existing Decor: Hold the samples against your wall colors, furniture, and other finishes to ensure cohesion. What looks great in isolation might clash in your actual space.
- Live with It: Give yourself a day or two to see how you feel about the color. For my craft room, we chose “Gingersnap,” a versatile shade that beautifully balances gray and tan tones. It’s a color that truly complements almost anything and adds a contemporary, yet warm, feel to the room.
Padding: The Unsung Hero of Carpet Installation
While often overlooked, the carpet padding beneath your new carpet is just as important as the carpet itself. High-quality padding extends the life of your carpet, provides additional comfort, and improves insulation and sound absorption. Discuss padding options with your supplier to ensure it matches your carpet choice and meets your needs for durability and comfort. Investing in good padding can significantly impact the feel and longevity of your new carpet.
Once we made our final decision, confirming “Tigressa H2O Headwaters I in Gingersnap,” we returned the sample board, ready to move to the next stage.
Step 2: Professional Measurement – Precision for a Perfect Fit
Even if you’re handy with a tape measure, professional measurement is a non-negotiable step for carpet installation. A couple of days after our selection, a technician from the store visited our home. In just about 10 minutes, he meticulously sketched out the room, noting all dimensions, angles, and potential seam locations. While it seemed quick, his expertise ensured that we would order precisely the right amount of carpet, minimizing waste and ensuring a seamless installation.
Here’s why relying on professionals for measurement is crucial:
- Accuracy: Professionals account for room irregularities, doorways, and closets that a DIY measurement might miss, ensuring every corner is covered without awkward gaps.
- Seam Placement: They strategically plan seam locations to be as inconspicuous as possible, crucial for a professional finish and maximizing the visual appeal of your new carpet.
- Waste Reduction: Expert measurement helps prevent over-ordering (saving you money) or under-ordering (avoiding delays and potential color discrepancies if a new dye lot is needed). This precision is key to a cost-effective project.
- Warranty Protection: Many carpet warranties require professional measurement and installation to be valid. Following this step protects your investment.
Step 3: Ordering and Scheduling – Bringing Your Vision to Life
With the measurements complete, the ordering process was straightforward. We finalized the order for our chosen carpet, and the store provided an estimated arrival time of 1-2 weeks. To our delight, it arrived even sooner, in about a week! As soon as the carpet reached the store, they promptly called us to schedule the installation day, making the transition from selection to installation smooth and efficient.
During this phase, remember to:
- Confirm All Details: Double-check the carpet style, color, padding type, and total quantity ordered. Any discrepancies should be addressed immediately.
- Understand Lead Times: Be aware that custom orders or specific styles might have longer lead times. Plan your project accordingly, especially if you have a specific deadline.
- Discuss Delivery and Storage: If you need to store the carpet for a short period, discuss options with your supplier. Proper storage prevents damage before installation.
- Finalize Payment and Warranty: Clarify payment terms and ensure you understand the manufacturer’s warranty for your carpet and padding, as well as any installation guarantees.
Step 4: Installation Day – The Transformation Unfolds
This is arguably the most exciting part of the entire process – watching your new carpet come to life! On our scheduled day, a professional father-son installation team, Steve and Greg, arrived promptly. Their efficiency, professionalism, and respect for our home were truly commendable. They worked diligently, cleanly, and even tidied up after themselves, leaving us with nothing but a beautifully carpeted room.
Preparing Your Room for Installation: What You Need to Do
While the installers handle the heavy lifting, there are a few crucial steps you must complete beforehand to ensure a smooth and efficient installation:
- Clear the Room Completely: All furniture, decor, and personal items must be removed from the room. This includes emptying closets if they are also being carpeted. This gives the installers a clear, unobstructed workspace and prevents damage to your belongings.
- Remove Old Flooring (Optional but Recommended for DIY): If you’re replacing existing carpet, you can often save on installation costs by removing the old carpet and padding yourself. However, ensure you know how to safely dispose of it and handle the tack strips. If you prefer, most installers offer old carpet removal as part of their service.
- Prepare the Subfloor: The subfloor must be clean, dry, and free of any debris, lumps, or pits. For our concrete floor, this involved patching several holes and scraping off dried drywall mud splatters. A smooth subfloor is essential for a uniform and long-lasting carpet installation.
- Install Baseboards (if applicable): If you’re installing new baseboards, they should ideally be installed about 3/8″ above the finished subfloor before the carpet layers arrive. This gap allows the carpet to be tucked neatly underneath for a clean finish.
- Provide a Workspace: Installers will need a designated area, typically just outside the room being carpeted, to lay out their tools, cut carpet, and temporarily store debris. For us, the family room down the hall served this purpose perfectly, keeping the main work area focused.
What to Expect During Installation
The actual installation process is fascinating to watch. For an average-sized bedroom with two experienced installers, the process typically takes around 1.5 hours. They will meticulously unroll the padding, secure it, then cut and stretch the carpet using specialized tools to ensure it lies flat and taut. Stretching is crucial to prevent wrinkles and extend carpet life. Seams are carefully joined and often sealed to prevent fraying and enhance durability. The edges are then tucked under the baseboards for a clean, finished look.
Witnessing the transformation happen so quickly is truly satisfying. While I don’t have the video to share here, imagine seeing the room go from bare subfloor to beautifully carpeted in a matter of seconds!
Post-Installation Care and Maintenance
Once your new carpet is installed, a little care goes a long way in preserving its beauty and extending its life. Proper maintenance is key to protecting your investment and keeping your home looking fresh:
- Initial Vacuuming: Give your new carpet a thorough vacuuming within 24 hours to remove any loose fibers from the manufacturing and installation process. This is normal and helps settle the pile.
- Manufacturer’s Guidelines: Always refer to the specific care instructions provided by your carpet manufacturer. Different fibers and constructions may have unique cleaning recommendations to ensure longevity and warranty compliance.
- Regular Vacuuming: Frequent vacuuming (2-3 times a week, more in high-traffic areas) is crucial to prevent soil buildup and maintain the carpet’s appearance. Use a vacuum with strong suction and a rotating brush for optimal cleaning.
- Prompt Spill Cleanup: Address spills immediately. Blot, don’t rub, with a clean white cloth. Rubbing can spread the stain and damage carpet fibers. Use appropriate cleaning solutions recommended by your carpet manufacturer for best results.
- Professional Cleaning: Schedule professional deep cleaning every 12-18 months to remove embedded dirt and refresh your carpet’s fibers. This also often helps maintain your warranty and significantly extends the life of your carpet.
- Use Doormats: Place doormats at all entrances to trap dirt and moisture before it tracks onto your carpet. Consider both indoor and outdoor mats for maximum effectiveness.
- Rearrange Furniture: Periodically shift heavy furniture a few inches to prevent permanent indentations in the carpet pile.
A Glimpse into the Finished Craft Room
The craft room is now incredibly close to being fully finished! All that remains are the installation of the closet shelving and the closet doors. Of course, as with any home renovation project, we’ve encountered a few minor snags, so it might be a couple more days until the grand reveal. But to tide you over, here’s an exclusive sneak peek at the gorgeous new carpet, which has truly elevated the entire space:
Swoon. Isn’t it just beautiful? I am absolutely thrilled with how it turned out! The color, the texture, the immediate warmth it adds—it’s everything I envisioned for this creative haven.
Ready to Transform Your Space?
Embarking on a carpet installation project can seem overwhelming, but by breaking it down into manageable steps and leveraging professional expertise, it becomes an exciting journey of transformation. From the initial selection of the perfect fiber and color to the meticulous professional installation, each stage plays a vital role in achieving a comfortable, stylish, and long-lasting floor.
I hope this detailed account of my own experience, coupled with practical advice, empowers you to confidently approach your next carpet upgrade. Don’t hesitate to visit your local flooring experts, armed with this knowledge, to start planning your own stunning carpet transformation. A cozy, beautiful, and inviting space awaits!







