
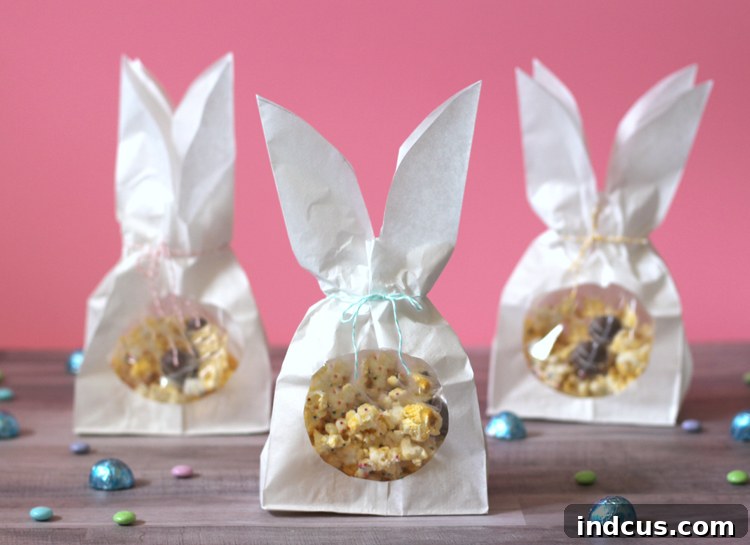
As the vibrant hues of spring begin to paint the world and the anticipation of Easter fills the air, there’s no better time to immerse yourself in charming, handmade creations. Today, we’re thrilled to guide you through a delightful project: crafting adorable **Easter bunny treat bags** and filling them with a scrumptious homemade “Bunny Bait” popcorn snack mix. This tutorial promises both fun and ease, resulting in captivating little sacks that are perfect for sharing joy. Imagine presenting these charming packages to friends, colleagues, or your children’s beloved teachers—they’re an ideal way to celebrate the season of renewal and generosity. Forget generic store-bought gifts; these personalized treat bags offer a heartwarming touch that truly embodies the spirit of Easter.
You’ll be pleasantly surprised at how quickly these charming bunny sacks come together, requiring just a few simple supplies for both the craft and the snack. Our irresistible “Bunny Bait” popcorn mix is not only incredibly easy to prepare but also irresistibly delicious, making it the perfect sweet and salty filling for your handmade gifts. Let’s dive into creating these wonderful Easter surprises!
Delicious “Bunny Bait” Popcorn Mix: The Perfect Easter Treat
Every adorable treat bag needs an equally delightful filling, and our “Peanut Butter Egg Bunny Bait” delivers on all fronts. This sweet and savory popcorn mix is a crowd-pleaser, combining classic flavors with festive flair. It’s incredibly simple to make, requiring minimal fuss for maximum deliciousness. Here’s what you’ll need to create this addictive snack that everyone will love.
Peanut Butter Egg Bunny Bait Recipe
This recipe yields a generous batch of delicious popcorn mix, perfect for filling multiple treat bags or sharing in a large bowl at your Easter gathering. Feel free to adjust quantities based on how many treat bags you plan to make or how much snack you want to have on hand.
- 1 Bag Microwave Popcorn: Choose a plain or lightly salted variety to best complement the sweet additions.
- 10 Dove Peanut Butter Eggs or other chocolate candy of your choice: The peanut butter eggs add a rich, creamy, and distinctively Easter flavor. However, feel free to experiment with M&M’s, mini chocolate eggs, or chopped chocolate bars if you prefer.
- 1/2 Cup Miniature Marshmallows: These soft, chewy morsels add a delightful texture and extra sweetness, mimicking tiny bunny tails.
- 2 Squares White Almond Bark: Also known as confectionery coating, almond bark melts smoothly and sets quickly, creating a perfect glaze to hold everything together. White chocolate chips or melting wafers can be used as alternatives.
- Colorful Sprinkles: A generous amount of festive sprinkles adds vibrant color and a celebratory touch, making the “Bunny Bait” truly pop. Opt for pastel Easter-themed sprinkles for an extra seasonal touch.
Preparation Instructions for Your Irresistible Bunny Bait:
- Pop the Popcorn: Begin by popping the bag of microwave popcorn according to package directions. Once popped, carefully open the bag and spread the popcorn out on a large baking sheet lined with wax paper or parchment paper. This liner will prevent sticking and make cleanup a breeze. Take a moment to pick out any unpopped kernels to ensure every bite is enjoyable.
- Add the Sweet Fillings: Unwrap the Dove Peanut Butter Eggs (or your chosen chocolate candies) and distribute them evenly over the warm popcorn. If you prefer smaller pieces or want the flavor more integrated, you can chop the eggs before scattering them. Next, sprinkle the miniature marshmallows evenly across the popcorn mixture. The residual warmth from the popcorn will slightly soften them, adding to the delightful texture.
- Melt the Almond Bark: Break the white almond bark into squares and place them in a microwave-safe bowl. Heat in the microwave in 30-second intervals, stirring well after each interval, until completely melted and smooth. Be careful not to overheat, as white chocolate can seize.
- Drizzle and Decorate: Once the almond bark is melted, drizzle it generously and evenly over the popcorn mix. Work quickly, as it sets fairly fast. While the white chocolate is still wet and glossy, liberally shower the entire mixture with colorful sprinkles. The more, the merrier, for a truly festive look!
- Cool and Serve: Allow the mixture to cool completely at room temperature or, to speed up the process, place the baking sheet in the refrigerator for about 10-15 minutes until the almond bark has fully hardened. Once cooled, break the “Bunny Bait” into delightful clumps. It’s now ready to be enjoyed as a standalone snack or packaged into your charming Easter bunny treat bags.
Crafting Adorable Easter Bunny Treat Bags
Now that you have your delicious “Bunny Bait” ready, it’s time to create the charming packaging that will make your Easter gifts truly unforgettable. These **DIY Easter bunny treat bags** are not only incredibly cute but also surprisingly simple to assemble, making them a fantastic craft project for all ages. Imagine the delight on someone’s face when they receive a handmade bag shaped like a sweet bunny, peeking out with treats inside. Let’s gather our materials and bring these little bunnies to life!
Easter Bunny Treat Bags
Supplies Needed for Your Bunny Bags
Before you begin, gather all your materials to ensure a smooth crafting process. Most of these items are readily available at craft stores, dollar stores, or even around your home.
- White Paper Sacks: Standard lunch-sized paper bags work perfectly. Their sturdy nature provides a good base for the bunny shape. You could experiment with different colors, but white offers that classic bunny look.
- Clear Plastic Sandwich Bags: These will hold the “Bunny Bait” securely inside the paper sack, keeping the food fresh and preventing any grease from seeping through the paper. Choose ones without zippers for easier manipulation.
- Baker’s Twine or Ribbon: A cheerful length of baker’s twine or a pretty pastel ribbon will be used to tie off the bags, adding a decorative and functional element. Consider colors that complement the Easter theme.
- Clear Tape: Essential for securing the inner plastic bag and maintaining the treat bag’s shape. Standard clear office tape works best.
- Scissors: A good pair of sharp scissors will be needed for cutting the paper bags precisely to form the bunny ears and the circular window.
- Pencil (Optional, but recommended): For tracing the circle and the ear shape before cutting, ensuring accuracy.
- Circular Template (Optional): A small cup, cookie cutter, or coin can serve as a template for tracing the perfect circle.
Step-by-Step Instructions for Your Bunny Bags
Follow these simple steps to transform plain paper sacks into charming Easter bunny treat bags. Take your time with each step, and don’t be afraid to get creative!
Step 1: Create the Iconic Bunny Ears
Lay your white paper sack flat. Using your scissors, carefully cut the top part of the bag to resemble two distinct bunny ears. Imagine a soft, rounded ‘M’ shape at the top of the bag. You’ll want the ears to be tall enough to be noticeable but not so long that they become flimsy. Aim for gentle curves and a central dip that defines the two ears. Don’t worry about perfection; slightly asymmetrical ears can add to the handmade charm! Here’s a visual guide to help you achieve the perfect shape:
Step 2: Craft the Bunny’s “Window”
With the bag still flat, trace a neat circle onto the front side of the bag, roughly in the center of where the bunny’s face would be. This circle will serve as a clear “window” to showcase the colorful “Bunny Bait” inside. You can use a small glass, a cookie cutter, or even a roll of tape as a template for a perfectly round shape. Once traced, carefully cut along the traced line. Take your time with this step to ensure a clean, smooth edge for your window. This opening is where the treats will peek through, adding an element of surprise and visual appeal.
Step 3: Fill and Secure the Treats
First, prepare your clear plastic sandwich bag. Cut off the top “zip” or seal part of the sandwich bag—you want an open top for easy filling and sealing within the paper bag. Carefully fill this plastic bag with a generous portion of your homemade “Bunny Bait” popcorn mix. Don’t overfill it, as you’ll need room to maneuver it into the paper sack. Once filled, gently place the plastic bag containing the treats inside the white paper bunny bag, aligning it so the treats are visible through the circular window. Secure the plastic bag in place by applying small strips of clear tape around its edges to the inside of the paper bag. This prevents the treat bag from shifting and ensures the “Bunny Bait” is perfectly framed.
Step 4: Tie Up Your Bunny Bag
Carefully gather the paper bag together just below the base of the bunny ears, gently scrunching it to create a neck-like shape. Take a length of baker’s twine or your chosen ribbon (about 12-18 inches long is usually sufficient) and tie it securely around the gathered portion of the bag. You can make a simple knot or tie a pretty bow for an extra decorative touch. This step closes the bag and enhances the bunny silhouette, giving your treat bag its final charming appearance.
Tips for Perfect Easter Bunny Treat Bags
- Precision Cuts: For cleaner ear and window cuts, you can draw your shapes with a pencil first and then cut along the lines. Erasers can remove any visible pencil marks.
- Personalize: After the bags are assembled, consider adding extra details. You could draw a cute bunny face around the window with a marker, or even glue on a small cotton ball for a fluffy tail on the back!
- Handle with Care: Paper bags can tear, so handle them gently, especially when cutting and scrunching.
- Kid-Friendly Activity: This craft is easy enough for children to help with! Kids can assist with cutting, filling the bags, and even tying the twine (with supervision, depending on age). It’s a fantastic way to spend quality time together during the Easter season.
Creative Gifting Ideas for Your Homemade Easter Treats
These delightful **homemade Easter treats** are incredibly versatile for gifting. Beyond just friends and co-workers, consider these ideas:
- Teacher Appreciation: A sweet gesture to thank educators for their hard work.
- Party Favors: Perfect for an Easter brunch or springtime gathering.
- Neighborhood Drop-offs: Brighten your neighbors’ day with a thoughtful surprise.
- Children’s Gifts: A charming addition to an Easter basket or a fun prize for an egg hunt.
- Hostess Gift: A unique and personal touch if you’re attending an Easter celebration.
Why Choose Homemade Easter Gifts?
In a world full of mass-produced items, a handmade gift carries a special weight. These **DIY Easter gifts** communicate thoughtfulness, effort, and a personal touch that store-bought items simply can’t replicate. They’re not just treat bags; they’re expressions of care, perfect for celebrating the joy and renewal of spring. Plus, engaging in crafts like this can be a wonderfully relaxing and creative outlet, allowing you to slow down and embrace the holiday spirit.
And just like that, you’ve created your very own charming **Easter bunny treat sacks**! Isn’t this a fun and rewarding craft project? It’s simple enough that even younger crafters can participate in the assembly, making it a wonderful family activity. Whether you’re making a single bag or a whole “warren” of bunnies, these adorable creations are sure to bring smiles and delight this Easter season. Happy crafting and happy Easter!







