
The festive lights of Christmas may have dimmed, but the creative spirit it ignites often shines brightest in the quiet moments that follow. As the holiday season gracefully recedes, I’m thrilled to finally unveil a collection of personalized projects that kept my sewing machine humming throughout December. These endeavors weren’t just about crafting; they were about infusing everyday items with unique charm and transforming simple garments into wearable art, perfect for thoughtful gifting.
Unleash Your Inner Designer: Elevate Everyday T-Shirts with DIY Customization
In a world of mass-produced fashion, there’s an undeniable allure to garments that tell a story, reflecting individuality and personal style. DIY t-shirt customization offers a fantastic avenue for self-expression, allowing you to breathe new life into basic apparel or create one-of-a-kind gifts that truly resonate. Whether you’re aiming for a subtle embellishment or a bold statement piece, the possibilities are as limitless as your imagination. For my teenage sister, I sought to transform two unassuming, inexpensive t-shirts into something truly special – a concept my five-year-old daughter articulates perfectly: “everything is better when it’s fancy.” This principle guided my hands as I embarked on two distinct yet equally captivating projects designed to add a touch of handmade elegance and contemporary flair.
Project 1: Delicate Detachable Fabric Flowers – A Whimsical Touch
The first t-shirt received a charming floral transformation, designed to offer versatility and ease of care. The idea was to create embellishments that could be removed before washing, ensuring their longevity and the practicality of the garment. This approach combines the beauty of textile art with smart design, making handmade fashion both exquisite and functional.
Materials You’ll Need for Your Floral Embellishments:
- A plain t-shirt (any color you prefer, ideally one that complements your chosen fabric).
- Poly-satin fabric (or any fabric with a slight sheen and good drape, like chiffon or organza) in a coordinating or contrasting color. I found a lovely matching shade at Hobby Lobby for a fraction of a dollar – a quarter-yard goes a very long way!
- Felt fabric scraps (for the backing of the flowers).
- Sew-on brooch pins or safety pins.
- Matching thread.
- Sewing machine or needle for hand-sewing.
- Fabric scissors.
- Optional: Hot glue gun (for securing pins quickly).
Step-by-Step Guide to Crafting Detachable Fabric Flowers:
Creating beautiful fabric flowers is a rewarding process that allows for immense creativity. For this shirt, I experimented with three distinct styles to add depth and visual interest.
- Preparation is Key: Begin by washing and ironing your chosen poly-satin fabric to ensure it’s clean and wrinkle-free. Decide on the size and arrangement of your flowers on the t-shirt. Sketching a rough placement can be helpful.
- Flower Type 1: The Classic Ruffled Rose.
- Cut a strip of poly-satin, approximately 1.5 to 2 inches wide and 15-20 inches long (adjust length for desired fullness).
- Fold the strip in half lengthwise and press.
- Using a needle and thread, run a gathering stitch along the raw edge of the folded strip.
- Gently pull the thread to gather the fabric, creating ruffles.
- Starting from one end, begin rolling the gathered strip tightly to form the center of the rose, securing it with a few stitches.
- Continue coiling the ruffled strip around the center, stitching the layers together at the base as you go, until you achieve your desired rose size. Secure the end with strong stitches.
- Flower Type 2: The Elegant Layered Petal Bloom.
- Cut out several petal shapes from your poly-satin. Vary the sizes (e.g., 3 large, 4 medium, 5 small petals). You can use a template or freehand cut organic shapes.
- For each petal, lightly singe the edges with a candle flame (very carefully and quickly!) to create a subtle curl and prevent fraying. Alternatively, you can use a small, tight zigzag stitch along the edges or simply embrace a raw edge look.
- Cut a small circle of felt (about 1.5 inches in diameter) to serve as the base.
- Begin by arranging the largest petals on the felt circle, overlapping them slightly to form the outer layer. Stitch or hot glue them in place.
- Continue layering the medium and then smaller petals towards the center, creating a full, multi-dimensional bloom.
- Finish with a small bead or a tightly rolled fabric center if desired.
- Flower Type 3: The Simple Gathered Edge Accent.
- Cut a circle of poly-satin, about 4-6 inches in diameter.
- Run a gathering stitch around the entire circumference of the circle, about 1/4 inch from the edge.
- Gently pull the thread to gather the fabric inwards, forming a cup or a small pouf.
- Adjust the gathers until the flower sits nicely. Secure the thread tightly.
- This creates a lovely, softer flower ideal for filling gaps or adding texture.
- Attaching the Pin Backing:
- For each finished flower, cut a small circle of felt, slightly smaller than the base of the flower.
- Position a sew-on brooch pin or safety pin onto the felt circle. Stitch the pin securely to the felt (or use a strong fabric glue).
- Carefully stitch or hot glue this felt backing to the underside of each fabric flower, ensuring the pin mechanism is sturdy and centered.
- This ingenious method allows the flowers to be easily removed, making the t-shirt machine-washable without risking damage to the delicate fabric flowers.
The beauty of these detachable flowers lies in their versatility. My sister can wear them clustered together for a dramatic statement, or individually for a subtle accent. The care is simple: remove the pins, wash the t-shirt as usual, and the flowers can be stored safely or even attached to other garments or accessories. This project truly embodies how a small amount of fabric and creativity can transform a simple t-shirt into a unique and cherished piece of apparel.
Project 2: The Dynamic Sunburst Cut-Out T-Shirt Design – A Bold Statement
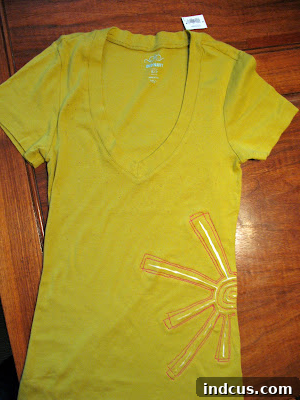
The second t-shirt project is one I’m particularly excited to share, as it employs a somewhat unconventional but incredibly striking technique. This design creates a textured, dimensional effect through carefully placed cuts and contrasting fabric, resulting in a look that is both edgy and artistic. It’s a statement piece that immediately draws the eye and showcases a clever approach to fabric manipulation.
Materials Required for Your Sunburst Masterpiece:
- A plain t-shirt (the original was green, providing a great contrast).
- A scrap piece of contrasting knit fabric (white was used, but any color that stands out against your t-shirt will work beautifully). Ensure it’s large enough to cover the entire design area.
- Coordinating or contrasting thread (pink was chosen to pop against the green).
- Sewing machine.
- Sharp fabric scissors (precision is key for the cuts).
- Fabric chalk or an erasable fabric marker (for drawing your design).
- Pins.
Crafting Your Sunburst T-Shirt: A Detailed Tutorial:
This technique might seem intricate, but with careful execution, it yields impressive results. The “sunburst” effect comes alive through the interplay of layers and meticulous cuts.
- Prepare Your Design Area: Lay your t-shirt flat and smooth. Decide where you want your sunburst design to be. I chose a prominent central placement.
- Secure the Contrasting Fabric: Turn your t-shirt inside-out. Take your scrap of white knit fabric and pin it smoothly to the inside of the t-shirt, covering the area where your design will be. Ensure it’s taut and free of wrinkles. You can tack it down lightly with a few hand stitches around the edges to prevent shifting during the next steps. This white fabric will peek through the cuts, creating the sunburst effect.
- Sketch Your Sunburst Pattern: Turn the t-shirt right-side out again. Using fabric chalk or an erasable marker, draw your sunburst design. Start with a central point and draw radiating lines outwards. You can make these lines straight, slightly curved, or even create more complex geometric patterns. The key is to ensure your lines are well-defined and spaced appropriately for cutting later. I chose a classic, organic sunburst shape, going over the design several times to ensure it was prominent.
- Sewing the Design: Using your sewing machine and your chosen thread color (a vibrant pink in my case, to provide a beautiful contrast against the green t-shirt), carefully stitch along all the lines of your drawn sunburst design. Go over each line multiple times (two or three passes are usually sufficient) to create a bold, visible stitched pattern. This stitching is crucial as it will hold the t-shirt fabric intact around the cut areas and prevent excessive fraying. It also defines the “rays” of the sunburst.
- The Critical Cutting Step: This is where the magic happens, but it requires patience and precision. Carefully slip your sharp fabric scissors in between the top t-shirt fabric and the tacked-down white knit fabric underneath. You will be cutting *only* the top layer of the t-shirt fabric, along the lines you just stitched. Cut slits between the sewn lines, ensuring you don’t cut through the white backing fabric. The goal is to create openings where the white fabric can show through. The stitching acts as your guide and boundary. Take your time, making clean, even cuts.
- Revealing the Effect and Finishing Touches: Once all your slits are cut, gently pull and manipulate the cut edges of the green t-shirt fabric. You’ll notice that the green edges naturally tend to “roll up” slightly, enhancing the textured, dimensional look and allowing the contrasting white fabric to truly pop. This rolling effect adds to the uniqueness of the design.
- Trimming Excess Fabric: Turn the t-shirt inside-out again. Carefully cut away the excess white knit fabric from the inside, leaving only enough to cover the area of your sunburst design. Be careful not to cut the t-shirt fabric itself. A small seam allowance around the stitched design is usually sufficient. And ta-dah! You’ve achieved a pretty cool and undeniably unique look.
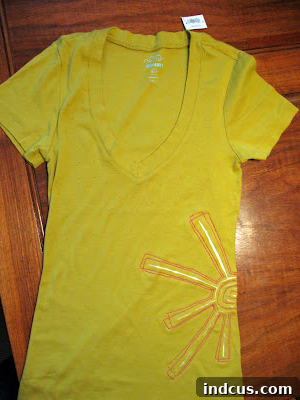
A little close up:

The combination of the bold pink stitching, the precisely cut green fabric, and the underlying white knit creates a captivating interplay of color and texture. The “rolling up” effect of the cut edges adds an organic, almost sculptural quality to the design, making it a true conversation starter. This project was incredibly fun to execute and offers endless possibilities for customization. Imagine different shapes, multiple colors of thread, or even subtle glitter fabrics peeking through the cutouts!
Why DIY Fashion is More Than Just a Hobby: Embracing Sustainable Style and Personal Expression
Beyond the immediate satisfaction of creating something beautiful with your own hands, engaging in DIY fashion projects offers a multitude of benefits. Firstly, it champions sustainability by encouraging the upcycling and personalization of existing garments, reducing textile waste and extending the life of clothing. Instead of buying new, you transform what you already have, making a conscious choice for the environment.
Secondly, handmade items inherently carry a unique story and a personal touch that mass-produced goods simply cannot replicate. For the recipient of a handmade gift, this translates into a deeper appreciation and a stronger connection to the item. It shows thought, effort, and a willingness to invest time in creating something truly special. For the maker, it’s a profound act of self-expression, allowing their creativity and individuality to shine through in every stitch and cut.
Moreover, these projects foster valuable skills – from basic sewing techniques to problem-solving and design thinking. They build confidence and provide a tangible sense of accomplishment. The process of taking a simple idea and bringing it to life, step by meticulous step, is incredibly empowering. It reminds us that with a little imagination and some basic tools, we can transform the ordinary into the extraordinary.
Ready to Create Your Own Fashion Statement?
These two projects represent just a glimpse into the vast world of DIY t-shirt customization. From the delicate charm of detachable fabric flowers to the bold, artistic statement of a sunburst cut-out design, each offers a unique way to personalize apparel and express creativity. Both are relatively inexpensive, requiring minimal materials, making them accessible to crafters of all skill levels. The joy of gifting these customized shirts to my sister was immense, seeing her delight in something made just for her.
And now, having poured my heart into these creations for others, I find myself with a delightful task remaining: to make one for myself! The inspiration is strong, and the possibilities are endless. So, whether you’re looking to refresh your wardrobe, craft a meaningful gift, or simply explore your creative side, I highly encourage you to pick up a plain t-shirt, some fabric scraps, and unleash your inner fashion designer. Happy crafting!







