
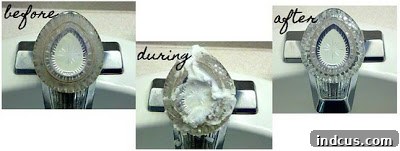
Welcome to Pinterest Tested – your reliable source for evaluating popular DIY hacks and home remedies! In a world brimming with internet claims, it’s easy to wonder: does that ‘miracle’ cleaner truly live up to its hype? What about that ingenious homemade facial scrub, or the clever kitchen organizing tip? Here, we separate fact from fiction. Every Monday, we dive into a captivating Pinterest Pin, putting its claims to the ultimate real-world test, ensuring you get honest, firsthand results that you can trust.
Pinterest Tested: Can Baking Soda and Hydrogen Peroxide Really Conquer Stubborn Faucet Gunk?
Today’s mission takes us into the often-overlooked, yet highly trafficked, territory of bathroom faucets. Over time, these fixtures can accumulate an unsightly medley of hard water stains, soap scum, and general grime, turning sparkling chrome into a crusty challenge. The internet, specifically Pinterest, offers a plethora of solutions, one of the most popular being a simple concoction of baking soda and hydrogen peroxide. Is this dynamic duo truly the answer to our persistent faucet woes, promising a sparkling, like-new finish without harsh chemicals?
We’re putting this specific viral Pinterest Pin to the ultimate test:
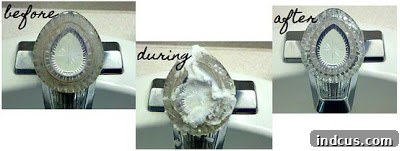
The Challenge: Unmasking the Power of Baking Soda & Hydrogen Peroxide on Bathroom Grime
Our bathroom faucets, much like many others, had fallen victim to that stubborn, often brown and crusty, build-up around their bases and handles. This pervasive gunk, a common affliction in busy bathrooms, is typically a combination of mineral deposits from hard water, soap residue, and everyday dirt. It’s not just an aesthetic issue; this build-up can also harbor bacteria and, if left unchecked, can even affect the functionality of your faucet over time. It’s unsightly, notoriously difficult to remove with standard cleaners, and frankly, a bit embarrassing when guests are over. The Pinterest hack promised an easy, natural, and highly effective solution. But would it deliver where many commercial products often fall short, transforming grime into gleam?
Why Baking Soda and Hydrogen Peroxide? Understanding the “Miracle” Claim
Before diving into the actual test, it’s worth understanding why this particular combination of ingredients has garnered such a stellar reputation in the DIY cleaning world. Both baking soda (sodium bicarbonate) and hydrogen peroxide are celebrated for their individual cleaning properties, and when combined, they are often touted as a powerful, non-toxic duo that can tackle a wide array of household messes.
- Baking Soda: The Gentle Abrasive and Deodorizer
Known for its fine, gritty texture, baking soda acts as a mild abrasive. This physical property allows it to gently scrub away tough grime, dried-on paste, and even some light rust without the risk of scratching delicate surfaces like chrome or stainless steel. Its alkaline nature is also highly effective at neutralizing acids and dissolving organic compounds such as grease, soap scum, and food residues. Beyond its scrubbing power, baking soda is a fantastic natural deodorizer, actively absorbing and neutralizing unpleasant odors rather than just masking them with perfumes. - Hydrogen Peroxide: The Mild Bleach and Disinfectant
Hydrogen peroxide (H₂O₂, typically a 3% solution readily available in drugstores) is a common household antiseptic and disinfectant. It’s a mild bleaching agent, which means it can effectively help to lighten stains, brighten surfaces, and restore a fresh appearance. Its oxidizing properties make it particularly effective at breaking down organic matter, as well as killing a broad spectrum of bacteria, viruses, and fungi. This makes it a powerful ally in bathroom sanitation, where germs tend to thrive.
The synergy between these two household staples is believed to create a powerful paste that not only scrubs away physical build-up but also chemically breaks down stains, lifts dirt, and sanitizes the treated area. This makes it an incredibly attractive alternative to harsher chemical cleaners, especially for those seeking eco-friendly, budget-friendly, and family-safe cleaning options that minimize exposure to volatile organic compounds (VOCs).
The Test Protocol: Putting the Pinterest Hack to Work
With our understanding of the ingredients and the promise of a miraculous clean firmly in mind, it was time to put the theory into practice. We approached this test with careful observation and a methodical step-by-step breakdown of how we utilized the supposed “miracle” solution on our very real-world, very dirty bathroom faucet.
Gathering Our Supplies: Simplicity at Its Best
One of the immediate appeals of this DIY cleaner is the minimal requirement for supplies. You likely already have these inexpensive staples lurking in your pantry or medicine cabinet, making this a spontaneous cleaning project you can undertake anytime inspiration strikes:
- Baking Soda: A generous amount, perhaps half a cup to start.
- Hydrogen Peroxide: The standard 3% solution, found in most pharmacies and supermarkets.
- Small Bowl or Container: For mixing the paste.
- An Old Toothbrush: Absolutely essential for reaching into the intricate nooks and crannies of faucet fixtures where grime loves to accumulate.
- A Cloth or Sponge: For wiping away the paste and rinsing.
- Rubber Gloves (Optional but Recommended): Especially for sensitive skin, to protect against irritation, though both ingredients are generally mild.
Mixing the “Miracle” Paste
The original Pin suggested a simple mix, aiming for a paste-like consistency. We started by pouring a generous amount of baking soda into a small, clean bowl. Gradually, we began adding hydrogen peroxide, a little at a time, stirring constantly with the toothbrush or a small spoon. The goal was to achieve a thick, spreadable paste – similar to the consistency of toothpaste. The consistency is absolutely key here – if it’s too runny, it won’t cling effectively to vertical surfaces and will simply drip away; if it’s too dry, it won’t spread easily or allow the peroxide to activate properly.
Application: Meticulously Targeting the Grime
With our freshly mixed paste ready, we meticulously applied it to all the affected areas of the bathroom faucet. This included the crucial area where the faucet meets the sink basin, the handles themselves, the spout, and especially around the tricky crevices and seams where years of grime, hard water deposits, and soap scum love to hide. We ensured a thick, even layer, making sure the paste made good, direct contact with all the crusty, brown build-up we were aiming to tackle. Precision in application ensures maximum contact and effectiveness.
The Waiting Game: Ten Minutes of Anticipation
As per the Pin’s instructions, we allowed the paste to sit undisturbed, giving it a full ten minutes to work its alleged magic. This dwell time is crucial for any cleaning agent. It allows the chemical properties of both baking soda and hydrogen peroxide to penetrate, soften, and begin to break down the grime, mineral deposits, and organic matter that have solidified on the faucet surfaces. Patience is often rewarded in cleaning, giving the ingredients adequate time to interact with the dirt.
The Scrubbing Action: Elbow Grease Meets Toothbrush
After the prescribed waiting period, it was time for the manual labor phase. Armed with an old, but still effective, toothbrush, we began scrubbing vigorously. The fine, densely packed bristles of the toothbrush proved to be perfect for getting into the tight spots around the faucet base, underneath the handle knobs, and along the seams where years of insidious build-up had accumulated. We concentrated our efforts on the most stubborn areas, applying consistent pressure and ensuring the abrasive action of the baking soda worked its way into the gunk.
Visual Evidence: Before and After The Cleanse
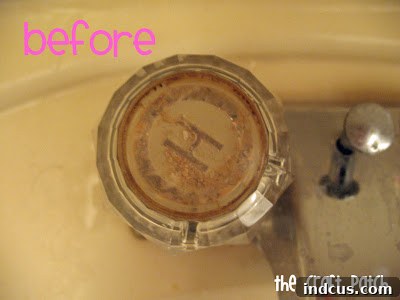
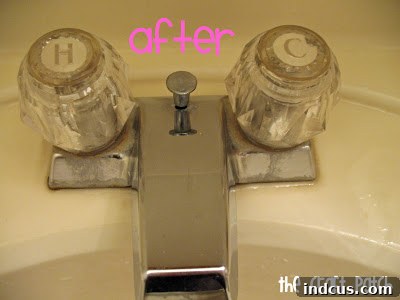
A picture, as they say, is worth a thousand words – especially when evaluating the effectiveness of a cleaning hack. To provide an objective and unbiased assessment, we meticulously documented the state of the faucet before and immediately after the cleaning process. The visual transformation, or indeed, the lack thereof, would be critical to forming our final verdict on this much-hyped Pinterest Pin.
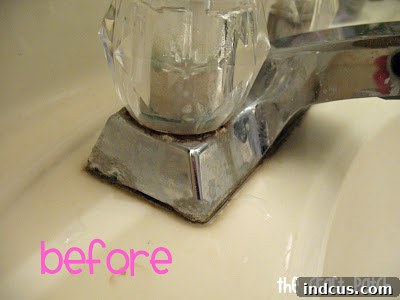
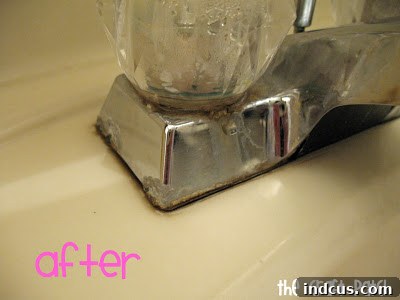
Upon first glance, the immediate difference wasn’t as dramatically transformative as one might expect from a “miracle” cleaner showcased in perfectly edited online videos. The pervasive brown gunk around the base did appear slightly lighter, losing some of its intensity, but a substantial amount remained, seemingly fused to the chrome surface. It certainly wasn’t the sparkling, like-new, showroom-ready finish we might have envisioned after seeing compelling “after” shots on social media. The expectation of a complete overhaul was not entirely met.
Analyzing the Results: A Nuanced Perspective
While the overall transformation wasn’t mind-blowing for the main body of the faucet, especially for the most deeply embedded, years-old grime, a closer and more critical examination revealed some interesting nuances and surprising successes in specific areas. It’s important to look beyond the immediate overall impression to truly understand the cleaner’s capabilities and limitations.
The Faucet Body and Base: A Modest Improvement, Not a Full Restoration
For the persistent, crusty build-up right at the base of the round knobs and where the faucet meets the sink basin, the cleaner offered only a modest improvement. The thick, brown deposits were definitely lightened, losing some of their intense coloration and density. The surface felt slightly smoother to the touch, indicating some material had been removed. However, they weren’t completely eradicated. It appeared that while the solution could soften and somewhat dissolve the outer layers of the grime, it wasn’t potent enough to fully penetrate and break down years of accumulated, solidified mineral deposits and soap scum in a single, 10-minute application. For such severe cases, more aggressive methods or multiple applications might be necessary.
The Knob Tops: A Clear Winner!
This is where the baking soda and hydrogen peroxide combination truly shone and delivered a genuinely impressive result. The tops of the faucet knobs, which were initially covered in a similar brown, crusty layer, underwent a much more noticeable and satisfying transformation. They went from looking distinctly old, dirty, and heavily encrusted to merely “slightly old looking.” This might sound like faint praise, but in the context of persistent grime that often feels impossible to shift, it represented a significant step up. The surface felt considerably smoother, and the underlying material was far more visible, with much of the surface discoloration and texture gone. This suggests that for less embedded, more surface-level gunk, or perhaps different types of mineral deposits that accumulate on the knobs, the cleaner is remarkably effective and capable of restoring a good degree of cleanliness and shine.
The Hidden Clean: A Revelation of Dislodged Gunk
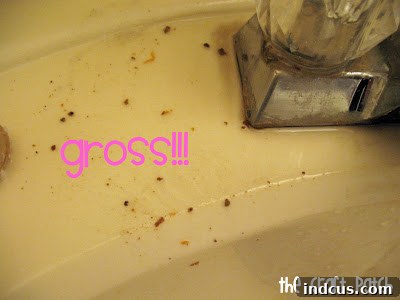
One of the most telling indicators of the cleaner’s deeper effectiveness, despite the somewhat limited visual change on the external base, came unexpectedly. After thoroughly scrubbing and when I poured clean water over the faucet handle to rinse away the remaining paste, a considerable amount of dark, murky gunk came shooting out from underneath the handle mechanisms and from within the small gaps of the fixture. This was grime that was not readily visible from the surface but had clearly been loosened, softened, and dislodged by the cleaning solution and the subsequent scrubbing action. This suggests that even if the visual “before and after” wasn’t dramatically astounding for every external area, the cleaner was actively working to penetrate and remove hidden build-up within the intricate components of the faucet, which is crucial for overall hygiene and the long-term, smooth operation of the faucet itself. It highlights that sometimes, a clean isn’t just about what you can see.
The Verdict: Not a Miracle, But Definitely a Valuable Tool
THE RESULTS: After a thorough and honest test, I can confidently say that the baking soda and hydrogen peroxide cleaner does work. However, I would hesitate to label it a “miracle” cleaning solution for severely neglected bathroom faucets with years of deeply embedded, stubborn grime. While it certainly improved the appearance of some areas, particularly the knob tops, and proved effective at dislodging hidden gunk, the dramatic, sparkling, like-new transformation often portrayed in viral online content simply wasn’t achieved on this particular, deeply crusted fixture in a single, standard application.
Nevertheless, there are significant and undeniable advantages that make this DIY solution a highly valuable and practical addition to your regular cleaning arsenal:
- No Strong Odor: Unlike many commercial bathroom cleaners that emit harsh, unpleasant chemical fumes and leave lingering scents, this homemade paste is virtually odorless. This makes for a much more pleasant and comfortable cleaning experience, a huge plus for those sensitive to strong scents or concerned about maintaining good indoor air quality.
- Readily Available Ingredients: Both baking soda and hydrogen peroxide are common household items, found in almost every pantry or medicine cabinet. This means you likely have them on hand right now, eliminating the need for a special trip to the store when you decide to tackle a cleaning task.
- Inexpensive: These ingredients are remarkably cheap to purchase, offering a highly cost-effective cleaning solution compared to specialized, often pricey, commercial bathroom products. It’s a budget-friendly way to keep your home clean.
- Eco-Friendly Alternative: For those striving for a greener, more sustainable home, this natural cleaner minimizes exposure to harsh, potentially harmful chemicals. It also reduces plastic waste from single-use packaging of various commercial cleaning products, aligning with environmentally conscious living.
In conclusion, while it might not deliver a “miraculous” overnight transformation for years of heavy, calcified build-up, it is an effective, gentle, and practical cleaner for regular maintenance and for tackling moderate grime and surface discoloration. It’s a testament that sometimes, simple, everyday ingredients can be surprisingly potent and versatile in the world of home cleaning.
An Unexpected Discovery: Triumph on Linoleum Floors!
ETA (Editor’s Note): One of the most exciting and unexpected outcomes of this test was an accidental, yet incredibly successful, off-label application. After observing its moderate success on the faucet and having a significant amount of the baking soda and hydrogen peroxide paste left over, I decided on a whim to try the solution on the linoleum floor in my bathroom. The floor, particularly in high-traffic areas around the toilet and sink, often accumulates a sticky, embedded layer of dirt and grime that typically requires intense scrubbing with harsh, foamy chemical cleaners to remove effectively.
I cautiously spread a layer of the paste over a particularly grimy section of the linoleum, allowing it to sit for the same ten minutes as I had done with the faucet. What happened next was truly remarkable and quite astonishing. Instead of the usual struggle and back-breaking effort required for this type of floor cleaning, the dirt simply wiped away with minimal effort! It was astonishingly effective; the paste had somehow softened and lifted the deeply embedded grime that usually clings stubbornly to the linoleum’s textured surface, without any aggressive scrubbing. The results were genuinely impressive, transforming a tedious and often frustrating chore into a swift, satisfying, and effortlessly clean outcome.
This surprising discovery highlights an important lesson in DIY cleaning: a solution might not be a “miracle” for one specific task (like heavily crusted faucets), but it could be revolutionary for another entirely different application. While it offered incremental improvements on the faucets, it proved to be an absolute game-changer for cleaning the linoleum floor. This discrepancy suggests that the specific composition of the grime (e.g., more organic dirt and soap scum on the floor versus tenacious hard water mineral deposits on the faucet) and the material of the surface itself play highly significant roles in the overall effectiveness of any cleaning agent. It encourages experimentation and highlights the versatility of simple, natural cleaners.
Beyond the Pin: Comprehensive Strategies for Truly Sparkling Faucets
Even if the baking soda and hydrogen peroxide combination didn’t provide a complete overhaul for our extremely dirty faucets, it serves as an excellent starting point for regular maintenance and tackling less severe grime. For those aiming for truly sparkling fixtures and effective grime prevention, consider incorporating these additional, comprehensive tips into your cleaning routine:
Targeting Hard Water Stains: The Vinegar Advantage
If hard water deposits are your primary concern, particularly those unsightly white, chalky stains, white vinegar is your undisputed best friend. Its acidic nature is exceptionally effective at dissolving mineral build-up. For stubborn spots, soak paper towels or a cloth in undiluted white vinegar and wrap them securely around the affected faucet areas, leaving them to work for a few hours or even overnight. The acidity will gently break down the minerals, making them easy to wipe away with a sponge or brush.
Everyday Maintenance: The Power of Consistency
The absolute best way to prevent severe build-up from ever occurring is through consistent, regular maintenance. A quick wipe-down of your faucets with a soft microfiber cloth after each use can significantly prevent water spots and soap scum from adhering and drying. Incorporate a weekly quick clean with a gentle all-purpose cleaner or a homemade solution (like diluted vinegar or the baking soda paste for specific areas) to keep grime from accumulating.
Tools of the Trade: Beyond the Toothbrush
While an old toothbrush is undeniably excellent for reaching into intricate crevices and around bases, consider other specialized tools. Cotton swabs can reach even tighter, more delicate spaces. For polishing chrome or stainless steel fixtures to a brilliant shine, a dedicated microfiber polishing cloth, or even a soft cloth dampened with a little rubbing alcohol, can restore luster without scratching. Never use abrasive scrubbers like steel wool on delicate finishes.
When to Call in Reinforcements: Commercial Solutions
For extremely old or neglected faucets with very thick, calcified build-up, or even deep rust stains, a specialized commercial descaler or rust remover might be necessary. These products are formulated with stronger chemicals specifically designed to break down these tough deposits. Always read labels carefully and ensure the product is safe for your specific faucet finish (e.g., chrome, brushed nickel, bronze) to avoid causing damage or discoloration. Always test in an inconspicuous area first to ensure compatibility.
Considering Replacement: A Last Resort for Severely Damaged Faucets
If your faucets are severely corroded, deeply pitted, leaking incessantly, or simply beyond effective repair or restoration with cleaning solutions, it might be a practical and aesthetic decision to consider replacing them. Modern faucets are often designed with easier-to-clean finishes (like PVD finishes), better resistance to hard water stains, and more efficient water-saving features, making an upgrade a worthwhile investment in your bathroom’s functionality and appearance.
Your Turn: Share Your Faucet Cleaning Secrets!
Our journey to conquer stubborn faucet grime revealed both successes and areas for improvement. While the baking soda and hydrogen peroxide solution proved its worth as an odorless, inexpensive, and effective general cleaner – especially for linoleum floors and certain types of faucet grime – the elusive “miracle” for deeply crusted, heavily neglected faucets still feels just out of reach with this simple method.
This is where you, our valued readers, come in! Do you have a tried-and-true method for getting those stubborn faucet knobs looking less shabby and truly sparkling? Have you found a combination of products or a specific technique that works wonders on severe hard water stains, brown build-up, or even rust on bathroom fixtures? We would absolutely love to hear your suggestions, tips, and personal experiences. Share your secrets and wisdom in the comments below and help us all achieve a perfectly gleaming, hygienic bathroom!
Stay tuned for our next Pinterest Tested adventure, where we’ll continue to debunk myths and uncover truths behind popular online hacks, ensuring you only spend your time and effort on solutions that truly deliver!







