
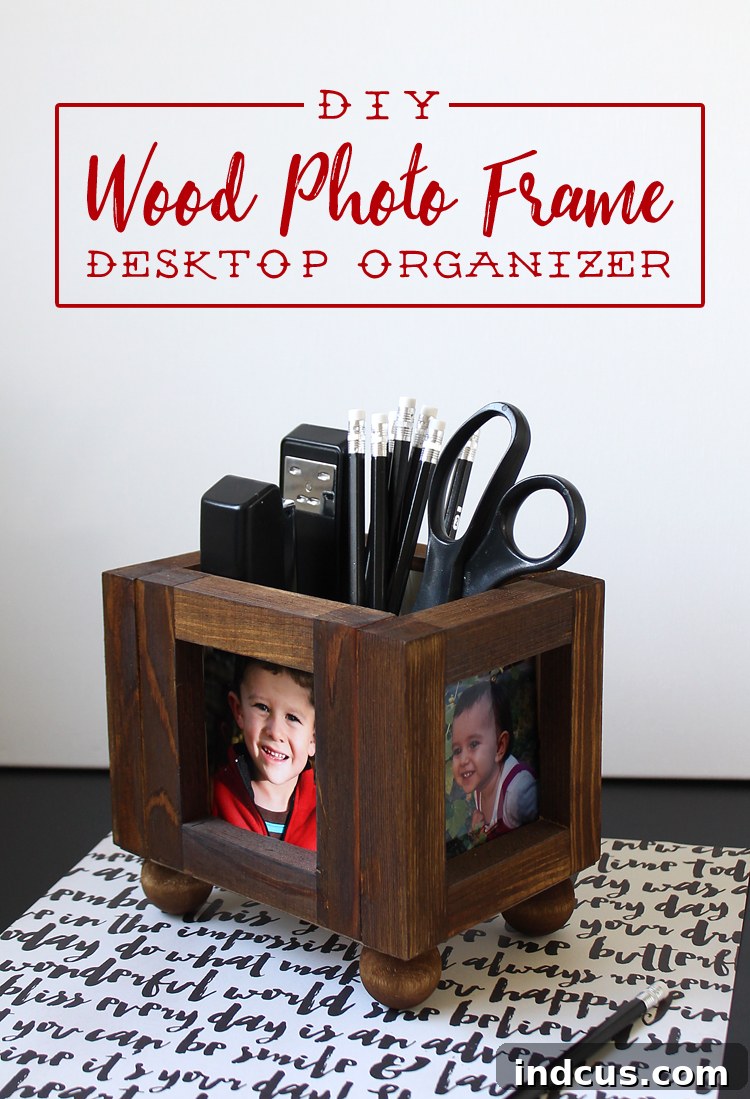
The quest for the perfect gift often leads us down a path of mass-produced items, but there’s an undeniable charm and sentimental value in something handmade. Imagine presenting a loved one with a gift that not only serves a practical purpose but also holds cherished memories within its very design. This holiday season, or for upcoming special occasions like Mother’s Day or Father’s Day, we have an exceptional DIY project that fits the bill perfectly: a beautifully crafted wood photo frame desktop organizer.
This isn’t just any desktop organizer; it’s a personalized masterpiece, thoughtfully designed to bring joy and order to any desk. Whether it’s for a proud parent to display on their office desk, a grandparent showcasing precious photos of their grandchildren, or a favorite aunt or uncle who appreciates unique, heartfelt treasures, this project is guaranteed to be a hit. The best part? It’s surprisingly simple to create, requiring absolutely no specialized tools or complex wood cutting. This makes it an ideal craft for kids to make (with a little adult supervision for the trickier steps) and a rewarding project for any DIY enthusiast looking for a quick yet impactful build.
Why This DIY Wood Photo Frame Desktop Organizer Is Perfect For You
In today’s fast-paced world, a well-organized workspace is essential for productivity and peace of mind. Clutter can quickly become overwhelming, but a functional and aesthetically pleasing organizer can transform your desk from chaotic to calm. Our DIY wood photo frame desktop organizer offers the perfect blend of utility and personal touch. Here’s why it stands out:
- Sentimental Value: Unlike generic organizers, this project allows you to incorporate cherished photographs directly into its design. Each side can feature a different memory, making it a constant source of warmth and inspiration. It’s a gift that truly keeps on giving, reminding the recipient of their loved ones every day.
- Perfect for Any Occasion: While it’s an excellent choice for Father’s Day or Mother’s Day, its versatility extends to birthdays, holidays, teacher appreciation gifts, or even a thoughtful housewarming present. The ability to customize its appearance makes it suitable for anyone.
- No Special Tools Required: Forget about saws, drills, or complex carpentry skills. This project is designed for accessibility, relying primarily on glue and basic craft supplies. This makes it a fantastic entry point for beginners in woodworking or a stress-free craft for experienced makers.
- Budget-Friendly: Many of the essential materials can be sourced affordably, even from dollar stores or craft supply discounts, making this a cost-effective alternative to expensive store-bought organizers.
- Customizable Aesthetic: From choosing the wood finish (stain or paint) to selecting the cardstock liner, every element of this organizer can be tailored to match the recipient’s style and home decor.
This wood photo organizer isn’t just about holding pens and paper; it’s about holding memories, connecting with loved ones, and adding a unique, handmade touch to any desk. Let’s dive into how you can create this charming and practical piece.
To embark on your journey of crafting this beautiful and personalized DIY office desktop organizer, gather the following essential supplies. Each item plays a crucial role in bringing your vision to life, ensuring both the durability and aesthetic appeal of your finished project.
Materials You’ll Need
- Four Unfinished Wood Picture Frames: These form the core structure of your organizer. The key is to find frames that are uniform in size and have a flat edge for easy gluing. Look for simple, unfinished wooden frames that allow for customization. Great places to check include dollar stores (like Dollar Tree), craft giants (Michaels, Hobby Lobby), or even online craft suppliers.
- 1.25 inch Wooden Ball Feet – Four Count: These small wooden feet will elevate your organizer, giving it a more polished, furniture-like appearance and added stability. They are typically found in the wood crafts section of hobby stores.
- Chipboard: A sturdy piece of chipboard will serve as the bottom of your organizer, providing a solid base for the structure and the feet. It’s thicker and more rigid than regular cardstock, offering better support.
- Spray Stain & Foam Brush: For adding color and character to your wood components. Spray stain offers even coverage and can be quicker to apply, while a foam brush is excellent for precise application and working with liquid stains or paints. You can choose any color to match your desired aesthetic.
- Wood Glue: A strong wood glue is essential for securely bonding the picture frames together and attaching the chipboard bottom and wooden feet. Ensure you have a reliable brand for lasting adhesion.
- Clear Spray Topcoat: An optional but highly recommended step, a clear topcoat protects your finished project from wear and tear, moisture, and UV damage, ensuring its beauty endures.
- Cardstock: This will be used to create an interior liner for your organizer, adding a decorative touch and helping to protect the inside of the wooden box. Choose a color or pattern that complements your stain/paint choice.
An Important Update Regarding Materials: Since this project was initially conceived several years ago, the specific company from which the original wood frames were purchased has unfortunately ceased operations. However, the crafting world is full of ingenious alternatives! If you prefer a shortcut or are having trouble finding individual frames, you can find excellent options like this wood picture frame caddy at craft stores like Michaels. This pre-assembled caddy already forms the box shape, significantly reducing the initial assembly steps. You would simply need to add the wooden ball feet, then proceed with staining or painting to finish the project. This offers a fantastic way to achieve a similar result with even less effort!
Step-by-Step Guide to Crafting Your Desktop Organizer
Creating this wood photo frame desktop organizer is a rewarding experience, blending simple steps with creative expression. Follow these detailed instructions to bring your handmade gift to life.
Step 1: Prepare Your Wooden Components with Stain or Paint
Begin by giving your unfinished wood picture frames and wooden ball feet their initial transformation. Choose either a spray stain for a classic, rich wood look or your favorite craft paint for a pop of color. If using spray stain, ensure you’re in a well-ventilated area and lay down a drop cloth to protect your workspace. Apply the stain or paint in thin, even coats, allowing each coat to dry completely according to the product’s instructions before applying the next. A foam brush is ideal for applying liquid stain or paint evenly, reaching into corners and ensuring smooth coverage. Take your time with this step, as a good finish forms the foundation of your organizer’s aesthetic appeal.
Step 2: Assemble the Frame Box
Once your frames are dry, it’s time to assemble the main structure of your organizer. Take your four stained or painted picture frames and apply a generous bead of wood glue along one edge of a frame. Press another frame firmly against it, ensuring the edges align perfectly to form a corner. Repeat this process, gluing all four frames together to create a sturdy, open-top box shape. Precision is key here; aim for right angles and flush edges. If you have clamps, they can be helpful to hold the frames together while the glue sets. Otherwise, heavy books or masking tape can provide temporary pressure. Allow ample drying time for the wood glue to cure completely, ideally several hours or even overnight, to ensure a strong, lasting bond.
Step 3: Install the Chipboard Bottom
Now that your frame box is solid, it’s time to add a sturdy bottom. Measure the exact dimensions of the opening at the bottom of your newly formed box. Using these measurements, cut a piece of chipboard to size. Ensure the chipboard fits snugly but not so tightly that it warps the frame. Apply a layer of wood glue evenly along the bottom edges of the wooden frame, then carefully press the chipboard into place. Make sure it’s flush with the bottom edges of the frames. Apply gentle pressure to ensure good adhesion, and once again, let the glue dry completely. I recommend letting it dry overnight to guarantee maximum strength, as this bottom will support the contents of your organizer.
Step 4: Attach the Wooden Ball Feet
With the bottom in place, let’s add the finishing touch that elevates your organizer – the wooden ball feet. Turn your organizer upside down. Apply a dab of wood glue to the flat part of each wooden ball foot. Carefully position one foot at each of the four corners of the chipboard bottom. Press firmly to ensure good contact. These feet not only provide stability but also lift the organizer slightly off the desk surface, giving it a more refined look and protecting your desk from potential scratches. Allow these to dry thoroughly, again, giving them ample time for the glue to bond strongly.
Step 5: Apply a Protective Clear Topcoat (Optional, but Recommended)
This step is optional, but highly recommended for enhanced durability and longevity. Once all the glue is completely dry and the entire structure is stable, spray the entire project with a clear protective topcoat. A clear topcoat will shield the wood from scratches, moisture, and general wear and tear, ensuring your beautiful handmade organizer remains pristine for years to come. Choose between a matte, satin, or glossy finish based on your preference. Apply in thin, even coats in a well-ventilated area, following the manufacturer’s instructions for drying times between coats.
Step 6: Craft a Decorative Cardstock Liner
To add a touch of color and a finished look to the interior, create a custom liner using cardstock. Measure the interior dimensions of each side of the box. Cut four pieces of cardstock to fit perfectly. You can choose coordinating colors or patterns to match the recipient’s style. Once cut, tape these pieces together from the outside edges, forming a mini box shape that will fit snugly inside your wooden organizer. Carefully slide this cardstock liner into the wooden box. This liner not only adds aesthetic appeal but also provides a soft interior surface, protecting the contents and the wooden walls.
Step 7: Add a Personal Message or Decorative Bottom
For an extra layer of personalization, cut one more piece of cardstock to the size of the bottom interior of the organizer. This is where you can get truly creative! If this is a Father’s Day gift, as in our example, you can include a heartfelt love note, a drawing from a child, or a personalized message written directly onto the cardstock. This ‘secret message’ at the bottom adds a delightful surprise and makes the gift even more special. Secure it in place with a small amount of glue or double-sided tape, ensuring it lays flat. This final touch truly elevates the handmade nature of your present.
Unleashing Your Creativity: Customization & Personalization Ideas
The beauty of a DIY project lies in its endless possibilities for customization. While the core design is straightforward, you can truly make this wood photo frame desktop organizer unique with a few creative touches:
- Decorative Embellishments: Consider adding small wooden letters, stencils, or even decoupage elements to the exterior of the frames. Beads, twine, or small metal accents can also enhance the rustic or modern feel, depending on your chosen aesthetic.
- Paint Techniques: Instead of a solid stain or paint, experiment with distressing techniques for a shabby chic look, or try a two-tone paint job for a more dynamic visual. You could even use chalk paint for a matte finish that’s easy to write on.
- Interior Dividers: If the recipient needs more compartmentalization, you can add small chipboard dividers inside the organizer to create separate sections for pens, paper clips, and sticky notes. These can be glued in place or designed to be removable.
- Seasonal Themes: Adapt the cardstock liner and exterior decorations to seasonal themes for gifts throughout the year. Think autumnal colors for Thanksgiving, festive patterns for Christmas, or bright florals for spring.
- Different Uses: While designed as a desktop organizer, this versatile box can also serve as a craft supply holder, a remote control caddy for the living room, a bedside table organizer, or even a unique planter (with a waterproof liner, of course!).
Tips for a Flawless Finish
To ensure your wood photo frame desktop organizer looks professional and lasts for years, keep these tips in mind:
- Work in a Clean Environment: Dust and debris can get stuck in glue or paint, marring your finish. Ensure your workspace is clean.
- Read Product Instructions: Always follow the drying times and application instructions for your specific stain, paint, glue, and topcoat.
- Use Even Pressure: When gluing components, apply consistent and even pressure to ensure a strong bond and prevent gaps.
- Practice Patience: Rushing the drying process can compromise the integrity and appearance of your project. Allow adequate time for each step.
- Safety First: If using spray products, always work in a well-ventilated area and consider wearing gloves and a mask.
Caring for Your Handmade Organizer
Maintaining your beautiful wood photo frame desktop organizer is simple. Dust it regularly with a soft cloth. If it needs cleaning, a slightly damp cloth can be used on the finished wood, followed by a dry one. Avoid harsh chemical cleaners, as they can damage the stain or paint finish and the clear topcoat. With proper care, this handmade treasure will continue to bring joy and organization for many years.
Now, all that’s left is the most delightful part: selecting those adorable pictures of your kids, family, or cherished moments to fill the photo frames. Choose snapshots that evoke happiness, laughter, and love to truly make this organizer a personal shrine of memories. Once the photos are in place, you’ll have not just a functional item, but a useful, thoughtful, and deeply personal handmade gift that speaks volumes about your care and creativity. It’s a present that will be admired and used daily, serving as a constant reminder of the special bond you share.
This post includes affiliate links. If you make a purchase through my link, I earn a small commission at no additional cost to you.







