
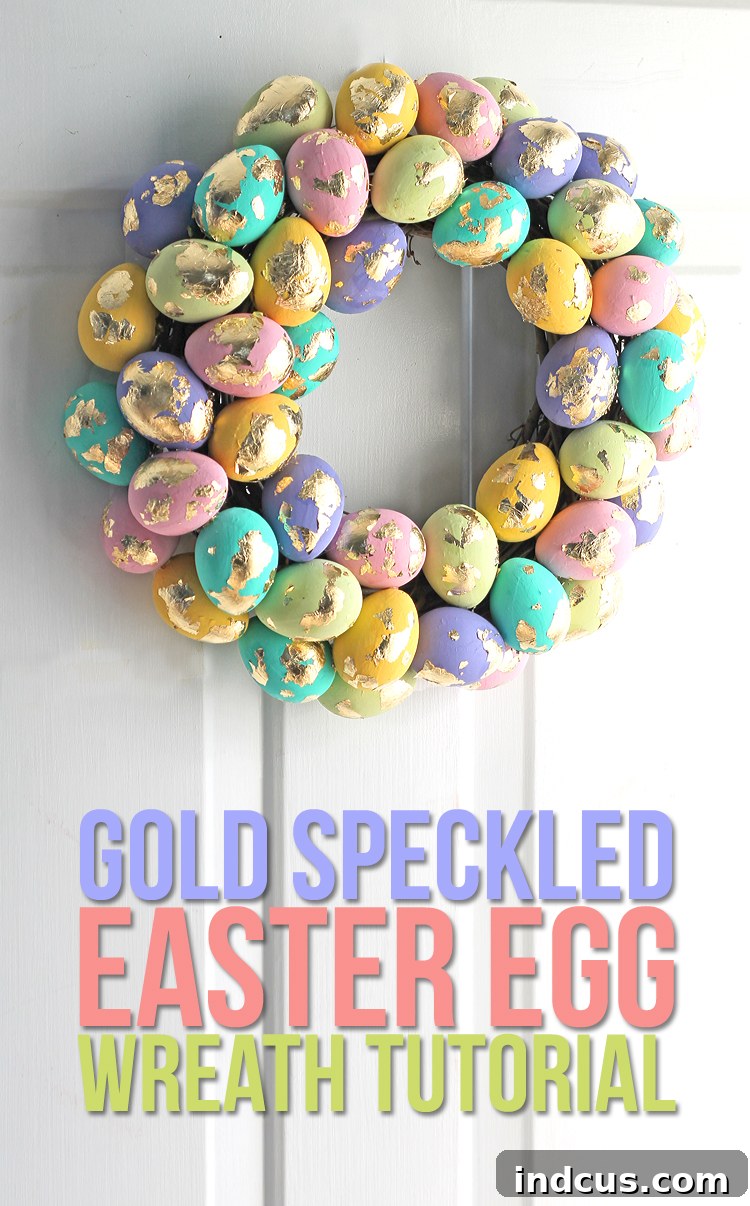
Spring is a season of renewal, vibrant colors, and cheerful decorations, and what better way to welcome its arrival than with a stunning, handcrafted wreath for your front door? If you’re looking for a DIY project that combines artistic flair with the festive spirit of Easter, you’ve come to the right place. This tutorial will guide you through creating an absolutely charming Easter egg wreath, adorned with brightly colored eggs and delicate gold leaf speckles. It’s an easy and incredibly rewarding craft that promises to add a unique touch of elegance and whimsy to your home decor.
There’s something truly special about the combination of vivid, joyful hues and the subtle sparkle of gold leaf. This exquisite wreath isn’t just a decoration; it’s a statement piece that perfectly captures the essence of springtime celebration. While beautiful Easter egg wreaths are often seen in boutique stores and home decor shops, their price tags can be quite steep. That’s where the magic of DIY comes in! By crafting your own, you gain the immense satisfaction of creating something unique, tailoring it precisely to your aesthetic preferences, and saving a considerable amount of money in the process. It’s a win-win scenario that allows you to unleash your creativity while beautifying your living space with a personalized touch.
Craft Your Own Dazzling Gold Speckled Easter Egg Wreath: A Step-by-Step Guide
Embrace the joy of crafting and design a breathtaking DIY Easter wreath that will undoubtedly become a cherished part of your seasonal decor. This project is not only fulfilling but also surprisingly simple, even for novice crafters. Before we dive into the creative process, let’s gather all the essential supplies needed to bring this vision to life. Having everything prepared beforehand ensures a smooth and enjoyable crafting experience.
Materials You’ll Need for Your Spring Wreath Creation
The beauty of this Spring wreath lies in its simplicity and the readily available nature of its components. Here’s a detailed list of what you’ll need, along with some considerations for each item:
- 12-inch Wreath Form: The foundation of your wreath. While a sturdy grapevine wreath was used for this project, offering a rustic texture, foam or wire wreath forms are also excellent alternatives. Grapevine wreaths provide a natural, organic feel, but their uneven surface can require more glue. Foam forms are smooth and easy to work with, while wire forms offer structural integrity. Choose based on your preference and desired aesthetic.
- Paper Mache Eggs (approx. 48 total): These lightweight and affordable eggs are perfect for painting and decorating. The quantity can vary depending on the size of your eggs and how densely you wish to cover your wreath form. Having extra is always a good idea in case of mishaps or if you decide to add more layers for a fuller look. They are durable enough to handle paint and adhesive without crumbling.
- Gold Leaf: This delicate material is key to achieving the luxurious, speckled effect. Gold leaf sheets come in various sizes and thicknesses. Handle them with care as they are extremely fragile. A small book of gold leaf sheets typically contains enough for several projects, making it a cost-effective way to add shimmer.
- Gold Leaf Adhesive (or Mod Podge): This specialized adhesive is designed to bond gold leaf securely. While Mod Podge can be used as an alternative, a dedicated gold leaf adhesive generally provides a stronger, more consistent bond and allows for finer detail in speckling. Consider using a clear-drying formula for best results.
- Craft Paint and Paint Brushes: Choose a palette of vibrant colors that evoke the spirit of Easter and Spring – think pastels, brights, or a rainbow spectrum. Acrylic craft paints work wonderfully on paper mache eggs, offering good coverage and quick drying times. Have a selection of brushes, including smaller ones for detail work and larger ones for base coating.
- Hot Glue Gun + Glue Sticks: An essential tool for securely attaching the eggs to the wreath form. Ensure your glue gun is in good working condition and have plenty of glue sticks on hand, especially if you’re working with an uneven surface like a grapevine wreath that might require more adhesive to create a strong bond. Safety first when using a hot glue gun!
Detailed Instructions for Your DIY Gold Speckled Easter Wreath
Now that you have all your materials, let’s embark on the creative journey of assembling your beautiful gold speckled Easter egg wreath. Follow these steps carefully to achieve a professional and dazzling finish.
Step 1: Preparing Your Canvas – Painting the Paper Mache Eggs
Begin by giving your paper mache eggs a fresh coat of color. This step requires a bit of patience due to the eggs’ round shape. To make painting easier, consider inserting a wooden skewer into one end of each egg to use as a handle. Paint one half of the egg thoroughly, allowing it to dry completely before carefully turning it over to paint the other side. This method prevents smudges and ensures an even finish. For vibrant, opaque coverage, two coats of paint are highly recommended for each egg. Experiment with a variety of bright, cheerful colors to create a rainbow effect, or stick to a complementary palette that matches your home decor. Let all painted eggs dry fully before proceeding.
Step 2: Building the Foundation – Attaching Eggs to the Wreath Form
With your colorful eggs ready, it’s time to attach them to your wreath form. Begin by laying out your eggs on the wreath form without glue to determine your desired pattern and density. This allows you to visualize the final look and make any adjustments before permanent attachment. Once satisfied, use your hot glue gun to firmly secure each egg to the wreath. If you are using a grapevine wreath, its natural, textured surface can be uneven, so don’t be shy with the hot glue. Apply a generous amount to ensure each egg is held securely in place. Work in sections, attaching eggs closely together to create a lush, full appearance, minimizing any visible gaps in the wreath form. Pay attention to how the colors are distributed to maintain a balanced aesthetic.
Step 3: Adding the Sparkle – Applying Gold Leaf Adhesive
Now for the magical touch – adding the gold speckles. Using a small, stiff paintbrush or even your fingertip, carefully dab or brush small amounts of gold leaf adhesive onto the eggs in a random, speckled pattern. The goal is to create an organic, natural-looking scattered effect rather than uniform dots. If you’re using Mod Podge as an alternative, be aware that it might not yield the same crisp, defined speckles as a dedicated gold leaf adhesive, but it will still provide a lovely shimmer. Apply the adhesive to all the eggs, ensuring an even distribution of speckles across the entire wreath. Allow the adhesive to dry until it becomes tacky to the touch – this is crucial for the gold leaf to adhere properly. Test a small, inconspicuous spot to ensure it’s sticky but not wet.
Step 4: The Golden Touch – Applying Gold Leaf Sheets
Once the adhesive has reached the perfect tacky consistency, gently place a sheet of gold leaf over the areas where you’ve applied the adhesive. Lightly press the gold leaf onto the eggs with a soft, clean brush or your finger. The gold leaf will instantly adhere to the tacky spots, creating beautiful, shimmering speckles. Continue this process, covering all the adhesive-applied areas. Work carefully, as gold leaf is incredibly delicate and can tear easily. Don’t worry about perfection at this stage; any excess will be removed later. After applying all the gold leaf, let the adhesive dry completely, ideally overnight. This extended drying time ensures a strong bond and prevents the gold leaf from smudging or peeling off prematurely.
Step 5: Revealing the Radiance – Removing Excess Gold Leaf
After the gold leaf adhesive has fully dried, it’s time to reveal the stunning gold speckles. Gently rub off any excess gold leaf using your fingers. The gold will only stick where the adhesive was applied, leaving behind beautiful, defined speckles. For more stubborn or tiny flakes, use a clean, dry, soft-bristled paintbrush to gently dust them away. To ensure every last loose piece is removed and to achieve a crisp finish, you can use a hair dryer on a cool setting to blow off any remaining stubborn gold dust. This final step cleans up the wreath and highlights the exquisite contrast between the vibrant egg colors and the sparkling gold. Take your time with this step to avoid damaging the adhered gold leaf.
If the process of working with delicate gold leaf sheets seems a bit intimidating, or if you’re looking for an even quicker method to achieve a similar golden effect, an excellent alternative is to use gold leaf paint. Simply dab or splatter the paint onto your dried eggs using a brush for a beautiful, metallic speckled finish that mimics the look of real gold leaf with less fuss.
Tips for Success and Variations for Your Easter Wreath
- Durability: To protect your beautiful wreath from the elements, especially if you plan to hang it outdoors (under a covered porch), consider applying a clear sealant spray. A matte or satin finish spray will preserve the colors and gold leaf without adding too much shine.
- Customization: Don’t limit yourself to just eggs! You can further embellish your Spring decor with small faux flowers, delicate ribbons, bows, or even tiny faux berries nestled among the eggs. These additions can enhance the wreath’s texture and visual interest, allowing for endless personalization.
- Color Schemes: While a vibrant rainbow offers a cheerful vibe, consider other color palettes. A monochromatic wreath with varying shades of a single color, an ombre effect, or a sophisticated pastel scheme can create different moods and match various home aesthetics.
- Egg Sizes: Experiment with different sizes of paper mache eggs to add depth and dimension to your wreath. Larger eggs can form the base, with smaller eggs filling in the gaps.
- Gift Idea: A handmade Easter egg wreath makes a thoughtful and unique gift for friends, family, or as a hostess gift during Spring gatherings.
Displaying and Maintaining Your Handcrafted Wreath
Once your handmade wreath is complete, it’s ready to transform your space. This wreath is ideal for hanging on a front door (especially if covered or indoors), above a mantelpiece, or as a charming wall decoration in your entryway or living room. To keep your wreath looking its best, gently dust it periodically with a soft brush or a can of compressed air. When the season ends, store your wreath in a sturdy box in a cool, dry place to protect it from dust and damage, ensuring it will be just as beautiful for many Springs to come.
I am absolutely thrilled with how this pretty wreath turned out. Its vibrant colors and sparkling gold details make it the perfect accent for Easter and the entire Spring season. It looks utterly fabulous gracing my front door, bringing a smile to my face every time I see it. Now, if only the weather would get the memo that it’s officially Spring and catch up to the cheerful spirit of this wreath! Creating your own DIY Easter wreath is not just a craft; it’s an opportunity to infuse your home with joy, personality, and the undeniable charm of handmade decor. Give it a try, and let your creativity blossom!







