
Revitalize Your Denim: A Budget-Friendly DIY Jeans Update for Spring
Spring has finally sprung! After the long, quiet slumber of winter, there’s an undeniable buzz in the air. Trees are awakening with vibrant blossoms, the sun casts a warm, inviting glow, and the world outside beckons us to shed our layers and embrace the season of renewal. For many of us, this natural awakening extends to our personal style. As the days grow longer and spirits lift, we often find ourselves yearning for a wardrobe refresh that mirrors the vibrant energy of spring. We want to feel light, fresh, and ready for all the adventures the warmer months promise.
While the desire for newness is strong, the reality of budget constraints often tempers our shopping impulses. Splurging on an entirely new wardrobe isn’t always feasible, or even necessary. Yet, the longing to update our look, to shed the stylistic remnants of winter, remains. This common dilemma leads many to seek creative, cost-effective solutions that allow for personal expression without breaking the bank.
This is where the magic of DIY fashion truly shines. Instead of resigning ourselves to the same old outfits, we can transform existing pieces into something fresh and exciting. A little creativity and a few simple tools can breathe new life into forgotten favorites, making them feel brand new and perfectly suited for the season ahead. Today, I’m thrilled to share a super simple, yet incredibly impactful project that will make you fall in love with your jeans all over again – just in time for spring!
Introducing Your Next DIY Project: Hand-Embroidered Denim
Have you ever looked at a perfectly good pair of jeans and thought, “These just need something more”? That’s exactly how I felt. My goal was to modernize a classic pair, adding a unique touch that would make them feel bespoke and ready for the season. And the best part? The transformation is achieved with nothing more than a needle, some embroidery floss, and a bit of patience. This isn’t about intricate patterns or advanced stitching techniques; it’s about elevating the existing structure of your denim with a subtle, yet striking, detail.
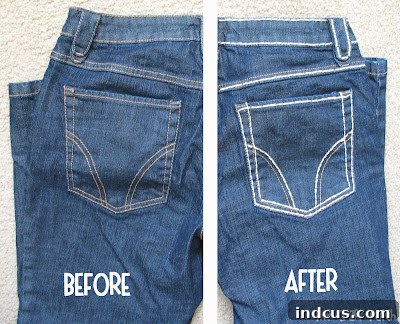
As you can see, the change is subtle but significant. By simply stitching over the existing top-stitching lines of the jeans with contrasting or complementary embroidery floss, you create a captivating visual texture and a renewed sense of style. It’s a small detail that makes a big statement, instantly updating your denim for a fraction of the cost of a new pair.
Why Choose This DIY Jeans Update?
This particular denim DIY project offers a plethora of benefits, making it an ideal choice for anyone looking to refresh their wardrobe with intention and creativity.
- Cost-Effective Fashion: In an era of fast fashion and ever-changing trends, investing in new clothes constantly can be a drain on your finances. This project costs mere dollars – a few bundles of embroidery floss and you’re ready to go. It leverages an item you already own, transforming it into something new without needing to buy anything substantial. It’s truly a budget fashion hack that delivers significant style impact.
- Unleash Personalization: One of the greatest joys of DIY is the ability to infuse your unique personality into your clothing. Mass-produced items often lack that special touch. By hand-stitching your jeans, you create a piece that is truly one-of-a-kind. Choose floss colors that resonate with your style, whether you prefer vibrant contrasts, subtle tonal shifts, or even a mix of hues for a bohemian flair.
- Embrace Sustainable Style: Extending the life of your garments is a fantastic way to practice sustainable fashion. Instead of discarding or replacing a perfectly functional pair of jeans because they feel a bit dated, you’re giving them a second life. This reduces textile waste and promotes a more mindful approach to consumption, aligning with eco-conscious values.
- Therapeutic and Rewarding: Engaging in a creative craft like hand-stitching can be incredibly calming and meditative. It allows you to slow down, focus on a repetitive task, and enjoy the process of creating something with your own hands. The sense of accomplishment when you see your finished, transformed jeans is immensely satisfying, making the effort worthwhile.
Materials You’ll Need for Your Embroidered Jeans Project
Gathering your supplies is the first exciting step in any DIY project. For this denim update, you won’t need much, and most items might already be in your crafting stash.
- A Pair of Jeans: Choose a pair that’s in good condition but perhaps feels a bit plain or dated. Denim with prominent top-stitching lines is ideal, as these will be your guide. Darker washes can make lighter floss colors pop, while lighter washes offer versatility for both bright and subtle threads.
- Embroidery Floss: This is your primary decorative element. Standard six-strand cotton embroidery floss is perfect. The quantity will depend on how much stitching you plan to do, but for a full pair of jeans, expect to use three to four bundles (skeins) of floss. Consider various colors:
- Contrasting Colors: For a bold statement (e.g., bright yellow or red floss on dark blue denim).
- Complementary Colors: For a softer, more integrated look (e.g., light blue floss on medium blue denim).
- Multi-Color Palette: For a playful, unique design, perhaps alternating colors on different seams.
- Sturdy Hand-Sewing Needle: Jeans fabric is notoriously thick, especially at the seams. You’ll need a large, sturdy needle, often referred to as a “denim needle” or “jeans needle,” which has a sharp point and a strong shaft to prevent bending or breaking. A longer needle can also be helpful for better grip.
- Thimble or Rubber Gripper: This is absolutely essential for protecting your fingers and helping you pull the needle through dense fabric. A thimble fits on your finger to push the needle, while a rubber gripper (like a piece of a rubber mat or a rubber finger cot) provides extra traction to pull the needle through stubborn spots, particularly thick seams. Trust me, your fingers will thank you!
- Sharp Scissors: For cleanly cutting your embroidery floss.
Step-by-Step Guide: How to Hand-Embroider Your Jeans
Now for the fun part – bringing your vision to life! This process is straightforward, but requires a bit of patience and attention to detail.
Preparation and Planning
- Choose Your Denim: Lay out your chosen jeans. Decide which seams you want to embellish. The most common and effective areas are the outer leg seams, inner leg seams, pockets, waistband, and belt loops. Following the existing top-stitching creates a neat, professional finish without needing to draw guide lines.
- Select Your Floss: Pick your embroidery floss color(s). If using multiple colors, decide on a pattern or where each color will be used. For a seamless look, stick to one color per seam section.
Preparing Your Floss and Needle
- Thread Your Needle: Embroidery floss typically comes with six strands twisted together. For this project, using all six strands simultaneously provides the best visibility and texture, making the stitching pop. Thread your sturdy needle with the full six strands.
- Knot the End: Tie a secure knot at the end of your floss. A double or triple knot will ensure it doesn’t pull through the denim. You can also make a small, discreet knot on the inside of the jeans to hide it.
The Stitching Process: Following the Lines
- Starting Your Stitch: Begin on the inside of the jeans, pushing the needle through to the front along an existing stitch line. Pull the floss through until the knot catches on the inside.
- Basic Running Stitch: The easiest and most effective stitch for this project is a simple running stitch. This involves making small, even stitches by pushing the needle down through the fabric and then back up a short distance away. Aim to follow the existing top-stitching as closely as possible, using the original thread as your guide. This creates a neat, uniform line.
- Navigating Thick Seams: This is where your heavy-duty needle and gripper come in. When you encounter exceptionally thick areas, like where multiple seams cross (e.g., at the crotch or side seams near the hem), you might need extra force.
- Push and Pull: Use your thimble to push the needle through from the top. Once the tip emerges on the other side, use the rubber gripper to firmly grasp the needle and pull it all the way through. Don’t force it too hard without a gripper, as you risk bending the needle or injuring your fingers.
- Small Stitches: In these dense areas, make your individual stitches slightly smaller to make them easier to manage.
- Maintain Evenness: Try to keep your stitches as consistent in length and spacing as possible. This uniformity contributes to a polished, professional look. Don’t worry if they’re not absolutely perfect – handmade charm is part of the appeal!
- Securing Your Stitches: When you reach the end of a floss length or a section of stitching, secure it. Turn the jeans inside out. Make a few small, discreet stitches on the back of your work, knotting the floss securely to prevent it from unraveling. Trim any excess floss close to the knot.
Finishing Touches and Care
- Inspect Your Work: Once all your desired seams are stitched, carefully inspect your jeans. Trim any stray threads.
- Washing Instructions: To protect your beautiful new embroidery, it’s advisable to wash your jeans on a gentle cycle in cold water. You might even consider turning them inside out before washing to minimize friction. Air drying is also recommended to preserve the integrity of the floss and the denim. Avoid harsh detergents or strong bleaching agents.
Creative Variations & Styling Tips for Your Customized Denim
This basic technique is just the starting point! There are countless ways to customize your embroidered jeans further and integrate them into your spring wardrobe.
- Explore Different Stitches: While the running stitch is simple and effective, don’t hesitate to experiment with other basic embroidery stitches if you feel adventurous. A backstitch creates a bolder, more continuous line, while a chain stitch offers a lovely textured effect.
- Mix Colors and Patterns: Instead of a single color, try alternating two or three colors along a single seam for a striped effect. Or use different colors on different sections of the jeans for a patchwork feel. You could even add small, simple embroidered motifs like stars, hearts, or tiny flowers in sparse areas.
- Add Other Embellishments: Take your denim update a step further by incorporating other DIY elements. Small iron-on patches can be strategically placed. A few well-placed beads or sequins can catch the light beautifully. Just ensure any added embellishments are securely attached and can withstand washing.
- Styling Your Newly Updated Jeans: Your embroidered jeans are a statement piece!
- Casual Chic: Pair them with a simple white tee and sneakers for an effortlessly cool everyday look.
- Boho Vibes: Combine them with a flowy tunic, espadrilles, and layered jewelry for a relaxed, bohemian aesthetic.
- Dressed Up: Believe it or not, these can even be dressed up! Try them with a crisp blouse, a blazer, and heels for a unique smart-casual ensemble. The unique detailing adds a touch of sophistication.
Beyond Jeans: More Spring Wardrobe Refresh Ideas
The philosophy of “make do and mend,” or rather, “make do and personalize,” extends far beyond denim. Once you’ve experienced the joy of updating your jeans, you might be inspired to tackle other areas of your wardrobe!
- DIY T-Shirt Updates: Simple tees can be transformed with fabric paint, iron-on transfers, or even strategic cutting and re-tying.
- Accessory Makeovers: Give old scarves new life with fabric dye, or add charms and beads to plain handbags.
- Thrifting and Upcycling: Visit thrift stores with an open mind, looking for garments with potential. A slightly oversized dress can become a tunic, or a men’s shirt can be cropped and tied.
- Jewelry Making: Create unique necklaces, earrings, or bracelets that perfectly complement your new, personalized wardrobe.
Embrace Your Creative Side This Spring!
As spring unfurls its vibrant tapestry, let it inspire you to unlock your own creativity. There’s an incredible satisfaction that comes from wearing something you’ve transformed with your own hands. Not only do you save money and contribute to a more sustainable lifestyle, but you also wear your unique style proudly, literally on your sleeve (or pant leg!).
This simple jeans update is more than just a craft project; it’s an invitation to view your wardrobe with fresh eyes, to see potential where you once saw plainness. It’s about empowering yourself to create fashion that truly reflects who you are, without being dictated by trends or price tags.
So, grab that needle, pick out your favorite floss, and start stitching! You’ll be amazed at how a few thoughtful details can completely rejuvenate your denim and your outlook on spring fashion. We’d love to see your creations! Share your updated jeans projects with us and inspire fellow DIY enthusiasts.
Spring is a time for renewal, and that includes refreshing our personal style. This budget-friendly, hand-embroidered jeans project is a perfect way to usher in the new season with a personalized touch. It’s a simple act of creativity that yields significant style dividends, proving that you don’t need to splurge to look and feel fabulous. Happy stitching, and happy spring!







