
Spooktacular Mummy Cupcakes: An Unwrapping Guide to Easy Halloween Treats
As the leaves turn and a chill fills the air, thoughts inevitably drift to Halloween – a season of costumes, candy, and delightful frights. And what better way to celebrate than with a batch of adorably eerie treats? Forget complicated confections; these mummy cupcakes are not only incredibly simple to make but also incredibly charming, perfect for adding a touch of spooky fun to any Halloween gathering, school party, or a cozy autumn evening at home.
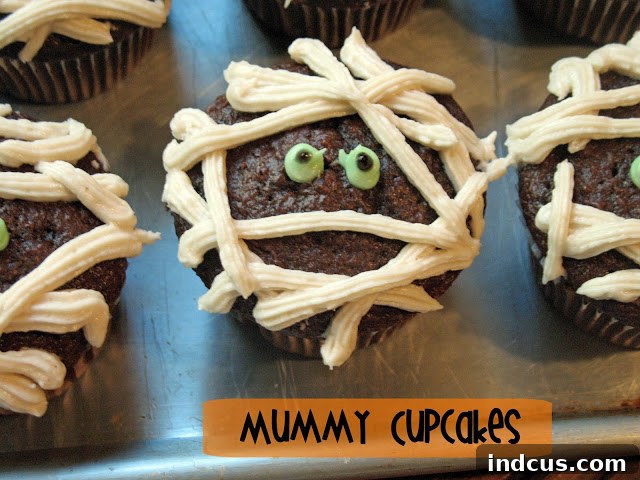
Imagine rich, moist chocolate cupcakes, lovingly adorned with a labyrinth of white frosting “bandages” and peering green eyes that seem to follow you from every angle. They’re a guaranteed hit with both kids and adults, striking the perfect balance between fright and delight. The best part? You don’t need to be a professional baker to create these masterpieces. With a few basic ingredients and a dash of creativity, you’ll be unwrapping a tray full of these cute, creepy creations in no time.
Why Mummy Cupcakes Are the Ultimate Halloween Treat
Halloween baking should be fun, not stressful. Mummy cupcakes embody this philosophy entirely. Their appeal lies in their simplicity and visual impact. Here’s why they’re a perennial favorite:
- Kid-Friendly Fun: The decorating process is straightforward enough for children to participate, making it a fantastic family activity. Kids love creating their own spooky faces!
- Visually Striking: Despite their ease, these cupcakes are incredibly eye-catching. The contrast of the white “bandages” against the dark cake and bright green eyes makes them stand out on any dessert table.
- Versatility: They can be adapted to various dietary needs or flavor preferences, from gluten-free cakes to different frosting flavors.
- Perfect for Parties: Easy to transport and serve, they’re ideal for school events, office potlucks, or your annual Halloween bash. No forks or plates needed – just grab and go!
- Delicious: At their core, these are simply delicious chocolate cupcakes with sweet buttercream frosting. What’s not to love?
Gather Your Ingredients: What You’ll Need
Creating these delightful mummy cupcakes requires two main components: the chocolate cupcakes themselves and the festive frosting. Feel free to use your favorite homemade chocolate cupcake recipe, or opt for a boxed mix for ultimate convenience.
For the Chocolate Cupcakes (Makes 12-18, depending on size):
If you’re baking from scratch, here’s a classic recipe. Alternatively, a good quality boxed chocolate cake mix prepared according to package directions works perfectly.
- 1 ½ cups (190g) all-purpose flour
- 1 ½ cups (300g) granulated sugar
- ¾ cup (65g) unsweetened cocoa powder
- 1 ½ teaspoons baking soda
- 1 teaspoon baking powder
- ½ teaspoon salt
- 1 cup (240ml) milk (whole or 2%)
- ½ cup (120ml) vegetable oil
- 2 large eggs
- 2 teaspoons vanilla extract
- 1 cup (240ml) boiling water
For the Buttercream Frosting:
- 1 cup (226g) unsalted butter, softened
- 4-5 cups (480-600g) powdered sugar, sifted
- ¼ cup (60ml) heavy cream or milk
- 1 teaspoon vanilla extract
- Pinch of salt
- Green gel food coloring (for the eyes)
- Optional: Black edible marker or small chocolate chips for eye pupils
Essential Equipment for Mummy Magic
Having the right tools can make your baking and decorating process smoother and more enjoyable:
- 12-cup muffin tin
- Paper cupcake liners
- Large mixing bowls
- Electric mixer (stand or hand-held)
- Whisk and rubber spatula
- Piping bags (disposable or reusable) with a small round tip (like Wilton #3 or #5) and a flat tip (like Wilton #47 or #48) for bandages, or simply snip a small corner off a sturdy Ziploc bag.
- Small offset spatula or butter knife for spreading base frosting (optional).
Step-by-Step Guide: How to Bring Your Mummies to Life
Follow these simple instructions to create your own adorable army of mummy cupcakes. The key to successful decorating is patience and completely cooled cupcakes!
Part 1: Baking the Perfect Chocolate Cupcakes
- Preheat Oven & Prepare Pan: Preheat your oven to 350°F (175°C). Line a 12-cup muffin tin with paper cupcake liners.
- Combine Dry Ingredients: In a large mixing bowl, whisk together the flour, granulated sugar, cocoa powder, baking soda, baking powder, and salt. Ensure there are no lumps.
- Combine Wet Ingredients (Excluding Hot Water): In a separate medium bowl, whisk together the milk, vegetable oil, eggs, and vanilla extract until well combined.
- Combine Wet and Dry: Pour the wet ingredients into the dry ingredients and mix on low speed with an electric mixer until just combined. Do not overmix.
- Add Boiling Water: Carefully pour the boiling water into the batter and mix on low speed until just smooth. The batter will be thin, but this is normal and contributes to the moist texture.
- Fill Liners: Divide the batter evenly among the prepared cupcake liners, filling each about two-thirds full.
- Bake: Bake for 18-22 minutes, or until a wooden skewer inserted into the center of a cupcake comes out clean.
- Cool Completely: Remove the cupcakes from the oven and let them cool in the muffin tin for a few minutes before transferring them to a wire rack to cool completely. This step is crucial; warm cupcakes will melt your frosting!
Part 2: Preparing the Spooky Frosting
- Beat the Butter: In a large mixing bowl, beat the softened butter with an electric mixer on medium-high speed until light and fluffy (about 2-3 minutes).
- Add Powdered Sugar: Gradually add the sifted powdered sugar, one cup at a time, mixing on low speed until combined, then increasing to medium-high.
- Add Liquids & Flavoring: Pour in the heavy cream (or milk), vanilla extract, and a pinch of salt. Beat on medium-high speed for another 3-5 minutes, scraping down the sides of the bowl occasionally, until the frosting is light, fluffy, and spreadable. If it’s too thick, add a tiny bit more cream; if too thin, add more powdered sugar.
- Prepare Green Frosting: Scoop about 1/4 to 1/2 cup of the white buttercream into a separate small bowl. Add a few drops of green gel food coloring and mix until you achieve a vibrant green color for the mummy’s eyes.
Part 3: Decorating Your Mummy Masterpieces
- Base Frosting (Optional but Recommended): For a smoother look and to help the “bandages” adhere better, you can spread a thin layer of white buttercream over the top of each cooled cupcake using an offset spatula or butter knife.
- Create the Bandages:
- Fill a piping bag fitted with a flat tip (or a Ziploc bag with a small corner snipped) with the plain white buttercream.
- Starting from the outside edge of the cupcake, pipe horizontal or diagonal strips of frosting across the top, overlapping them slightly to create a bandaged effect. Don’t worry about perfection; unevenness adds to the charm!
- Leave a small gap in the upper center of the cupcake where the eyes will go.
- Add the Eyes:
- Fill a separate piping bag fitted with a small round tip (or a Ziploc bag with a tiny corner snipped) with the green frosting.
- Pipe two small dots in the gap you left for the eyes. These will be the mummy’s glowing eyes.
- Optional: For pupils, you can carefully place a tiny chocolate chip on each green dot, or use a black edible marker for a more defined look. Alternatively, store-bought candy eyes are a quick and easy substitute.
- Final Touches: Continue piping a few more “bandages” around and over the top of the eyes, making it look like they’re peeking out from beneath the wraps.
Tips and Tricks for Perfect Mummy Cupcakes
Even though these are easy, a few expert tips can elevate your mummy creations:
- Cool Completely: This cannot be stressed enough. Warm cupcakes will cause your beautiful frosting to melt and slide right off.
- Use Gel Food Coloring: Gel food coloring provides vibrant colors without thinning your frosting, which liquid colors can do.
- Vary Your Bandages: Don’t feel restricted to perfect lines. Some mummies look great with slightly messier, overlapping, or even criss-crossed bandages for a more aged or “unraveling” look.
- Practice Your Piping: If you’re new to piping, try a few practice lines on a piece of parchment paper first. It helps you get a feel for the pressure needed.
- Make Ahead: You can bake the cupcakes a day in advance and store them in an airtight container at room temperature. The frosting can also be made a day or two ahead and stored in the refrigerator; just let it come to room temperature and re-whip briefly before decorating.
- Storage: Once decorated, store your mummy cupcakes in an airtight container at room temperature for up to 2-3 days, or in the refrigerator for up to a week. Let them come to room temperature before serving for the best flavor and texture.
Variations and Customizations for Your Spooky Treats
While chocolate cupcakes with white and green frosting are classic, don’t hesitate to get creative:
- Cupcake Flavors: Try vanilla, red velvet, pumpkin spice, or even a classic yellow cake base.
- Eye Color: Use blue, red, or even yellow food coloring for different eye effects. Store-bought candy eyes are also a fantastic shortcut.
- Gory Details: For a more gruesome look, drizzle a little red gel (like edible fake blood) peeking out from under the bandages.
- Gluten-Free/Vegan Options: Use your favorite gluten-free flour blend or vegan cupcake and frosting recipes to accommodate dietary needs.
- Other Spooky Details: Add tiny edible spiders or bats on some cupcakes for extra creepiness.
Serving Suggestions: The Perfect Occasion
These mummy cupcakes are versatile for many Halloween-themed events:
- Halloween Parties: The ultimate party favor or dessert centerpiece.
- School or Office Treats: A delightful surprise that’s easy to share.
- Trunk-or-Treat Events: Individually wrapped, they’re perfect for handing out.
- Family Movie Night: A sweet accompaniment to your favorite spooky film.
- Just Because: Sometimes, you don’t need a reason to enjoy a fun, themed treat!
Unwrap the Fun!
These mummy cupcakes are proof that Halloween baking doesn’t have to be complicated to be spectacular. With simple ingredients and a straightforward decorating technique, you can create a batch of treats that are as delicious as they are adorable. They’re a fantastic way to embrace the festive spirit of the season, get creative in the kitchen, and share some sweet, spooky joy with loved ones.
So, preheat your ovens, gather your frosting, and prepare to bring these charming mummies to life. Happy Halloween baking!







