
Crafting Enchanting Blooms: Your Ultimate Guide to DIY Paper Flowers for Nursery Wall Art
Embarking on a new decorating adventure is always exciting, and nothing quite sparks joy like personalizing a special space. As I finally begin the delightful journey of creating our baby’s nursery, my vision for a charming and whimsical atmosphere starts with the walls. The very first project I’m tackling is a stunning paper flower garden, an array of different types of paper blooms mounted beautifully on the nursery walls. After some creative experimentation, I’ve perfected a truly adorable and incredibly versatile method for making these paper flowers, and I’m thrilled to share a detailed, step-by-step tutorial with you today. Get ready to transform simple scrapbook paper into breathtaking floral masterpieces!
Whether you’re decorating a nursery, adding a personalized touch to a living room, or searching for an affordable yet impactful decor solution, these DIY paper flowers are an absolute game-changer. They offer endless possibilities for customization, allowing you to match any color scheme, style, or theme. Not only are they budget-friendly, but the process of creating them is incredibly rewarding, yielding a truly unique piece of art that reflects your personal touch.
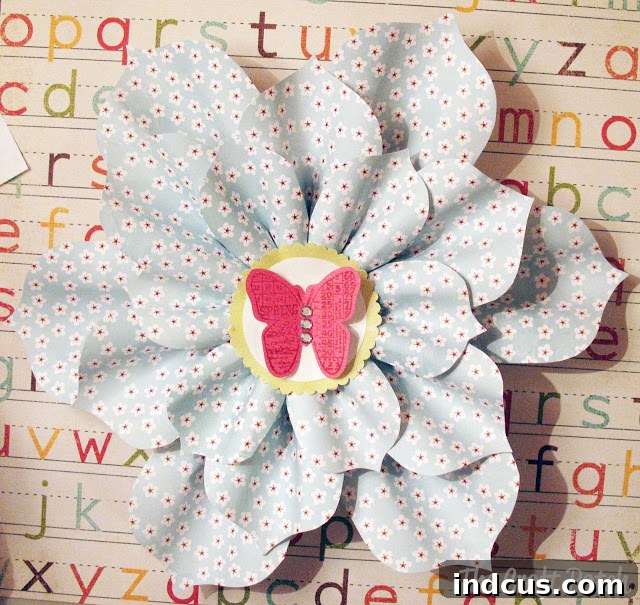
Behold Your Beautiful Creation: The Finished Paper Flower!
Isn’t it captivating? I’m absolutely smitten with the outcome! The depth and dimension of these paper blossoms make them appear far more intricate than they actually are to create. This tutorial will guide you through each stage, ensuring your final product is just as stunning.
Ready to Craft Your Own Paper Flower Masterpiece?
Before we dive into the creative process, let’s gather our simple yet essential supplies. You’ll be amazed at what you can achieve with just a few basic items:
- Scrapbook Paper: The heart of your flower. Choose a variety of colors, patterns, and even textures to add personality. Cardstock is also an excellent choice for durability.
- Scissors: A good pair of sharp scissors will make cutting much easier and more precise.
- Hot Glue Gun & Glue Sticks: Your primary adhesive for quick and strong bonds.
- Optional but Recommended: A pencil, a ruler, a bone folder for creasing, or even a cutting machine like a Cricut or Silhouette for precision cutting.
Step-by-Step Tutorial: Crafting Your Gorgeous Paper Flowers
Follow these detailed instructions to create your own bespoke paper flowers. Remember, creativity is key, so feel free to adapt these steps to your unique style!
Step 1: Preparing Your Petals – The Foundation of Your Flower
Begin by cutting out your flower petals. To achieve a beautifully layered and full bloom, you’ll want to cut six petals each in three distinct, varying sizes. This gradual increase in size will create a wonderful sense of depth when the layers are assembled. While the exact dimensions can be experimented with for endless variations, for this particular flower, my petals measured approximately 3 inches, 4 inches, and 5 inches in length. This combination resulted in a finished flower that was roughly 11 inches across, making a significant visual impact. Don’t hesitate to play with different petal shapes—from classic rounded edges to more pointed or even heart-shaped designs—to achieve truly unique floral expressions.
| Here you can see two sizes of petals. (I had already started using one stack when I remembered to snap this photo!) |
| Yes, indeed… my trusty hot glue gun shows the signs of countless creative adventures! Ha ha. |
Step 2: Shaping the Petals – Adding Dimension and Realism
To give your flat paper petals a beautiful, lifelike dimension, we’ll start by shaping them. Apply a small dot of hot glue precisely at the bottom center of each individual petal. This strategic placement is crucial for the next step.
Step 3: Sculpting and Curling – Bringing Petals to Life
Immediately after applying the glue in Step 2, gently bring the two bottom edges of the petal together and pinch them firmly until the hot glue cools and sets. This creates a subtle crease and cup-like shape at the base of the petal, adding depth. Once the glue is dry, take a moment to gently curl the outside edges of each petal. You can achieve this by lightly running your finger or a dull edge (like the side of a pencil or a bone folder) along the edge, creating a soft, rounded curve. Repeat this process meticulously for all six petals of the same size. This attention to detail in shaping is what will make your finished flower look truly professional and organic.
Step 4: Assembling Petal Rings – Creating Your Flower’s Layers
Now that your petals are beautifully shaped, it’s time to assemble them into rings. Start with one of your petal sizes. Place a small dot of hot glue on the bottom right corner of one petal. Precision here will help create a neat circle.
Step 5: Forming the Circular Base – Connecting Your Petals
Take the petal with glue on its bottom right corner, and carefully press it onto the bottom left corner of another petal, ensuring their corners align perfectly with the right sides together. This creates a continuous bond. Continue this process, gluing petal after petal, until all six petals of that specific size are securely connected, forming a perfect circular ring. Repeat this exact same procedure for each of the other petal sizes, so you end up with three distinct petal rings—one small, one medium, and one large. Each ring will serve as a layer of your majestic paper flower.
Step 6: Layering for Fullness – Bringing the Flower to Life
Now comes the magical part where your flower starts to truly take shape and gain its beautiful fullness. Apply a generous amount of hot glue to the back center of the smallest petal ring. Carefully position and press this smallest layer onto the center of the medium-sized petal ring. Pay close attention to the placement: you want the petals of the smallest layer to be staggered, overlapping the gaps between the petals of the medium layer. This crucial step prevents the petals from lining up perfectly, which would give your flower an unnatural, flat appearance. Once the smallest layer is secured, repeat the process: apply hot glue to the back center of the combined small/medium layer, and then carefully glue it onto the largest petal ring, again ensuring that the petals are beautifully staggered and overlapped. This layering technique is essential for achieving that lush, voluminous look.
Take a closer look at the image above and notice how I intentionally spaced the petals so they overlap and are not perfectly aligned. This staggering effect is vital when you’re gluing your layers together. If the tips of your petals all line up, the flower will lose its natural, organic aesthetic and won’t look as captivating.
Step 7: Embellishing the Center – The Finishing Touch of Charm
Now that the main structure of your paper flower is complete, it’s time to add a decorative element to cover the center hole and truly bring your creation to life. This is where your creativity can fully blossom, as the possibilities for embellishment are truly endless! For this particular flower, I layered several smaller paper circles, creating a lovely focal point, and then added a stamped butterfly for a touch of whimsical charm. However, don’t limit yourself to this idea. Consider using an array of different embellishments:
- Buttons: A collection of colorful or vintage buttons can add a unique, tactile element.
- Rhinestones & Jewels: For a touch of sparkle and elegance, perfect for a glamorous nursery or event decor.
- Words or Monograms: Cut out or stamp initials, names, or meaningful words for a personalized statement.
- Photos: A small, cherished photo can turn your flower into a sentimental keepsake.
- Fabric or Felt: Adding a fabric circle or a small fabric rosette can introduce interesting texture.
- Glitter: A sprinkle of fine glitter or a fully glittered paper circle for a dazzling effect.
- Small Trinkets: Beads, charms, or even tiny faux pearls can be beautiful additions.
The key is to choose something that complements the overall aesthetic of your flower and the space it will adorn. This final touch truly elevates your DIY paper flower from a craft project to a piece of art.
Step 8: Adding a Hanging Mechanism (Optional but Recommended)
To make displaying your beautiful paper flower simple and hassle-free, the last thing I did was to create a small paper loop on the back. Simply cut a strip of paper, form it into a loop, and hot glue both ends securely to the back of the largest petal layer. This loop provides a convenient way to hang your flower on a small nail, hook, or pushpin. Alternatively, for a flush wall mounting, you could use a small command strip or double-sided adhesive tape, especially for lighter flowers. Position the hanging mechanism discreetly so it doesn’t interfere with the flower’s aesthetic when displayed.
Unleash Your Creativity: Exploring Paper Flower Variations
One of the most exciting aspects of this paper flower technique is its incredible versatility. To truly illustrate how adaptable this method is, observe this second flower I crafted using the very same fundamental steps:
As you can see, this flower possesses a completely distinct character and feel! All I modified was the shape and proportion of the petals; I cut out longer, skinnier petals with a more rounded top, giving it a slightly different botanical vibe. Furthermore, I introduced an additional layer of pointed leaves in a contrasting color around the outermost layer of petals, adding an extra dimension and naturalistic touch. For the center, I opted for a large, vibrant yellow button, which instantly transformed its personality. These small adjustments can lead to vastly different and equally beautiful results, proving the power of creative experimentation.
Inspiring Your Next Paper Flower Project: Endless Creative Ideas
To further ignite your imagination and encourage more paper crafting adventures, here are some additional ideas and techniques you can explore:
- Glitter Galore: Elevate your flowers by using glitter paper from the start, or apply glitter glue to the edges or entire petals for an extra sparkle. Because, let’s be honest, everything is better with glitter!
- Antique Charm: Achieve a soft, vintage, or antique aesthetic by gently crinkling or crumpling the paper before you begin assembling your petals. This adds wonderful texture and character.
- Distressed Edges: Before assembly, use ink pads or distressing tools to gently ink around the edges of each petal. This creates depth, definition, and can give a beautifully aged look.
- Double-Sided Blooms: Make two identical flowers and glue them back-to-back. This creates a fully finished flower that looks fantastic from every angle, perfect for garlands, mobiles, or hanging decorations.
- Material Exploration: Experiment with different types of paper beyond scrapbook paper. Try vellum for a translucent, ethereal effect, or embossed paper for subtle patterns and textures that catch the light beautifully.
- Hand-Stitched Details: For a truly unique and charming detail, sew around the edges of each petal before assembling. The visible stitching adds a lovely handcrafted touch and can introduce contrasting colors.
- Jumbo Blooms: Go big! Create colossal flowers by adding more layers and significantly larger petals. These oversized blooms make incredible statement pieces for event backdrops, photo booths, or dramatic wall art. Remember to plan for structural support if they become very large.
- Ombré Effect: Use papers in graduating shades of a single color to create a beautiful ombré effect from the center outwards.
- Mixed Media: Combine paper with other materials like lace, ribbon, or small fabric cutouts within your flower design for an even richer texture.
- Paper Flower Garlands & Wreaths: Once you master individual flowers, connect multiple blooms to create stunning garlands or affix them to a circular base for a beautiful paper flower wreath.
I genuinely believe I need to craft a hundred more of these paper flowers! They are incredibly fun to make, and the creative possibilities are truly boundless. Each one is a small work of art, waiting to brighten a room or bring a smile to someone’s face.
True to my word, I’ve been busy making more! Check out THIS post to see the incredible variety of different paper flowers I’ve created using these techniques! Get ready for some serious paper flower mania inspiration!







