
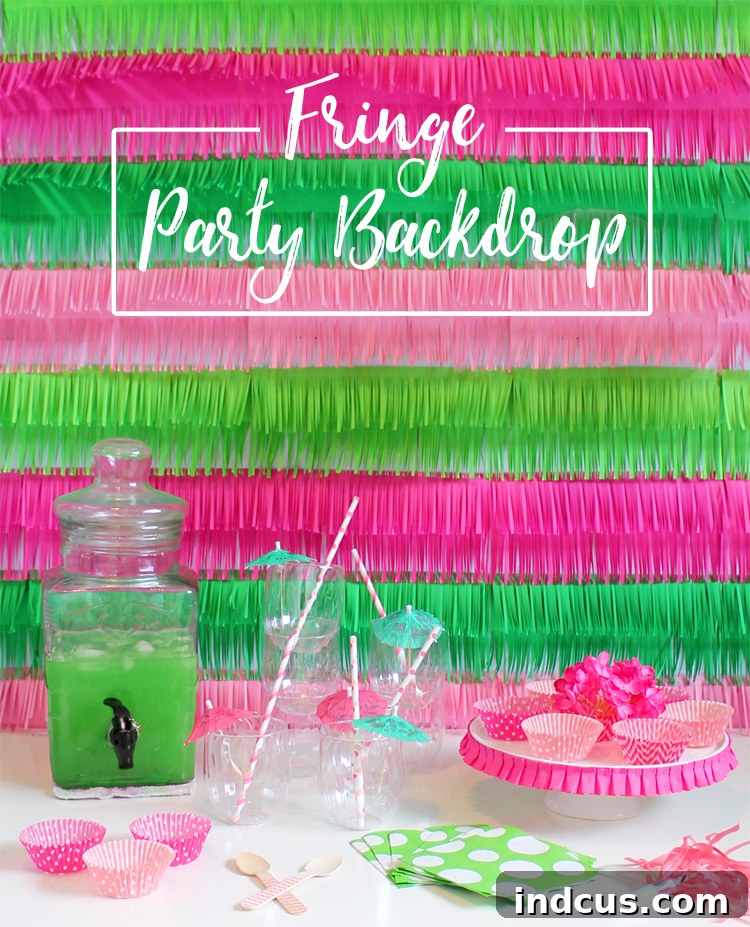
Create a Stunning DIY Fringe Party Backdrop with Colorful Cardstock
Welcome to the ultimate guide for crafting an unforgettable party decoration! If your home is anything like ours, summer brings a flurry of birthday celebrations. With four out of five family members celebrating their special day during the warmer months, we’re always on the lookout for exciting, reusable, and easy-to-make party decor. This year, I stumbled upon a fantastic craft innovation—fringe scissors—and immediately envisioned a vibrant, festive fringe party backdrop. The best part? It looks incredibly complex and professional, but it’s surprisingly simple and quick to assemble, thanks to those ingenious scissors!
A personalized party backdrop isn’t just decor; it’s a focal point, a photo booth, and a reflection of your celebration’s theme. This DIY project allows you to unleash your creativity, choosing colors and patterns that perfectly match any occasion, from whimsical birthday bashes to elegant bridal showers. Get ready to impress your guests and capture picture-perfect memories with a custom-made fringe backdrop that radiates joy and handmade charm.
Why Choose a DIY Fringe Backdrop for Your Next Event?
Beyond its aesthetic appeal, a handmade fringe backdrop offers numerous benefits that elevate any party or event. Firstly, it’s incredibly cost-effective compared to purchasing pre-made decorations. You have full control over the materials, allowing you to select cardstock that fits your budget without compromising on style. Secondly, the customization possibilities are endless. Whether you’re aiming for a specific color palette, an ombre effect, or a multi-textured look, you can tailor every detail to your unique vision. This level of personalization ensures your event stands out and truly reflects your individual taste.
Moreover, a fringe backdrop serves as an excellent focal point for photographs. In an age where every moment is a photo opportunity, having a dedicated, visually stunning background is invaluable. Imagine the joyous smiles captured against a backdrop of cascading, colorful fringe – perfect for social media sharing and creating lasting memories. It’s not just for birthdays; consider it for baby showers, graduations, anniversaries, or even as temporary room decor. The versatility and impressive visual impact make it a crafting project well worth your time and effort.
To embark on creating your own dazzling fringe party or photo background, gather the following essential materials:
Materials Needed for Your Fringe Backdrop Project
Selecting the right materials is the first step towards a successful and beautiful fringe backdrop. Each item plays a crucial role in achieving that professional, eye-catching finish.
- Cardstock: This is the star of your show! Choose a variety of colors that complement your party theme. Cardstock is preferred over regular paper because its heavier weight provides a more substantial, structured fringe that holds its shape beautifully. Think about vibrant color combinations, soft pastels, or even glitter cardstock for extra sparkle. The possibilities truly are endless for creating a unique palette.
- Fringe Scissors: These specialized scissors are an absolute game-changer for this project. Unlike standard scissors, fringe scissors have multiple blades that allow you to cut several strips of fringe in a single swipe, dramatically speeding up the most time-consuming part of the process. They create consistent, even fringe every time, saving you immense effort and ensuring a polished look.
- Tape Runner (or a Glue Stick): While a good quality glue stick can work, a tape runner is highly recommended for its clean application and instant adhesion. It eliminates drying time and prevents the paper from wrinkling or buckling, which can happen with wet glues. The convenience of a tape runner makes the assembly process much smoother and faster, allowing you to achieve seamless rows of fringe with ease.
- Paper Cutter with Scoring Attachment or Paper Scoring Tool: This tool is essential for creating clean, crisp fold lines on your cardstock. A scoring attachment on a paper cutter allows you to cut and score simultaneously, while a dedicated scoring tool provides precision. Scoring prevents cracking in the paper when folding and ensures all your fringe pieces have a uniform bend, contributing to the overall neatness and professional finish of your backdrop.
- Butcher Paper: This will serve as the sturdy base for your fringe backdrop. Butcher paper is ideal because it’s strong enough to support the weight of the cardstock fringe, yet flexible enough to hang easily. Its wide width allows you to create backdrops of various sizes. If butcher paper isn’t readily available, a large roll of kraft paper or even several pieces of poster board taped together can work as an alternative.
As mentioned, those fringe scissors are a true marvel. They effortlessly slice through paper, creating four or five perfectly uniform fringy pieces with each smooth motion. This innovation alone transforms what could be a tedious task into an enjoyable and efficient crafting experience.
Step-by-Step Instructions: Crafting Your Fringe Backdrop
Follow these detailed steps to bring your vibrant fringe party backdrop to life. Patience and precision in each stage will ensure a stunning final result.
Step 1. Prepare Your Fringe Strips: Begin by taking each sheet of cardstock and carefully cutting fringe along both of its long edges using your fringe scissors. This is the most time-consuming part of the project, so prepare yourself with a good movie or your favorite podcast. To avoid hand fatigue, I highly recommend breaking this step into shorter sessions over a couple of days. Believe me, craft injuries like blisters are real, especially with repetitive cutting! Take breaks, stretch your hands, and enjoy the process. Aim for consistent, deep cuts, stopping about an inch or so from the center of the paper to leave a solid strip in the middle.
Step 2: Score the Fold Line: Once all your cardstock sheets are fringed, it’s time to create a crisp fold. Using your paper cutter with a scoring attachment or a dedicated paper scoring tool, create a score line across the solid, unfringed center portion of each sheet. This line (often depicted as pink in diagrams, for visibility) will be your precise guide for folding. Scoring prevents the cardstock from cracking and ensures a clean, straight fold, which is crucial for the uniform appearance of your fringe layers.
Step 3: Fold the Fringe: Carefully fold each fringed cardstock strip along the score line you just created. The fringe should fold neatly over onto itself, creating a doubled layer of fringe on each side of the central fold. Ensure that the folds are sharp and even; this precision will contribute significantly to the tidy and full appearance of your finished backdrop. This step prepares each individual fringe piece for attachment to your base, allowing them to hang beautifully.
Step 4: Assemble Your Backdrop Base: Unroll your butcher paper and cut it to the desired dimensions of your final backdrop. Remember to account for hanging space if needed. Now, using your tape runner, begin attaching the folded fringe strips in horizontal rows across the butcher paper. Start from the bottom edge of your butcher paper and work your way upwards. Apply a line of adhesive along the folded edge of a fringe strip and press it firmly onto the butcher paper. Overlap each subsequent row slightly over the previous one to create a dense, layered effect, ensuring no gaps show the butcher paper underneath. Alternate colors as desired to create your chosen pattern or color scheme. Consistency in placement is key here for a cohesive look.
Step 5: Finishing Touches: Once all your fringe strips are securely attached and your backdrop is covered from top to bottom, lay it flat. Carefully trim off any excess butcher paper that might be sticking out around the edges of your fringe. This step ensures a clean, professional finish and gives your backdrop a polished, custom-made appearance. You can also trim the entire backdrop to a specific shape if you desire, or simply tidy up the edges for a crisp, rectangular look.
And there you have it! Your very own DIY party backdrop, bursting with fringy goodness and vibrant colors. Isn’t it seriously cute? The satisfaction of creating something so visually striking with your own hands is truly rewarding.
I recently incorporated this exact backdrop into a delightful strawberry-themed party, and it was an absolute hit! The backdrop perfectly complemented the theme, creating an atmosphere of whimsical charm. It truly tied the whole celebration together, making for an incredibly “berry glad it’s summer” vibe. You can explore all the details of that vibrant party HERE, including the triple-layer ice cream cake that was, dare I say, to die for!
Unleash Your Creativity: Customizing Your Fringe Backdrop
The beauty of this DIY project lies in its incredible adaptability. There are countless fun ways you can modify and personalize this idea to perfectly match your specific party theme or aesthetic preferences. Let your imagination run wild!
- Color Gradients and Ombre Effects: Instead of alternating distinct colors, try transitioning from one shade to another gradually. Start with a dark color at the bottom and slowly move to lighter shades as you work your way up, or vice versa, to create a stunning ombre effect.
- Themed Color Palettes: For a specific theme, select colors accordingly. Think bright neons for a 90s party, metallic golds and silvers for a glamorous New Year’s Eve celebration, deep greens and reds for a festive holiday event, or soft blues and pinks for a baby shower.
- Mixed Materials: Don’t limit yourself to just cardstock! Incorporate strips of metallic foil paper, glitter cardstock, tissue paper, or even lightweight fabric ribbons into your rows of fringe for added texture and sparkle.
- Varying Fringe Lengths and Widths: Experiment with cutting some fringe strips longer or shorter, or making some cuts wider than others. This can create a more dynamic and organic look, adding visual interest and depth to your backdrop.
- Adding Embellishments: Once your backdrop is complete, enhance it with additional decorations. String fairy lights through the fringe for a magical glow, attach balloons, paper flowers, or even cut-out letters to spell out a personalized message like “Happy Birthday” or the guest of honor’s name.
- Unique Shapes and Patterns: Instead of straight horizontal rows, consider attaching your fringe in diagonal lines, chevron patterns, or even creating large geometric shapes within the backdrop for a modern twist. You could also cut the fringe ends into pointed or wavy shapes for a different texture.
- Interactive Elements: For a photo booth, you could incorporate props directly onto the backdrop or create small pockets within the fringe layers to hold disposable cameras or small favors.
Beyond Birthdays: Versatile Uses for Your Fringe Backdrop
While perfect for birthday celebrations, a DIY fringe backdrop’s utility extends far beyond just one type of event. Its vibrant and customizable nature makes it suitable for a multitude of occasions and settings:
- Photo Booths: Elevate any photo booth setup, whether for weddings, bridal showers, corporate events, or school dances. The dynamic texture and color make for incredibly engaging and memorable photographs.
- Event Decor: Use it as a vibrant background for dessert tables, gift tables, or as an accent wall in any event space, instantly transforming a plain room into a festive environment.
- Retail Displays: Businesses can utilize these backdrops to add a pop of color and visual interest to their window displays or in-store product presentations.
- Children’s Room Decor: A smaller version can serve as a playful and colorful headboard or an accent wall in a child’s bedroom or playroom, easily updated as their interests change.
- Seasonal Home Decor: Craft one in autumnal colors for Thanksgiving, pastels for Easter, or patriotic hues for national holidays to add a festive touch to your home decor.
- Theatrical or Performance Stages: Simple yet effective, these backdrops can add instant atmosphere to school plays, talent shows, or community performances.
No matter the occasion, this fringe backdrop is an easy and impactful way to infuse personality and joy into any space. So gather your materials, put on some music, and get ready to craft something truly special. Happy crafting, and may your celebrations be filled with color and cheer!







