
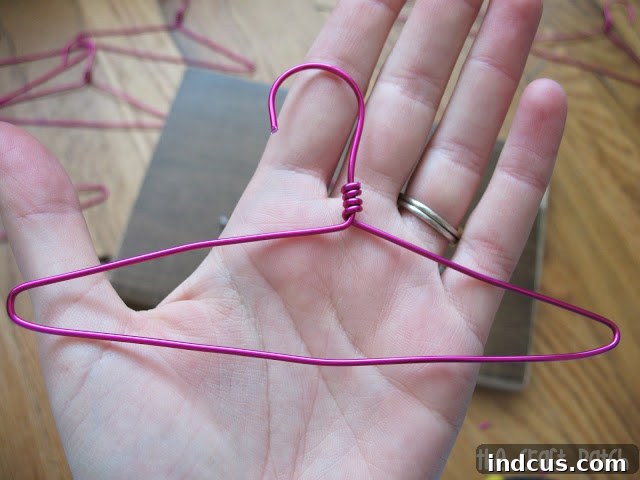
DIY Custom Wire Hangers: Elevate Your Doll’s Wardrobe with Handmade Miniature Organization
Every doll enthusiast knows the joy of a well-loved doll collection, complete with a diverse wardrobe ready for any adventure. Yet, the challenge often lies in keeping those precious miniature outfits organized and pristine. While a beautifully crafted doll clothes closet is a dream come true for any little one, the true magic often lies in the details – like perfectly sized, sturdy hangers. We understand the satisfaction that comes from seeing a doll’s ensembles neatly arranged, and that’s precisely why we’re diving into an exciting and rewarding craft project today: making custom wire hangers for doll clothes!
A while back, inspired by a desire for functional beauty, my husband created an incredible doll clothes closet for our daughter. This charming miniature armoire, complete with hinged doors and a dowel rod for hanging garments, quickly became a cherished piece in her playroom. You can catch a glimpse of this delightful project here, and truly appreciate the inspiration behind these miniature hangers:
This charming closet, skillfully constructed from beadboard and lined with decorative scrapbook paper, offered the perfect stage for a well-curated doll wardrobe. However, the initial solution for hanging clothes—simple cardboard cutouts—proved to be less than ideal over time. They lacked durability, easily bent, and frankly, didn’t match the closet’s overall handmade charm and sturdiness.
It was clear a more robust and aesthetically pleasing solution was needed to properly display and care for the doll’s attire. That’s when the idea sparked: why not craft miniature wire hangers? These DIY doll clothes hangers offer unparalleled sturdiness, a professional look, and the incredible advantage of being fully customizable to fit any doll’s outfit, from tiny dresses for fashion dolls to elaborate ensembles for popular dolls like American Girl. Today, we’re thrilled to share our foolproof method for creating these adorable and functional miniature hangers, transforming your doll’s closet into an impeccably organized haven and enhancing playtime for years to come.
Why Choose DIY Wire Hangers for Doll Clothes?
While you might find generic plastic doll hangers in stores, making your own wire versions offers several distinct advantages that elevate the organization and aesthetic of your doll’s wardrobe. Firstly, customization is paramount. You gain the ability to tailor each hanger’s width and shape to perfectly suit specific doll clothes, preventing those annoying shoulder bumps or slips often seen with ill-fitting, generic hangers. This ensures every garment, from delicate silks to voluminous party dresses, maintains its shape beautifully.
Secondly, durability is a significant factor; 14 gauge wire provides a strength and longevity that cardboard or flimsy plastic simply can’t match. These robust hangers ensure your doll’s treasured outfits are supported for years, making them a worthwhile investment of your time. Lastly, there’s the sheer satisfaction and joy of creating something beautiful and functional with your own hands. This project is not only practical but also a wonderfully engaging craft for adults and older children alike, adding a personal, handmade touch to your doll’s world that mass-produced items simply can’t replicate. It’s a fantastic way to bond over a creative endeavor while solving a common doll organization problem.
Gather Your Crafting Essentials: Materials for Your Miniature Hangers
Before we embark on this creative journey of making DIY miniature hangers, let’s ensure you have all the necessary supplies at hand. Most of these items are readily available at craft stores, hardware stores, or even around your home, making this an accessible and enjoyable DIY project. Having everything prepared beforehand will ensure a smooth and efficient crafting experience. Here’s what you’ll need to create your custom doll clothes hangers:
- A Picture of a Wire Hanger: This will serve as your visual guide for the classic hanger shape. Alternatively, if you have a knack for freehand drawing, you can sketch your own ideal miniature hanger design directly onto your wood scrap. The key is to visualize the classic triangular base and the iconic curved hook. This provides a tangible reference for your template.
- A Small Scrap of Wood: Any sturdy piece of wood will do, as long as it’s large enough to accommodate your hanger template. This will be your stable, reusable base for shaping the wire, preventing it from slipping and ensuring consistent results.
- A Few Nails: Standard finishing nails or small brads (about 1.5 to 2 inches long) will work perfectly. You’ll need three for each hanger template you create on your wood board. These nails will act as the fixed points around which you’ll bend your wire.
- A Hammer: Essential for securely driving the nails into your wooden template. Choose a hammer that feels comfortable and safe to handle.
- Needle-Nose Pliers (with Wire Cutters): These are indispensable for this project! They allow for precise bending, twisting, and holding of the wire. The fine tip is perfect for intricate work, while the cutting edge is crucial for snipping the wire neatly. If your needle-nose pliers don’t have built-in wire cutters, you’ll need a separate pair of small, sturdy wire cutters.
- 14 Gauge Wire: This is the star of our show! 14 gauge wire strikes the perfect balance – it’s robust enough to hold its shape and support doll clothes without bending or warping, yet flexible enough to be easily manipulated with pliers. You can find a fantastic selection of colors in the jewelry or craft wire section of most craft stores or conveniently online. Choosing a fun color can add an extra pop of personality and charm to your doll’s closet, making the hangers themselves part of the decor!
Step-by-Step Guide: Crafting Your Perfect Miniature Wire Hangers
Now that you’ve gathered your supplies, let’s get hands-on! Follow these detailed instructions carefully to create sturdy, beautiful, and perfectly sized wire hangers for your doll’s cherished garments. This process is designed to be straightforward, ensuring success even for novice crafters.
Step 1: Constructing Your Hanger Template Foundation
The secret to uniform, well-shaped hangers lies in creating a reliable and repeatable template. Begin by drawing the foundational triangular shape of your desired hanger directly onto your scrap of wood. Pay close attention to the dimensions; consider the size of the doll clothes you intend to hang – for larger doll clothes (like those for American Girl dolls), you’ll want a slightly wider triangle than for smaller fashion doll outfits (like Barbie’s). Once you’ve perfected your triangle, hammer a nail or two firmly into each of its three corner points. Ensure the nails are driven deep enough to be secure but still allow the wire to be wrapped around them. These nails will act as precise guides, ensuring consistent bends and identical shapes for every miniature hanger you produce, making batch crafting a breeze.
Step 2: Expertly Wrapping the Wire Base for Shape
Unroll a generous length of your 14 gauge wire – it’s always better to have a little extra than not enough. Starting at one of the top nails, begin wrapping the wire around your nail template, pulling it taut as you go. The goal here is to achieve the straightest lines possible for the bottom and sides of your hanger, ensuring a crisp and clean finish. As you wrap, make sure to leave a small overlap (about an inch or two) where your wire ends meet at the top point of the triangle. This overlap is crucial for securing the hanger’s structure later and will form the foundation for the hook. Maintain consistent tension throughout the wrapping process to prevent any sagging or unevenness in the hanger’s base.
Step 3: Securing the Hanger’s Apex with a Twist
Once you’ve wrapped the wire securely around the three nails, gently remove the wire form from your wooden template. Take the overlapping ends of the wire at the top of the triangle and twist them together tightly. Use your needle-nose pliers to get a firm, controlled grip and create a secure, neat twist. Aim for a consistent twist that is both strong and visually appealing. This twisting action not only strengthens the hanger’s base but also forms the robust starting point for the hanging hook. Crucially, after twisting, use your pliers to carefully tuck in any sharp wire ends. We want these miniature hangers to be completely snag-free and smooth, protecting delicate doll clothes from accidental pulls or tears, and safeguarding little fingers.
Step 4: Forming the Iconic Hook for Hanging
The final, defining touch is shaping the hanger’s characteristic curved hook. Grab a cylindrical object – a thick marker, a glue stick, a small dowel, or even the handle of your pliers works perfectly – to serve as your guide. Position the twisted wire section (where your two ends meet) over your chosen cylinder. Carefully and firmly bend the excess wire around the curve of the object, forming a smooth, elegant hook. Take your time to achieve a graceful and symmetrical curve. Once the hook is shaped to your liking, use the wire cutters built into your needle-nose pliers (or a separate pair of cutters) to snip off any remaining excess wire. Ensure the cut is clean and flush, again, to prevent any sharp points that could snag fabric or injure hands. This step completes your miniature masterpiece.
And just like that, with these four simple steps, you’ve created a charming and robust miniature wire hanger! The satisfaction of seeing your first perfectly formed hanger is truly rewarding, and you’ll find yourself eager to make more.
Beyond Basic: Customization and Advanced Hanger Ideas
One of the best aspects of crafting your own wire hangers is the endless potential for customization. Once you master the basic technique, you can explore various ways to personalize and adapt these hangers to meet all your doll wardrobe organization needs. Here are a few ideas to take your doll’s closet to the next level:
- Varying Sizes: Don’t stick to just one template! Create multiple wooden templates to make hangers of different widths and heights. This allows you to perfectly fit everything from tiny shirts and swimsuits for smaller fashion dolls to elaborate gowns and coats for larger dolls like American Girl, ensuring every garment hangs impeccably.
- Color Pop: Utilize the wide array of colored craft wires available. Imagine a vibrant rainbow of hangers for a fun and cheerful doll closet, or use specific colors to categorize outfits (e.g., pink for dresses, blue for casual wear, gold for formal attire). This adds a decorative element and makes finding specific outfits even easier.
- Skirt and Pant Hangers: As briefly mentioned in the original inspiration, these wire hangers are easily adaptable for skirts and pants. Simply attach two miniature clothespins to the bottom bar of your wire hanger. These tiny clips offer a charming and incredibly functional way to hang bottom garments, preventing creases and keeping matching sets together. You can even find decorative miniature clothespins to add extra flair. Seriously, are these not the cutest and most practical solution ever for a complete doll wardrobe?
- Adding Embellishments: For a touch of sparkle, consider adding small beads, charms, or even a tiny bow made of ribbon to the hook of your hangers. This can personalize them even further and make them truly unique.
Tips for Success and Troubleshooting Common Issues
Even though this is a straightforward project, a few tips and tricks can ensure smooth sailing and help you achieve professional-looking results every time. Don’t be afraid to experiment and learn as you go!
- Practice Makes Perfect: Don’t be discouraged if your first few hangers aren’t flawless. Wire bending and shaping takes a little practice to get just right. You’ll quickly develop a feel for the material and the tools. Save your first few attempts as a reminder of how much you’ve improved!
- Wire Tension is Key: Maintaining consistent tension while wrapping the wire around the nails is crucial for creating symmetrical and sturdy hangers. Too loose, and your hanger might be floppy; too tight, and it might be hard to remove from the template or prone to warping. Find that sweet spot!
- Always Smooth Edges: After twisting and especially after cutting the wire, always double-check for any sharp wire ends or burrs. Use your needle-nose pliers to press down, file, or smooth any stray points to ensure complete safety and prevent delicate doll fabrics from snagging. This is a critical step for longevity and usability.
- Template Longevity: Your wooden template with nails can be reused indefinitely, making batch production of hangers incredibly efficient. If you plan to make many hangers, consider making a very sturdy template.
- Safety First: When working with tools like hammers and pliers, and especially cutting wire, always exercise caution. If children are involved in the crafting process, ensure adult supervision for all steps involving sharp objects.
The Joy of an Organized Doll Wardrobe: A Craft That Lasts
Imagine your little one’s delight as she opens her doll’s closet to find every dress, every skirt, and every tiny accessory neatly hanging on its own adorable, custom-made wire hanger. This simple DIY project doesn’t just create functional accessories; it fosters a sense of order, encourages imaginative play, and adds a beautiful, personalized touch to a beloved toy collection. The act of organizing their doll’s clothes can also subtly teach children about responsibility and care for their belongings.
No more crumpled outfits at the bottom of a toy box! These durable and charming miniature hangers will keep all your doll’s clothes in pristine condition and easily accessible for endless dress-up adventures. This project is a testament to how small, thoughtful details can make a big difference in enhancing playtime and creating cherished memories. It’s an investment in both organization and imaginative play that will be appreciated for years to come.
Ready to Craft Your Own Doll Clothes Hangers?
We’ve walked you through every step of creating these delightful and practical DIY wire hangers for doll clothes. Now, we encourage you to gather your materials and give this wonderfully satisfying project a try. Whether you’re aiming for practical organization, a decorative touch, or a thoughtful, handmade gift for a doll lover in your life, these custom wire hangers are a fantastic solution. They add functionality and charm that store-bought options simply can’t match.
Don’t hesitate to personalize them with different colored wires or by adding small embellishments. Once your doll’s wardrobe is perfectly organized, you’ll wonder how you ever managed without them! Share your creations with us – we’d love to see how you personalize your doll’s closet and bring these miniature hangers to life! Happy crafting, and enjoy the beauty of a perfectly organized doll wardrobe!







