
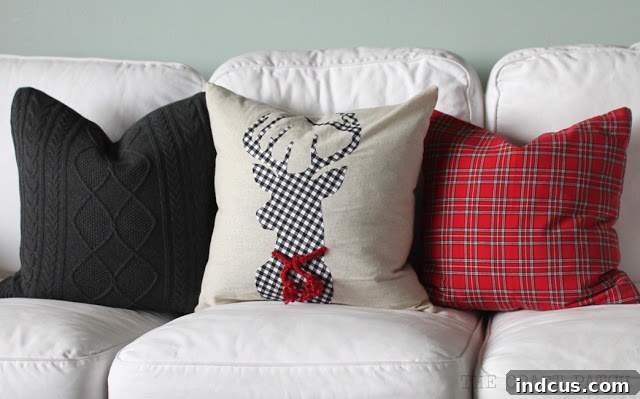
Transform Your Home for the Holidays: Three Simple DIY Pillow Covers You Can Make Today
The holiday season is a magical time, filled with warmth, joy, and the delightful task of transforming our homes into festive sanctuaries. One of the simplest yet most impactful ways to infuse seasonal cheer into your living space is through throw pillows. They offer an instant splash of color, texture, and holiday spirit, turning everyday furniture into cozy, inviting havens. If you’re like me, you love to swap out bright summer florals for something a little more textural and warm as the colder months approach, perhaps with vibrant pops of red for Christmas.
Crafting your own holiday pillow covers is not only a fantastic way to personalize your decor but also an incredibly budget-friendly project. You don’t need to be a seasoned seamstress to create stunning results. In fact, you can easily make several beautiful, custom pillow covers in a single afternoon. Get ready to add that perfect touch of handmade charm to your couch, chairs, or bed with these three simple DIY pillow cover ideas.
Let’s dive into these delightful projects, designed to add comfort and character to your festive home!
1. The Cozy Upcycled Sweater Pillow: No Knitting Required!
Imagine the soft, comforting texture of your favorite sweater, now repurposed into a stylish and incredibly cozy pillow. This project is a game-changer for anyone who loves the look of intricate cable knits but dreads the thought of knitting. It’s an ingenious way to bring that rustic, winter-cabin feel into your home without ever picking up knitting needles. The best part? It’s incredibly quick to make, often taking less than an hour from start to finish!
Materials & Tools:
- An old sweater (wool, cashmere, or a soft acrylic blend works wonderfully) – thrift stores are perfect for finding unique textures and colors.
- A pillow insert (ensure it fits comfortably inside the sweater material).
- Fabric scissors.
- Sewing machine (or needle and thread for hand-sewing).
- Pins.
- Measuring tape or ruler.
Instructions:
- **Prepare Your Sweater:** First, wash and dry your chosen sweater according to its care instructions. This helps pre-shrink it and ensures it’s clean and fresh. Lay the sweater flat and smooth it out.
- **Measure and Cut:** Determine the size of your pillow insert. Lay the insert on top of the sweater body to gauge the right area. You’ll want to cut a square or rectangle from the body of the sweater, making sure to leave at least a 1/2 to 1-inch seam allowance on all four sides beyond your pillow insert’s dimensions. For example, if your insert is 18×18 inches, cut a piece roughly 19×19 or 20×20 inches. Try to utilize any existing finished hems of the sweater if possible, as this can reduce the amount of sewing needed.
- **Pin the Sides:** Fold the sweater fabric in half, right sides together, if you cut one large piece. Alternatively, if you cut two separate pieces (front and back), place them right sides facing each other. Pin along three of the edges and partially along the fourth, leaving an opening large enough to insert your pillow form later (typically 6-8 inches).
- **Sew the Edges:** Using your sewing machine (or hand-sewing with a strong backstitch), sew along the pinned edges with your chosen seam allowance. Make sure to backstitch at the beginning and end of each seam for added durability.
- **Clip Corners (Optional but Recommended):** Carefully trim the corners of the fabric diagonally, close to the stitch line but without cutting through it. This reduces bulk in the corners when you turn the pillow right side out, resulting in sharper, crisper corners.
- **Turn and Stuff:** Turn the pillow cover right side out through the opening you left. Gently push out the corners. Insert your pillow form, working it into all corners until the cover is plump and smooth.
- **Close the Opening:** Hand-sew the opening shut using a ladder stitch (invisible stitch) for a neat, seamless finish. Alternatively, for a quicker approach, you could use fabric glue or add a zipper or velcro closure for easy removal and washing.
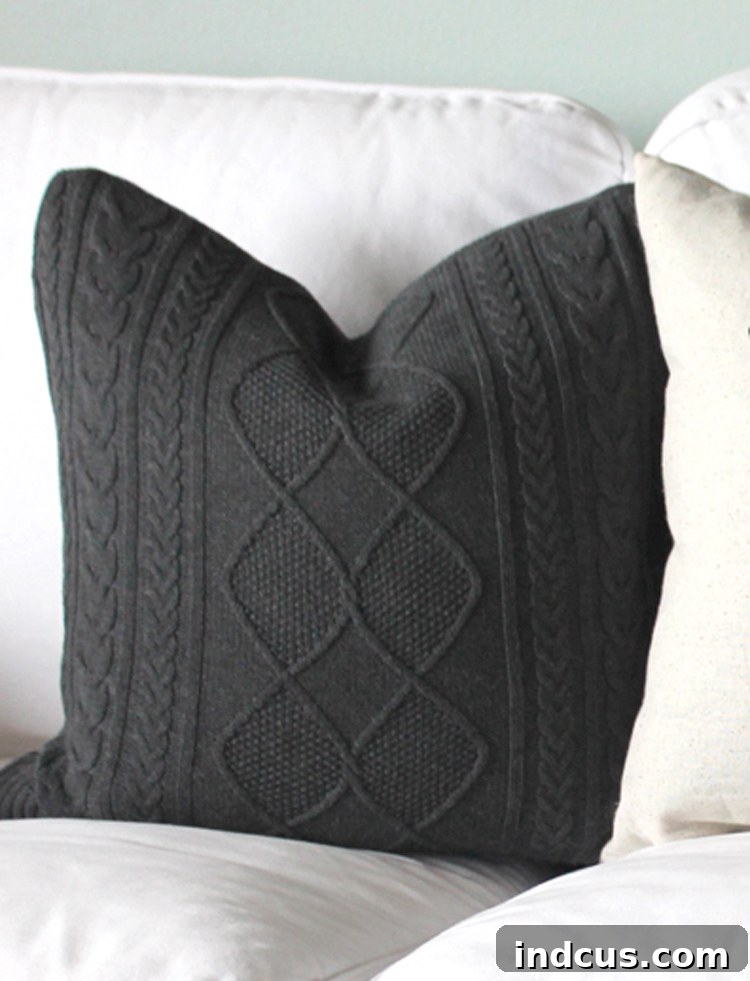
This upcycled sweater pillow not only adds incredible texture and warmth to your holiday decor but also tells a story of sustainable crafting. It’s a fantastic way to give an old sweater new life while creating a unique and personal piece for your home.
2. The Easy Plaid Deer Pillow: A Rustic Holiday Accent
Nothing says “rustic holiday charm” quite like a majestic deer silhouette. This project combines the timeless appeal of plaid fabric with an iconic winter motif, creating a pillow that feels both classic and effortlessly festive. While it looks professionally crafted, the steps are surprisingly simple, making it perfect for crafters of all skill levels. You can easily adapt this technique for other animal silhouettes or holiday shapes.
Materials & Tools:
- Blank pillow cover (either one you sew yourself or a store-bought one).
- Plaid fabric for the deer (flannel, buffalo check, or any woven fabric with a tight weave works well).
- Double-sided iron-on adhesive (such as HeatnBond Lite or fusible web).
- Printer and paper for the deer template.
- Scissors (fabric scissors and small detail scissors are helpful).
- Iron and ironing board.
- Red yarn or thin ribbon for the “scarf.”
- Hot glue gun and glue sticks, or needle and coordinating thread for attaching the scarf.
- Optional: Sewing machine with a satin stitch foot (or a steady hand for hand embroidery).
Instructions:
- **Download Your Deer Template:** Begin by downloading a deer silhouette template. You can find many free options online by searching “deer silhouette template.” Print it out to your desired size, ensuring it fits well on your pillow cover. If you prefer the specific design used here, you can access one HERE.
- **Prepare Your Fabric with Adhesive:** Cut a piece of your plaid fabric slightly larger than your deer template. Iron the double-sided iron-on adhesive to the wrong side of this plaid fabric, following the manufacturer’s instructions. This usually involves placing the rough side of the adhesive onto the fabric and pressing with a warm iron until it adheres. This step is crucial for creating a “no-sew” appliqué that stays firmly in place.
- **Trace and Cut the Deer:** Once the adhesive is cooled and securely attached, trace your deer template onto the paper backing of the adhesive. Carefully cut out the deer shape using sharp scissors, ensuring clean edges. Once cut, peel off the paper backing to reveal the adhesive on the back of your plaid deer.
- **Iron the Deer onto the Pillow:** Position your plaid deer onto the blank pillow fabric exactly where you want it. Take your time to center it and ensure it’s straight. Once satisfied with the placement, press down firmly with a hot iron, again following the adhesive manufacturer’s instructions for temperature and pressing time. The heat will bond the deer appliqué permanently to your pillow cover fabric.
- **Craft the Scarf:** Braid or crochet two 6-inch lengths of red yarn or ribbon to create a miniature scarf for your deer. A simple three-strand braid works perfectly. You can also just use a thin strip of red felt or ribbon if you prefer a no-braid option.
- **Attach the Scarf:** Drape the braided scarf around the deer’s neck. You have a couple of options for attachment:
- **Hot Glue:** A quick and easy method. Apply small dots of hot glue to secure the scarf in place.
- **Hand-Sewing:** For a more secure and durable attachment, use a needle and coordinating red thread to hand-sew the scarf to the pillow cover. This helps ensure it withstands handling over time.
- **Optional: Add a Satin Stitch for Durability:** To give your deer appliqué a more finished look and prevent the edges from lifting or fraying over time, you can run a satin stitch around the perimeter. This is done with a sewing machine using a zigzag stitch set to a very short stitch length and a wide width, or it can be done by hand with embroidery floss. While this step adds durability and a polished finish, it’s entirely optional. As the original crafter noted, for a seasonal pillow used only a month out of the year, it might not be strictly necessary, but it’s a great option for longevity.
For your pillow cover, you can sew your own using a favorite fabric, or save time by purchasing a pre-made blank cover. There are many affordable options available; for instance, you can find a highly similar blank pillow cover here, often for less than $4. You can also find great deals on Amazon, such as a pack of two blank pillow covers for around $12 here. These pre-made covers often come with convenient zipper closures, making them easy to use and wash. This project is a fantastic way to incorporate classic Christmas imagery into your decor with minimal effort.
3. The Plaid Cloth Napkin Pillow: The Easiest Holiday Pillow Ever!
If you’re looking for a holiday DIY project that requires almost no sewing skill and can be completed in minutes, then the plaid cloth napkin pillow is your new best friend. This ingenious idea leverages the pre-finished edges of cloth napkins to create a beautiful pillow cover with minimal effort. It’s incredibly cost-effective, especially when you can snatch up holiday-themed napkins during seasonal sales.
Materials & Tools:
- Two matching (or coordinating) cloth napkins, preferably with a festive pattern like buffalo check or tartan plaid.
- A pillow insert that fits the size of your napkins.
- Sewing machine (or needle and thread for quick hand-sewing).
- Pins.
- Fabric scissors (optional, for trimming threads).
Instructions:
- **Choose Your Napkins:** Head to stores like Hobby Lobby or your favorite home goods section during the holiday season. Look for sturdy cloth napkins that are already hemmed. Plaid patterns are particularly festive, but any pattern that complements your decor will work. Often, you can find them on sale for a dollar or two each, making this project incredibly affordable. For example, a black and white buffalo check cloth napkin like this one would be perfect.
- **Prepare for Sewing:** Lay one napkin flat, then place the second napkin directly on top, right sides together. Align all four edges perfectly, paying special attention to any patterns to ensure they match up nicely.
- **Pin the Edges:** Pin three sides of the napkins together. On the fourth side, pin from each corner inward, leaving a gap of about 5-7 inches in the middle. This opening will be where you insert your pillow form.
- **Sew the Sides:** Using your sewing machine (or hand-sewing with a straight stitch), sew along the pinned edges with a 1/2-inch seam allowance. Remember to backstitch at the beginning and end of your seams for extra strength, especially around the opening. The beauty of using napkins is that their existing finished hems become the interior seam allowance, making the process even simpler!
- **Turn Right Side Out and Insert Pillow:** Carefully clip the corners to reduce bulk, then turn the pillow cover right side out through the opening. Gently push out the corners so they are crisp. Insert your pillow form, fluffing it and adjusting it until it fills the napkin cover completely and evenly.
- **Close the Opening:** Hand-sew the opening shut using a ladder stitch (invisible stitch) for a clean finish. Alternatively, if you want to be able to remove the insert, you could sew in a small piece of Velcro or a few snaps before fully closing it.
This method is truly the simplest way to create a decorative pillow cover. It capitalizes on the pre-finished edges of the napkins, eliminating the need for hemming and significantly cutting down on sewing time. On a related note, if you enjoy this kind of upcycling, you might also be interested in how to make a pillow out of a placemat, a similar technique often shared on social media for quick home decor hacks.
Styling Your New Holiday Pillows and Enjoying the Season
Once your beautiful new holiday pillow covers are complete, it’s time to arrange them and truly embrace the festive ambiance they create. These DIY projects are not just about crafting; they’re about creating a warm, inviting atmosphere that reflects your personal style and makes your home feel extra special during this magical time of year.
I’m absolutely loving my cozy Christmas couch, adorned with these handmade treasures. There’s something incredibly satisfying about curling up under a divine fur throw blanket (mine is from Fred Meyer, a wonderful find!), sipping on hot cocoa, and simply enjoying the glowing lights of the Christmas tree, surrounded by decor you’ve crafted yourself. Mix and match your new sweater, deer, and plaid napkin pillows with existing holiday decor, or use them as a foundation for an entirely new festive look. Don’t be afraid to combine different textures – the plushness of a sweater, the crispness of plaid, and the softness of other fabrics create a rich, layered effect.
These projects are designed to be accessible and fun, offering a creative outlet during the busy holiday season. Whether you’re making them for your own home or as thoughtful, handmade gifts for loved ones, the joy of creating is truly a gift in itself. Embrace the process, let your creativity shine, and enjoy the cozy, festive environment you’ve cultivated.
Happy crafting, and may your home be filled with warmth, comfort, and holiday cheer!







