
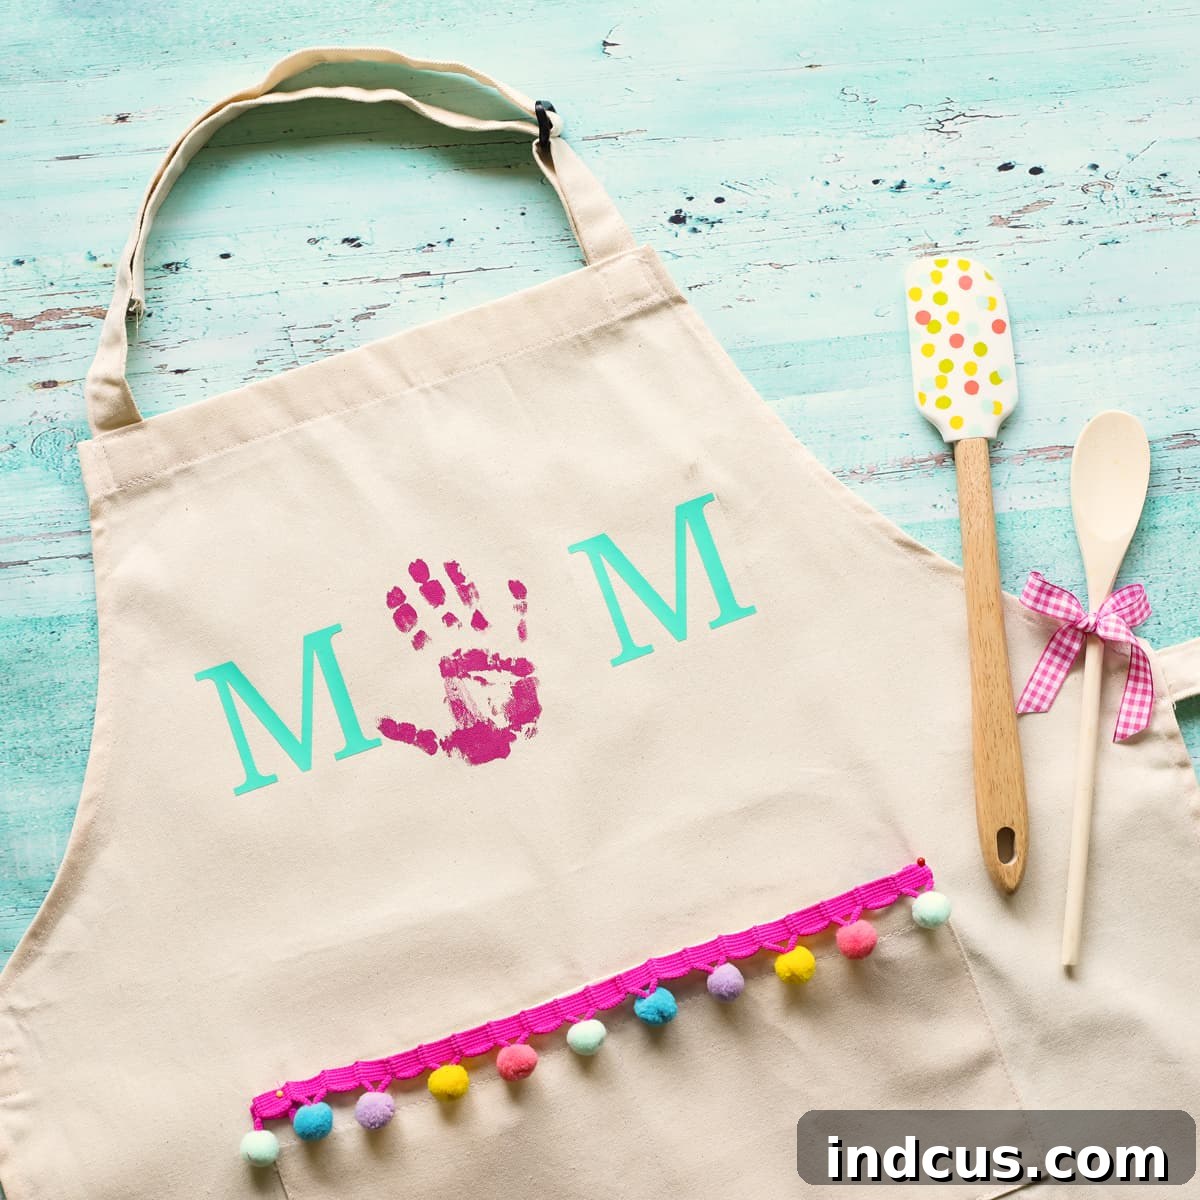
Create a Cherished Mother’s Day Handprint Apron: A Heartfelt DIY Gift for Mom
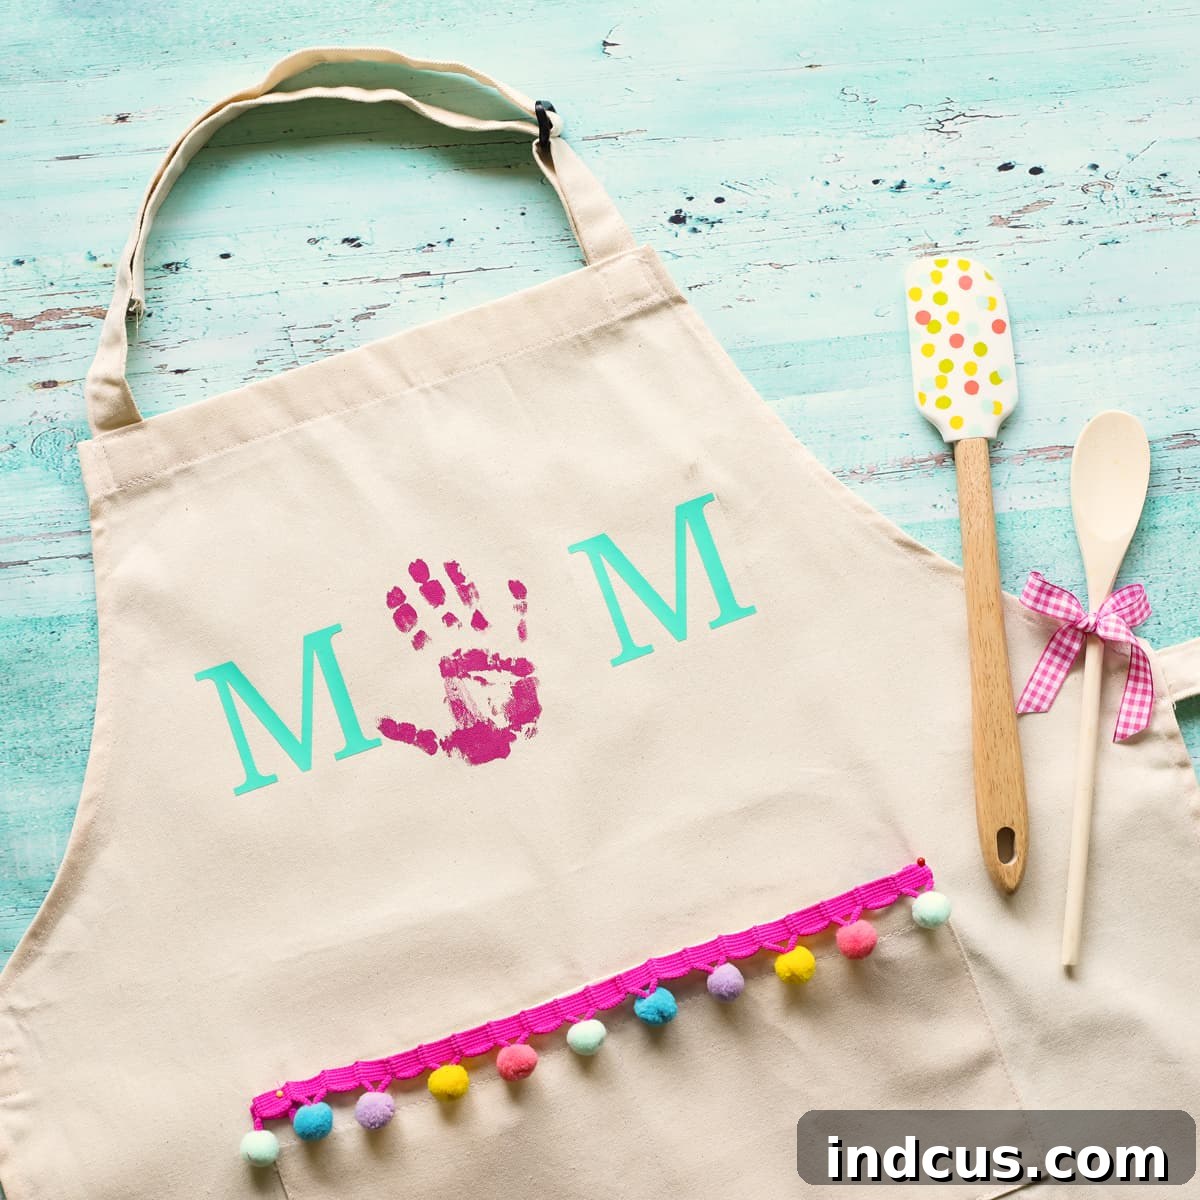
Mother’s Day is a truly special occasion to honor the incredible women who shape our lives. While many gifts are appreciated, there’s an unparalleled joy in receiving a handmade present, especially one that captures a precious moment in time. This year, move beyond the ordinary and create a beautiful, sentimental handprint apron that Mom will treasure for years to come. This DIY project perfectly blends the timeless charm of a child’s handprint with the modern elegance of heat transfer vinyl, resulting in a lasting keepsake that is both easy to make and deeply personal.
Imagine the delight on Mom’s face as she unwraps a custom-made apron, lovingly adorned with her child’s actual handprint and the heartfelt word “MOM.” It’s much more than just a functional item; it’s a tangible memory, a snapshot of tiny hands, and a powerful symbol of the unconditional love shared. Whether she wears it while baking her favorite treats, engaging in creative crafts, or tending to her garden, this personalized apron will serve as a constant, warm reminder of her cherished little ones. Let’s embark on this wonderful crafting journey to create an unforgettable Mother’s Day handprint apron!
Gather Your Crafting Essentials: Materials Needed for Your Personalized Handprint Apron
Before you begin this rewarding DIY adventure, ensure you have all your supplies meticulously gathered and organized. Having everything readily available will make your crafting experience smooth, efficient, and enjoyable, allowing you to focus on the creative process.
- Blank Canvas Apron: Select a high-quality, plain canvas apron. Opt for white or a light-colored apron as it will provide the best contrast and truly make the handprint and vinyl design pop. It’s advisable to pre-wash and dry the apron once before starting your project to prevent any future shrinkage or color distortion.
- Heat Transfer Vinyl (HTV): Choose a durable and flexible HTV, such as the popular EasyWeed, in a color that beautifully contrasts with your chosen apron. You’ll need enough vinyl to cut two distinct “M” letters. This specialized vinyl adheres permanently to fabric when heat is applied, creating a professional and long-lasting finish.
- Silhouette or Cricut Cutting Machine: A digital cutting machine like a Silhouette Cameo, Cricut Explore Air, or Cricut Maker is invaluable for precisely cutting intricate vinyl designs. It ensures clean, sharp edges, making your project look professional.
- Fabric Paint: Pick a non-toxic, washable fabric paint in your child’s favorite color, or a shade you know Mom will adore. Double-check that the paint is specifically designed for fabric and will dry permanently without fading or washing out.
- Trim, Ribbon, or Other Embellishments (Optional): Think about adding extra decorative touches such as elegant lace trim around the apron’s edges, a charming ribbon bow, sparkling glitter HTV, or even small fabric appliqués. These additions can elevate the apron’s aesthetic and add more personalization.
- Iron or Heat Press: An essential tool for effectively applying the heat transfer vinyl. While a standard household iron can work, a dedicated heat press offers more consistent temperature and even pressure, yielding superior, professional-grade results.
- Parchment Paper or Teflon Sheet: Crucial for protecting your iron or heat press from direct contact with the vinyl and paint, as well as shielding the fabric during the heat application process.
- Measuring Tape or Ruler: Indispensable for accurately determining the size of the vinyl letters and ensuring precise placement of both the handprint and the vinyl elements on the apron.
- Weeding Tool: A small, sharp, hook-like tool specifically designed to remove excess vinyl from around your cut design with precision and ease.
- Paper Plate or Paint Palette: Ideal for dispensing fabric paint, allowing for easy access and minimal mess during the handprinting step.
- Wet Wipes or Damp Cloth: Keep these close by for immediate and easy cleanup of little hands after the paint application!
Step-by-Step Guide: Crafting Your Personalized Mother’s Day Handprint Apron
Follow these detailed and easy-to-understand instructions to create a truly beautiful and enduring keepsake. Taking your time with each step will ensure a flawless, professional, and deeply heartfelt finish that Mom will adore.
Step 1: Design Your Vinyl Letters in Silhouette Studio (or Your Chosen Cutting Software)
Begin this exciting project by accurately measuring your child’s hand from the base of the wrist to the tip of the longest finger. This measurement will serve as a crucial guide for determining the ideal size of your vinyl letters. Next, open your Silhouette Studio software (or the equivalent program for your specific cutting machine, such as Cricut Design Space). Insert two separate instances of the letter “M” onto your digital design canvas. Feel free to explore and choose any font that appeals to you, but consider opting for a font that is bold and clear; this will facilitate easier weeding later on and ensure excellent visibility on the apron. Adjust the size of each “M” so that their height is roughly equivalent to your child’s hand measurement. This careful sizing ensures that the word “MOM” will appear beautifully balanced and proportionate when positioned around the central handprint. Arrange the two “M”s on your virtual cutting mat, leaving sufficient space between them to allow for easy cutting and flexible placement later in the process.
Step 2: Cutting the Heat Transfer Vinyl (HTV) with Precision and Care
Once your “M” design is meticulously finalized within the software, the next critical step is to prepare for the cutting process. Carefully load your chosen heat transfer vinyl into your cutting machine. It is absolutely essential to ensure that the shiny, clear carrier sheet side of the vinyl is facing DOWN on your cutting mat. This is a very common oversight for beginners, so always double-check this orientation! Before you send your design to the cutter, you must remember to MIRROR your image in the software. HTV designs require mirroring because they are applied face down, ensuring they appear correctly oriented when heat-pressed onto the fabric. Adjust your blade settings according to the specific type of vinyl you are using and your machine’s recommendations (performing a small test cut on a scrap piece of vinyl is always highly recommended to confirm settings!). Once all settings are verified, send your design to cut. This process will precisely cut out the outlines of your “M” letters into the vinyl layer, leaving the clear carrier sheet fully intact.
Step 3: Weeding the Excess Vinyl for a Clean Design
After your cutting machine has completed its precise work, carefully remove the vinyl sheet from the cutting mat. Now, it’s time for the weeding process – this involves meticulously removing all the excess vinyl that is not part of your intended design. Using a specialized weeding tool (a sharp, hook-like instrument is best), gently and carefully peel away the vinyl material surrounding your two “M” letters. Also, remember to remove any tiny inner pieces, such as the small triangular sections within the “M”s. The goal is to be left with only the two perfectly cut “M” letters, which should remain securely adhered to the clear, sticky carrier backing paper. Take your time with this step, ensuring that all small, unwanted pieces are removed cleanly for a crisp and professional-looking finish. Once the weeding is complete, you can carefully cut the two “M” letters apart from each other; this will make their individual placement on the apron much easier later on.
Step 4: Creating the Heart of the Gift – The Precious Handprint!
This is truly where the magic of personalization happens! First, ensure your chosen apron is laid out perfectly flat and completely wrinkle-free on a stable work surface. Carefully decide on the precise placement for the handprint – typically, the central area of the apron provides the most aesthetically pleasing and balanced look. You might find it helpful to do a quick “dry run” with your child’s unpainted hand to visualize the optimal spot and ensure it fits well. Pour a small, manageable amount of your chosen fabric paint onto a paper plate or a dedicated paint palette. Gently but thoroughly paint your child’s entire palm and all their fingers with a thin, even layer of fabric paint. Ensure full, consistent coverage without applying too much paint, which could lead to smudging or a blurry impression. Now, with a steady hand, gently but firmly press your child’s painted hand onto the carefully chosen center of the apron. Apply even pressure across the entire hand for a few seconds, then very carefully lift their hand straight up to prevent any smearing or distortion of the print. Have wet wipes or a damp cloth immediately on hand for quick cleanup of their little hands. Now comes the most crucial part: allow the handprint to dry completely and thoroughly. Depending on the type of paint used, the thickness of the application, and the humidity levels, this drying process can take several hours, or even extend overnight. Do NOT proceed to the next step until the fabric paint is absolutely bone dry to the touch to avoid any smudging or unintended transfer.
Step 5: Applying the Heat Transfer Vinyl Letters to Spell “MOM”
Once the fabric paint handprint is completely and utterly dry, it’s time to add your perfectly cut vinyl letters. Carefully position one “M” on each side of the handprint. This strategic placement will beautifully frame the handprint and spell out the loving word “MOM.” Take your time to ensure that the letters are aligned both horizontally and vertically, creating a balanced and aesthetically pleasing look. Once you are fully satisfied with their placement, gently cover the vinyl letters with a piece of parchment paper or a dedicated Teflon sheet. This protective layer is vital for shielding your heat source (iron or heat press) and the apron fabric from direct contact with the vinyl. If you are using a standard household iron, set it to a medium-high temperature (typically around 305°F or the cotton setting) and ensure that the steam function is turned OFF. Apply firm, even pressure to each “M” for approximately 10-15 seconds. If you are using a heat press, always refer to the manufacturer’s specific instructions for your particular vinyl; however, generally, a setting of 305°F for 10-15 seconds with medium pressure is a good starting point. After the recommended heating time, carefully peel off the clear backing paper (also known as the carrier sheet). Note that some types of vinyl are “hot peel” (meaning you peel immediately), while others are “cold peel” (requiring you to wait for the vinyl to cool). Always refer to your HTV’s specific instructions for the best results. If you notice any part of the vinyl lifting or not adhering properly, simply lay the carrier sheet back down over the affected area, cover it with parchment paper, and re-press for a few more seconds. The end result will be a beautifully adhered, professional-looking “MOM” perfectly framing the precious handprint.
Step 6: Personalize and Embellish Your Masterpiece to Perfection
With the core design now complete, this is your opportunity to add those special finishing touches and truly make this apron a unique reflection of love! This step is all about unleashing your imagination and creativity. Consider enhancing the apron with a decorative trim stitched along its edges, or perhaps tying a beautiful ribbon into a charming bow at the top neckline. You could also incorporate additional small heat transfer vinyl accents, such as delicate hearts, twinkling stars, or even Mom’s initial, for an extra layer of personalization. Fabric markers offer another fantastic way to add details, such as writing the child’s name and the year below the handprint, transforming it into an even more specific and cherished keepsake. You might also use different colors of fabric paint to add subtle details, outlines, or small decorative elements around the handprint for emphasis. Remember, this is a gift crafted from the heart, so let your unique ideas and imagination guide you. The ultimate goal is to create something that deeply reflects the special bond between Mom and child, ensuring it becomes an irreplaceable token of affection and memory.
Expert Tips for Crafting Success
To ensure your handprint apron project goes smoothly and yields the best results, consider these helpful tips:
- Practice Makes Perfect: If you are new to working with heat transfer vinyl, it’s highly recommended to perform a small practice cut and application on a piece of scrap fabric before committing to your final apron. This helps you get a feel for your machine’s settings and the vinyl’s behavior.
- Involve the Children: Depending on your child’s age, allow them to participate in age-appropriate steps, such as helping to choose colors or carefully (with supervision!) painting their own hand. Their involvement adds an extra layer of personal sentiment to the gift.
- Safety First: Always supervise children closely when working with paints. More importantly, never allow children near hot irons or heat presses to prevent accidental burns.
- Maintain Cleanliness: Designate a specific, protected area for painting and keep plenty of wet wipes or a damp cloth easily accessible for immediate cleanup of hands and any small spills on your workspace.
- Layering HTV Techniques: Should you decide to incorporate multiple colors or layers of HTV, remember the rule for layering: apply each subsequent layer with a partial press (typically 5-8 seconds) before giving the very top layer a final, full press to ensure proper adhesion without over-heating the lower layers.
Creative Variations and Alternative Ideas for Your Handprint Apron
While the classic “MOM” handprint apron is undoubtedly charming, don’t hesitate to explore other creative avenues to make your gift even more unique:
- Footprints for Little Ones: For infants or very young babies, a footprint can be just as adorable and often easier to capture neatly than a handprint.
- Multiple Children’s Prints: If Mom is blessed with more than one child, consider overlapping their handprints in different colors or strategically placing them around the apron. You could also add each child’s name and age written neatly below their individual print.
- Different Loving Messages: Instead of simply “MOM,” you could choose to spell out “MAMA,” “BEST MOM EVER,” “GRANDMA,” or even a simple “LOVE” in vinyl.
- Beyond Aprons: This versatile crafting concept isn’t limited to aprons! Apply the same heartfelt technique to other items like t-shirts, practical tote bags, charming tea towels, or even oven mitts for equally endearing and personalized gifts.
- Seasonal and Themed Designs: Adapt the colors, fonts, and embellishments to suit other holidays or special occasions beyond Mother’s Day, creating a truly versatile gift idea.
Caring for Your Sentimental Handprint Apron
To ensure this beautiful and treasured keepsake remains vibrant and lasts for many years to come, proper care is absolutely essential. It is crucial to wait at least 24 hours, and ideally 48 hours, after applying the heat transfer vinyl before washing the apron for the first time. When it’s time to wash, turn the apron inside out to protect the design, use cold water, and select a gentle cycle on your washing machine. Absolutely avoid using bleach or harsh detergents, as these can damage both the fabric paint and the vinyl. Tumble dry the apron on a low heat setting, or for optimal longevity, air dry by hanging it up. If ironing becomes necessary, never iron directly over the vinyl or the painted handprint areas; instead, iron the apron inside out or place a pressing cloth (like parchment paper or a thin towel) over the design before applying heat.
A Gift from the Heart, Made with Endless Love
This DIY Mother’s Day handprint apron is much more than a simple craft project; it represents a profound opportunity to create a deeply personal, meaningful, and unforgettable gift. It beautifully captures the fleeting innocence and charm of childhood, transforming it into a functional piece of wearable art that Mom can use and cherish every day. The thoughtful effort, dedication, and boundless love poured into making this apron will undoubtedly warm her heart, making this Mother’s Day truly unforgettable and leaving a lasting impression. So, gather your supplies, enlist your eager little helper, and embark on crafting a present that speaks volumes of affection and devotion.







