
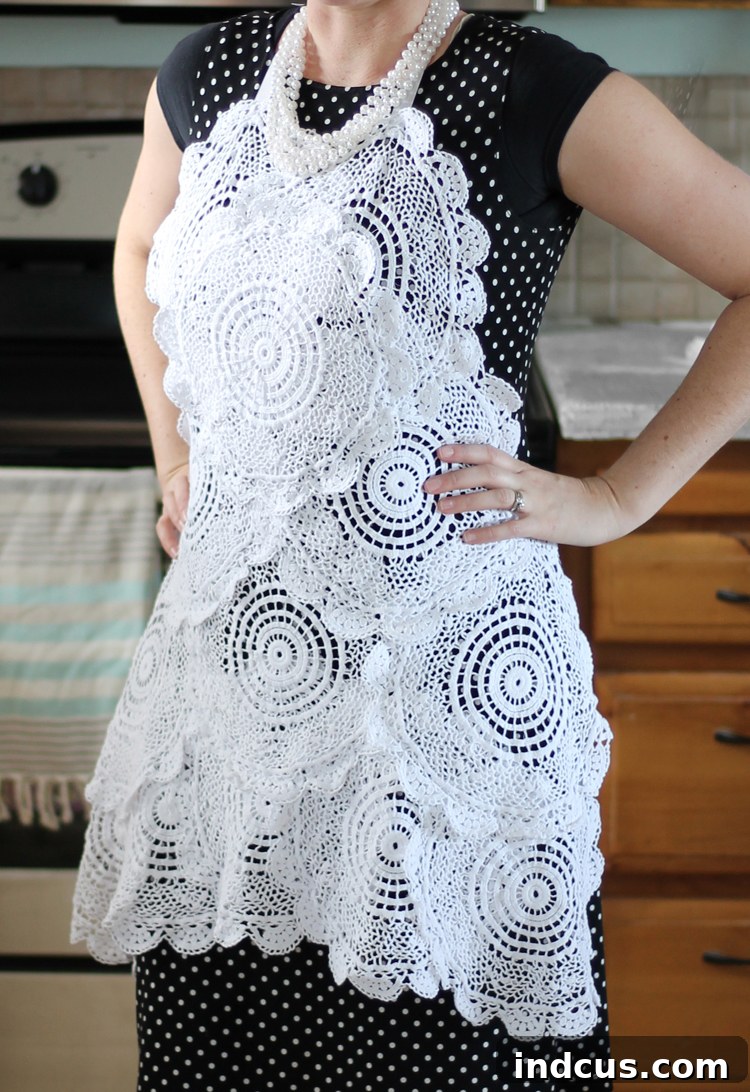
Crafting Charm: Your Guide to a Beautiful DIY Doily Apron
In the world of DIY, sometimes the most enchanting ideas spring from the most unexpected places. Have you ever had a creative spark that seemed a little… out there? A project so delightfully unconventional that it made others raise an eyebrow? This enchanting doily apron is precisely one of those projects. Born from a whimsical notion to transform delicate cotton doilies into a wearable piece of art, this creation defies traditional apron functionality to deliver pure, unadulterated charm.
While some might initially deem the concept “crazy” or “impractical,” the final result is nothing short of breathtaking. This doily apron embodies a beautiful blend of vintage elegance, feminine grace, and a touch of nostalgic whimsy. It’s not designed to protect your dress from heavy-duty baking splatters; rather, it’s crafted to make you feel beautiful, elegant, and perfectly adorned while you host a gathering, enjoy a light tea, or simply embrace a moment of creative self-expression. You might still get a bit of flour on your attire, but you’ll certainly look exquisitely pretty doing it!
If you’re ready to embark on a delightful crafting journey and create your own uniquely girly, cute, and utterly vintage-inspired doily apron, you’ve come to the right place. This comprehensive guide will walk you through every step, ensuring your finished apron is as charming and well-made as you envision.
Embrace Vintage Elegance with a Handmade Doily Apron
Why settle for a plain apron when you can drape yourself in delicate lace and timeless beauty? A handmade doily apron is more than just a kitchen accessory; it’s a statement piece, a conversation starter, and a testament to the joy of slow crafting. It evokes images of simpler times, garden parties, and the elegance of yesteryear, making it perfect for hostessing, light baking, or even as a unique prop for photography or a costume.
This project is surprisingly straightforward, even for those with moderate sewing experience. The key lies in careful planning and precise stitching, transforming individual lace pieces into a cohesive and stunning garment. Get ready to impress your friends and delight yourself with a truly one-of-a-kind creation that celebrates femininity and the enduring appeal of handmade items.
Gather Your Essentials: Materials for Your Doily Apron Project
Before diving into the construction of your beautiful doily apron, gather all your materials. Having everything at hand will ensure a smooth and enjoyable crafting process. Here’s a detailed look at what you’ll need:
- 12 or 13 Cotton Doilies – 12-inch size: The foundation of your apron! Opt for cotton doilies for their lovely texture, durability, and ease of sewing. The 12-inch size provides ample coverage and creates a beautiful, flowing apron shape. You might find these at craft stores, antique shops, or online marketplaces. Feel free to mix and match slightly different patterns for added character, or choose a uniform design for a more cohesive look. Ensure they are clean and pressed before you begin.
- White Thread: A good quality, all-purpose polyester or cotton thread is ideal. White thread will seamlessly blend with your doilies, making your stitches virtually invisible and maintaining the pristine, delicate aesthetic of the apron.
- White Grosgrain Ribbon: Grosgrain ribbon is an excellent choice for the apron ties because of its strength, ribbed texture, and ability to hold its shape well. You’ll need enough length for both the neck strap and the waist ties. A width of 1/2 to 1 inch generally works best, offering a comfortable tie without overwhelming the delicate doilies.
- Basic Sewing Supplies:
- Sharp Fabric Scissors: For clean cuts.
- Sewing Machine (recommended): While this project can be hand-stitched, a sewing machine will offer greater precision, speed, and durability for the seams.
- Sewing Needles: If hand-sewing, or for your machine. Choose a fine needle suitable for delicate fabrics.
- Straight Pins: To hold the doilies in place before sewing.
- Measuring Tape: For cutting ribbon and assessing placement.
- Lighter (optional, for ribbon ends): To prevent fraying. Use with caution.
- Iron and Ironing Board: To press doilies if needed, and to finish the apron neatly.
Step-by-Step Guide: Crafting Your Own Doily Apron
With your materials gathered, let’s begin the exciting process of transforming individual doilies into a stunning, vintage-inspired apron. Take your time with each step, enjoying the creative journey.
Phase 1: Designing Your Doily Layout
The initial arrangement of your doilies is crucial for defining the overall shape and aesthetic of your apron. This is where your vision truly comes to life.
Step 1: The Vision Board – Arranging Your Doilies
Start by laying out your doilies on a large, flat surface, such as a clean floor or a spacious table. This allows you to visualize the apron’s form and how each doily will interact with its neighbors. Experiment with different overlaps and configurations until you achieve a shape that resembles a classic apron bib with a gentle skirt. I found that a staggered, slightly overlapping pattern worked best to create a cohesive and flowing design. Think about the symmetry and balance of the design, ensuring the overall look is pleasing to your eye.
Step 2: The Critical Centerpiece – Strategic Doily Placement
There’s one particular doily placement that is absolutely essential for both aesthetic harmony and practical modesty. Refer to the image below; notice the doily highlighted in red? That specific doily is the linchpin of your design.
Why is this particular doily so crucial? Well, without it, the apron might end up creating an unintentional and rather awkward “target” effect on the chest area. My initial attempt at this apron, before I discovered the necessity of this strategically placed center doily, resulted in a truly embarrassing situation! Let’s just say it prompted a swift redesign. This central doily ensures proper coverage, creates a balanced visual flow, and avoids any accidental fashion faux pas. So, seriously, do not skip this one!
Phase 2: Assembling the Doily Body
Once your doilies are perfectly arranged, it’s time to bring them together into a solid apron structure.
Step 3: Secure Your Design – Pinning Doilies Together
With your doilies laid out exactly as you want them, begin pinning them together. I recommend starting at the bottom row and working your way upwards. Carefully lift one section at a time, ensuring the overlaps remain precise, and secure the layers with straight pins. Place pins generously along the edges where the doilies overlap, ensuring they are firmly held in place. This meticulous pinning prevents any shifting or misalignment when you take the doilies to your sewing machine.
Step 4: Stitching the Rows – Sewing Doilies with Precision
Once a row or a section is securely pinned, gently transfer it to your sewing machine. Using your white thread, carefully sew the overlapping edges of the doilies together. A straight stitch set to a medium length, or a very narrow zigzag stitch, works beautifully for this. Stitch slowly and steadily, staying close to the edge of the top doily, ensuring you catch both layers securely. Reinforce the beginning and end of each seam with a backstitch for added durability. Take care not to pull or stretch the delicate lace as you sew.
Step 5: Taming the Flaps – Securing the Back Edges
After sewing the doilies together on the front, flip your apron over to the backside. You’ll likely notice some “flaps” or loose edges where the doilies overlap. To create a clean, professional finish and prevent snagging or unraveling, these flaps need to be secured. Gently fold each flap down flat against the underlying doily and stitch it into place. You can use a small, discreet hand stitch for this, or carefully machine-stitch along the edge, being mindful not to stitch through to the front if it would be visible. This step adds structure and neatness to the back of your apron.
Step 6: Building the Apron Structure – Repeating the Process
Continue to repeat Steps 3 through 5 for every row of doilies, working your way up from the bottom. Pin, sew the overlaps, and then secure the back flaps for each section. As you progress, periodically hold up your developing apron to ensure everything is aligning correctly and that the overall shape remains consistent with your initial vision. Take your time, as precision here will lead to a beautifully finished garment.
Phase 3: Adding the Finishing Touches – Straps and Ties
With the body of your doily apron complete, it’s time to add the essential elements that will allow you to wear it: the ribbon straps and waist ties.
Step 7: Preparing Your Ribbon Straps
Measure and cut your white grosgrain ribbon. For the neck strap, you’ll want a length that allows the apron to sit comfortably on your chest, plus enough for a secure attachment. For the waist ties, measure generously so they can be tied in a pretty bow at the back. A good starting point for waist ties is usually 24-30 inches each, but you can always trim them down. The most crucial part of this step is to prevent fraying: carefully melt the ends of all cut ribbon pieces with a lighter. Gently pass the flame across the cut edge until it slightly melts and seals. If you prefer not to use a flame, a small dab of clear fabric glue or Fray Check can achieve a similar result.
Step 8: Positioning the Neck Strap
Pin the prepared ribbon neck strap to the top corners of your apron’s bib. Ensure they are placed symmetrically and securely. The ends of the ribbon should be tucked slightly under the doily edge to create a clean attachment point.
Step 9: Attaching the Neck Straps for Durability
Sew the neck straps firmly in place. Because these straps will bear some weight and stress, it’s important to reinforce your stitching. I recommend sewing them in at least two places, perhaps using a small box stitch (a square of stitching with an “X” through it) or multiple lines of straight stitching. This provides extra strength and ensures the straps won’t detach with wear. Use your white thread for a seamless finish.
Step 10: Crafting the Waist Ties
Repeat the pinning and sewing process for the waist ties. Attach them to the sides of your apron where the bib transitions to the “skirt” portion, or wherever feels most natural and comfortable for tying around your waist. Again, use strong, reinforced stitching to ensure they are secure. Make sure both ties are positioned at the same height for a balanced look.
Step 11: Final Inspection and Presentation
Once all your doilies are beautifully sewn and your ribbon ties are securely attached, take a moment to inspect your finished apron. Trim any loose threads, press it gently with a warm iron (using a pressing cloth if your doilies are delicate), and admire your handiwork. You are now done!
Caring for Your Handcrafted Doily Apron
To ensure your exquisite doily apron remains beautiful for years to come, proper care is essential. Given its delicate nature, treat it with gentle consideration:
- Washing: Hand wash in cool water with a mild detergent. Gently agitate, but avoid harsh scrubbing or twisting. Rinse thoroughly.
- Drying: Lay flat on a clean towel or hang to air dry, reshaping the doilies as needed. Avoid machine drying, which can distort the lace.
- Ironing: If necessary, iron on a low heat setting while the apron is still slightly damp. For extra protection, place a thin pressing cloth over the doilies.
- Storage: Store your apron flat or hang it carefully to prevent wrinkles and preserve its shape.
Styling Your Vintage Doily Apron: Beyond the Kitchen
This isn’t just an apron; it’s a fashion accessory! While it’s perfect for light culinary endeavors, don’t limit its potential. Embrace its vintage charm with these styling ideas:
- Classic Hostess: Pair it with a simple, elegant dress, a string of pearls, and a pair of sassy heels for a refined hostess look that will make your guests feel truly special.
- Bohemian Chic: Layer it over a simple linen tunic or a flowy maxi dress for a whimsical, free-spirited vibe perfect for a garden party or a summer picnic.
- Creative Flair: Wear it over a plain t-shirt and jeans to elevate your everyday attire and show off your unique handmade style.
- Photo Prop: It makes an absolutely charming prop for vintage-themed photoshoots, adding a touch of old-world elegance to any scene.
- Gift Giving: A handmade doily apron is a thoughtful and personal gift for a fellow crafter, a new homeowner, or anyone who appreciates unique, artisanal pieces.
Put on a pair of sassy heels, perhaps a string of pearls, and go rock your new vintage apron with confidence and style!
Congratulations! You’ve successfully transformed a collection of delicate doilies into a truly beautiful and unique apron. This project is a testament to the power of creativity and the joy of crafting something truly special with your own hands. Every stitch tells a story, and your new doily apron is ready to become a cherished part of yours.
Whether you wear it for special occasions, as a delightful decorative piece, or simply to add a touch of glamour to your daily routine, this apron is sure to bring a smile to your face. We encourage you to share your creations and inspire others in the crafting community. Happy crafting!







