
Stunning Bathroom Makeover on a Shoestring Budget: A $96 Transformation
We are absolutely thrilled to finally share the incredible transformation of our bathroom with you! This project has been a labor of love, and we couldn’t be more excited about how much we achieved on an incredibly tight budget. In fact, the entire renovation cost us a mere $96, yet the final result looks as if we spent a fortune. It’s a testament to what creativity, careful planning, and a little elbow grease can accomplish when undertaking a DIY bathroom remodel. Prepare to be amazed as we reveal the journey from our old, outdated bathroom to a fresh, inviting oasis, proving that beautiful home improvements don’t have to break the bank.
To truly appreciate the “after,” let’s take a moment to look back at where we started. The original space was… well, let’s just say it had seen better days. Dated fixtures, a drab color scheme dominated by dark tones, and an overall lack of personality made it a room we barely wanted to use. It felt cramped, uninspired, and desperately needed an update to match the rest of our home’s evolving style. See for yourself the state of our bathroom before its dramatic transformation:
The Reveal: A Breath of Fresh Air for Under $100 – Our Stunning Small Bathroom Transformation
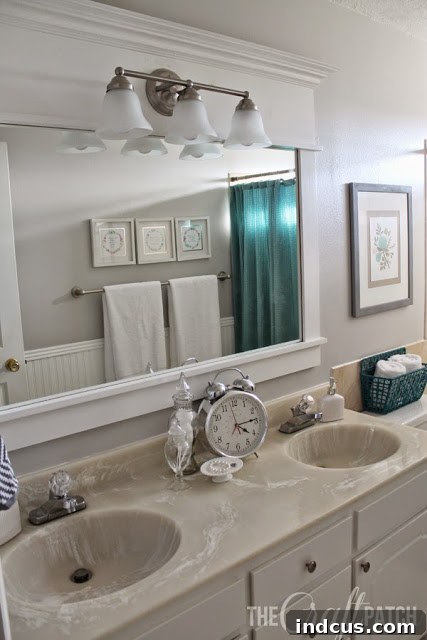
And now, for the moment you’ve been eagerly anticipating! Prepare to witness the stunning transformation that proves you don’t need a massive budget to achieve your dream bathroom. This isn’t just a simple refresh; it’s a complete metamorphosis that brought light, style, and serenity back into our lives. It feels like a brand new room, a true sanctuary designed for relaxation and rejuvenation, achieved with thoughtful, inexpensive bathroom upgrades. The result is so profound that it utterly transforms the daily experience of using this space.
Ahhh… stepping into this bathroom now is truly like inhaling a breath of fresh air. Every detail, though budget-friendly, contributes to a cohesive and elegant design. The transformation is so dramatic that we often forget it’s the same room! This incredible small bathroom transformation has not only enhanced our home’s aesthetics but also significantly improved our daily routine.
The Masterpiece: A Custom DIY Mirror Frame That Commands Attention
Without a doubt, the new frame around the existing mirror is the undisputed focal point of this entire budget bathroom makeover. My husband deserves all the credit for his incredible skill and dedication on this project. This wasn’t just about adding a decorative border; it was a clever solution to a practical problem, resulting in a piece that adds immense drama and sophistication to the room, instantly elevating its aesthetic. Building your own mirror frame is a fantastic way to personalize your space and save on costly custom pieces.
The initial challenge we faced was an off-centered light fixture above the vanity. Upon inspection, we discovered the reason: the “centered” position landed directly on a wall stud, making it impossible to install a standard electrical box without extensive, costly rewiring. For someone like me with a touch of OCD, an off-centered light fixture was simply unacceptable. We needed a creative solution that wouldn’t involve expensive electrical work or tearing down walls, and that’s when the idea of the extra-tall mirror frame came to life.
Instead of moving the light, we ingeniously built the DIY mirror frame to extend upwards, perfectly centering the existing light fixture within its new boundaries. This brilliant solution not only fixed the alignment issue but also added an unexpected vertical element that truly elevates the space. The added height draws the eye upwards, making the bathroom feel larger, more luxurious, and incredibly well-designed. I absolutely love, love, love the dramatic impact it creates, proving that functional problems can lead to beautiful design solutions!
Smart Updates: Revitalizing Fixtures and Optimizing Storage for an Affordable Bathroom Update
Beyond the mirror, we focused on smaller, high-impact changes that wouldn’t break the bank. One such project involved refreshing the existing toilet paper holder and towel ring. Instead of replacing them, which can be surprisingly expensive, we gave them a modern update with brushed nickel spray paint. This simple trick instantly transformed their appearance, making them look brand new and seamlessly integrated with the updated aesthetic of the bathroom. It’s an incredibly cost-effective way to achieve a cohesive look without buying all new fixtures.
Furthermore, we addressed a common bathroom dilemma: insufficient towel space. Utilizing the existing mounts, we crafted an extra-long towel rod. This DIY solution provided ample room for towels without adding new holes to the walls, maximizing functionality and maintaining a clean look. To further optimize the space and allow for decorative elements, I strategically relocated the original towel ring to a different wall, creating the perfect spot to hang charming art above the toilet. This seemingly small adjustment made a huge difference in the room’s flow and overall aesthetic appeal, adding both practicality and personality to our bathroom decor ideas.
The Power of Paint: A $5 Mistint Masterpiece for a Modern Bathroom
Perhaps one of the most transformative elements of this affordable bathroom renovation was the fresh coat of paint. The original dark brown walls made the space feel cramped and gloomy, absorbing all the natural light. We opted for a soft gray, a sophisticated and versatile color that instantly opened up the room, making it feel lighter, airier, and far more aligned with our personal style. This calming hue provides a perfect neutral backdrop for the other elements of the design, contributing significantly to a modern bathroom aesthetic.
And here’s a fantastic DIY tip for saving money on paint: this beautiful gray was originally a $5 mistint from Lowe’s! It started as a peachy tan, a color that would never have worked for our vision. However, with a stroke of ingenuity and a little experimentation, I mixed in a small amount of black paint until I achieved the perfect shade of gray I had envisioned. I was honestly surprised by how well it worked out, proving that sometimes the best results come from unexpected places and a willingness to experiment. Finding and repurposing mistint paints can drastically cut down on your renovation costs without compromising on style, making it a cornerstone of any truly budget-friendly bathroom project.
Vanity Reimagined: Fresh Paint and Hardware for a Brighter Space
The existing vanity, while functional, was also a victim of the bathroom’s outdated aesthetic. Its dark finish contributed to the overall gloomy feel of the room. A fresh coat of crisp white paint instantly gave it new life, brightening the entire area and creating a clean, modern foundation for the rest of the decor. To complement this, we installed new cabinet knobs. These small details, chosen for their clean lines and modern appeal, collectively made a huge difference, transforming a tired piece of furniture into a stylish and integrated part of the bathroom’s new look. The vanity now feels light, airy, and much more inviting, enhancing the sense of space in our small bathroom.
Affordable Elegance: Bathroom Decor That Doesn’t Break the Bank
Decor plays a crucial role in tying a room together and infusing it with personality, and we proved that you don’t need high-end pieces to achieve a polished look. The stylish hand towel, with its modern pattern and subtle texture, was a delightful find from Walmart. If you haven’t noticed, Walmart has truly elevated its home decor game recently, offering trendy and affordable options that rival boutique stores. Seriously, check them out for your next budget-friendly home decor haul!
Adding to our collection of budget-friendly treasures, the chic soap pumps were sourced from Dollar Tree. Yes, you read that right – Dollar Tree! These small but impactful additions demonstrate that with a keen eye and a bit of patience, you can find incredibly stylish items without overspending. It’s all about making smart choices and knowing where to shop for the best value, allowing these seemingly minor details to tie the entire room together and enhance the bathroom design tips applied.
Illuminating Style: A Modern Light Fixture Upgrade
The old light fixture was a glaring example of the bathroom’s outdated aesthetic – a brass monstrosity that was missing most of its glass shades and offered poor illumination. Replacing it was a priority, and we opted for a new fixture that champions simplicity and modern design. The clean lines and contemporary finish of the new light fixture instantly updated the vanity area, providing ample, clear illumination while contributing significantly to the overall refreshed feel of the room. It’s amazing how much a single fixture can change the entire atmosphere of a space, making it feel more current and inviting. This was a key component in our overall affordable bathroom updates.
Harmonious Hues: A Calming Gray and Blue Palette for Serenity
Our chosen color scheme leans heavily on a serene gray, complemented by carefully placed pops of blue. This combination creates an incredibly calming and refreshing atmosphere, perfect for a bathroom sanctuary. The gray provides a sophisticated and timeless foundation, creating a neutral base that feels both modern and comforting. Meanwhile, the hints of blue add a touch of vibrancy and depth, preventing the space from feeling monotonous and introducing a cool, tranquil energy. This particular palette is known for its ability to promote relaxation and bring a sense of tranquility, making our small bathroom transformation feel much larger, more inviting, and utterly serene. It’s a perfect choice for creating a spa-like feel on a budget.
Thrift Store Treasures: Adding Personality with a Splash of Color
One of my favorite finds for this bathroom was a small basket, discovered at a local thrift store for an unbelievable 50 cents! It was originally a natural wicker color, which didn’t quite fit our new, modern aesthetic. With a quick application of Rust-Oleum American Accents spray paint in the vibrant shade of ‘Lagoon,’ this inexpensive find was instantly transformed. It now provides a delightful pop of blue, adding personality and a modern touch to the room while offering practical storage for extra hand towels or toiletries. This is another fantastic example of how upcycling second-hand items can contribute significantly to a budget-friendly bathroom renovation, allowing you to achieve a custom look without the custom price tag. It also adds a unique, handcrafted feel that mass-produced items often lack.
The Art of the Vignette: Functional Beauty on the Vanity
Creating a stylish yet functional vignette on the vanity surface brings a sense of curated elegance and personal touch to the bathroom. This is where pretty meets practical, achieving the best possible combination for daily use. Our vignette includes a beautiful antique pedestal dish, a cherished heirloom from my husband’s grandmother. It serves as a perfect, safe spot to corral my wedding ring when I’m getting ready or washing my hands, adding a touch of sentimental value. Alongside it, a large, eye-catching clock ensures I never lose track of time during my morning routine, blending utility with decorative appeal. These thoughtful touches elevate the space, adding both personal meaning and everyday utility, making the vanity area both organized and aesthetically pleasing.
The Ultimate Satisfaction: Before & After Revelations of Our Budget Bathroom Makeover
For any DIY enthusiast, the ultimate satisfaction comes from seeing the stark contrast between the “before” and “after” photos. It’s a visual testament to hard work, creativity, and the immense power of transformation that even a limited budget can achieve. These comparison photos truly highlight the dramatic impact of our budget-friendly bathroom renovation. They are a constant reminder that with vision, a smart approach to sourcing materials, and a willingness to get hands-on, even a small investment can yield monumental results, making your dream bathroom a reality.
The Grout Refresh: A Hidden Gem of Renovation
One detail that often goes unnoticed but made a monumental difference was refreshing the grout lines. Seriously, look at the contrast in the grout now! The original grout was deeply discolored and utterly uninviting; I honestly didn’t even want to walk barefoot on the old floor due to its grimy appearance. But with a simple grout refresh product, those dirty, dingy lines were revitalized, and now the floor is sparkling clean and hygienic. This seemingly minor step contributed immensely to the overall sense of cleanliness, freshness, and brightness in the room, proving that sometimes the smallest changes yield the most surprising and impactful results in a budget-friendly bathroom remodel.
Looking Ahead: Future Aspirations for Our Dream Bathroom
While we are incredibly pleased with our bathroom remodel on a budget and absolutely adore our transformed space, it’s important to acknowledge that home improvement is often an ongoing journey. We also have a few longer-term aspirations for this room. Eventually, we’d love to upgrade the faucets to a more modern, water-efficient design, retile the tub surround to further enhance the fresh aesthetic, and perhaps invest in a new vanity top for added durability and style. However, these are all more extensive projects that require a larger budget and more dedicated time, so they can certainly wait.
For now, we are immensely happy with every single change we’ve made and are thoroughly enjoying our beautiful, refreshed bathroom. This initial phase proves that you can achieve stunning results without breaking the bank, and we hope it inspires you to look at your own spaces with fresh eyes and consider what you can achieve with a little creativity and a smart, strategic budget!
The Incredible $96 Budget Breakdown: Proof That Dreams Don’t Have to Break the Bank
Here’s the detailed cost breakdown, demonstrating how every penny contributed to this remarkable bathroom transformation. This list is undeniable proof that a DIY bathroom remodel doesn’t have to be expensive to be stunning; smart choices and strategic purchases are key:
- Cabinet knobs (modern, sleek design): $10
- New light fixture (energy-efficient and stylish): $40
- Wood for custom mirror frame (pine for durability): $25
- Paint (Lowe’s mistint, custom mixed gray): $5
- Brushed nickel spray paint (for existing hardware): $4
- Grout refresh product (for sparkling clean floors): $12
- Total Renovation Cost: $96
We hope our affordable bathroom update and detailed budget breakdown inspires you to look at your own space with fresh eyes and consider what incredible transformations you can achieve with creativity and a smart budget!







