
Transform Your Bedroom on a Budget: The Ultimate DIY Metal Headboard Makeover with Rustoleum
For what felt like an eternity, I had been searching high and low for the perfect headboard to complete our bedroom. The right headboard can truly anchor a space, adding character and a touch of personal style. Yet, finding one that fits both aesthetic desires and budget constraints can be an incredibly frustrating quest. During my prolonged search, I stumbled upon a listing on a local selling site featuring a distinctly unappealing brass headboard. My initial reaction was to scroll past it without a second thought, dismissing it as just another piece of outdated furniture.
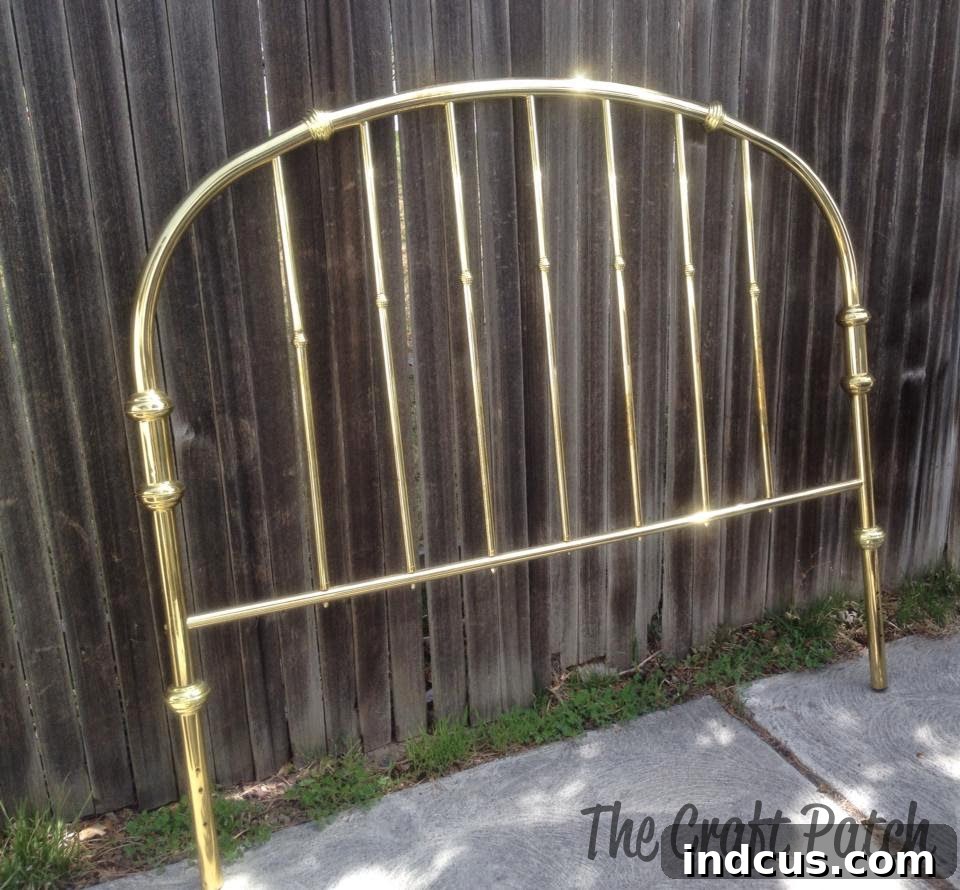
As you can see, it wasn’t exactly a showstopper. Far from it, in fact. It was an eye-catching shade of brassy gold, a style that had certainly seen better days and didn’t align with the contemporary or rustic-chic look I was aiming for. However, fate, or perhaps just the algorithm of the selling site, had other plans. When the same headboard reappeared in my feed a few days later, a thought sparked: what if its ‘ugly’ exterior was just a disguise? What if it held untapped potential? I decided to take a chance, offering the seller a mere $10, which to my surprise, she readily accepted. It turns out the “brass” wasn’t genuine; it was merely gold-colored metal, which actually made it an even better candidate for a budget-friendly makeover.
The Unexpected Placeholder: A Journey into DIY Furniture Upcycling
While this $10 find wasn’t the dream headboard I had envisioned, it served a crucial purpose. My handy husband, in a burst of DIY enthusiasm, had expressed his desire to custom-build a headboard for our bed. Anyone with a partner who loves a good woodworking project knows that “I want to build something” can often translate to “it might be finished sometime in the next decade.” This metal headboard, therefore, became the perfect placeholder, a temporary solution that could potentially evolve into something more. It was an opportunity to experiment, to breathe new life into an unloved item, and to create something beautiful without breaking the bank. Could I get an amen from anyone who understands the intricate timelines of a spontaneous DIY project?
The journey began with the simplest yet most crucial step in any successful spray painting project: preparation. I started by giving the entire headboard a light but thorough sanding. This isn’t about stripping away the old finish entirely, but rather creating a slightly roughened surface for the primer to adhere to. Think of it as giving your new paint a sturdy handshake with the old material. After the sanding dust was wiped clean, I moved on to applying the first essential layer: primer.
Mastering the Art of Metal Transformation: Primer and Paint Application
The primer step is non-negotiable, especially when working with metal surfaces. A good quality metal primer provides an essential bonding layer, ensuring that your chosen topcoat adheres properly and lasts for years without chipping or peeling. It also helps to prevent rust, which is vital for the longevity of any metal furniture piece. I applied an even, thin coat of primer across the entire headboard, making sure to cover all the nooks and crannies. Patience is key here; rushing this stage can compromise the final finish. I allowed the primer to dry completely, following the manufacturer’s recommendations, before moving on to the exciting part: adding color.
For the main transformation, I opted for Rustoleum Oil Rubbed Bronze spray paint. This particular shade is renowned for its rich, deep tones and subtle metallic sheen, which promised to elevate the headboard from its brassy origins to a sophisticated, antique-inspired finish. Applying the paint required a steady hand and a methodical approach. I applied several light coats, rather than one thick one. This technique is paramount for achieving a professional-looking finish, preventing drips, and ensuring even coverage. Each coat was allowed to dry to the touch before the next was applied, building up the color gradually.
The Magic of Metallic: Witnessing the Transformation
I had heard a lot of buzz about metallic spray paints, but this was my first time using one, and I was genuinely blown away by the results. The Rustoleum Oil Rubbed Bronze delivered an absolutely stunning finish. Just look at the captivating detail it created:
Now I completely understand why this product receives so much adoration. Those subtle, sparkly flecks embedded within the paint give the entire project an authentic, high-end feel. It’s a far cry from the flat, sometimes dull finish of regular spray paint. No one would ever suspect that this elegantly transformed headboard was once a $10 discarded item. With its fresh, new coat of paint, this piece is nothing short of gorgeous! The metallic sheen catches the light beautifully, adding depth and a touch of understated glamour to the piece.
The transformation was so dramatic, it’s almost unbelievable until you see the before-and-after side by side. It’s a testament to the power of paint and a little DIY determination.
Your Guide to an Easy Metal Headboard Makeover: A Simple 3-Step Process
If you have an old metal headboard collecting dust, or any metal furniture piece that’s screaming for a refresh, this simple three-step process is your ticket to a stunning makeover. It’s an incredibly rewarding project that yields professional-looking results with minimal effort and expense.
- Preparation is Key: Wash, Dry, and Lightly Sand. Begin by thoroughly washing the entire headboard with a mild detergent and water to remove any grime, dust, or grease. Allow it to dry completely. Once dry, lightly sand the entire surface by hand using a fine-grit sanding block (around 180-220 grit). This step is crucial for creating a “tooth” for the primer to grip onto and for removing any loose flakes of old paint or rust. Wipe down with a tack cloth or damp cloth to remove all sanding dust.
- Prime for Perfection: Apply Metal Spray Paint Primer. In a well-ventilated area, apply a thin, even coat of a high-quality metal spray paint primer. Ensure you hold the can at a consistent distance (typically 8-12 inches) and use a sweeping motion to avoid streaks and drips. Primer creates a uniform base, enhances adhesion, and provides an extra layer of protection against rust. Allow the primer to dry completely according to the manufacturer’s instructions. This might take a few hours or even overnight, depending on humidity and temperature.
- Color Transformation: Apply Rustoleum Metallic Spray Paint. Once the primer is fully dry, it’s time for the magic! Apply several light, even coats of your chosen Rustoleum Metallic spray paint (or another preferred brand). Remember the golden rule of spray painting: thin coats are better than one thick coat. Over-spraying can lead to drips, sags, and an uneven finish. Allow each coat to dry to the touch before applying the next, typically 15-30 minutes. Continue until you achieve your desired color depth and coverage, usually 2-4 coats.
Essential Spray Painting Tips for a Flawless Finish
To ensure a truly professional-looking finish, keep these valuable spray painting tips in mind:
- Shake Well and Often: Before you start and periodically during application, vigorously shake the spray paint can for at least one minute. This ensures the pigments and propellants are thoroughly mixed for consistent color and flow.
- Work in a Well-Ventilated Area: Always spray outdoors or in a garage with open doors to ensure proper airflow and minimize inhalation of fumes. Wear a respirator mask for added safety.
- Maintain Distance: Hold the can at the recommended distance (usually 8-12 inches) from the surface. Too close, and you’ll get drips; too far, and you’ll get a dusty, uneven coat.
- Use Sweeping Motions: Instead of spraying directly at one spot, use continuous, even sweeping motions across the surface. Release the nozzle at the end of each pass to avoid paint buildup.
- Layer Lightly: As mentioned, multiple light coats are far superior to one heavy coat. This prevents drips, allows for better adhesion, and creates a smoother, more durable finish.
- Check Weather Conditions: Ideal spray painting conditions are low humidity and temperatures between 50-90°F (10-32°C). High humidity can cause blushing or a rough finish, while extreme temperatures can affect drying time and paint flow.
- Protect Surroundings: Lay down a drop cloth or old newspaper to protect your work area from overspray. Use painter’s tape to mask off any areas you don’t want painted.
- Allow Adequate Drying and Curing Time: While paint may be dry to the touch in minutes, it takes longer to fully cure and harden. Avoid handling or placing items on your newly painted piece for at least 24-48 hours, or even longer, depending on the product and conditions.
The Stunning Reveal: A Bedroom Upgrade on a Dime
With the last coat applied and sufficient time given for the paint to cure, the headboard was ready to take its rightful place in our bedroom. The transformation was nothing short of astonishing. The rich Oil Rubbed Bronze perfectly complements the existing decor, adding a touch of sophisticated industrial charm that effortlessly blends with various interior styles, from modern farmhouse to transitional. It’s incredibly rewarding to look at this once-forgotten piece and see the potential that was unlocked with just a little effort and a can of spray paint.
Now, my husband can truly take his sweet time meticulously crafting a custom headboard, because I am absolutely delighted with this one. This beautiful, repurposed headboard could comfortably grace our bedroom for years to come. And, let’s be honest, we all know that “years” is precisely how long it might take for that custom-built masterpiece to materialize anyway!
Why Choose DIY for Your Home Decor?
This project is a perfect example of why embracing DIY (Do It Yourself) for home decor can be so fulfilling:
- Cost-Effective: Transforming an existing piece is almost always cheaper than buying new, especially when you score a deal like a $10 headboard.
- Personalization: You get exactly the color and finish you desire, ensuring the piece perfectly matches your unique style and existing decor.
- Sustainability: Upcycling old furniture reduces waste and gives items a second life, contributing to a more sustainable lifestyle.
- Sense of Accomplishment: There’s immense satisfaction in creating something beautiful with your own hands. Every time you look at the finished piece, you’ll feel a sense of pride.
- Learning New Skills: DIY projects offer an opportunity to learn practical skills that can be applied to many other areas of home improvement.
Whether you’re looking to save money, express your creativity, or simply breathe new life into an old piece, a metal headboard makeover with spray paint is an accessible and impactful project. Give it a try – you might be amazed at what you can achieve!







