
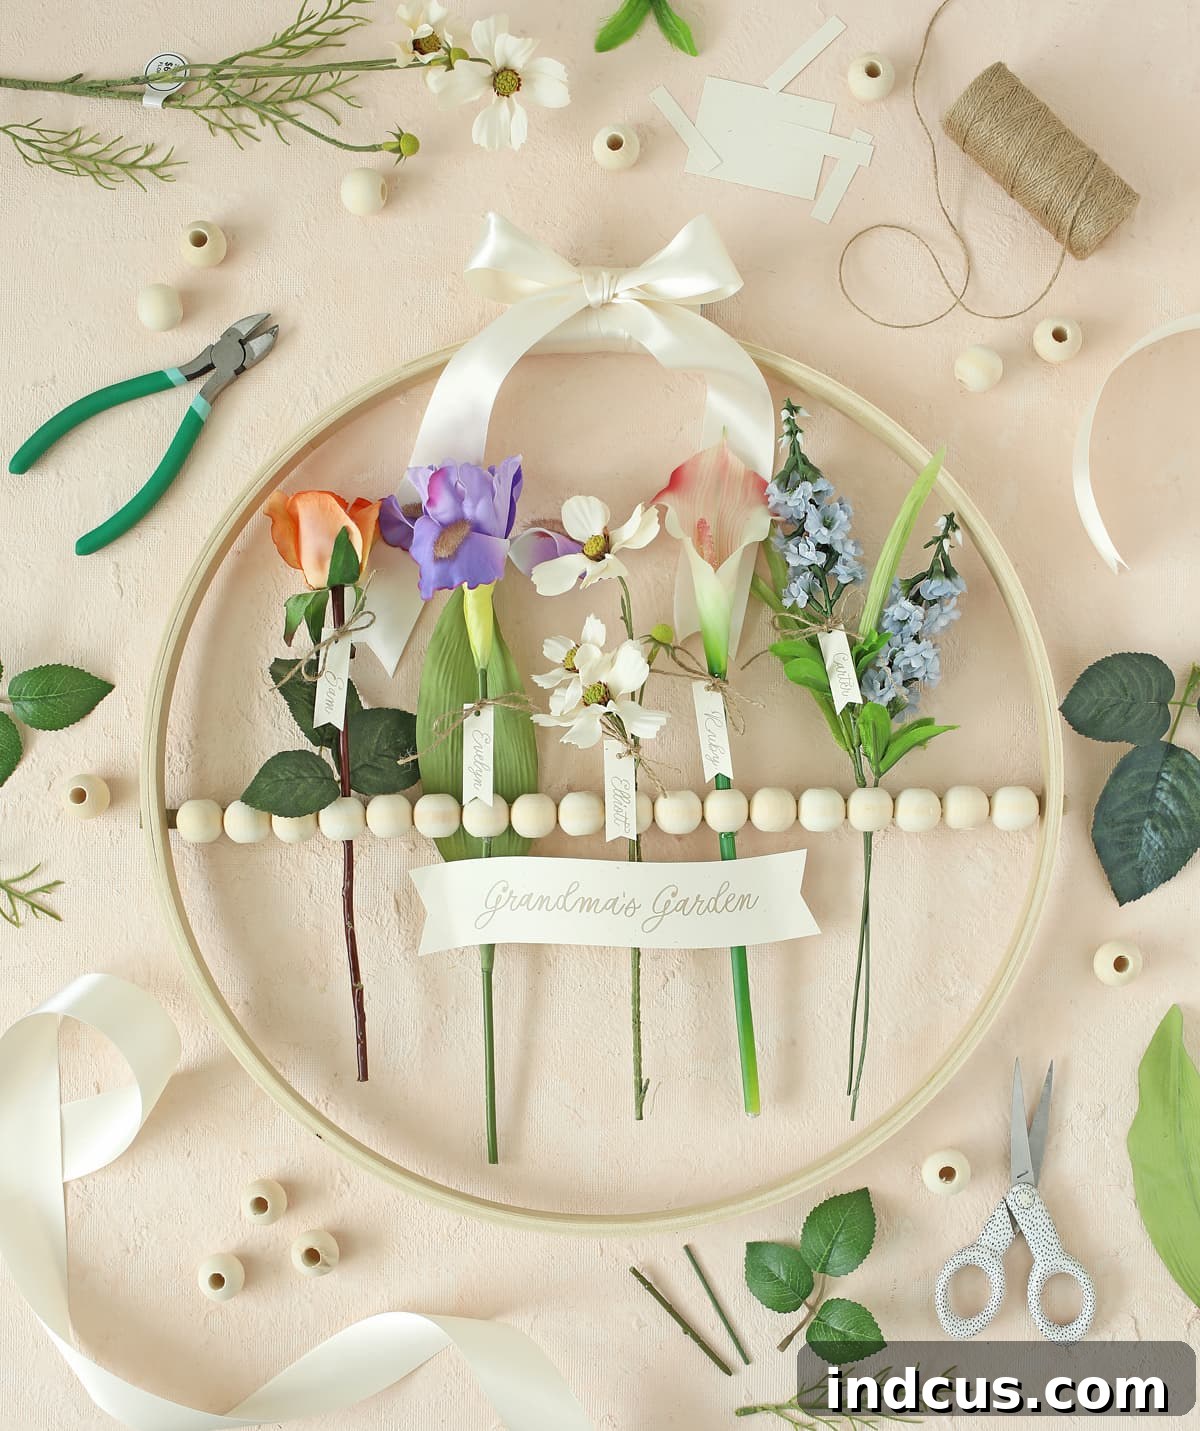
Craft a Timeless DIY Birth Flower Wall Hanging: A Sentimental Gift for Mom or Grandma
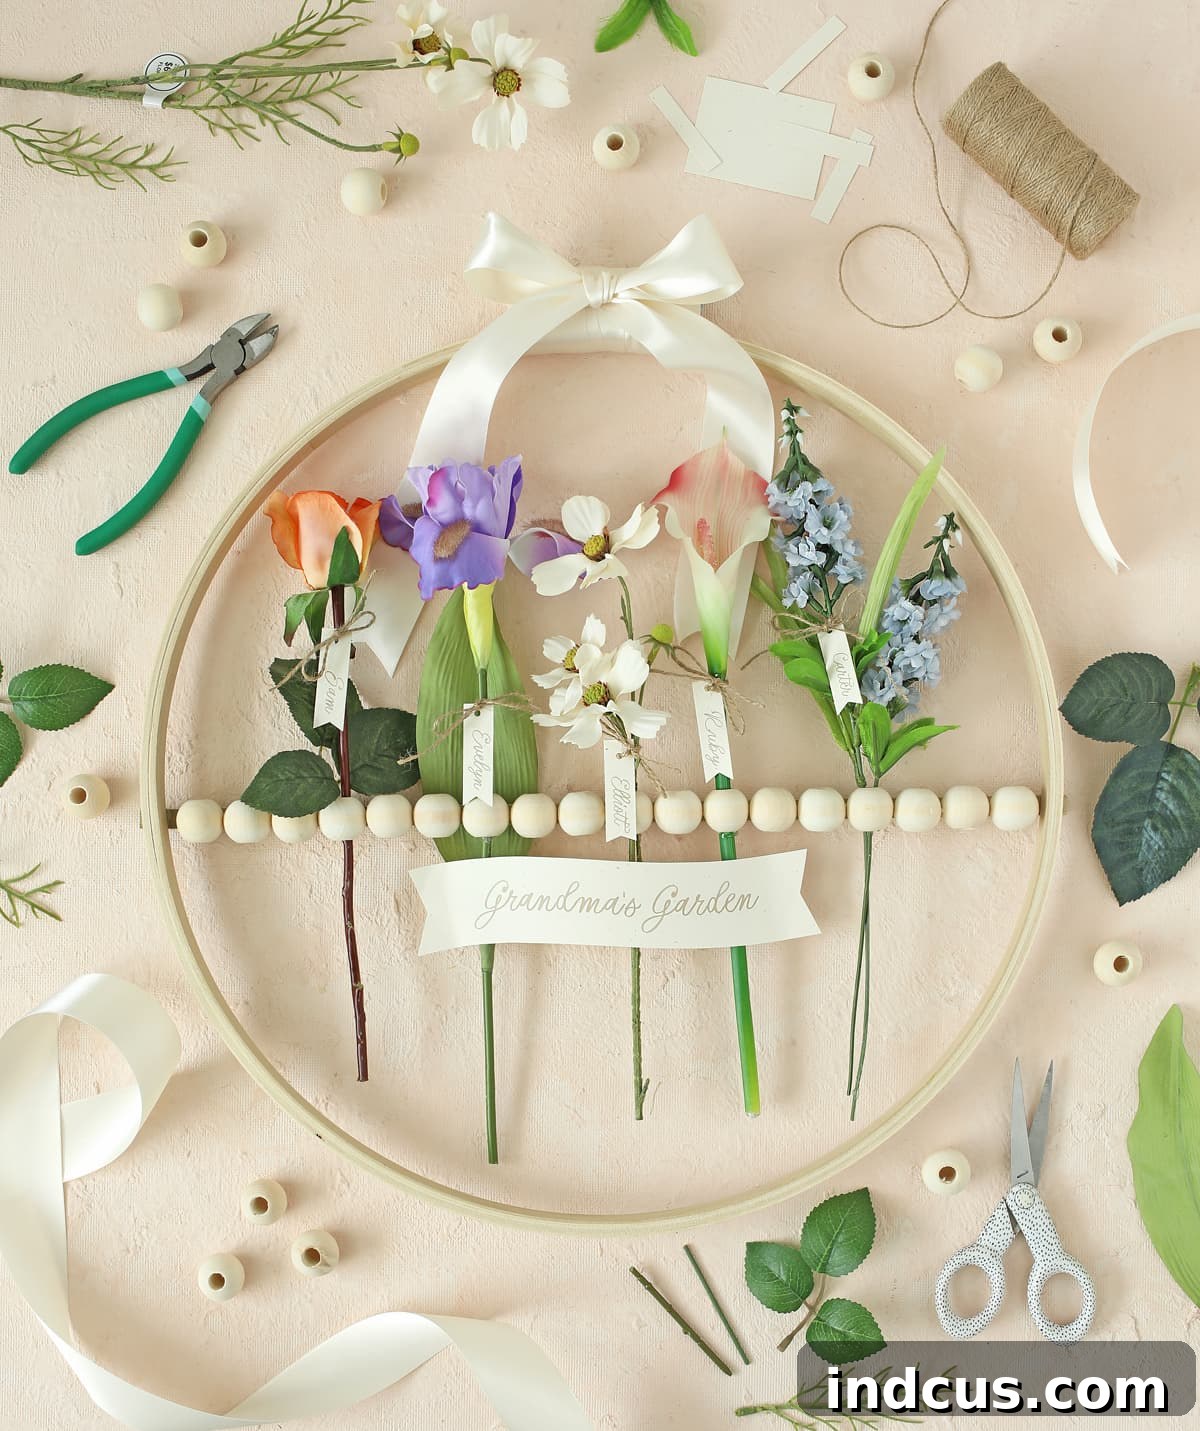
Welcome, fellow crafters, to a project that promises to tug at heartstrings and add a touch of personalized beauty to any home! Today, we’re diving into an incredibly thoughtful and visually stunning DIY creation: a custom birth flower wall hanging. This isn’t just another craft; it’s a deeply sentimental gift designed to celebrate the unique lives of children or grandchildren, represented by the delicate blossoms of their birth months. For over a year, this idea has been a cherished concept, and I’m absolutely thrilled to finally bring it to life and share every detail with you.
This post is proudly sponsored by Hobby Lobby, your ultimate destination for creative supplies.
Discover the Enchanting World of Birth Flowers for a Personalized Touch
When we think of personalized gifts for mothers or grandmothers, birthstones often come to mind, adorning rings and necklaces with a sparkle unique to each loved one. But did you know that every month also boasts its own designated birth flower? This beautiful, often overlooked tradition offers an equally profound and visually stunning way to honor family members. The concept of creating a decorative piece using these specific floral symbols immediately captured my imagination. Imagine a display where each bloom tells a story, representing a cherished child or grandchild.
My quest began with a mission: to track down high-quality faux versions of every single birth flower. And, as always, Hobby Lobby proved to be an invaluable resource! Their extensive floral department did not disappoint; I was able to find nearly all the necessary blooms to bring this vision to fruition. I’ve done the painstaking legwork for you, meticulously compiling a list and providing direct links where possible, making it incredibly easy for you to gather the specific flowers needed for your own personalized birth flower decoration. This thoughtful gesture is bound to be a conversation starter and a treasured keepsake for years to come.
A Comprehensive Guide to Birth Flowers by Month
Understanding which flower corresponds to each month is the first step in this beautiful journey. Each bloom carries its own unique symbolism, adding an extra layer of meaning to your project. Here’s a detailed guide to help you select the perfect faux flowers for your sentimental wall hanging, complete with descriptions to inspire you:
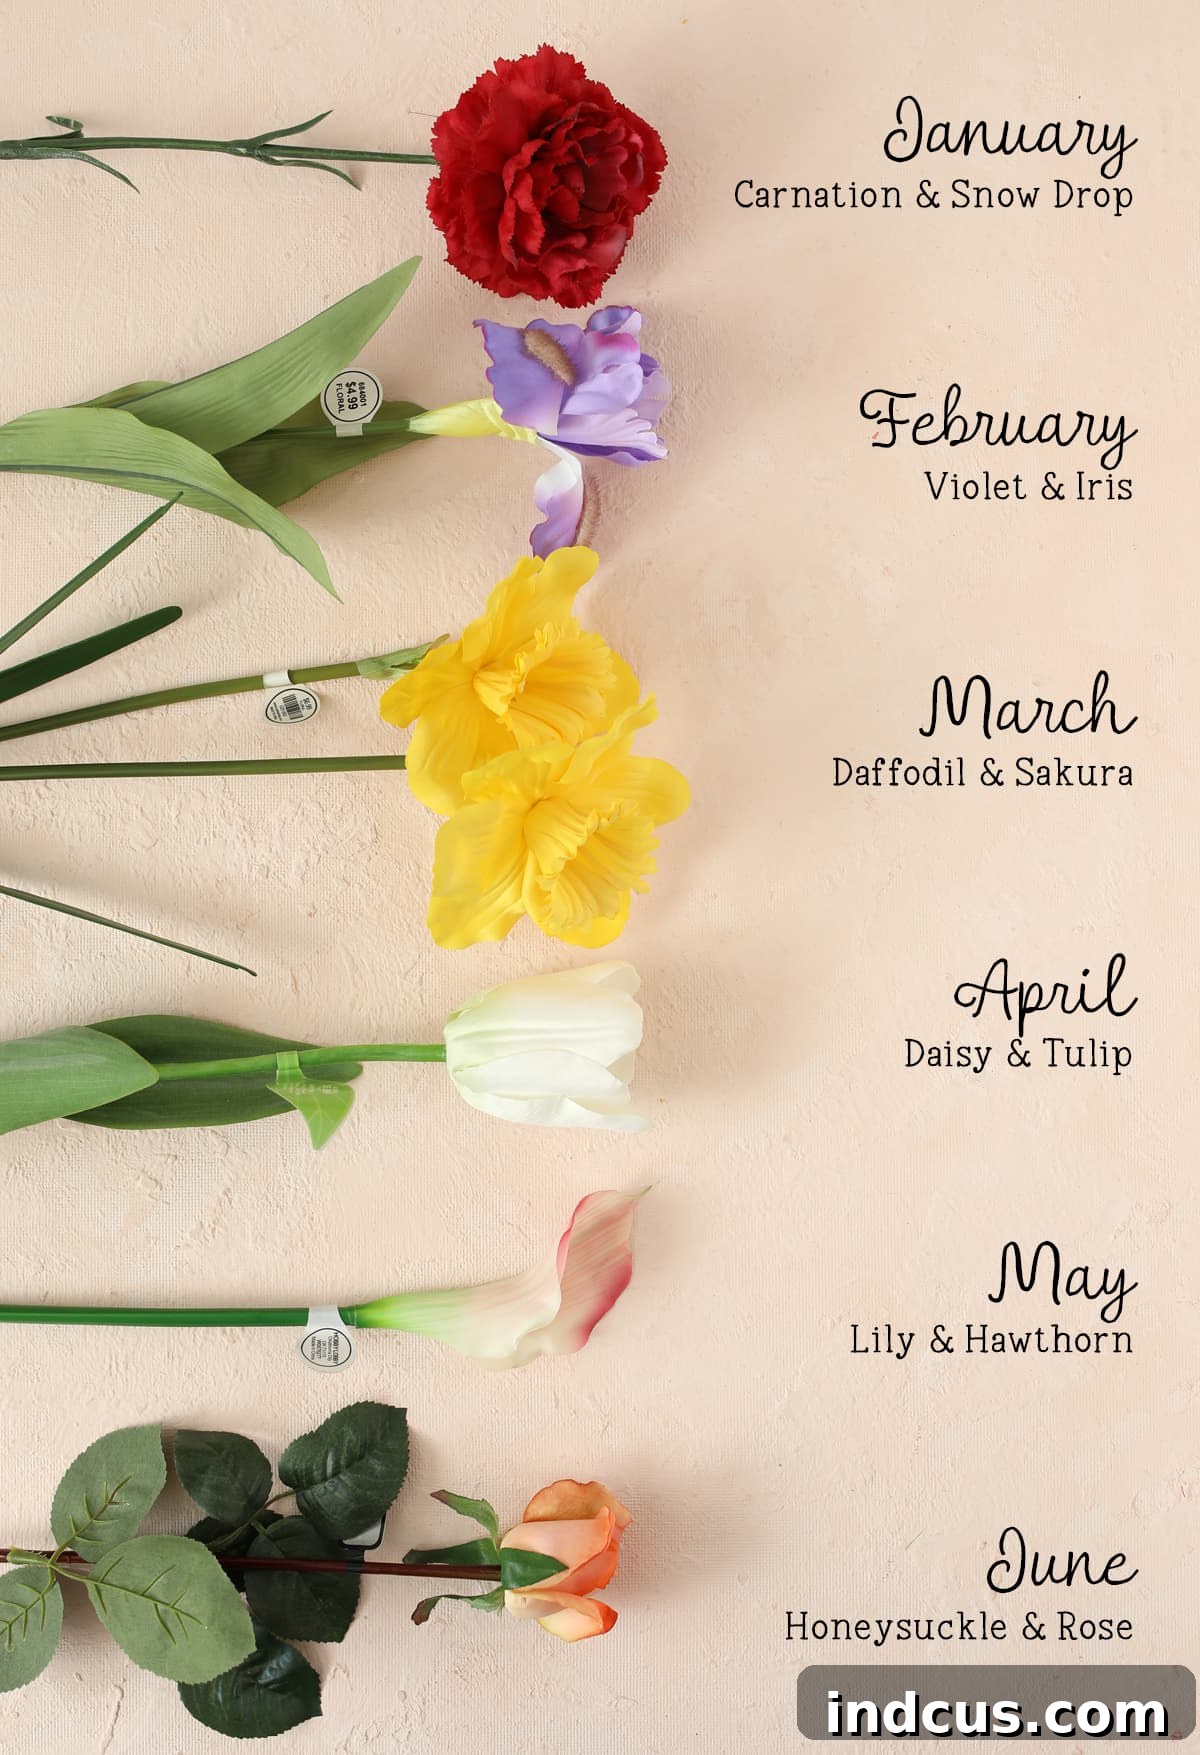
- January – Carnation and Snowdrop. Carnations symbolize love, fascination, and distinction, often given in various colors to convey different shades of affection. Snowdrops, appearing in late winter, represent hope and beauty.
- February – Violet and Iris. Violets signify faithfulness, humility, and spiritual wisdom. The Iris, with its regal petals, is a symbol of faith, hope, courage, and admiration.
- March – Daffodil and Sakura (Cherry Blossom). Daffodils herald new beginnings, joy, and unrequited love, bursting forth with vibrant energy. Cherry Blossoms, deeply revered in Japanese culture, represent the fleeting nature of life and immense beauty.
- April – Daisy and Tulip. Daisies symbolize innocence, purity, and true love. Tulips, especially in their varied colors, express perfect love, happiness, and elegance.
- May – Lily and Hawthorn. Lilies represent purity, majesty, and renewed life, with the Calla Lily often signifying magnificent beauty. Hawthorn symbolizes hope, supreme happiness, and protection.
- June – Honeysuckle and Rose. Honeysuckle evokes feelings of sweet love and devotion. The timeless Rose, especially in June, is universally recognized for love, beauty, and passion, with different colors conveying specific messages.
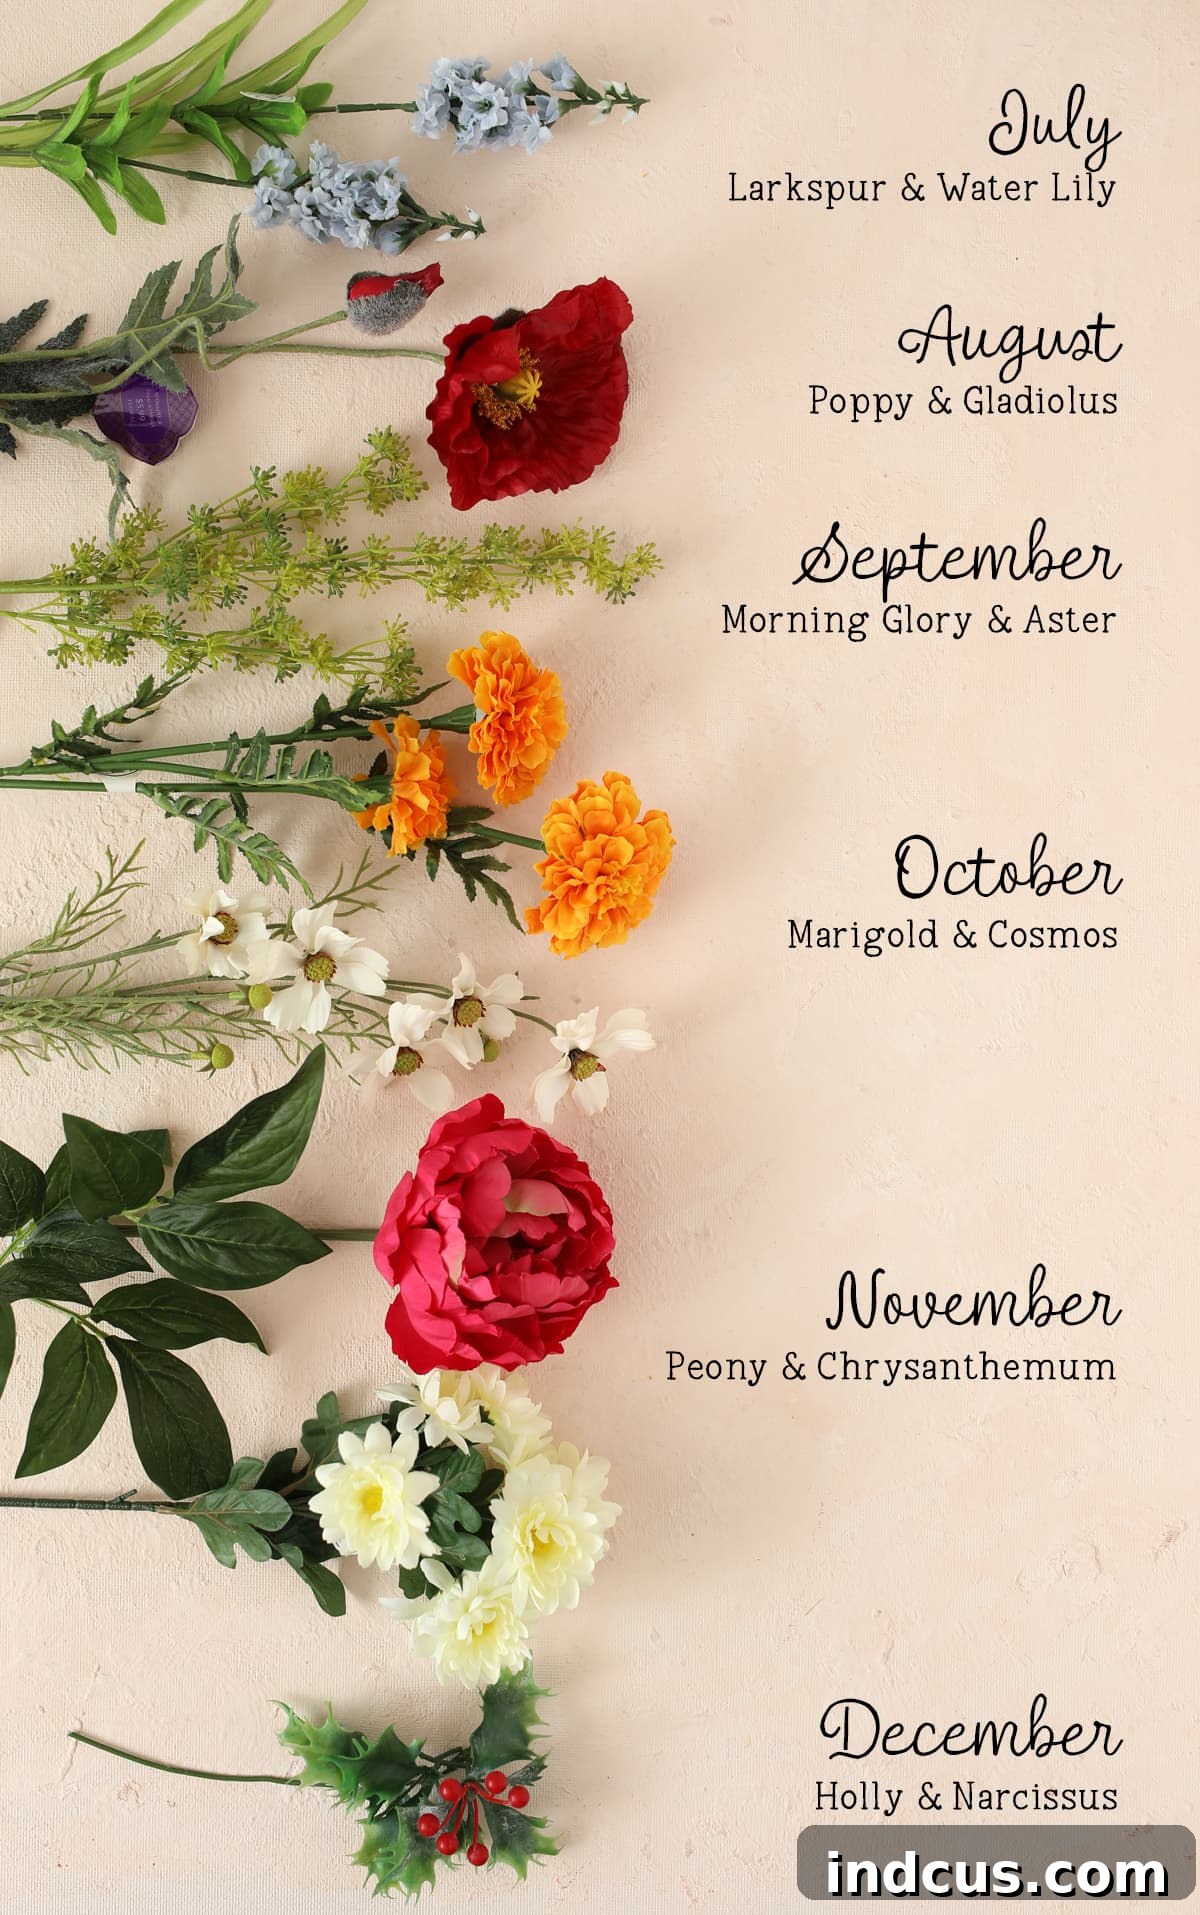
- July – Larkspur and Water Lily. Larkspurs symbolize lightness, levity, and a strong bond of love. The Water Lily stands for purity, peace, and enlightenment, gracefully floating on water.
- August – Poppy and Gladiolus. Poppies can symbolize remembrance, peace, and imagination, with different colors having varied meanings. Gladiolus, often called “sword lily,” represents strength of character, integrity, and sincerity.
- September – Morning Glory and Aster. Morning Glories symbolize affection and the fleeting nature of life as they bloom and fade within a day. Asters represent love, wisdom, and valor, with their star-like heads.
- October – Marigold and Cosmos. Marigolds are known for symbolizing passion, creativity, and sometimes sorrow, bringing vibrant color. Cosmos signify order, harmony, and peace, with their perfectly balanced petals.
- November – Peony and Chrysanthemum. Peonies symbolize honor, wealth, and romance, often associated with prosperity. Chrysanthemums, or “mums,” convey cheerfulness, friendship, and longevity, especially during autumn.
- December – Holly and Narcissus. Holly represents hope, domestic happiness, and protection, especially during the festive season. Narcissus (or Paperwhite) symbolizes faithfulness, respect, and good wishes, often blooming in winter.
A quick note on finding December’s flowers: they can sometimes be a bit tricky, especially outside the holiday season. I was fortunate to have some holly on hand from my Christmas decorations. Poinsettias are also a beautiful and widely recognized birth flower for December and are typically easier to locate during the colder months. For Narcissus, which closely resembles white daffodils, you can easily substitute with similar faux daffodil stems, and the difference would be barely noticeable.
Your Mission: Sourcing the Perfect Faux Blooms
The most time-consuming part of this delightful project will likely be the initial hunt for the ideal faux flowers. Crafting stores, particularly Hobby Lobby, are treasure troves for artificial florals. While browsing, keep these invaluable tips in mind to streamline your shopping experience and ensure you find exactly what you need:
- Read the Labels: Most individual floral stems in-store are organized by type, and their holding buckets or packaging often feature clear labels indicating the specific flower name. This is your primary guide.
- Utilize Technology: Don’t hesitate to use your smartphone! I found immense success by taking photos of the faux flowers in the store and employing a plant identifier app on my phone. Remarkably, these apps can often identify even artificial blooms, providing you with the exact name you need to cross-reference with our birth flower list.
- Consider Quality and Realism: While faux flowers offer longevity, some are more realistic than others. Look for “real touch” or “silk” varieties that mimic the texture and subtle variations of natural petals and leaves.
- Mix and Match: Don’t be afraid to combine different brands or styles of faux flowers if it means finding the perfect representation for each birth month.
- Check Online Inventory: Before heading to the store, consider checking Hobby Lobby’s website (or other craft retailers) for online availability. This can help you confirm if a particular flower is in stock at your local branch, saving you a trip.
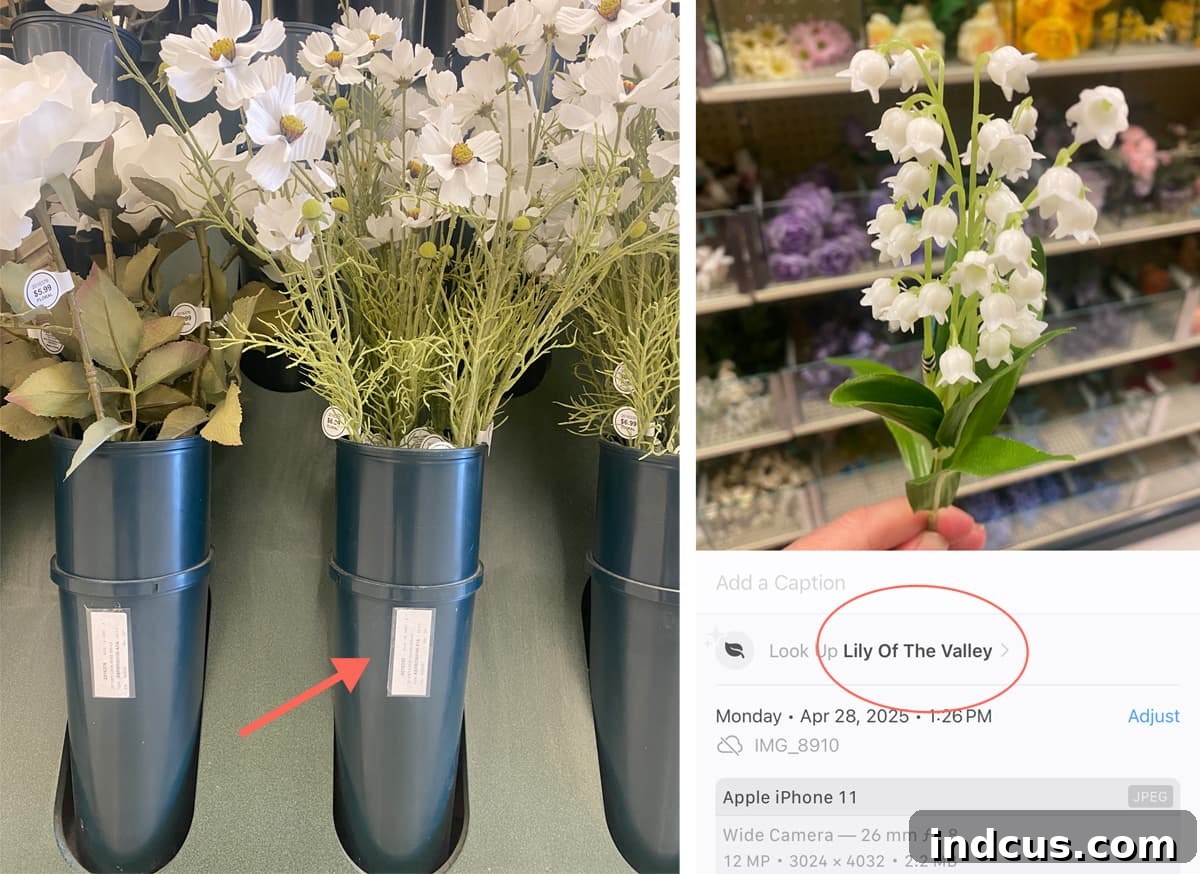
Once you’ve successfully gathered your blossoms, rest assured, the challenging part is behind you! The assembly of this beautiful wall hanging is surprisingly straightforward and incredibly rewarding.
Gather Your Crafting Essentials
Before you begin assembling your personalized floral display, ensure you have all the necessary tools and materials. Each item plays a specific role in creating a sturdy, elegant, and heartfelt gift. The combination of rustic wood and delicate faux flowers creates a charming aesthetic that’s both timeless and personal.
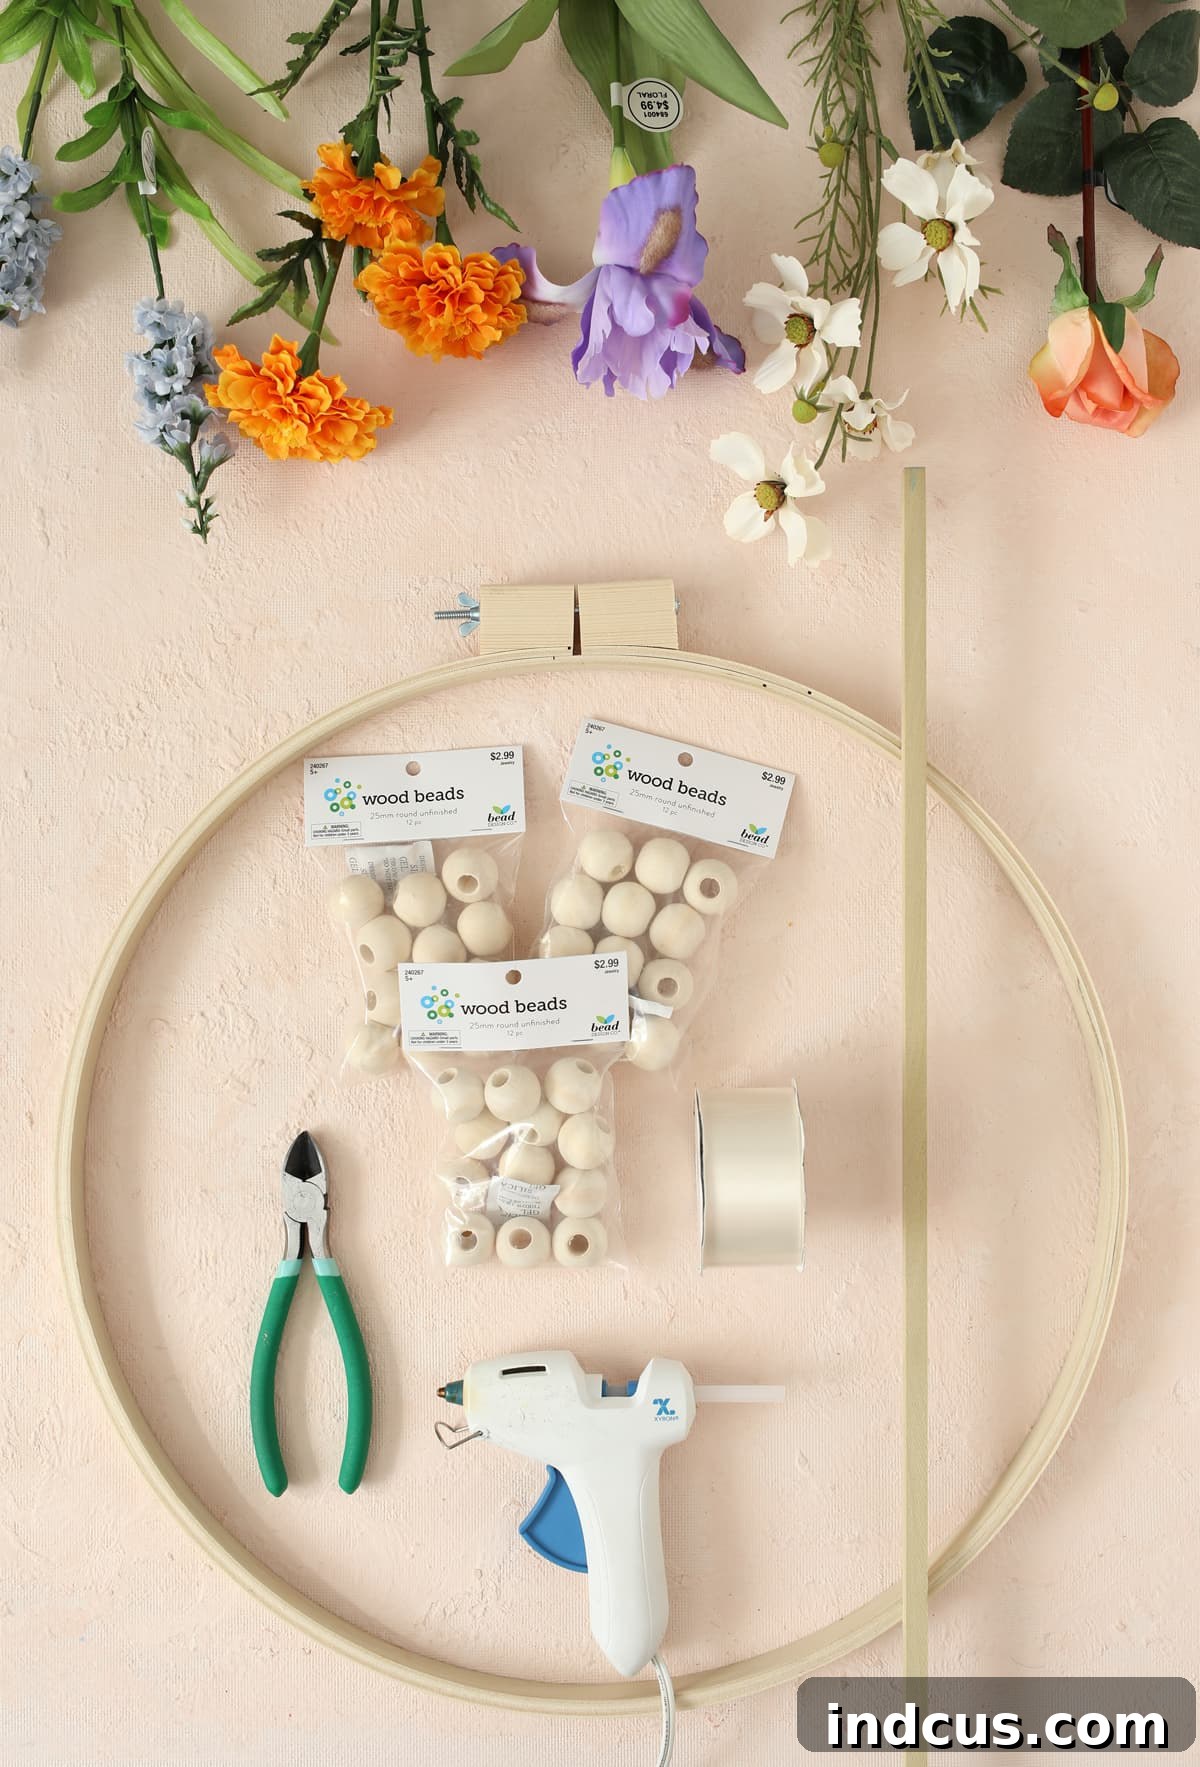
Materials Needed for Your Birth Flower Wall Hanging
- Faux Flowers: Selected based on the birth months of your loved ones. Choose varieties with strong, pliable stems.
- 18-Inch Wooden Embroidery Hoop: This provides the perfect circular frame for your display. Its natural wood finish adds a rustic, charming appeal.
- 3/8 Inch Square Wood Dowel: This acts as the central support for your flowers and beads.
- 25mm Wood Beads: (Approximately 18 beads or two packages) These are essential for holding the flower stems and adding a delightful natural texture. Ensure they have a sufficiently large hole for your stems.
- 1.5 Inch Wide Satin Ribbon: Used to cover the hoop clasp and add a touch of elegance and a hanging loop.
- Hot Glue Gun + Glue Sticks: Your primary tool for secure attachments throughout the project.
- Floral Stem Cutter: Crucial for cleanly trimming tough floral stems without damaging your scissors.
- Cardstock: For creating the personalized banner and individual name tags. Choose a sturdy, attractive paper.
- Hole Punch: For making holes in the name tags.
- Scissors: For cutting ribbon, cardstock, and minor floral adjustments.
- Twine: To string and attach the name tags to each flower.
While I opted for an 18-inch embroidery hoop for this particular project, Hobby Lobby also offers 14-inch and 23-inch options. These alternative sizes provide excellent flexibility, allowing you to accommodate a smaller or larger number of children or grandchildren beautifully within your unique design.
Step-by-Step Guide: Crafting Your Sentimental Wall Hanging
Now that you have all your materials, let’s bring this gorgeous birth flower display to life. Follow these steps carefully to ensure a stunning and durable finished product:
Step 1: Prepare the Wooden Dowel
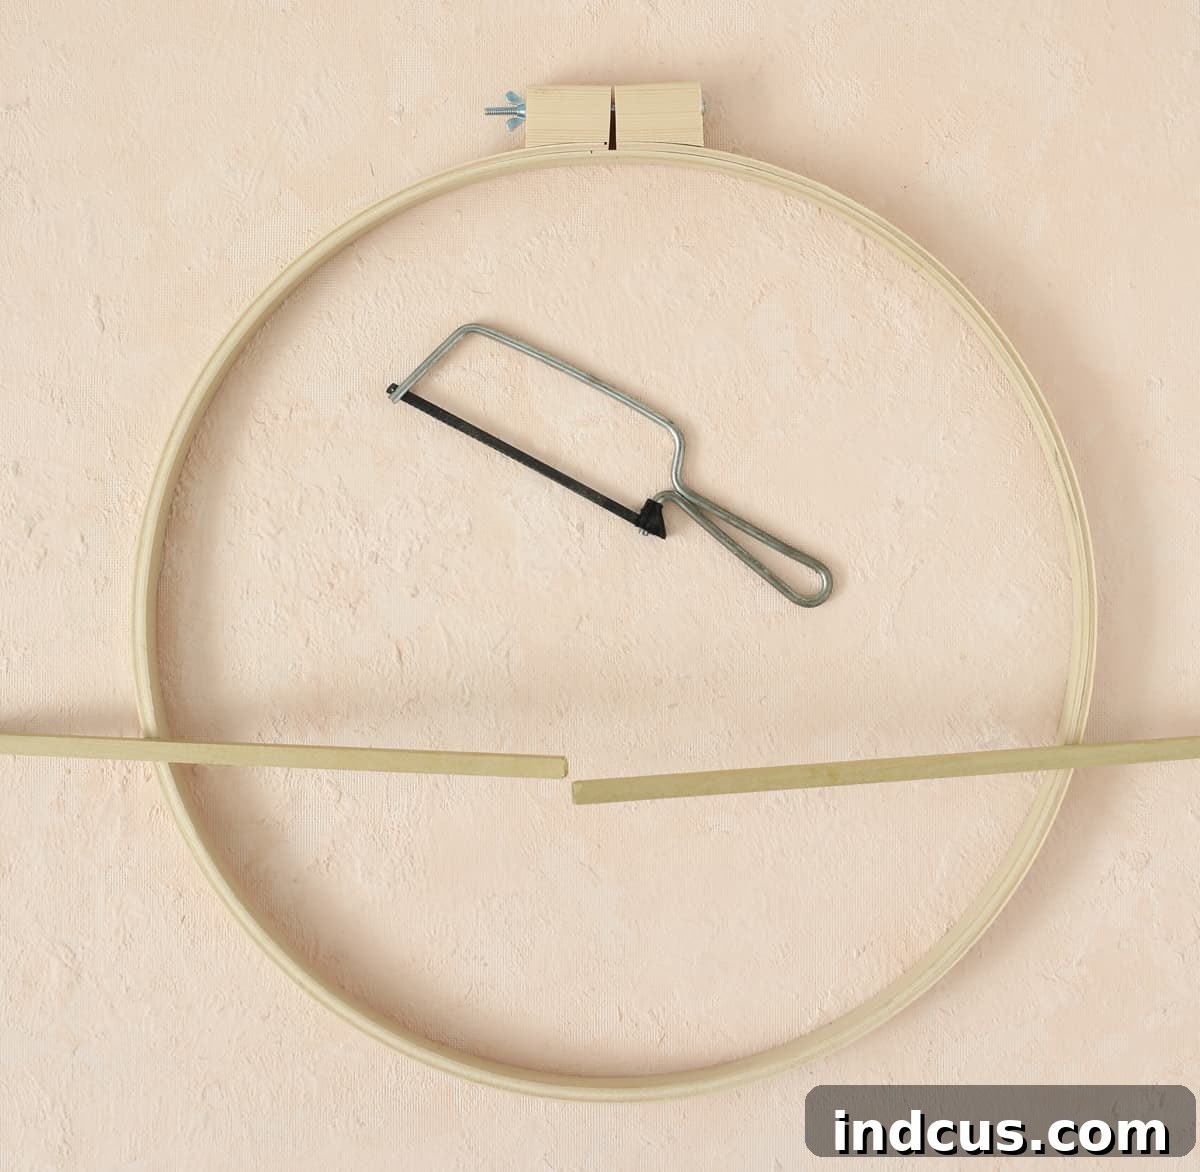
Begin by laying your wood dowel across the center of your 18-inch embroidery hoop. Measure and mark where it needs to be trimmed. I recommend cutting it just slightly longer than the inner diameter of the hoop. This ensures a snug fit and provides ample surface area for a secure hot glue attachment, preventing any wobbling later on. Use a saw or your floral stem cutters (if the dowel isn’t too thick) for a clean, straight cut.
Step 2: Secure the Dowel to the Hoop
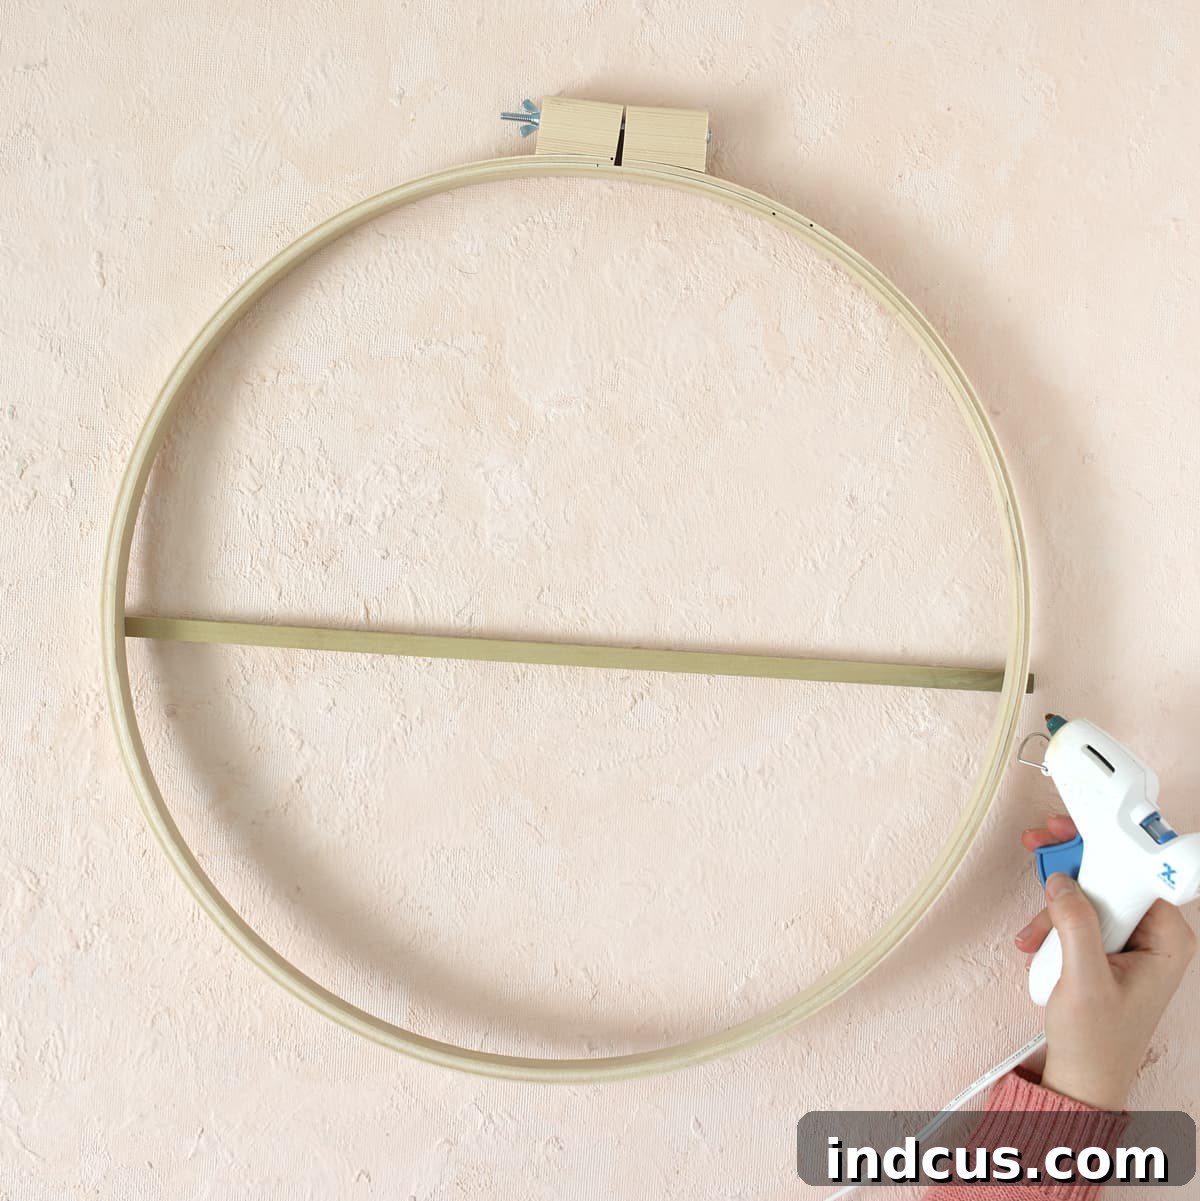
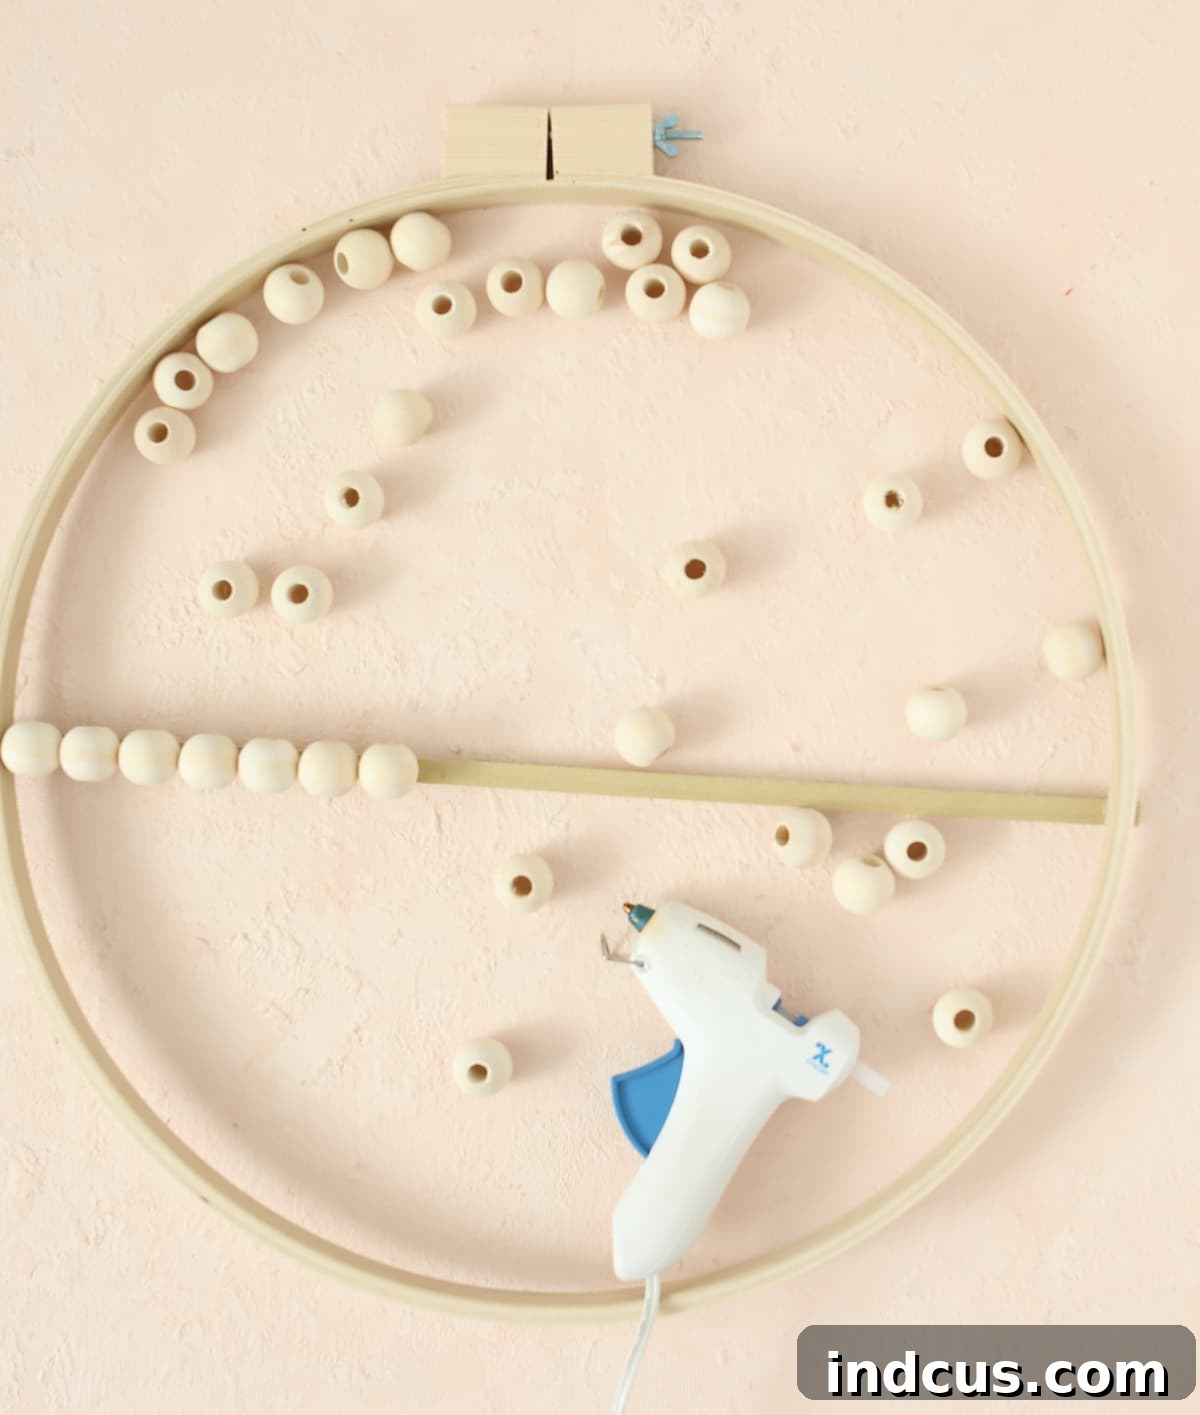
With your hot glue gun ready, apply a generous amount of hot glue to both ends of the dowel. Carefully press the dowel firmly against the inner edge of the embroidery hoop, ensuring it is perfectly centered and level. Hold it in place for a few moments until the glue cools and sets, creating a strong bond. This horizontal dowel will serve as the anchor for your personalized flowers.
Step 3: Attach the Wood Beads for Floral Placement
Now, it’s time to add the charming wood beads to the dowel. The key here is precise spacing. Before applying any glue, lay out all your chosen beads across the dowel. Arrange them evenly to ensure that once glued, there are no awkward gaps or crowded sections. Once you’re satisfied with the spacing, glue each bead securely to the dowel using hot glue. Critically, ensure that the hole in each bead is oriented straight up and down. This vertical alignment is essential for easily sliding the flower stems through in the next step. If you simply start gluing from one end, you might end up with an uneven distribution, so planning the layout beforehand is vital.
Step 4: Arrange and Secure Your Birth Flowers
This is where your artistic flair comes into play! Carefully slide the stems of your chosen birth flowers through the holes in the wood beads. Be prepared to trim stems to appropriate lengths using your floral stem cutters, remove excess leaves, or even gently reshape the flowers until each one sits perfectly and creates a harmonious display. Each faux flower is unique and may require a different approach. For instance, with an iris, you might need to detach leaves, slide the stem through, and then reattach a leaf or two from below the bead for a natural look. A rose stem might require pulling off several leaf bunches and trimming any nubs to fit snugly within the bead. Don’t be afraid to experiment and adjust until you are completely happy with the arrangement and balance of colors and textures.
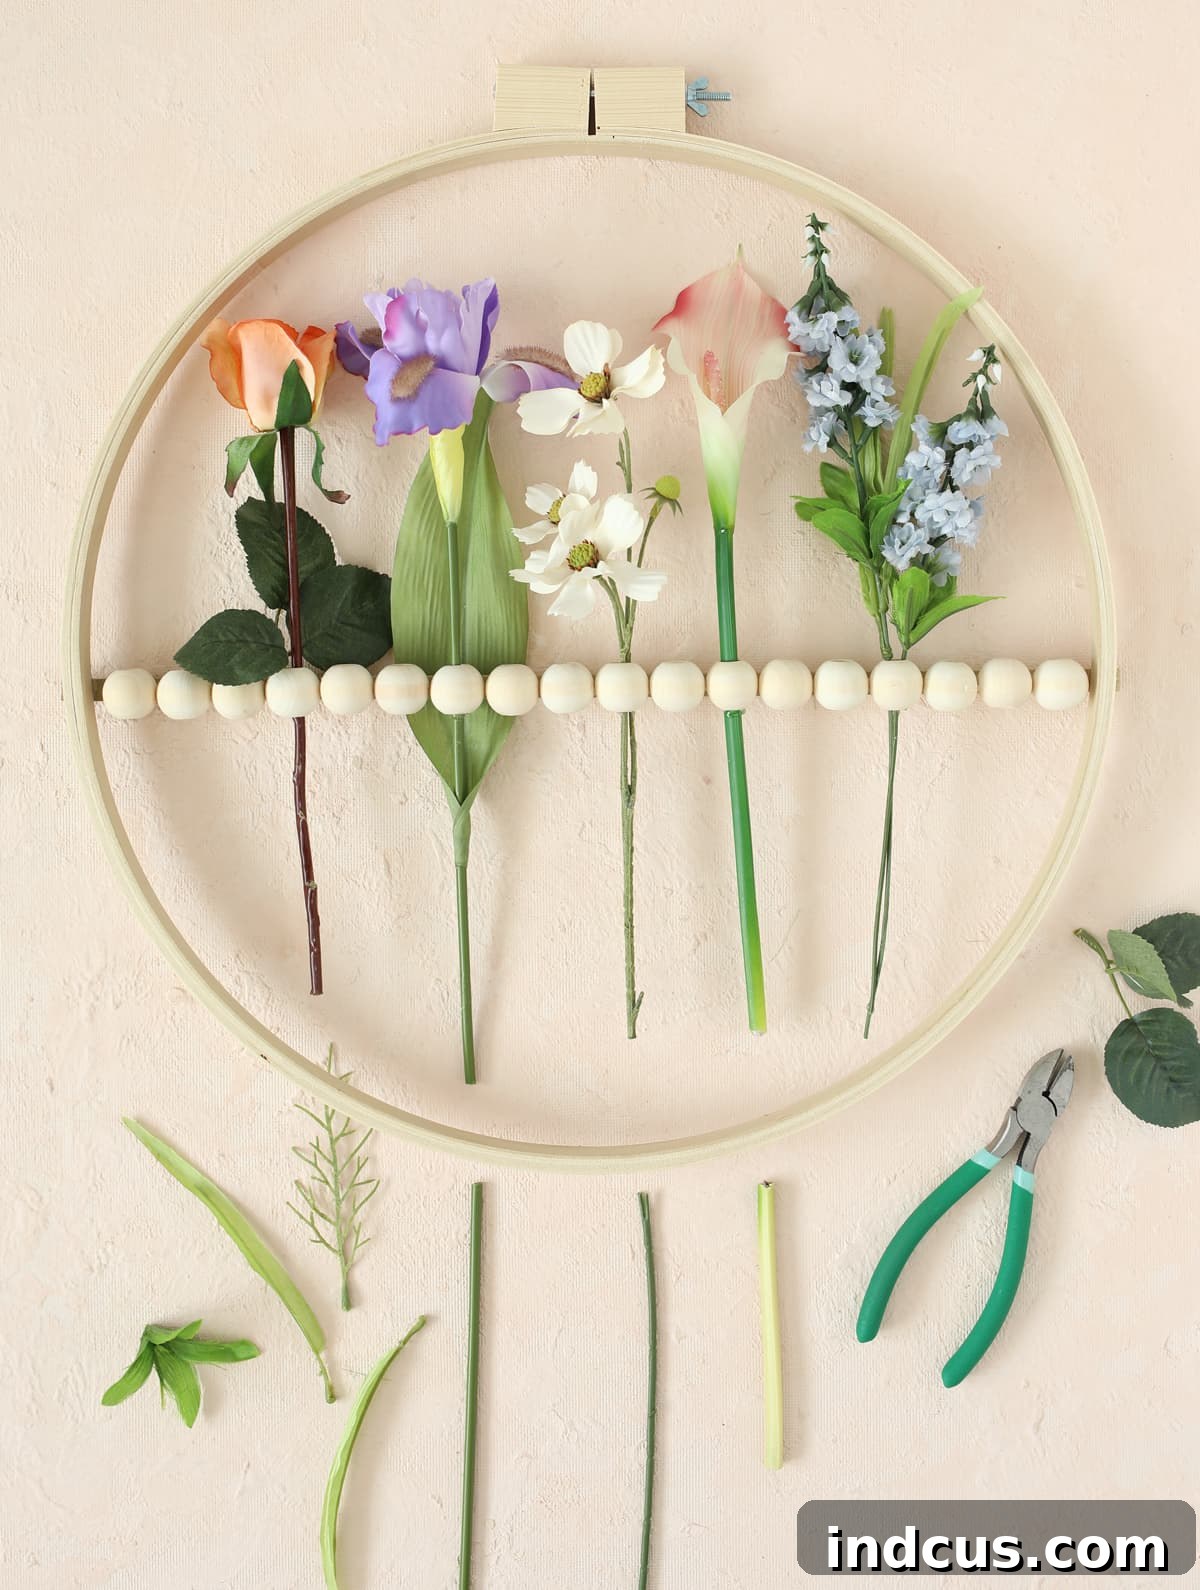
Once all your flowers are positioned beautifully, some might need a little extra security. For any flowers that seem loose, carefully insert the tip of your hot glue gun into the bead hole and fill it with a small amount of glue. This will firmly anchor the stem in place, ensuring your display remains pristine.
Step 5: Create and Attach the Sentimental Banner
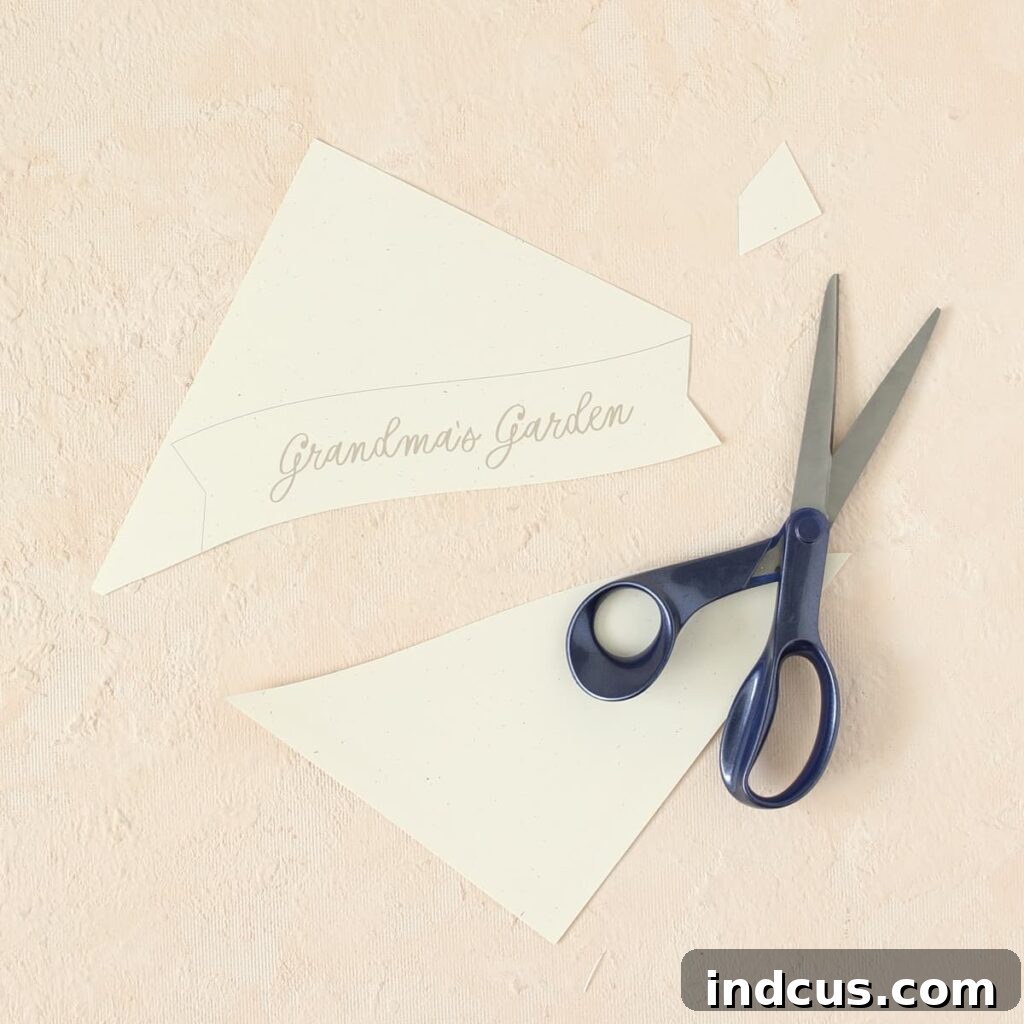
Select a piece of attractive cardstock that complements your flowers. Either type or neatly handwrite a heartwarming saying onto it. Cut the cardstock into a graceful banner shape – a simple V-cut at each end works wonderfully. Here are some inspiring phrase ideas to get you started:
- Grandma’s Garden
- Love Grows Here
- Mothers Plant the Seed of Love That Blooms Forever
- Love Grows in Families
- Grandma’s Flower Garden
- Children are like flowers. Water them with love.
- Our Family in Bloom
- Blooms of Love
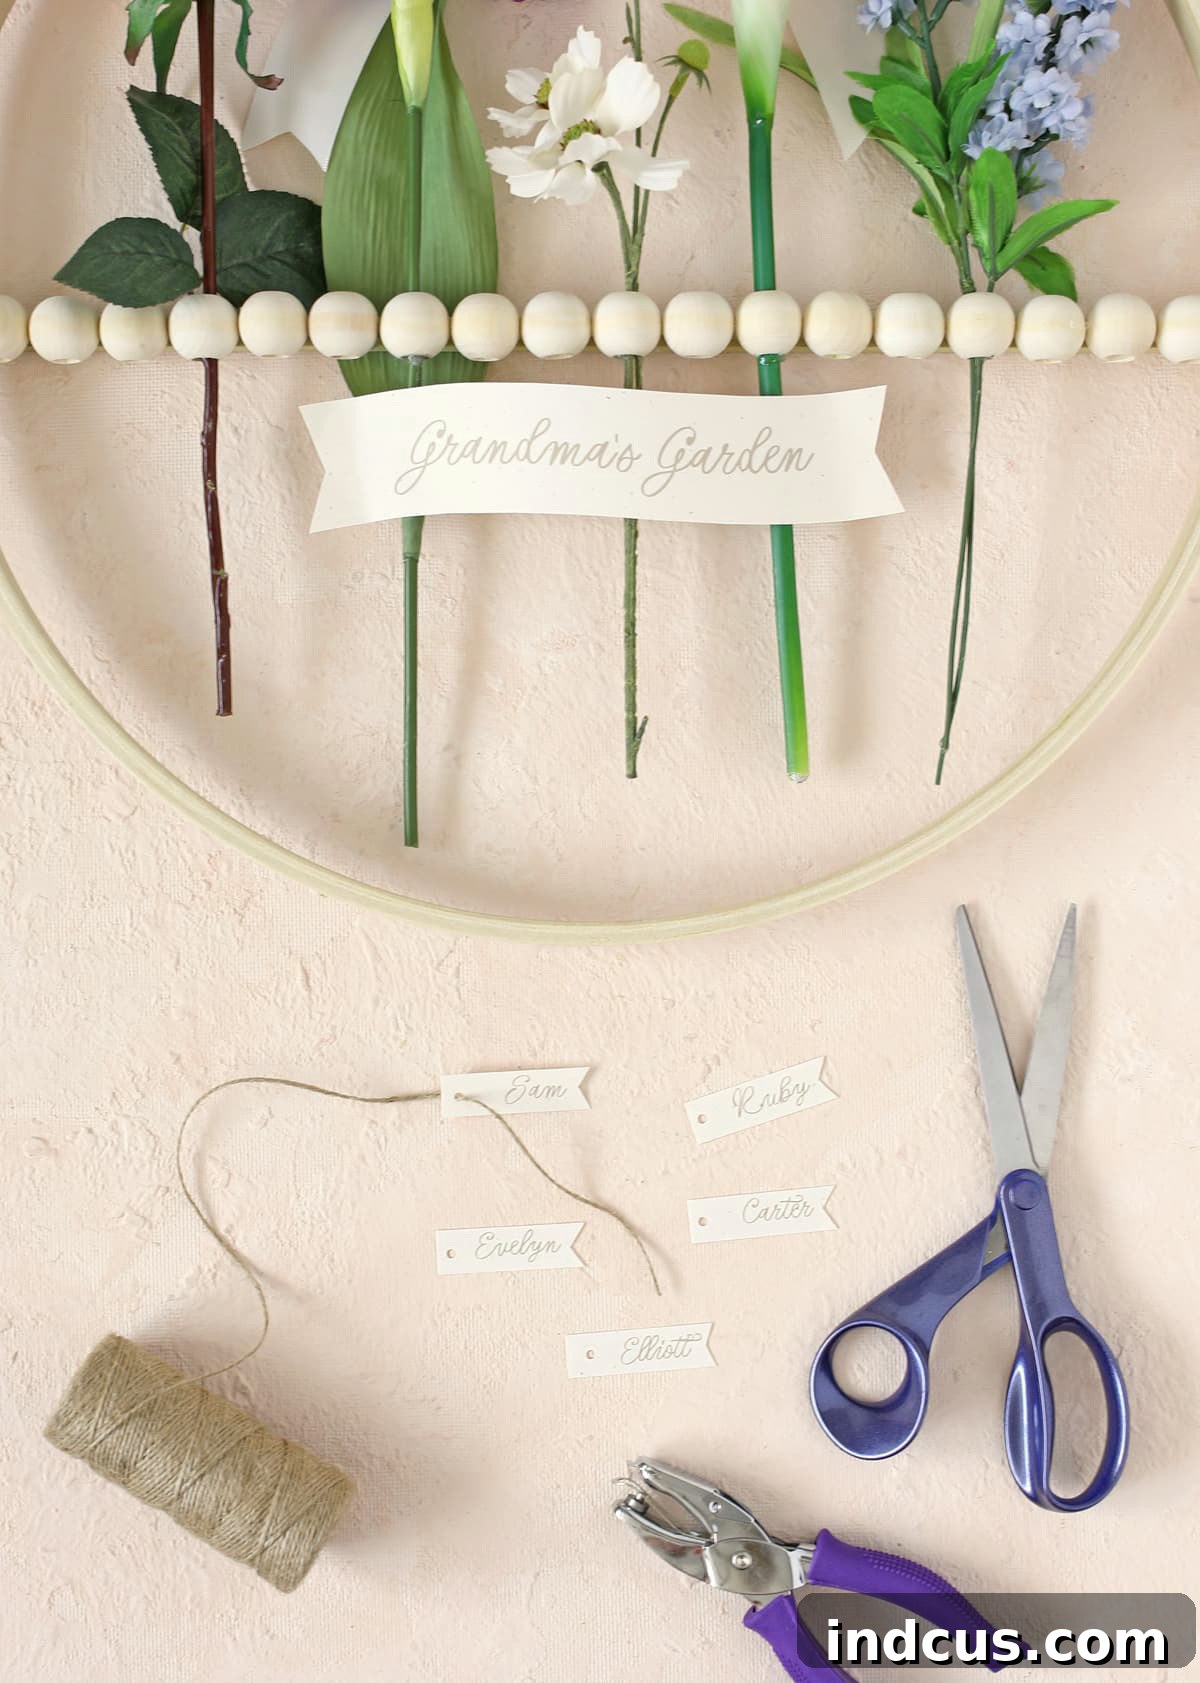
Once your banner is ready, carefully glue it just below the wooden beads, allowing it to rest gracefully against the flower stems. For an added touch of dimension and visual interest, I suggest curving the paper ever so slightly before gluing it, giving it a gentle, flowing appearance.
Step 6: Personalize with Individual Name Tags
Using the same cardstock, type or elegantly handwrite each child or grandchild’s name onto small, individual tags. Cut these out into desired shapes (simple rectangles, ovals, or small banners). Punch a small hole at the top of each tag using your hole punch. Thread a piece of jute twine through the hole, and then tie each personalized name tag securely to its corresponding birth flower. This step truly brings the “personalized” aspect of the gift to life, allowing the recipient to instantly connect each beautiful bloom to a beloved family member.
Step 7: The Final Flourish: Ribbon and Bow
The very last step is to add an elegant finishing touch with your satin ribbon. Wrap the ribbon around the metal clasp of the embroidery hoop, covering it completely for a polished look. Secure the ribbon ends with a dab of hot glue if necessary. Then, tie a beautiful, generous bow at the top, which will also serve as the hanging mechanism for your wall art. And just like that, your exquisite Mother’s Day birth flower display is complete and ready to be cherished!
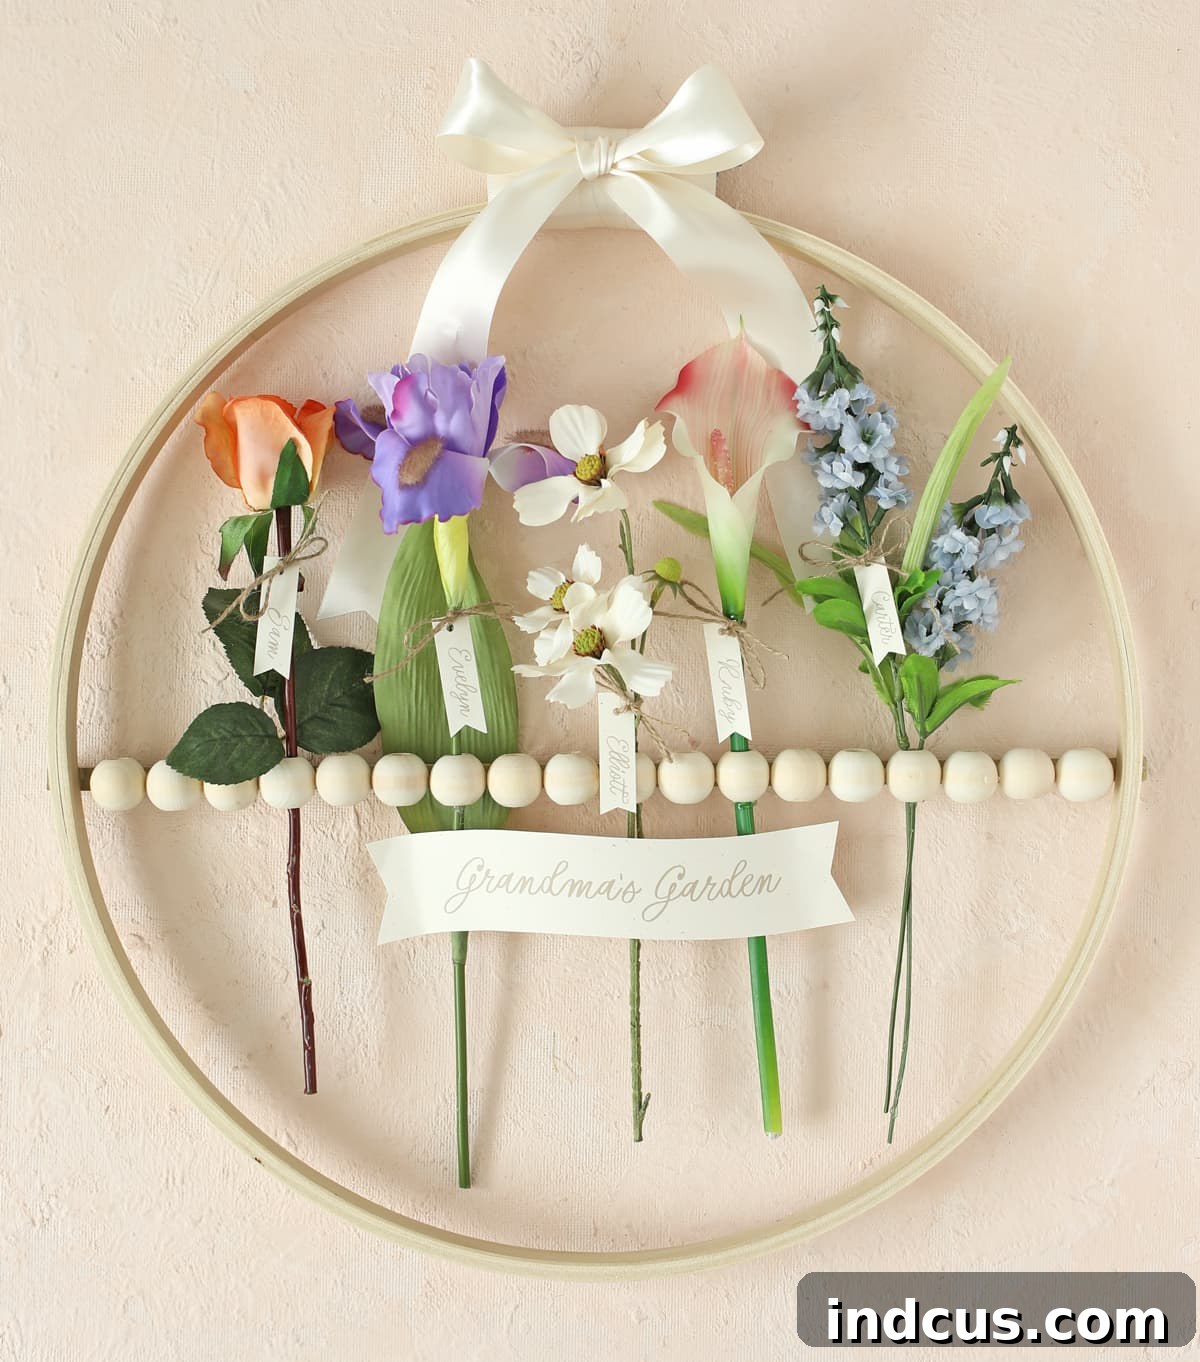
Take a moment to admire your handiwork. Isn’t it absolutely stunning? The combination of the natural wood, the vibrant faux flowers, and the personalized touches creates a truly unique piece of art that speaks volumes.
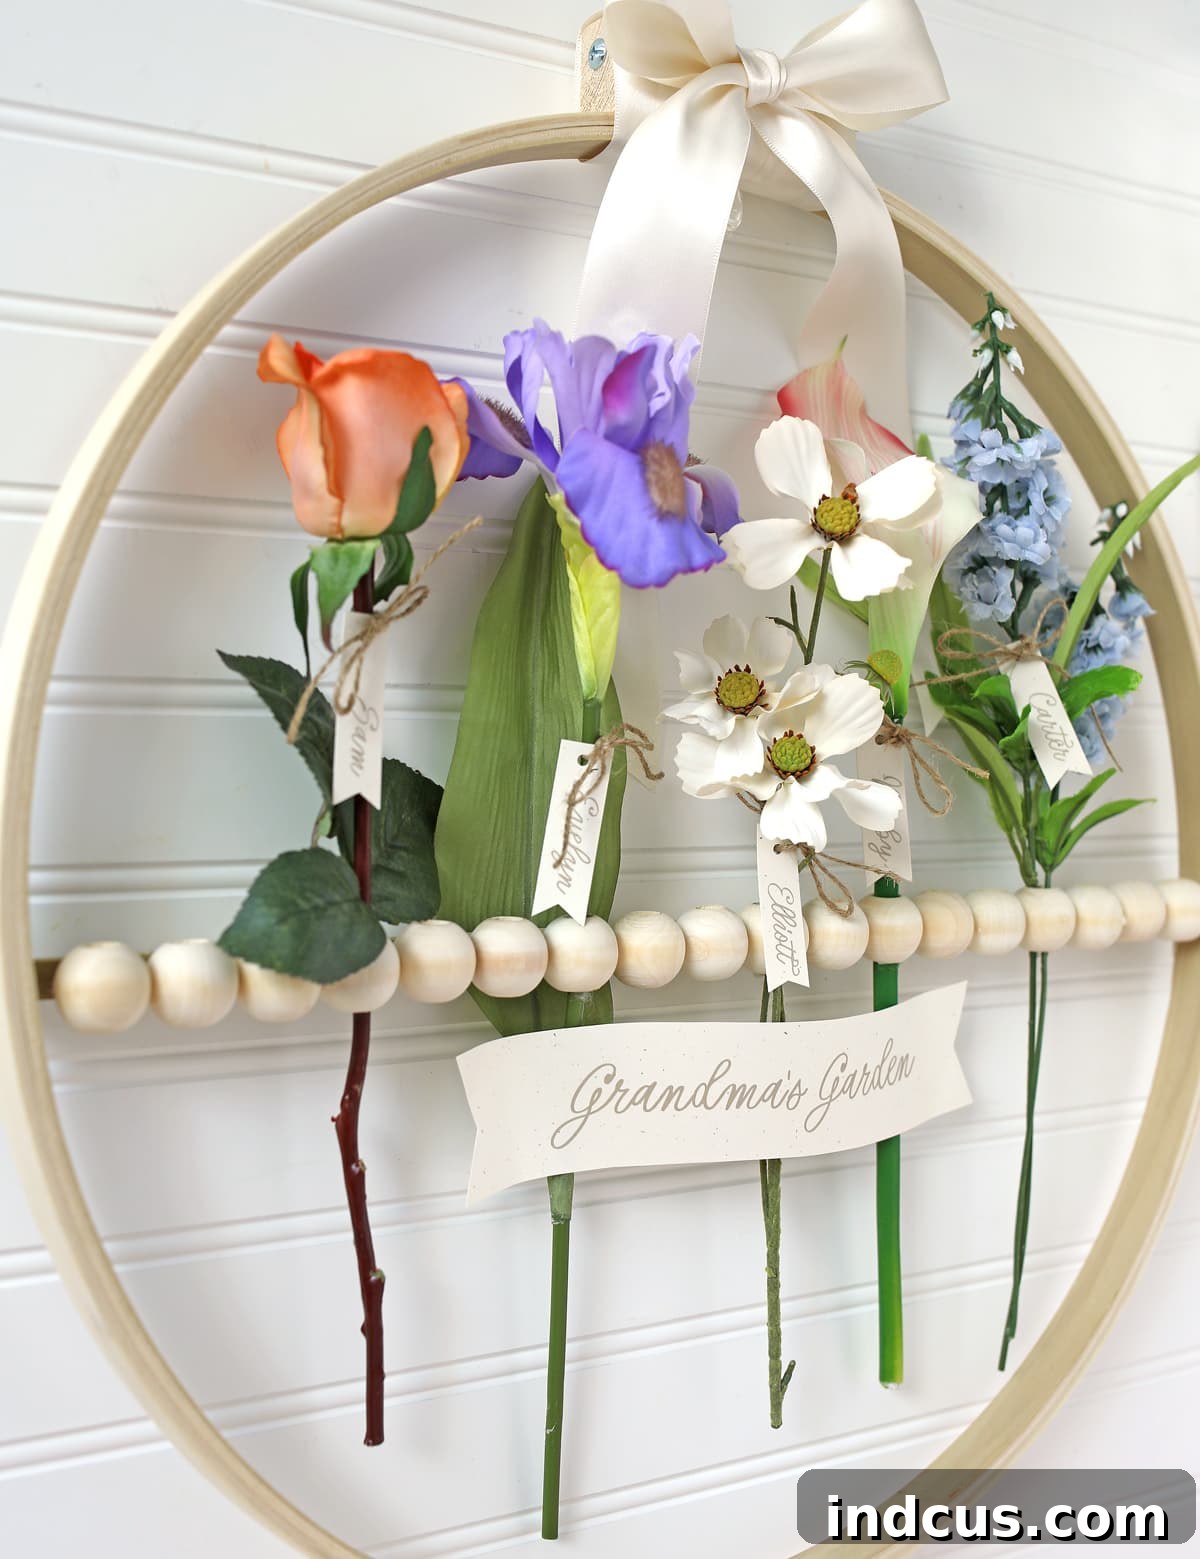
More Than Just a Craft: The Enduring Charm of Your Birth Flower Display
I am utterly smitten with this project. It’s more than just a decoration; it’s a testament to love, family, and the beauty of personalized artistry. While perfectly suited for Mother’s Day, its versatility extends far beyond a single occasion. Imagine transforming this into a charming wreath for your front door by simply choosing a selection of your favorite faux stems and skipping the personalized tags. The innovative use of the wood beads to securely hold the flowers creates a captivating visual effect that’s both modern and timeless.
This design is incredibly adaptable. You could paint the wooden hoop and dowel for a different aesthetic, add touches of greenery for a lush look, or even incorporate small LED fairy lights for an evening glow. The possibilities for customization are endless, allowing you to tailor this project to any recipient or home decor style. Whether gracing a living room wall, a nursery, or a cozy reading nook, this birth flower wall hanging is sure to evoke warmth, joy, and a sense of cherished family connection for anyone who beholds it. It truly is a project that you’ll adore creating and gifting!
Mother’s Day Birth Flower Craft Tutorial
For visual learners, a video tutorial complementing these instructions may be available to guide you through each step of creating this beautiful birth flower wall hanging.







