
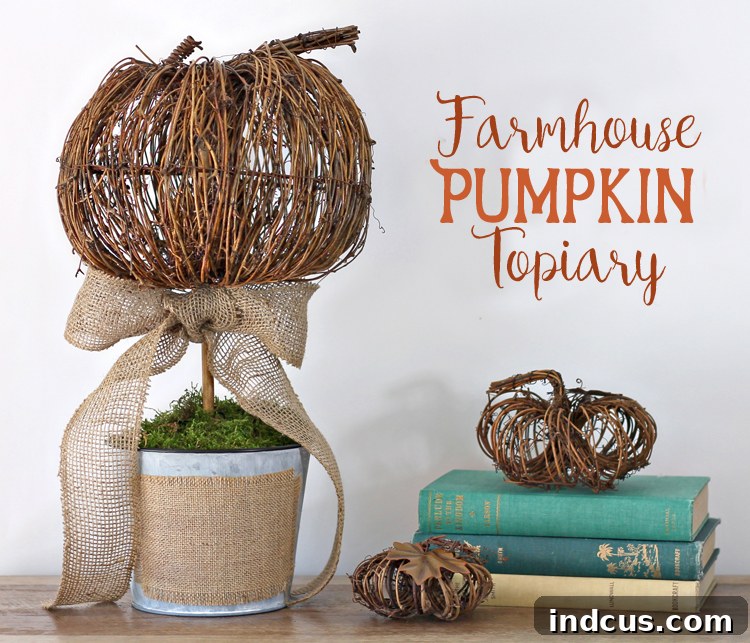
Craft Your Own Rustic Farmhouse Pumpkin Topiary: An Easy DIY Fall Decor Guide
As the leaves begin to turn vibrant shades of crimson and gold, and a crisp, inviting chill fills the air, there’s no denying the magical allure of autumn. Fall decorating is a cherished tradition, transforming our homes into cozy havens filled with warmth and character. If you’re eager to infuse your living space with the rustic charm of the season, but time is of the essence, you’ve come to the right place! This comprehensive, step-by-step tutorial will guide you through creating a stunning rustic farmhouse style pumpkin topiary that not only adds a touch of seasonal elegance to your home but can be completed in under an hour. It’s the perfect project for crafters of all skill levels, delivering maximum visual impact with minimal effort.
A topiary, traditionally a plant clipped into an ornamental shape, brings a sense of structured elegance to any setting. Our DIY version captures this refined aesthetic using charming fall elements, making it an ideal centerpiece, entryway accent, or a delightful addition to your porch decor. Imagine the inviting glow it will cast, perfectly complementing your existing farmhouse or seasonal decor. Let’s gather our supplies and begin this exciting journey into fall crafting!
Materials Needed for Your DIY Pumpkin Topiary
To embark on this delightful autumn craft, you’ll need a few readily available materials. We’ve included affiliate links for your convenience, making it easy to source everything you need.
- Twig Pumpkin: This will be the focal point of your topiary. Choose a size that complements your desired display area. Twig pumpkins offer a beautiful natural texture that perfectly suits the rustic farmhouse aesthetic.
- Craft Dowel: A sturdy wooden dowel will serve as the “stem” of your topiary, connecting the pumpkin to its base. Select a dowel thickness that feels proportionate to your pumpkin and offers good stability.
- Metal Bucket with Burlap Label: This acts as the charming base for your topiary. A metal bucket enhances the farmhouse appeal, while a burlap label adds an extra touch of rustic texture. You can also use other planters like terracotta pots or galvanized buckets.
- Preserved Sheet Moss: This natural filler will cover the craft foam, giving your base a soft, earthy finish. Sheet moss is easy to work with and provides an authentic woodland feel.
- Craft Foam: Essential for securely anchoring the dowel within your planter. Floral foam (the dry kind) or Styrofoam blocks work best for this purpose.
- Burlap Ribbon: Used to create a lovely decorative bow at the base of your pumpkin, adding a finishing touch of rustic elegance.
- Hot Glue Gun and Glue Sticks: Your best friend for quick and secure adhesion throughout this project.
- Optional: Craft paint or wood stain, small rocks or pebbles for added stability.
Step-by-Step Guide to Crafting Your Pumpkin Topiary
1. Prepare the Dowel and Secure the Pumpkin
Your first step is to prepare the wooden dowel. While optional, lightly staining or painting the dowel can enhance its rustic appearance and make it blend more seamlessly with the twig pumpkin. Choose a wood stain that matches the natural tones of the twigs, or a matte brown or black craft paint for a more contrasting look. Allow it to dry completely if you choose to paint or stain.
Next, carefully insert one end of the dowel into the bottom of your twig pumpkin. Aim for the center to ensure the pumpkin sits straight and balanced. Gently push and twist until the dowel is firmly embedded. Once you’re satisfied with its placement, apply a generous amount of hot glue around the base of the dowel where it meets the pumpkin to secure it. Hold it in place for a few moments until the glue sets. This crucial step provides the stable foundation for your entire topiary, so take your time to ensure a strong, central attachment.
2. Create a Stable Base with Craft Foam and Planter
Now, let’s prepare the base for your topiary. Take your craft foam and cut it to fit snugly inside your metal bucket or planter. You want it to fill the bucket without being too loose or too compressed. If the foam doesn’t stay firmly in place on its own, a few dabs of hot glue around the edges will help secure it to the bottom of the planter. This provides a stable anchor for the dowel.
Once the foam is secured, gently but firmly stick the free end of the dowel rod (the one attached to the pumpkin) into the center of the craft foam. Push it down until the pumpkin is at your desired height above the bucket. Again, apply hot glue around the base of the dowel where it meets the foam to ensure it’s firmly fixed. If you find your topiary feels a bit wobbly or “tipsy,” don’t fret! A simple solution is to add some small rocks, pebbles, or even sand to the bottom of the planter, around the craft foam. This added weight will significantly improve the stability of your topiary, making it less prone to toppling over.
3. Conceal the Foam with Preserved Sheet Moss
With the structure in place, it’s time to add the natural charm that truly defines the rustic farmhouse look. Take your preserved sheet moss and begin covering the visible craft foam inside the metal planter. Gently pull apart pieces of the moss and arrange them to create a smooth, even layer that completely conceals the foam. The goal is to make it look like the pumpkin is growing organically from a mossy bed.
While preserved moss often adheres to itself or the foam somewhat, you might find it beneficial to use small dabs of hot glue to secure certain pieces, especially around the dowel and the edges of the planter. This prevents the moss from shifting or falling out over time. You can also experiment with other natural fillers like small pinecones, faux berries, or even tiny acorns for an added touch of autumn authenticity.
4. Add the Finishing Touch: A Burlap Ribbon Bow
The final step is to add a charming decorative element that brings the whole design together: a burlap ribbon bow. Cut a length of burlap ribbon and fashion it into a simple, elegant bow. You can create a classic bunny ear bow or a more elaborate multi-loop bow, depending on your preference. Once you’re happy with your bow, apply a dot or two of hot glue to the back of it.
Carefully position the bow on the dowel rod, right beneath the bottom edge of the twig pumpkin. Press it firmly into place until the glue sets. This bow not only hides any imperfections where the pumpkin meets the dowel but also adds a beautiful textural contrast and a classic farmhouse accent. For extra flair, consider tying a small faux berry sprig or a tiny faux leaf into the center of your bow.
Your Rustic Pumpkin Topiary: Ready to Display!
And just like that, your beautiful, custom-made rustic farmhouse pumpkin topiary is complete! This DIY project is incredibly versatile and can elevate the decor in various settings throughout your home or for special events. The satisfaction of creating something so charming with your own hands is truly rewarding.
Inspiring Display Ideas for Your Fall Masterpiece
Here are some creative ways to showcase your new fall decor:
- Entryway Table: Place your topiary on an entryway table or console to create a warm and inviting welcome for guests. Surround it with mini pumpkins, faux berries, garlands of fall leaves, or a scented candle for an immersive autumn experience.
- Dining Table Centerpiece: Make it the focal point of your dining table for festive family meals or holiday gatherings. It pairs beautifully with plaid tablecloths, natural wood elements, and votive candles.
- Mantle Decor: Adorn your fireplace mantle by placing the topiary alongside larger pumpkins, decorative gourds, and twinkling string lights. This creates a cozy ambiance perfect for chilly evenings.
- Covered Porch or Patio: If placed in a sheltered area, your topiary makes an excellent addition to your outdoor fall decor. Combine it with mums, corn stalks, and larger pumpkins for a bountiful autumn display.
- Office or Study: Bring a touch of seasonal cheer to your workspace. It’s a subtle yet impactful way to enjoy the fall season while you work.
- Fall Wedding or Party Centerpieces: For special occasions, these topiaries make charming and unique centerpieces. You can customize them with ribbons matching your event’s color scheme.
- Add Fairy Lights: For an enchanting evening glow, consider carefully tucking a small strand of battery-operated fairy lights inside the twig pumpkin. The light will softly filter through the twigs, creating a magical luminescence.
I proudly placed my finished topiary on my entryway table, nestled amongst a delightful collection of pumpkins, faux berries, and vibrant fall leaves. It truly looks perfectly at home, radiating the quintessential spirit of autumn.
Customization and Care Tips
Feel free to get creative and personalize your topiary! Instead of burlap ribbon, try a plaid, velvet, or lace ribbon for a different look. You could also hot glue small faux leaves, mini pinecones, or even tiny faux flowers around the base of the pumpkin for extra embellishment. The beauty of DIY is that you can adapt it to match your personal style and existing decor.
To keep your topiary looking its best, simply dust it occasionally with a soft brush or a can of compressed air. Since it uses preserved and artificial materials, it requires very little maintenance and can be stored away carefully to be enjoyed year after year. Avoid placing it in direct sunlight for prolonged periods, as this might fade the colors of the moss or other natural elements over time.
This simple, elegant, and quick-to-make pumpkin topiary is more than just a decoration; it’s a celebration of the season, crafted with love. So go ahead, unleash your inner crafter, and bring the cozy charm of autumn into your home. Happy crafting!







