
Transforming Dingy Canvas Bins: An Easy DIY Craft Room Makeover
Every now and then, a project sparks an undeniable excitement, a creative current that makes me utterly giddy. Today, I am thrilled to share one of those truly delightful transformations with you. It’s a testament to how a small idea, born from a simple need, can blossom into something truly inspiring. If you love budget-friendly DIY, upcycling, and adding a personal touch to your home, then you’re in for a treat.
The Unexpected Find: A $3 Canvas Bin Treasure
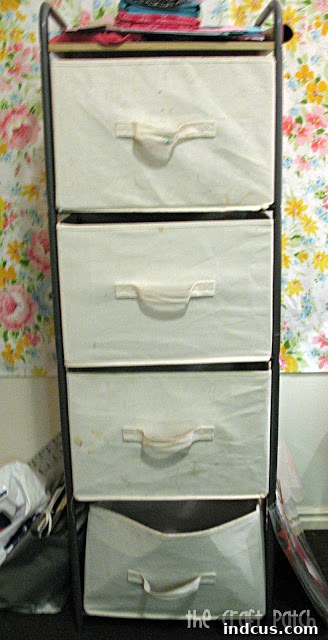
My journey into this particular creative endeavor began, as many great DIY stories do, at a local yard sale. Amidst a collection of forgotten items, I stumbled upon a modest shelf unit accompanied by four canvas bins. The moment I saw them, a vision for my craft room instantly formed. Storage is a perpetual quest for any crafter, and these bins, despite their rather unkempt appearance, seemed to hold immense potential for organizing my supplies. The price tag sealed the deal: a mere three dollars for the entire set! It felt like a steal, a true diamond in the rough waiting to be polished.
I envisioned them tidily arranged, holding threads, fabrics, paints, or various tools, bringing order to the beautiful chaos that often defines a creative space. This was precisely the kind of functional yet customizable storage I had been searching for.
The Unforeseen Challenge: A Washing Dilemma
Once home, the reality of my bargain purchase became clearer. While the structural integrity of the shelf was sound, the canvas bins themselves were, to put it mildly, quite dingy. Okay, perhaps “a lot dingy” would be a more accurate description. They bore the marks of prior use, with various smudges and discolorations that hinted at years of faithful service, now demanding a fresh start. My immediate, logical thought was to simply toss them into the washing machine. After all, canvas is fabric, and fabric gets washed, right?
However, my enthusiasm quickly met a sobering reality. It was only after I had brought my treasure home and started to inspect the bins more closely that I discovered their crucial design flaw for laundry purposes: the internal supports were made of cardboard. A classic “doh!” moment ensued. Washing them would undoubtedly ruin the structural integrity, turning my perfectly shaped bins into soggy, shapeless messes. The idea of washing them was immediately off the table, and with it, my initial, simple plan for their rejuvenation.
For a brief period, I entertained the thought of a more complex solution: carefully dismantling each bin, using the cardboard supports as templates, and sewing entirely new canvas covers. But the sheer volume of work involved – unpicking seams, cutting new fabric, meticulously sewing four separate bins – felt overwhelming. It wasn’t the quick, joyful project I had envisioned, and my enthusiasm waned considerably at the prospect of such an undertaking. I wanted a creative outlet, not a laborious sewing marathon.
A Midnight Revelation: The Power of Paint
Creative blocks often lead to unexpected breakthroughs. And in my case, inspiration struck in the quietest hours of the night. Around 1:00 AM, I suddenly woke up with an idea so brilliant, so perfectly simple, that I practically sprang out of bed (well, almost). The solution had been there all along, hiding in plain sight: I could paint those dirty, dingy bins! Why had I not thought of it sooner? Painting would not only cover the unsightly stains but also give me the opportunity to completely customize them, imbuing them with personality and making them truly unique pieces for my craft room.
The thought filled me with an exhilarating rush. It was the perfect compromise – no tedious sewing, no ruined cardboard, just pure creative expression. The bins wouldn’t just be cleaned; they would be reborn, given a whole new lease on life and a fresh, vibrant aesthetic. This was precisely the kind of upcycling project that makes my heart sing.
What do you think of the transformation?
The Creative Process: Bringing Designs to Life with Acrylic Paint
With a clear vision in mind, I wasted no time diving into the creative process. The beauty of this project lies in its simplicity and the freedom it offers for personalization. The steps were straightforward, making it an enjoyable and accessible DIY for anyone looking to add flair to their storage.
Step-by-Step Guide to Painting Your Canvas Bins:
- Preparation is Key: Before applying any paint, I gently wiped down the exterior of each bin with a damp cloth to remove any loose dust or surface grime. It’s important to ensure the bins are completely dry before proceeding. Protect your work surface with newspaper or a drop cloth, as paint spills can happen!
- Sketch Your Vision: Rather than freehanding directly with paint, I found it incredibly helpful to first pencil in the designs I wanted on each canvas bin. This allowed me to experiment with patterns, adjust shapes, and ensure symmetry before committing with paint. Simple geometric patterns, floral motifs, or even abstract squiggles work beautifully and can be tailored to your aesthetic. This stage is crucial for building confidence and achieving a polished look.
- Gather Your Tools: For this project, I opted for regular old acrylic craft paint. It’s incredibly versatile, dries quickly, offers a wide spectrum of colors, and is readily available at any craft store. You’ll also need a selection of paintbrushes – finer ones for detailed lines and broader ones for filling in larger areas. A cup of water for rinsing brushes and paper towels for blotting are essential.
- Apply the Paint: Once the pencil outlines were in place, I began filling them in with the vibrant acrylic colors. The process was surprisingly meditative and incredibly satisfying. Depending on the desired opacity and the color of the paint, you might need to apply two coats, allowing each layer to dry thoroughly in between. Acrylic paint tends to dry quickly, which makes the process efficient.
- Let It Dry and Cure: After all designs are complete, allow the paint to dry fully. While acrylic paint is touch-dry relatively quickly, it’s best to let the bins cure for at least 24-48 hours before heavy use to ensure maximum durability and prevent any accidental smudging or peeling.
- Optional: Seal for Durability: For added protection against wear and tear, especially if the bins will see frequent handling, consider applying a fabric medium mixed with your acrylic paint, or a clear spray sealant designed for fabric or craft projects. This step helps the paint remain flexible and reduces the risk of cracking or chipping over time.
The entire process was not just easy, but genuinely fun. I confess, the unreasonable giddiness I felt helped immensely with any potential tedium. There may or may not have been a few impromptu ballerina leaps each time I dashed to the bathroom to wash out my paintbrushes. Yes, I was that excited about this project – a clear sign that I was truly in my creative element!
The Stunning Transformation: A Craft Room Reimagined
The finished bins are nothing short of a triumph. I absolutely adore how they turned out! The dull, stained canvas has been replaced by vibrant patterns and clean lines, completely transforming their appearance. What were once forgotten utilitarian objects are now cheerful, personalized pieces of decor that inject personality and color into my craft room. The contrast between the “before” and “after” is truly remarkable, showcasing the incredible power of a little paint and a lot of imagination.
They make me so genuinely happy every time I look at them! More than just storage, they now serve as constant reminders of the joy of creation and the satisfaction of giving new life to old items. They brighten up my creative sanctuary, inspiring me to keep on crafting, experimenting, and bringing more beauty into my space.
Materials Used: Accessible and Affordable Acrylic Craft Paint
One of the best aspects of this project is how accessible the materials are. There’s no need for specialized or expensive paints. The paint I used is readily available regular old acrylic craft paint, the kind you can find in an entire aisle dedicated to it at popular craft stores like Michaels and Hobby Lobby. These paints are perfect for such projects because they are:
- Affordable: Making this a truly budget-friendly makeover.
- Versatile: Suitable for various surfaces, including fabric when properly applied.
- Easy to Use: They blend well and clean up easily with water while wet.
- Wide Color Range: Allowing for endless creative possibilities to match any decor.
Why This Project Matters: Beyond Just Storage
This canvas bin makeover is more than just a simple DIY; it embodies several key principles that resonate deeply with the crafting community:
- Budget-Friendly Creativity: For just a few dollars, I was able to transform functional items into decorative showpieces. This project proves that you don’t need to spend a fortune to create beautiful and personalized home decor.
- Sustainable Upcycling: Instead of discarding the bins due to their dingy appearance, I gave them a second life. Upcycling reduces waste and encourages a more mindful approach to consumption, turning potential trash into treasure.
- Personalized Home Decor: Mass-produced items often lack character. By hand-painting these bins, I infused them with my unique style, making them perfectly suited for my craft room and reflecting my personality.
- Inspiring Workspace: A well-organized and aesthetically pleasing craft room can significantly boost creativity and motivation. These cheerful bins now contribute to an environment that encourages me to spend more time making and creating.
- The Joy of Accomplishment: There’s immense satisfaction in looking at something you’ve transformed with your own hands. This project delivered that joy in spades, reminding me that creative challenges often lead to the most rewarding solutions.
Tips for Your Own Canvas Bin Makeover
Inspired to give your own storage bins a facelift? Here are a few extra tips to ensure your project is a resounding success:
- Fabric Medium for Flexibility: If you’re concerned about the paint cracking over time, especially on frequently handled areas, mix a fabric medium (available at craft stores) into your acrylic paint. This additive makes the paint more flexible once dry, ideal for textiles.
- Stencil for Precision: Not confident in your freehand drawing skills? Stencils are a fantastic tool for creating clean, repeatable patterns. From geometric shapes to intricate mandalas, there’s a stencil for every style.
- Test on an Inconspicuous Area: Before committing to your main design, test your paint colors and application technique on an inconspicuous spot, like the bottom or inside flap of the bin. This helps you get a feel for how the paint adheres and dries.
- Layering Colors: Don’t be afraid to experiment with layering different colors once the first coat is dry. This can add depth and visual interest to your designs.
- Consider a Protective Finish: For bins that will see heavy use or are prone to getting dirty, a coat of clear, matte spray sealant (check for suitability on fabric/crafts) can offer an extra layer of protection and make them easier to wipe clean.
Conclusion: Embrace the Power of Paint!
This journey from a dusty yard sale find to a collection of vibrant, custom-designed storage bins has been incredibly fulfilling. It’s a wonderful reminder that creativity doesn’t always require starting from scratch. Often, the most rewarding projects involve seeing the potential in overlooked items and giving them a second chance with a little imagination and a splash of paint. So, the next time you encounter a seemingly hopeless piece of furniture or an old storage container, pause and consider its hidden possibilities. A simple can of acrylic paint can truly work wonders, transforming the ordinary into the extraordinary.
What neglected treasures do you have lying around, just waiting for their own vibrant makeover? Grab some paint and let your imagination take flight!







