The Ultimate Guide to Crafting Engaging Felt Books: A DIY Journey for Creative Minds
Felt books, often known as quiet books, are more than just simple crafts; they are engaging, tactile, and educational tools that can provide hours of imaginative play and learning for children. These soft, durable, and customizable books are perfect for developing fine motor skills, encouraging creativity, and offering a peaceful activity for little ones. If you’ve ever admired these charming creations and wondered how to make one yourself, you’re in the right place. This comprehensive guide will walk you through every essential step, from initial design concepts to the final stitches, ensuring you can create a beautiful and enduring felt book that will be cherished for years.
Why Felt Books Are a Must-Have for Little Learners
Before diving into the crafting process, let’s explore why felt books are such a valuable addition to any child’s collection. Their unique properties make them stand out:
- Sensory Engagement: The soft texture of felt, combined with varying shapes and layers, provides a rich tactile experience that stimulates a child’s senses.
- Fine Motor Skill Development: Activities within felt books often involve zipping, buttoning, snapping, lacing, or matching shapes, all of which are excellent for honing crucial fine motor skills and hand-eye coordination.
- Imaginative Play: With characters, scenes, and interactive elements, felt books spark imaginative storytelling and creative play, allowing children to create their own narratives.
- Durability: When properly constructed, felt books are incredibly robust. Felt doesn’t fray easily, and sewn elements withstand repeated handling much better than glued paper.
- Customizability: You have complete control over the themes, characters, and activities, making each book uniquely tailored to a child’s interests or developmental stage.
- Quiet Play: As their alternative name suggests, “quiet books” are perfect for calm, focused play, ideal for car rides, waiting rooms, or simply a peaceful moment at home.
- Educational Value: They can be designed to teach letters, numbers, shapes, colors, animal recognition, and even practical life skills in a fun, interactive way.
Gather Your Crafting Essentials: Materials and Tools
To embark on your felt book journey, you’ll need a few basic supplies. High-quality materials will ensure your finished book is both beautiful and long-lasting.
- Felt Sheets: A variety of colors in wool blend or acrylic felt. Wool blend felt offers a luxurious feel and excellent durability, while acrylic felt is more budget-friendly and comes in a vast array of colors.
- Embroidery Floss or Thread: A selection of colors, especially contrasting ones for decorative stitching. Regular sewing thread can also be used for less prominent stitches.
- Sharp Fabric Scissors: Essential for clean, precise cuts. Dull scissors can lead to frayed edges and frustration.
- Drawing Supplies: Pencils, markers, and paper for sketching your designs and creating patterns.
- Clear Tape: Handy for securing paper patterns to felt while cutting.
- Sewing Needles: Assorted sizes, suitable for felt and embroidery floss.
- Pins: To temporarily hold felt pieces in place before stitching.
- Optional: Fusible webbing (for those who prefer some adhesive), sewing machine (for joining background pages or large elements), small buttons, beads, snaps, or Velcro for interactive elements (ensure these are securely attached for child safety).
Step-by-Step Felt Book Creation: Bringing Your Visions to Life
Now, let’s get into the heart of the crafting process. Each step is crucial for achieving a professional and delightful felt book.
Step 1: Conceptualize Your Design and Prepare Your Patterns
Every great felt book begins with a clear vision. Start by deciding on a theme for your page or book. Will it be a garden scene, an underwater adventure, or a simple animal recognition page? Once your theme is set, it’s time to bring your characters and elements to life.
Drawing or Printing Images: You can either hand-draw your desired image directly onto paper or find clip art online and print it out. The key here is to ensure your chosen image is scaled correctly to fit the background page of your felt book. A typical page size might be 8×8 or 9×9 inches, but adjust as per your preference. Consider the overall composition and how the elements will interact on the page.
Step 2: Precision Cutting – Transforming Patterns into Felt Pieces
This step requires patience and accuracy, as well-cut pieces are the foundation of a polished felt book.
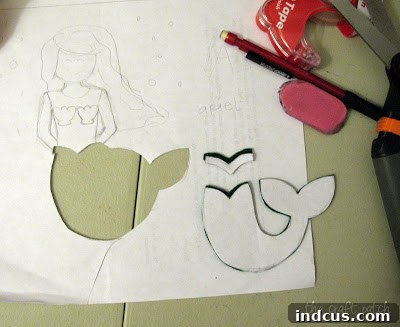
Creating Your Pattern Pieces: Begin by carefully cutting out parts of your drawn or printed image to serve as individual pattern templates. For example, if you’re making a character, you’ll cut out the head, body, arms, legs, and any distinct clothing items separately. To prevent the paper pattern from shifting while you cut the felt, use clear tape to secure the paper to the felt. This trick ensures clean, precise edges, which are vital for a neat finish.
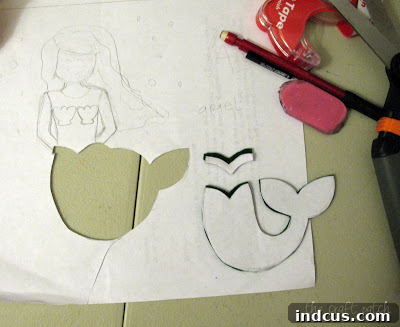
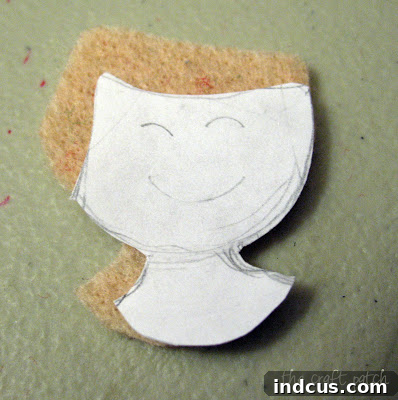
Understanding Layering and Overlapping: A critical technique in felt book creation is understanding how to layer pieces. If one felt piece needs to sit underneath another (like hair over a face, or a shirt under a jacket), you must cut extra felt around the edges of the underlying piece where it will be covered. This ensures that when the top piece is stitched down, the underlying piece remains securely attached and doesn’t lift or come loose. For instance, notice how extra felt is cut around Ariel’s head where it will be tucked under her hair. This additional felt provides a generous overlap, allowing for secure stitching and a seamless appearance.
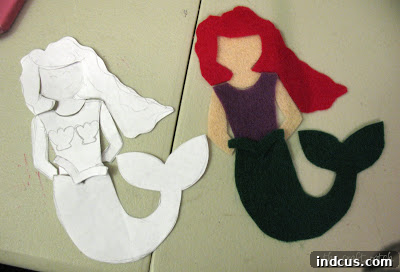
Deconstructing Your Design: As you progress, you’ll find that any time you need a new color or a distinct height/layer, you’ll likely need a separate felt piece. For a complex character, even if parts are the same color, they might be separate pieces if they represent different limbs or distinct features. For example, arms and a head might all be ‘skin tone’ but are three separate pieces to allow for articulation or individual placement. Similarly, a band around a character’s waist, being a different color and sitting higher than the main body, would necessitate its own piece. Carefully evaluate your design to break it down into manageable, individual felt components. The photo below illustrates how pieces are cut out, ready for assembly, and how the original paper pattern was segmented.
Step 3: The Art of Stitching – Securing Your Masterpiece
With all your felt pieces meticulously cut, the next exciting step is to bring your design to life by stitching it onto your background page. This is where your felt book truly begins to take shape.
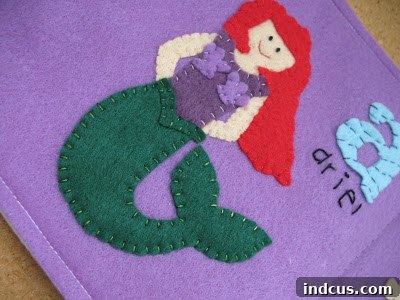
Hand Stitching for Durability and Charm: Hand stitching is highly recommended for felt books as it provides the most durable hold and allows for intricate detailing. While you could technically use a sewing machine for larger, simpler shapes on a background, the charming, handmade aesthetic and the ability to work with small, layered pieces make hand stitching the preferred method for most of the felt elements.
The Magic of Contrasting Stitching: Don’t underestimate the power of thread color! Using a contrasting thread color (e.g., white thread on blue felt, or a bright yellow on green) can add immense visual appeal to even the simplest shapes. It defines edges, adds texture, and makes your design pop, giving your book a professional and artistic finish. Experiment with different stitch types, like a simple running stitch, a neat blanket stitch, or a decorative backstitch, to add character.
Adhesive vs. No Adhesive: Many crafters debate whether to use adhesive (like fusible webbing or fabric glue) to hold pieces in place before stitching. While fusible webbing can certainly help stabilize pieces, especially intricate ones, it’s not strictly necessary. You can simply hold the felt pieces firmly in place while you stitch, perhaps using a few pins for larger elements. Forgoing adhesive ensures maximum flexibility and a purely sewn, long-lasting bond. If you opt for fusible webbing, choose a lightweight, flexible type specifically designed for fabric crafts, and always stitch over it for added durability.
Crafting Expressive Eyes and Facial Features: For eyes, a simple yet effective method is to use embroidery floss. Bring the thread up from the back of the felt page, tie several small, neat knots directly on the surface to form a raised “eye,” then carefully guide the needle back through the page to secure. This creates a durable and tactile eye that won’t fall off. Avoid using plastic googly eyes at all costs in children’s felt books! Not only are they easily picked off by curious little fingers (a constant frustration for crafters), but they can also pose a choking hazard for infants and toddlers. Hand-stitched eyes, or even small circles of felt stitched down, are always the safer and more enduring option.
Step 4: Assembling Your Felt Book Pages
Once your individual felt pages are complete with their charming scenes, it’s time to join them together to form a cohesive book. There are several popular methods, each with its own benefits:
- Sewn Spine: This is a traditional and very sturdy method. You can layer your completed pages, ensuring the back of one page faces the front of the next. Then, stitch a strong seam down the left side, either by hand or machine, to create a durable spine. For a cleaner finish, you can add a strip of felt over the spine.
- Grommets and Rings: A popular and often easier method involves punching grommets (metal eyelets) along the left edge of each page. The pages are then held together with binder rings or a colorful ribbon threaded through the grommets. This allows pages to be easily rearranged or added later.
- Ribbon or Yarn Binding: Similar to grommets, you can simply punch holes (or use an eyelet tool) along the left edge and thread a decorative ribbon or thick yarn through them, tying it securely to create a soft, flexible spine.
- Folded Pages: For a simpler book, you can create larger felt sheets and fold them in half to form two pages. Stitch along the fold to create a central spine.
Whichever method you choose, ensure the binding is secure enough to withstand enthusiastic handling by children.
Step 5: Final Touches and Embellishments
This is where you can add extra interactive elements and bring even more life to your felt book. Think about what will engage a child’s curiosity and motor skills:
- Velcro: Add small Velcro dots to removable pieces (like clothing for a doll, fruit for a tree) allowing children to attach and detach them.
- Buttons and Buttonholes: Stitch buttons onto one side and create corresponding buttonholes on another felt piece to practice fastening skills.
- Zippers and Snaps: Incorporate working zippers or snaps for practical life skill development.
- Pockets: Add felt pockets where small items can be stored or hidden, encouraging discovery.
- Beads and Ribbons: Securely stitch on larger, child-safe beads for tactile exploration or small lengths of ribbon for tying practice (ensure all small embellishments are extremely well-secured to prevent choking hazards).
Always prioritize child safety. Any small items must be sewn on with extreme reinforcement, or better yet, avoided for very young children.
Tips for a Professional Finish and Enduring Durability
To ensure your felt book stands the test of time and looks fantastic, keep these tips in mind:
- Choose Quality Felt: Higher quality wool blend felt generally holds its shape better and resists pilling more effectively than cheaper acrylic options.
- Sharp Scissors are Key: A fresh pair of fabric scissors will make a noticeable difference in the cleanliness of your cuts.
- Neat Stitches: While perfect stitches aren’t mandatory for a handmade look, striving for even, consistent stitches will greatly enhance the overall appearance and durability of your book.
- Reinforce Stress Points: If a part of your book will experience frequent pulling or manipulation (like a flap or a handle), reinforce the stitching in that area.
- Child Safety First: Always consider the age of the child. Avoid small, easily detachable parts for infants and toddlers. Double-check all seams and attachments for security.
Unleash Your Creativity: Ideas for Themed Felt Books
The beauty of making your own felt book is the boundless creative freedom. Here are some theme ideas to inspire your next project:
- Farm Animals: With detachable animals, barn doors that open, and tactile elements like hay.
- Ocean Adventure: Featuring a submarine, fish that swim, and perhaps a treasure chest.
- Alphabet and Numbers: Each page dedicated to a letter or number, with corresponding felt shapes.
- Shapes and Colors: Interactive pages where children match shapes or identify colors.
- Weather Book: Dress a felt character for different weather conditions.
- Quiet Time Activities: Pages dedicated to practical skills like buttoning a shirt, tying shoelaces, or zipping a jacket.
- Name Book: Personalize the book with the child’s name, having each letter as an interactive element.
- Seasons/Holidays: Pages depicting different seasons or festive holiday scenes.
Maintaining Your Felt Book: Care and Longevity
To keep your felt book looking its best, proper care is important. Most felt books should be spot cleaned with a damp cloth and mild soap. If a more thorough cleaning is needed, hand washing in cool water with a gentle detergent is best, followed by air drying flat to maintain its shape. Avoid machine washing and drying, as this can distort the felt and damage stitched elements. Store your felt book in a dry, clean place to prevent dust accumulation.
Your Journey to Crafting Heirloom Felt Books Begins!
Crafting a felt book is a rewarding experience, resulting in a unique, handmade treasure that provides both entertainment and educational value. With patience, creativity, and the step-by-step guidance provided here, you are well-equipped to design and construct a delightful quiet book that will be cherished for years to come. Dive into your stash of felt, unleash your imagination, and start creating something truly special for the little learners in your life. Happy crafting!
Explore completed felt book examples for further inspiration:
- Discover a Beautiful Girly Felt Name Book Here
- See an Engaging Boyish Felt Name Book Example
- View Another Boyish Felt Name Book Design