How to Create Exquisite Paper Heart Baskets: A Detailed DIY Origami Tutorial
There’s an undeniable charm in creating something beautiful and functional with your own hands, especially when it involves the elegant art of origami. The transformation of a simple flat sheet of paper into a three-dimensional marvel never ceases to amaze. Today, we’re diving into the delightful world of paper crafting to show you how to construct a charming origami heart-shaped basket. This project is surprisingly straightforward, making it perfect for crafters of all skill levels. We’ve meticulously broken down each step to ensure clarity, but remember, the accompanying video tutorial will be your most valuable companion throughout this creative journey. Feel free to follow along, pausing the video after each instruction, as this hands-on approach is truly the most effective way to master the folds.
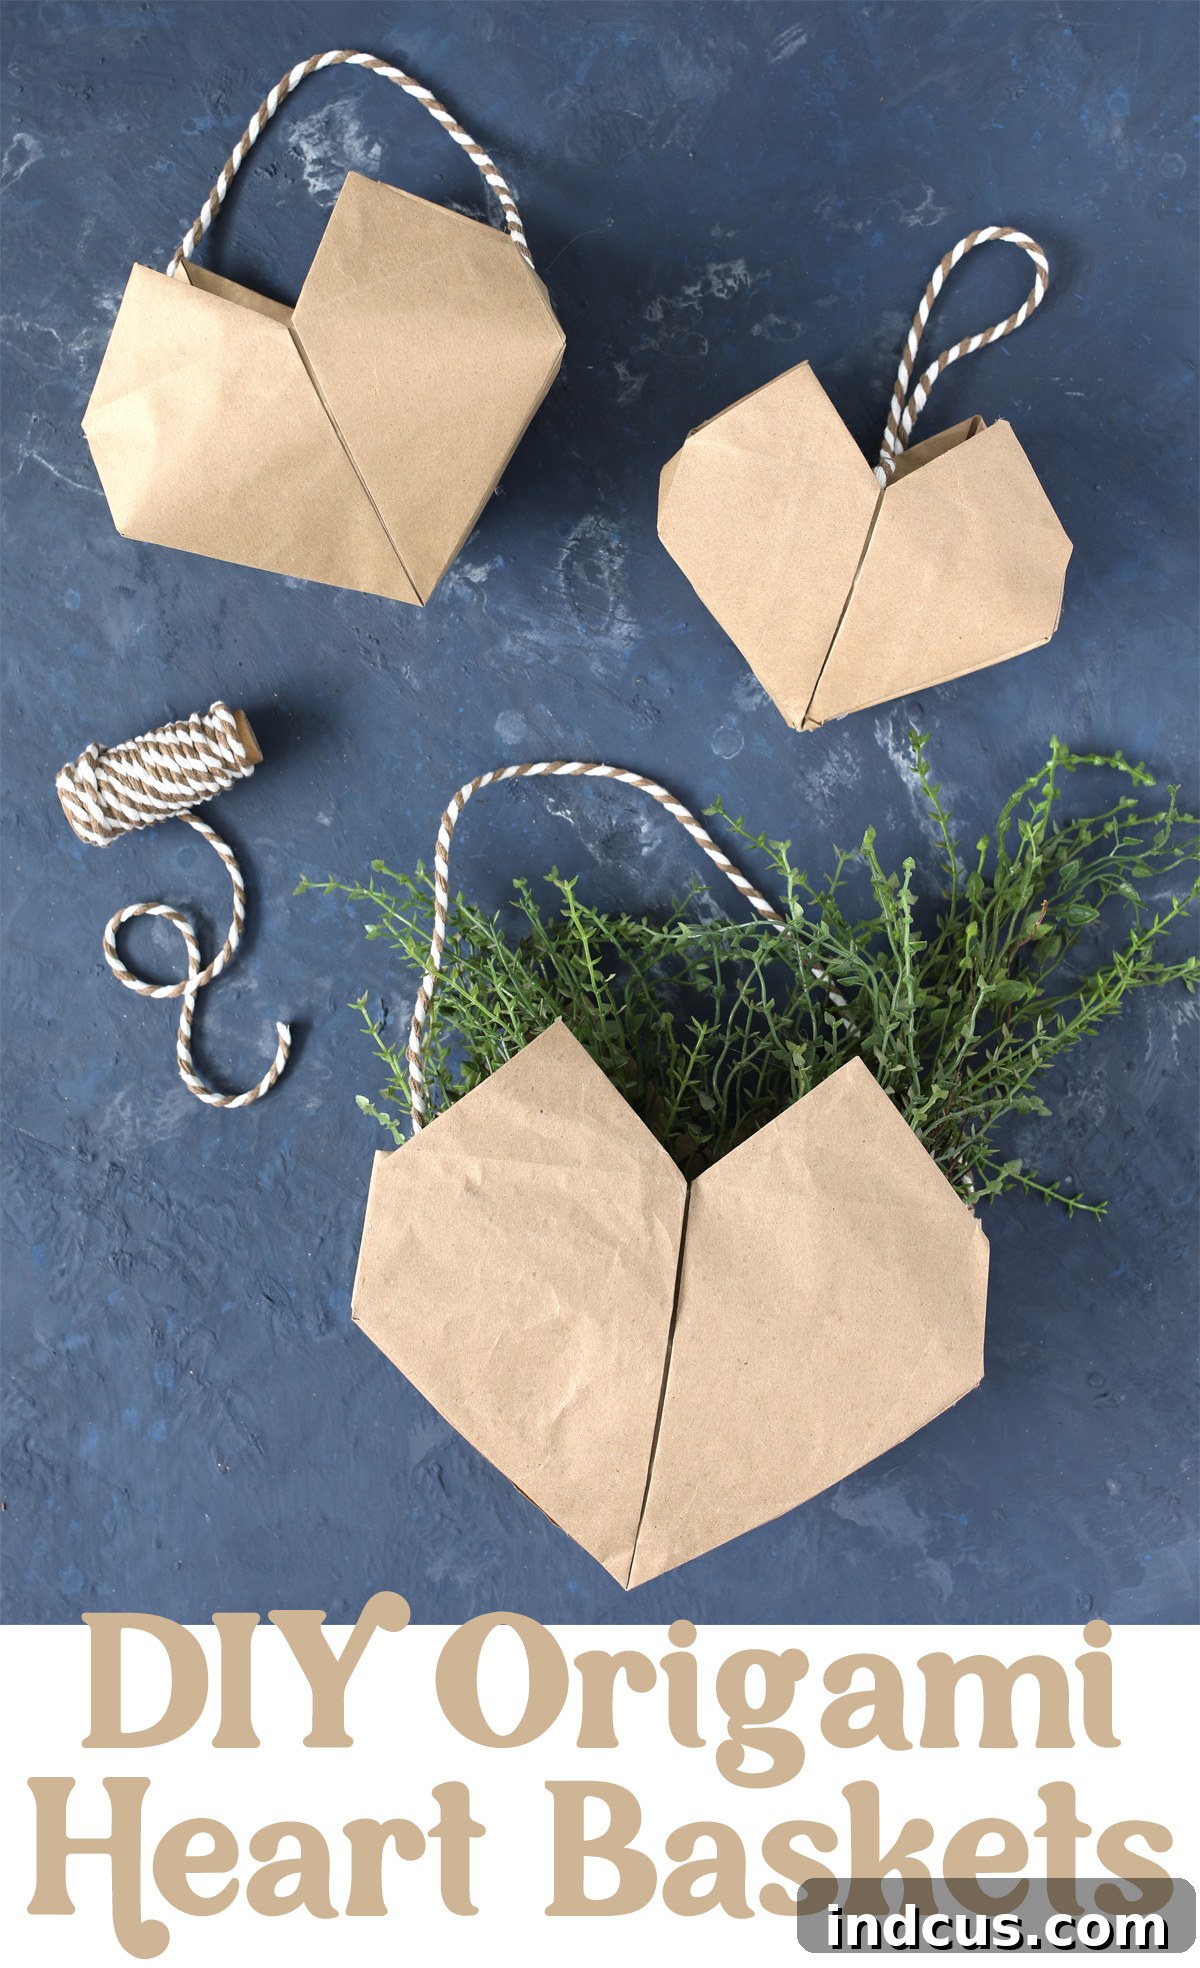
These adorable paper heart baskets are not just a craft; they’re a versatile decoration and gift solution that can bring a touch of handmade warmth to any occasion. Imagine them filled with sweet treats, small tokens of appreciation, or simply hanging as a whimsical decoration. Whether you’re planning for Valentine’s Day, a birthday, an anniversary, or just want to add a unique decorative accent to your home, these baskets are sure to impress. Their simplicity belies their elegant appearance, proving that some of the most beautiful creations come from the humblest materials and a little patience.
Embrace the Art of Paper Folding: Why You’ll Love This Project
Origami is more than just folding paper; it’s a meditative practice that enhances focus, fine motor skills, and problem-solving abilities. Crafting these heart baskets offers a wonderful opportunity to unwind and engage in a rewarding activity. Here are a few reasons why this particular origami project stands out:
- Perfect for Gifting: These baskets make incredibly thoughtful and personalized gifts. Fill them with chocolates, small candies, jewelry, or heartfelt notes for friends, family, or a special someone.
- Versatile Decor: Beyond Valentine’s Day, these baskets can serve as year-round decorations. Hang them in a craft room, use them as unique party favors, or add them to a festive holiday garland.
- Eco-Friendly Crafting: Repurpose materials like old wrapping paper, kraft paper, or even paper grocery bags, making this an environmentally conscious project.
- Beginner-Friendly: While the finished product looks intricate, the folding steps are designed to be accessible, especially with visual aids like images and a video tutorial.
Materials You’ll Need to Get Started
Gathering your materials is the first exciting step in any craft project. For our origami heart baskets, you’ll need just a few basic items, many of which you might already have around your home. The beauty of this craft lies in its simplicity and the potential for customization through your choice of paper and handle material.
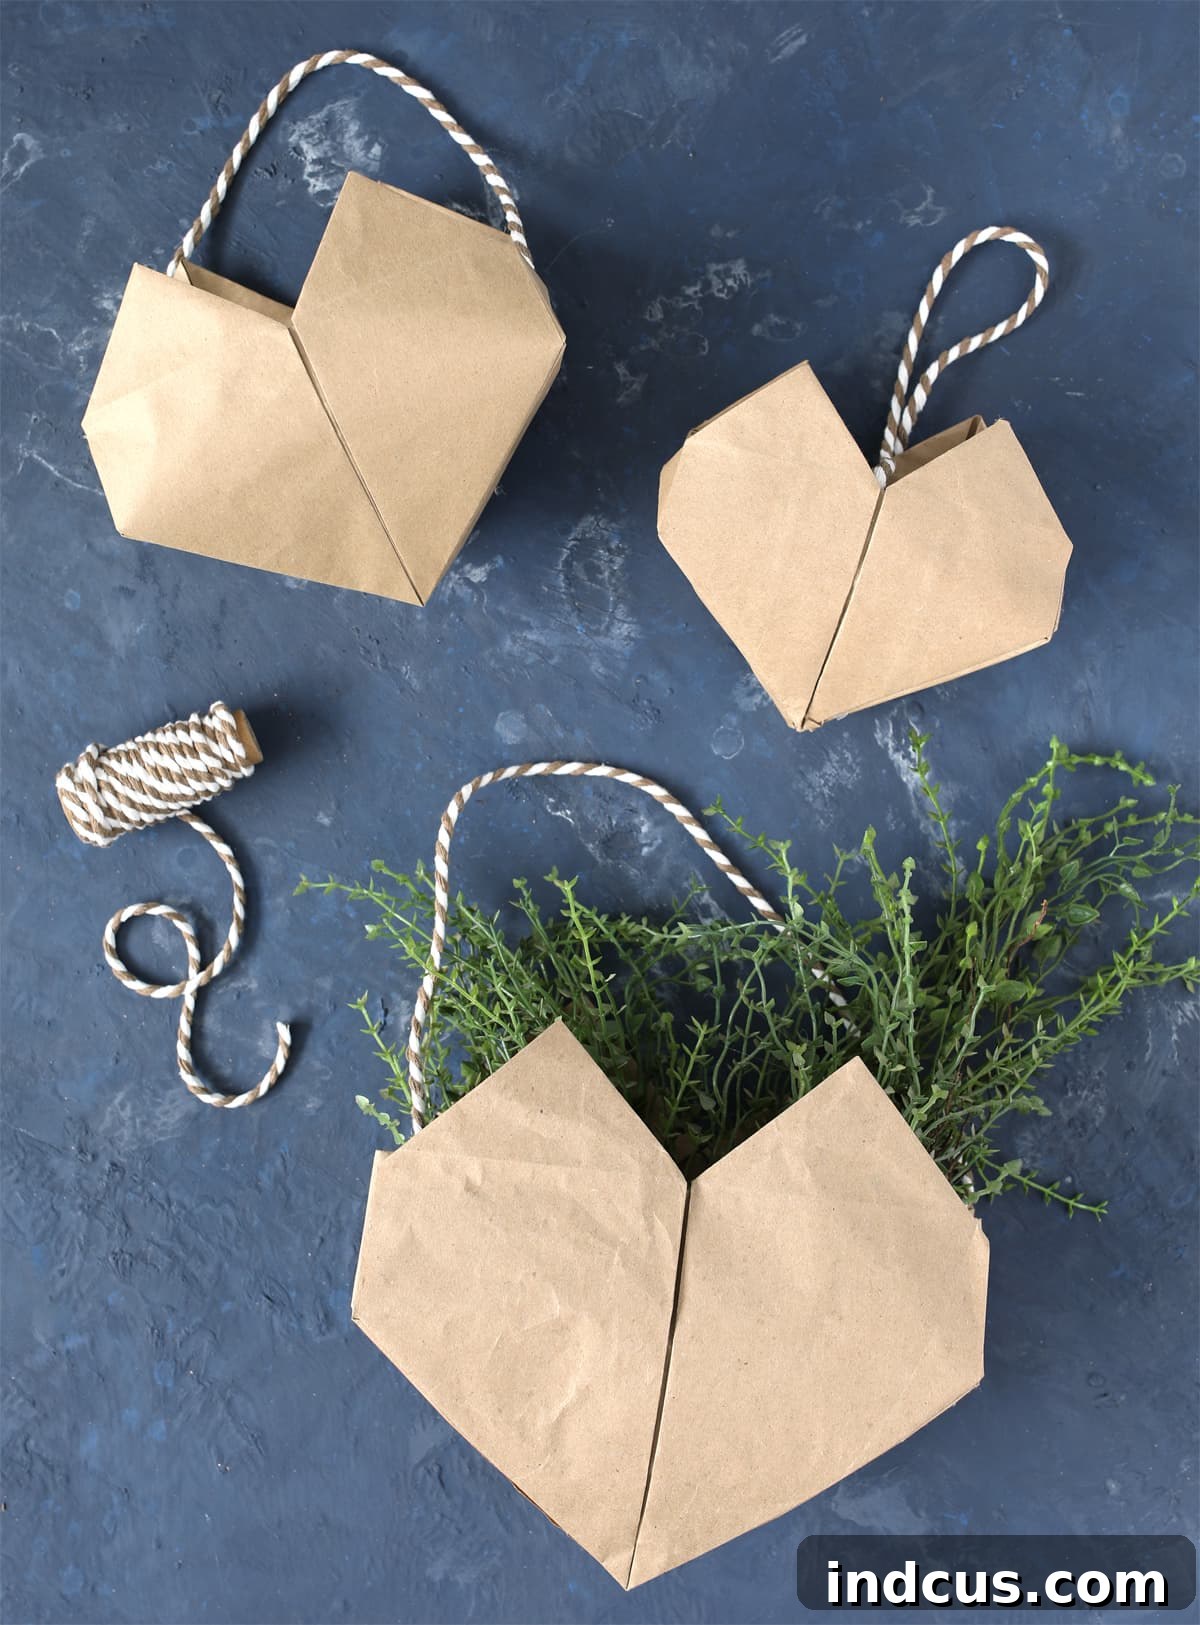
- Paper Squares: You’ll need two perfect squares of paper for each basket. The size is entirely up to you and will determine the final dimensions of your basket. For our demonstration, we started with 12″, 14″, and 16″ squares to create a variety of sizes. Excellent choices include a Kraft Paper Roll for a rustic look, patterned wrapping paper for a vibrant touch, or even sturdy sections cut from a paper grocery bag for an upcycled feel. The key is to use paper that is not too thick to fold easily but not so thin that it tears.
- Twine, Rope, or Ribbon: For adding a functional and decorative handle to your basket. Consider the aesthetic you’re aiming for; natural twine offers a rustic charm, while a satin ribbon can add an elegant touch.
- Hot Glue Gun + Glue Sticks: Essential for securely fastening the two heart halves together and attaching the handle, ensuring your basket holds its shape and contents.
Step-by-Step Instructions for Your Origami Heart Basket
Let’s begin the exciting process of transforming flat paper into a delightful heart basket. Precision in your folds is key to achieving a neat and professional-looking final product. Take your time, enjoy the process, and don’t hesitate to rewind the video tutorial if you need a clearer visual.
Part 1: Crafting Your Individual Paper Hearts
Step 1: Prepare Your Paper Squares. Start by cutting two perfectly square pieces of paper. The size of your squares will directly determine the size of your finished heart basket. Experiment with different dimensions; for instance, 12-inch, 14-inch, or 16-inch squares work well for creating varying basket sizes. Ensure your cuts are straight and the corners are precise to facilitate accurate folding later on.
Step 2: Create Foundational Creases. Take one of your paper squares. Begin by folding it exactly in half, edge to edge, then unfold it. Rotate the paper 90 degrees and repeat the fold in half, then unfold again. This will leave you with two intersecting crease lines, forming a “T” shape in the center of your paper. These creases are vital guide markers for all subsequent folds.
Step 3: Fold to the Center Line. With your paper laid flat, identify the right-side edge. Fold this edge inward, bringing it precisely to align with the central vertical crease line you just created. Press firmly to create a crisp fold.
Step 4: Orient Your Paper. Now, carefully flip the entire paper over to the other side. You should now see the narrow, folded section positioned at the bottom edge of your paper. This orientation is crucial for the next series of folds.
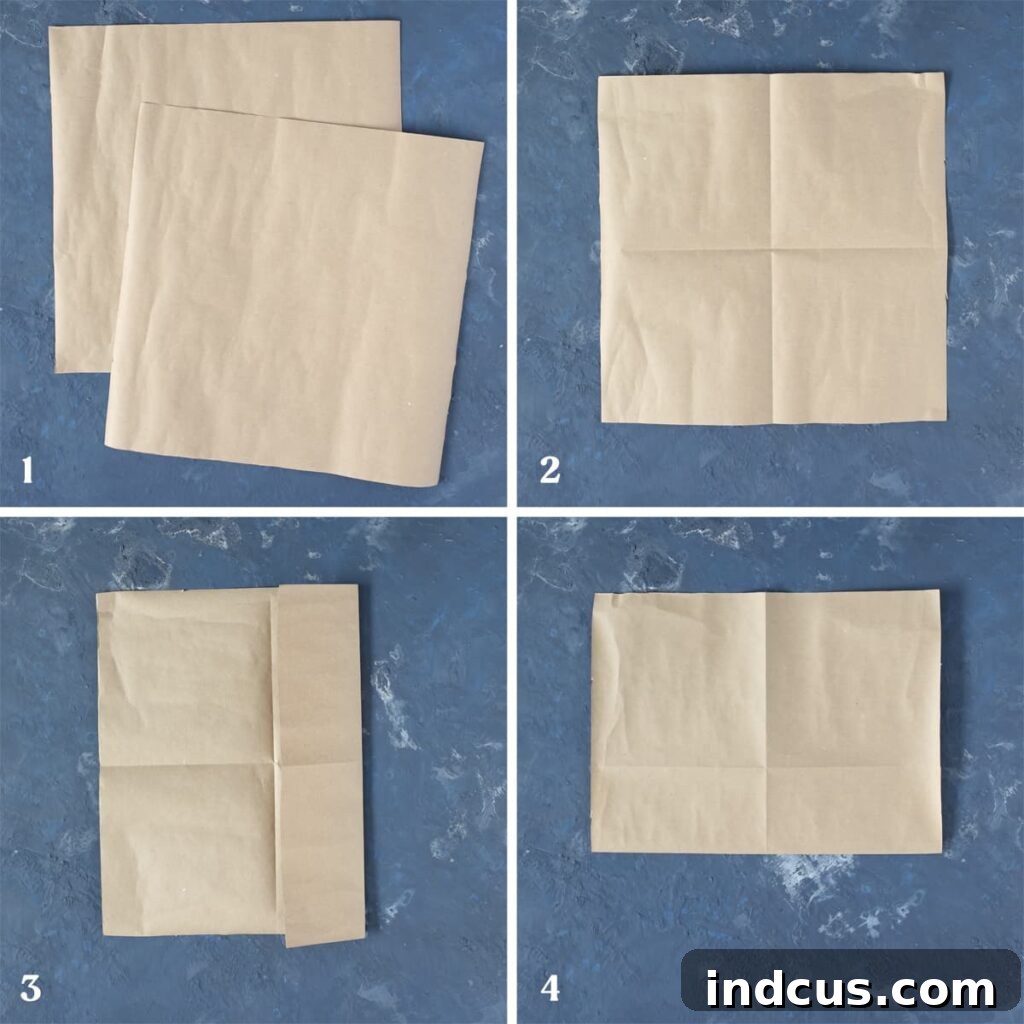
Step 5: Form the Bottom Point. Focus on the bottom section of your paper. Take the bottom-left corner and fold it upwards and inwards, aligning its edge with the central vertical crease. Repeat this exact fold with the bottom-right corner. When completed, these two folds will meet at the center, creating a distinct point at the very bottom of your paper.
Step 6: Refine the Bottom Point. Flip the paper over once more to its opposite side. Now, take the newly formed bottom point and fold it upwards. This fold should bring the tip of the point to be perfectly even with the top edge of the central folded line. This step helps to shape the base of your heart.
Step 7: Reorient the Paper. For the next sequence of folds, flip the paper over again, and then rotate it 180 degrees. This ensures you’re working with the correct side and orientation for the upcoming steps.
Step 8: Open the Top Flaps. Look at the top section of your paper. You’ll notice two small, tucked-in flaps. Gently open each of these flaps slightly. Then, flatten them out completely, pressing down to form two distinct triangle shapes at the top. These will contribute to the rounded top of the heart.
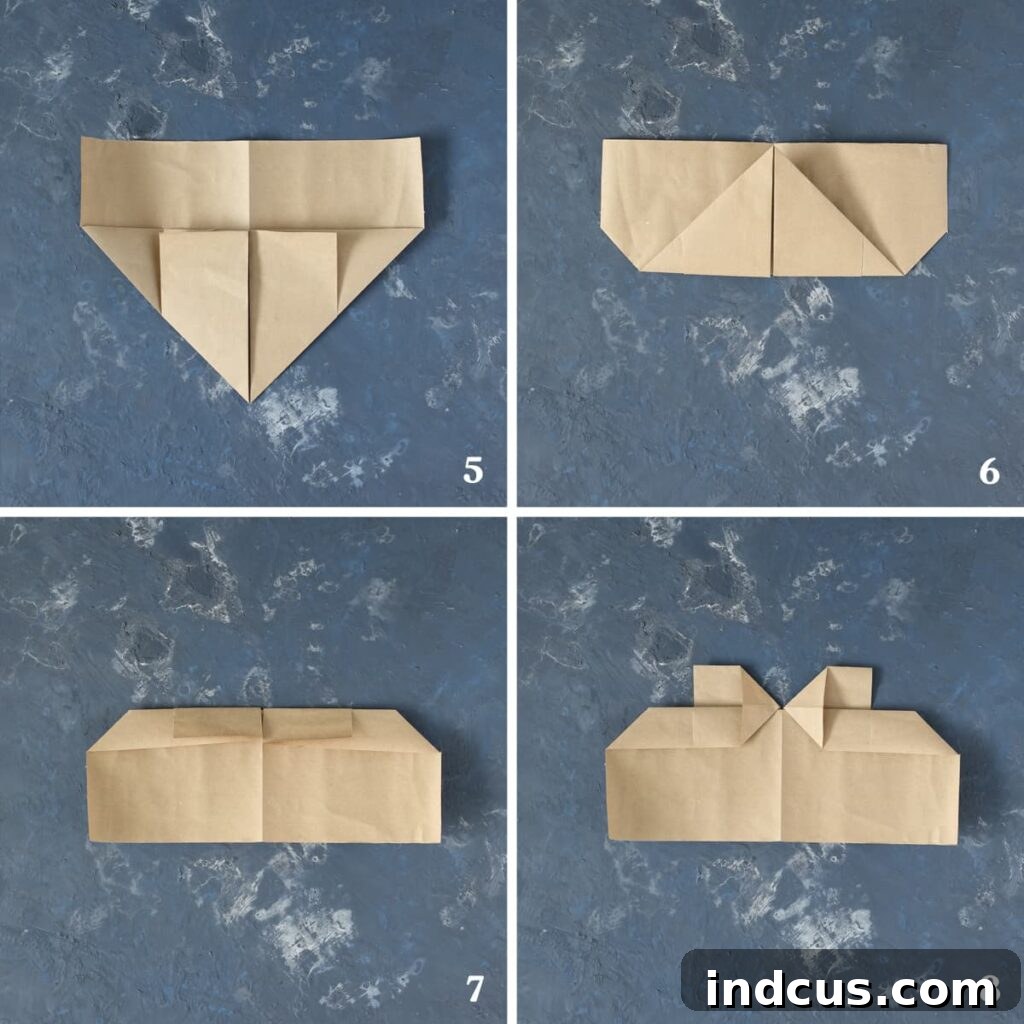
Step 9: Shape the Top Squares into Triangles. At the very top of your paper, you’ll see two small square-shaped flaps. Fold each of these inward. As you fold them, they should naturally form crisp triangle shapes. These folds are essential for defining the characteristic curves of the heart’s upper lobes.
Step 10: Fold Side Edges to Center. Take the flat left edge of your paper and fold it inward, aligning it perfectly with the central vertical line. Repeat this precise fold on the right side. These actions further refine the overall heart shape and bring the form closer to completion.
Step 11: Reveal the Heart Shape. Flip the paper over to the other side. You should now clearly see the distinct outline of a heart shape! Below the heart, you’ll notice two small, additional flaps. These are key for creating the basket’s depth.
Step 12: Secure the Heart Tip. Take those two flaps positioned below the heart and fold them upwards, making sure they are even with the bottom point of the heart. Gently lift the very tip of the heart, then carefully tuck these two flaps inside the opening created. Once tucked, apply a small amount of hot glue between the two layers of the heart tip to secure them together. Congratulations, you’ve successfully folded your first paper heart!
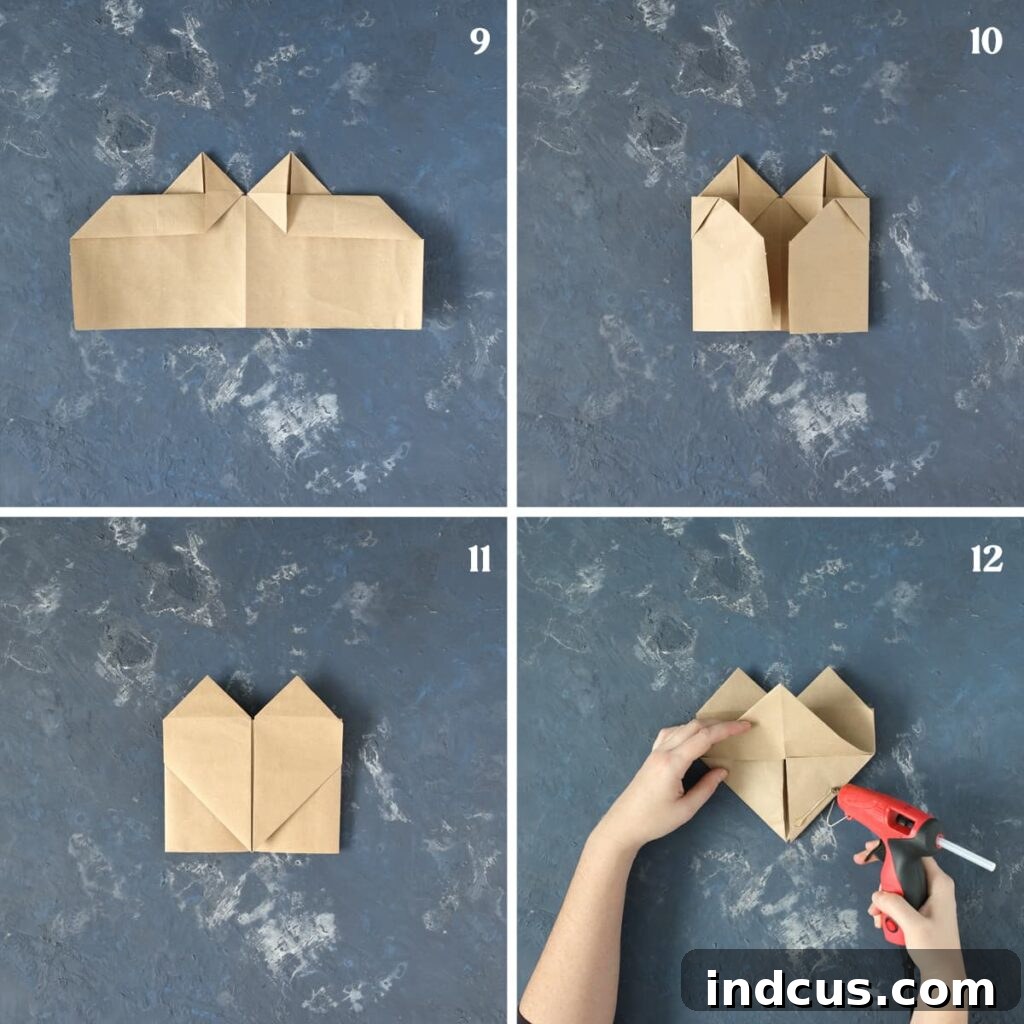
Part 2: Assembling Your Heart Basket and Adding a Handle
Step 13: Create a Second Heart. To form a basket, you’ll need two identical heart pieces. Repeat steps 1 through 12 to create your second paper heart. As you compare your two hearts, you’ll observe that each has a smooth, aesthetically pleasing front side and a back side that reveals multiple folded flaps. This distinction is normal and part of the origami process.
Step 14: Overlap and Glue the First Side. Carefully open up the side flaps of one of your hearts. Now, take both hearts and overlap their side flaps. Ensure that the tip of one heart aligns perfectly with the tip of the other, and the side flap edges also line up cleanly. Apply a thin bead of hot glue along these overlapping edges and press them together firmly until the glue sets. This begins to form the three-dimensional structure of your basket.
Step 15: Secure the Second Side. Rotate your partially assembled basket and repeat the exact same process on the other side. Overlap the remaining side flaps of the hearts, ensuring perfect alignment, and then glue them together securely. At this point, your heart basket should begin to take a recognizable, open form.
Step 16: Inspect the Interior. Your heart basket is now largely constructed! Before proceeding, take a moment to look inside. You might notice several loose paper parts or flaps sticking out. Don’t worry, this is expected, and the next steps will address tidying these up for a polished finish.
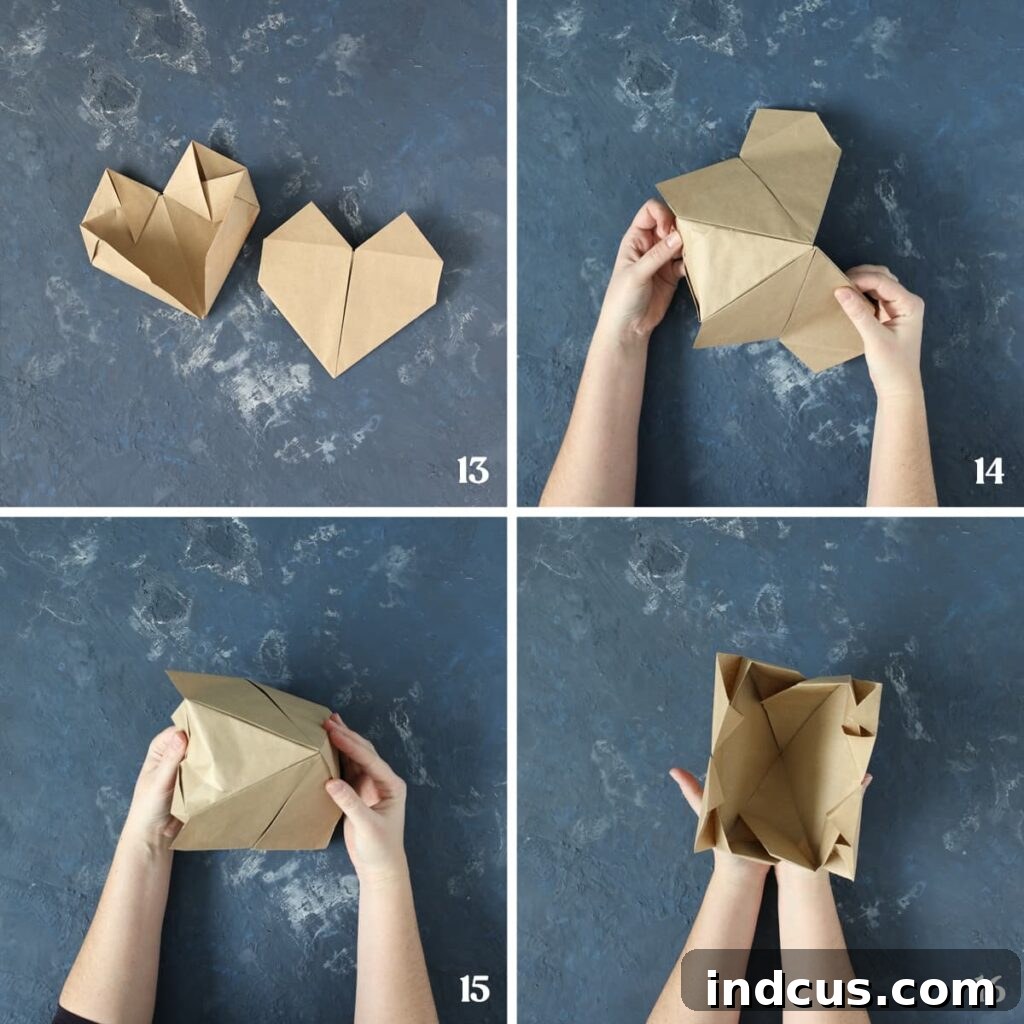
Step 17: Attach the Handle. Cut a length of twine, rope, or ribbon to your desired handle size. Insert each end of your chosen handle material into the overlapping area on each side of the assembled hearts. These overlapping sections create natural pockets for the handle. Once positioned, apply a generous amount of hot glue to secure the handle ends in place. While the glue is still pliable, also glue the side flaps firmly shut around the handle, ensuring a clean and strong attachment point.
Step 18: Glue Down All Edges. To give your basket a professional and sturdy finish, go around the entire structure and apply small dabs of hot glue to secure any remaining loose edges or flaps. Pay particular attention to the bottom and side seams, pressing firmly to create crisp lines and a robust construction.
Step 19: Achieve a Smooth Interior. Continue gluing down all remaining folded edges and flap pieces on the inside of the basket. The goal here is to make the interior as smooth and tidy as the exterior. Once all pieces are properly adhered, your basket will not only look beautiful but will also be strong enough to hold small items without snagging.
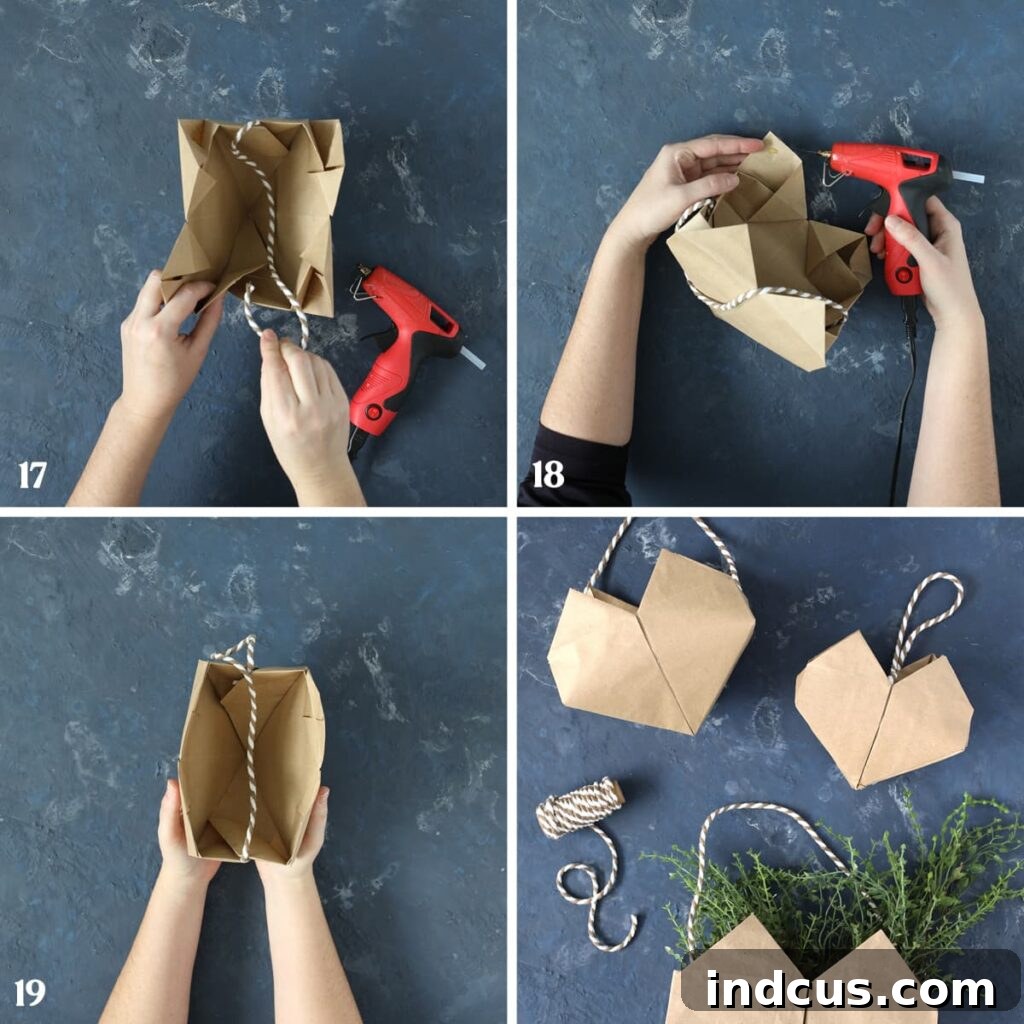
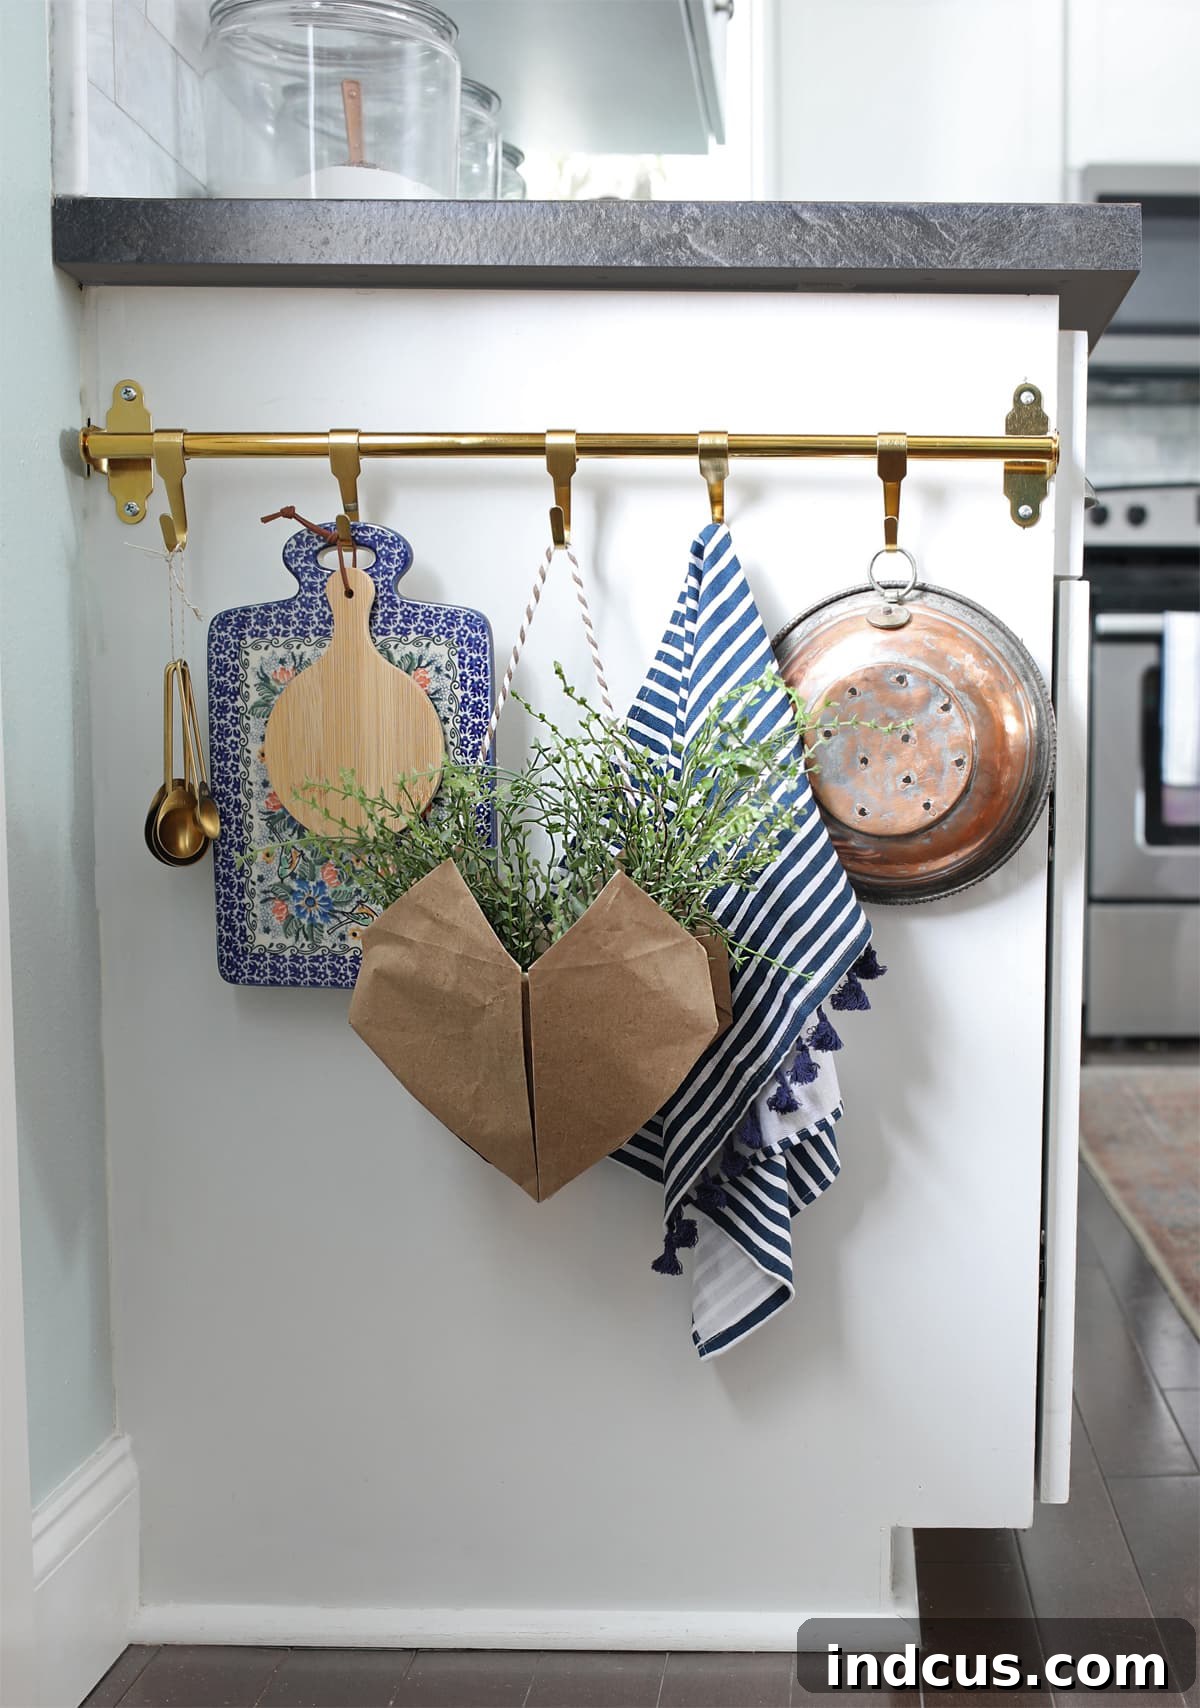
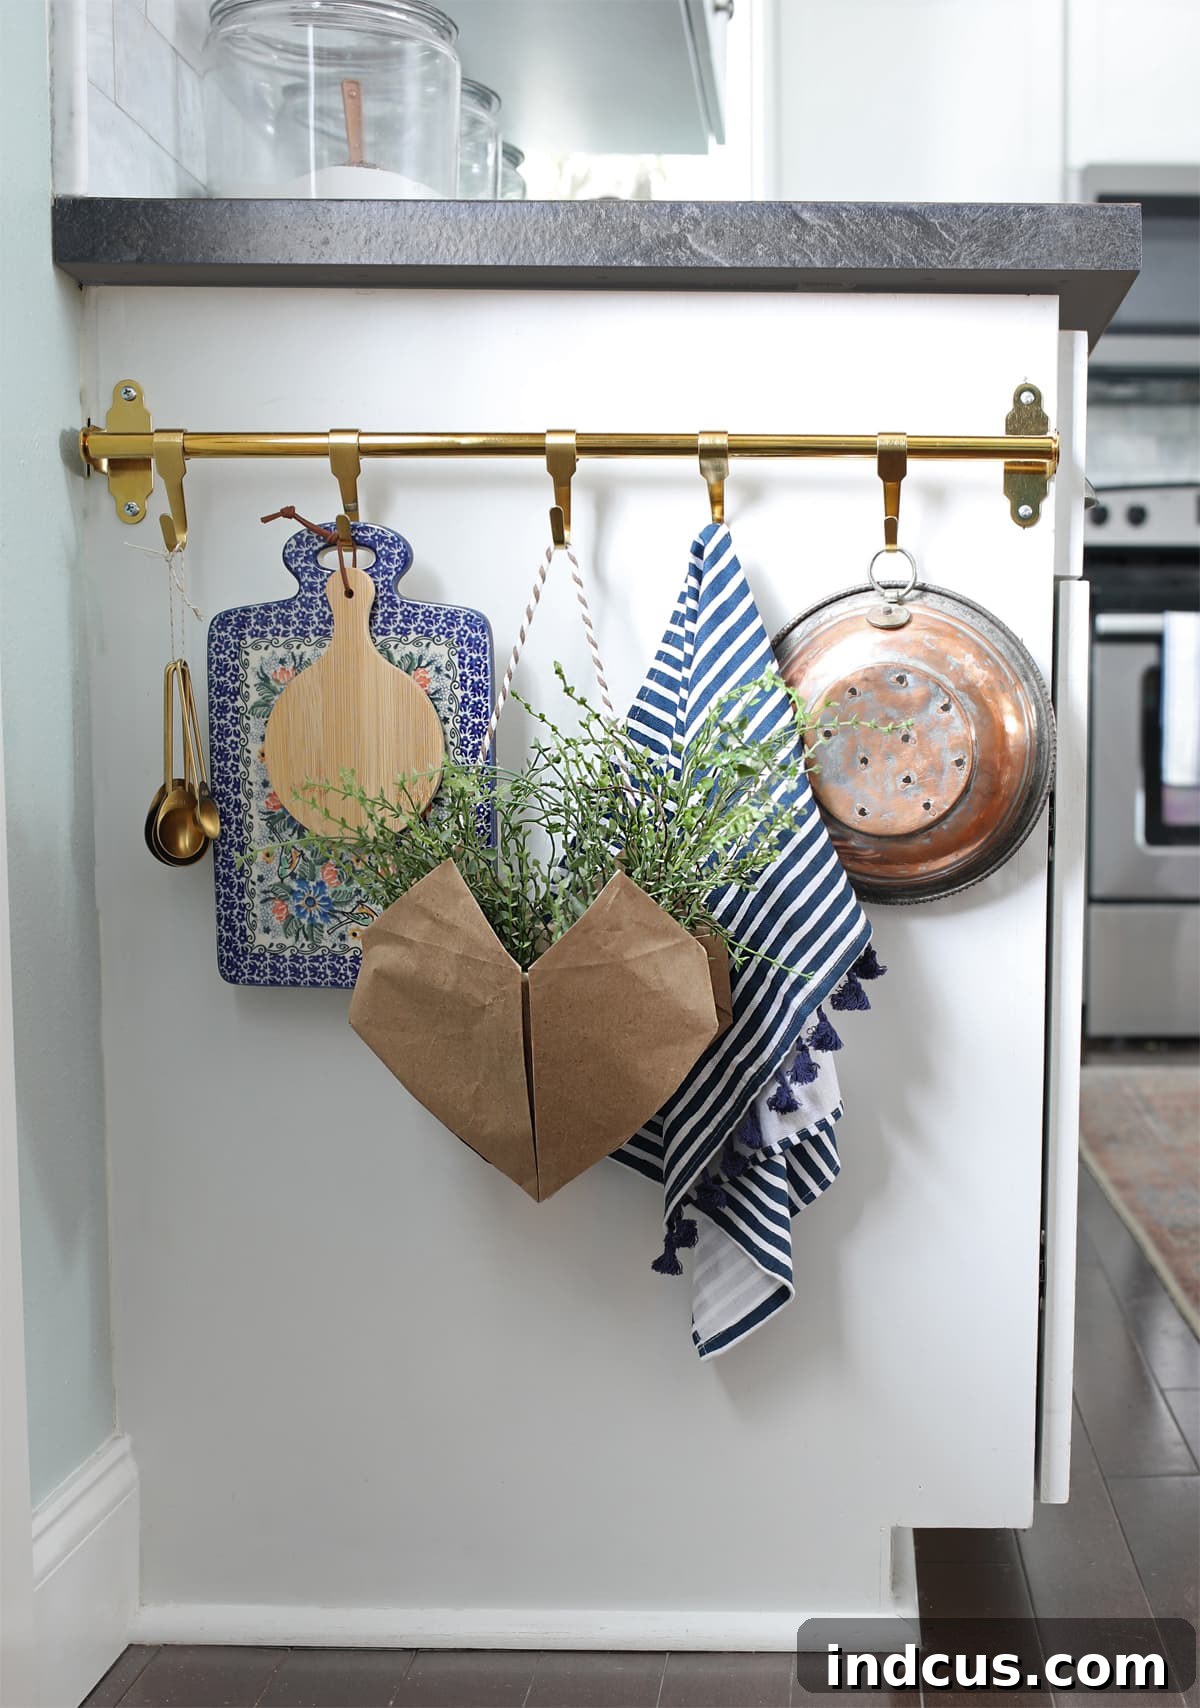
And there you have it! Your charming, handmade paper heart basket is now complete and ready to be filled, hung, and admired. These baskets are an absolutely darling way to present Valentine’s Day goodies to a cherished friend, a family member, or a loved one. I personally used mine as a subtle yet sweet Valentine’s Day decoration, hanging it in my kitchen to add a touch of festive cheer. But truly, this project is so inherently cute and versatile that you can find uses for it all year round, bringing a handmade touch of joy to any space or occasion.
Creative Ways to Use Your Heart Baskets
Once you’ve mastered the art of folding these delightful heart baskets, the possibilities for their use are endless. Here are some ideas to inspire your creativity:
- Party Favors: Fill them with small candies or tiny toys for birthdays, baby showers, or bridal showers.
- Wedding Decor: Use them to hold confetti or flower petals for guests to toss, or hang them as charming aisle decorations.
- Easter Treats: A smaller version makes a sweet alternative to traditional Easter baskets for little treats.
- Teacher Gifts: Fill with stationery, small chocolates, or a personalized note of appreciation.
- Everyday Organization: Hang them on hooks in your craft room or office to store small supplies like paper clips, buttons, or thumbtacks.
- Holiday Ornaments: Decorate with glitter or paint and hang them on your Christmas tree for a unique, handmade touch.
Visual Guide: Watch the Full Video Tutorial
Sometimes, seeing a fold in action makes all the difference. For a comprehensive visual walkthrough of every step, from preparing your paper to the final touches, be sure to watch our detailed video tutorial. It’s an invaluable resource to ensure your origami heart basket turns out perfectly.
Found this tutorial inspiring? Don’t forget to pin it to your favorite crafting board and share your beautiful creations with us!