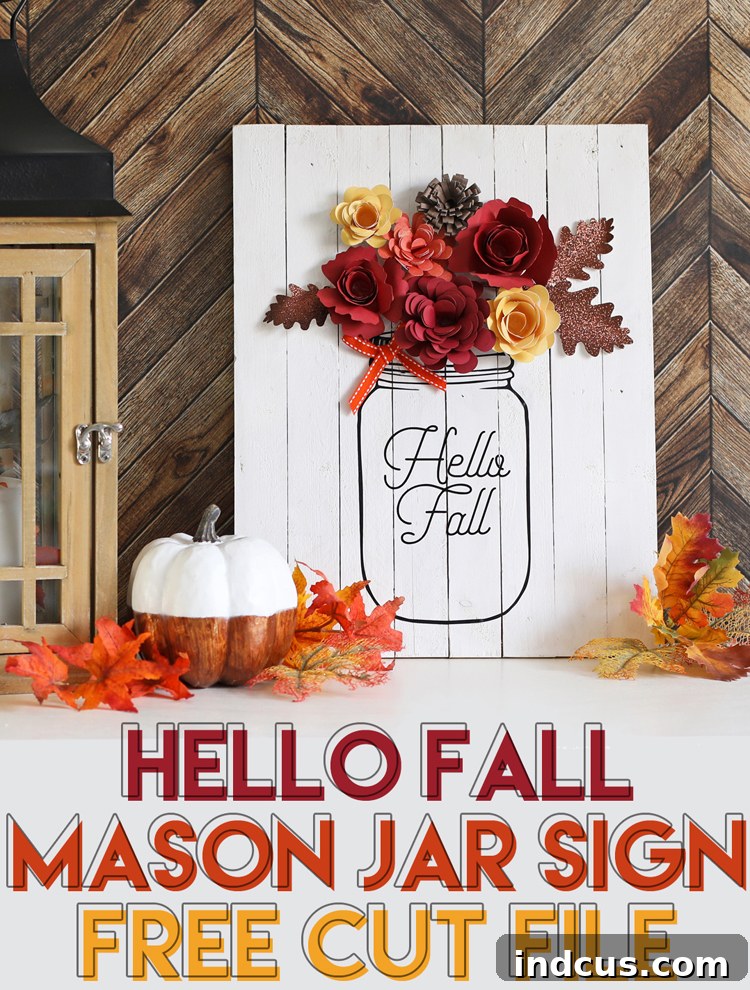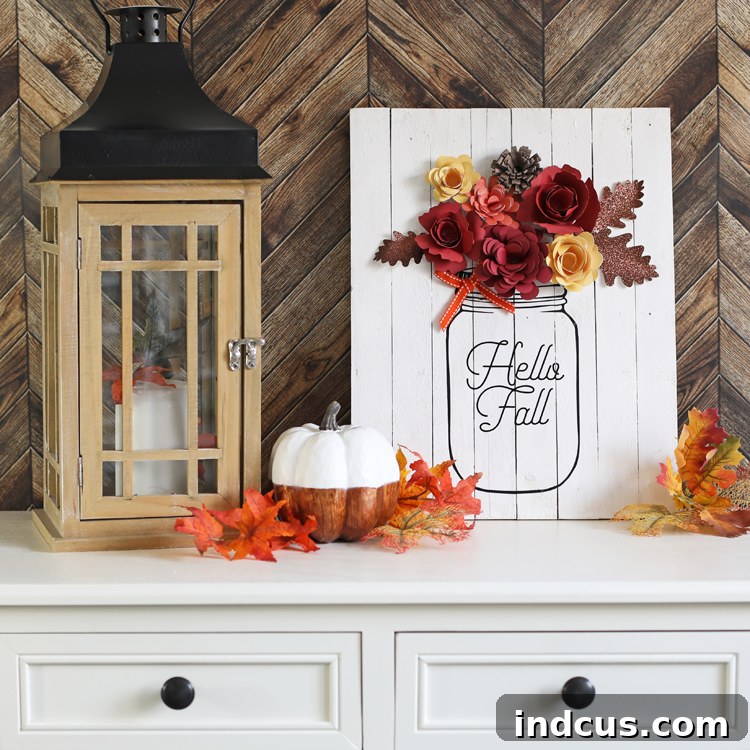
Hello Fall Pallet Wood Sign: DIY Craft Tutorial with Free SVG for Rolled Paper Flowers
As the leaves begin to change and a crisp breeze fills the air, there’s no better time to infuse your home with the cozy spirit of autumn. There’s a unique charm in handmade decor, and this DIY project offers just that – a rustic yet elegant “Hello Fall” pallet wood sign adorned with vibrant rolled paper flowers and delicate paper autumn leaves. This craft isn’t just about decorating; it’s about embracing the creative process and adding a personal touch to your seasonal home. Today, we’re thrilled to share a comprehensive tutorial and a complimentary cut file, making it simple for you to craft your very own charming fall masterpiece.
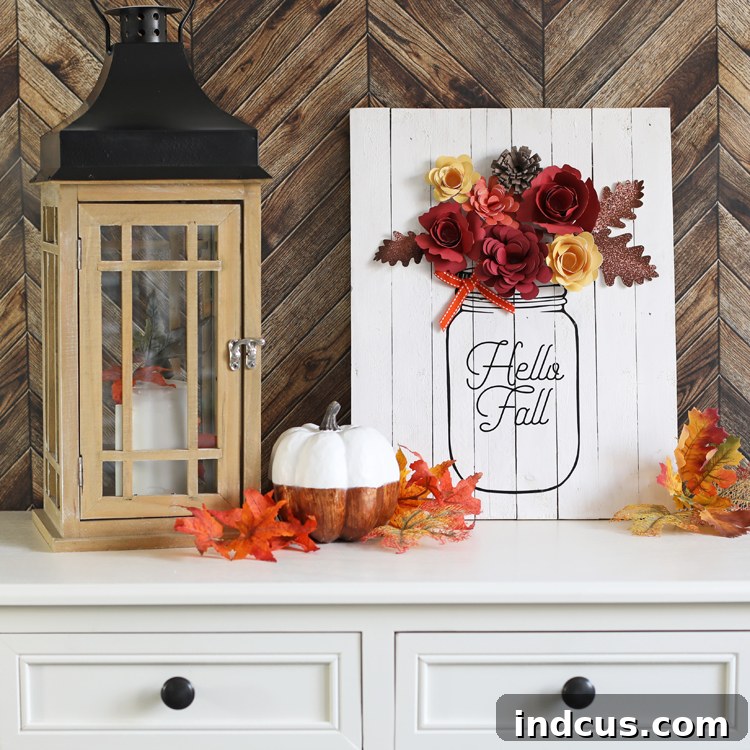
The beauty of this project lies in its simplicity and the ability to customize it to perfectly match your home’s aesthetic. Imagine a warm, inviting focal point that greets guests with the cheerful message “Hello Fall,” surrounded by an explosion of handcrafted paper blooms that capture the essence of the season. This tutorial will guide you through each step, from preparing your pallet wood sign to expertly arranging your paper floral display, ensuring a satisfying and beautiful outcome. Even if you’re new to crafting with a cutting machine, our detailed instructions and free SVG file will set you up for success.
Why Choose DIY Fall Decor?
In a world of mass-produced decorations, opting for DIY provides numerous benefits. Firstly, it allows for unparalleled personalization. You can select specific colors, textures, and styles that resonate with your home’s existing decor, creating a cohesive and harmonious look. Secondly, crafting your own decorations is often more budget-friendly than purchasing high-end items, allowing you to achieve a luxurious feel without the hefty price tag. Lastly, there’s immense satisfaction in creating something beautiful with your own hands. Each time you glance at your “Hello Fall” sign, you’ll be reminded of the joy and creativity that went into its making, adding a deeper layer of meaning to your seasonal display.
Materials You’ll Need for Your Fall Decor Sign
Gathering your supplies is the first exciting step in any craft project. For this “Hello Fall” pallet wood sign, you’ll need a few key items, most of which are readily available at craft stores or online. Remember, quality materials can make a difference in the final look and longevity of your sign.
(Please note: Some links below are affiliate links, meaning we may earn a small commission if you make a purchase through them, at no extra cost to you. This helps support our craft tutorials and free resources!)
- Pallet Wood Sign: The foundation of your project. These pre-assembled wood signs offer a rustic charm that’s perfect for farmhouse-style decor. Choose one that fits your desired dimensions.
- White Craft Paint + Paintbrush: Essential for giving your sign a clean, bright base. Chalk paint is an excellent choice for its matte finish and ease of use, often requiring fewer coats. Alternatively, you could use a wood stain for a darker, richer background.
- Silhouette Cameo Craft Cutting Machine: Or any comparable electronic cutting machine (like Cricut). This machine is invaluable for precisely cutting vinyl decals and intricate paper flower designs, saving you hours of hand-cutting.
- Assorted Cardstock in Fall Colors: Think rich reds, burnt oranges, deep yellows, warm browns, and earthy greens. The more variety in your cardstock, the more depth and visual interest your paper flowers will have. Look for medium-weight cardstock for easy rolling and durability.
- Black Adhesive Vinyl + Transfer Tape: High-quality adhesive vinyl will ensure a crisp and long-lasting “Hello Fall” design. Transfer tape is crucial for applying the vinyl decal smoothly and accurately onto your wooden surface.
- Hot Glue Gun + Gluesticks: Your go-to for securing the paper flowers and leaves firmly to the sign. A good quality hot glue gun will heat quickly and provide a strong bond.
- Free Design File: Your downloadable SVG file for the “Hello Fall” mason jar and accompanying elements. This file is your key to making this project effortless! **You’ll find the download link at the bottom of this post.**
Step-by-Step Guide to Crafting Your Hello Fall Sign
Step 1: Prepare Your Pallet Wood Sign
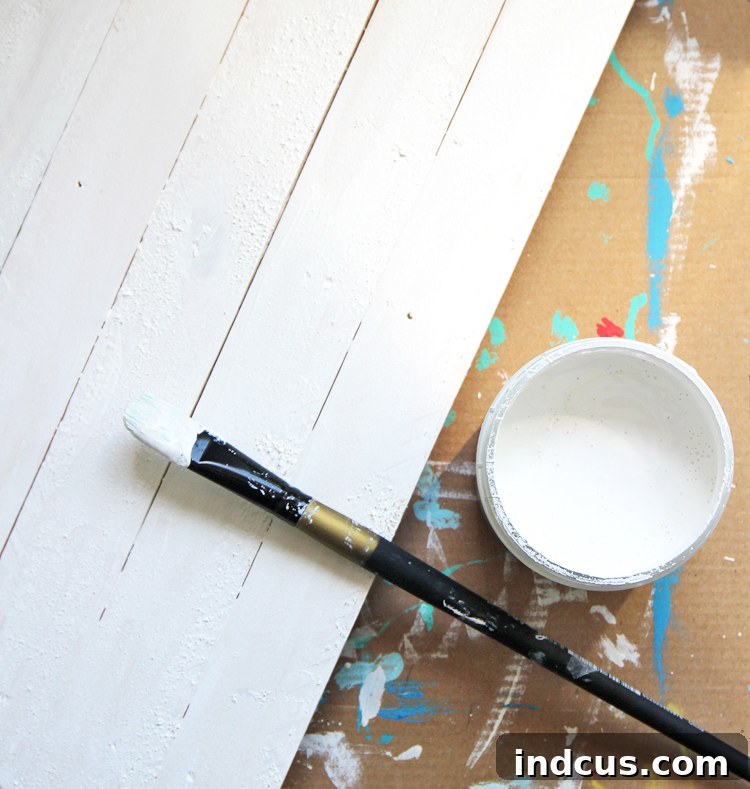
The first step sets the foundation for your beautiful fall sign. Begin by painting or staining your blank pallet wood sign. I opted for my favorite white chalk paint from DecoArt, which provides a lovely matte finish and excellent coverage. If you choose paint, apply thin, even coats, allowing each layer to dry completely before adding the next. Depending on your desired look, one to two coats should suffice. If you prefer a rustic, weathered look, you might distress the edges lightly with sandpaper after the paint has dried. Alternatively, a wood stain can bring out the natural grain of the wood, offering a richer, deeper background that also complements autumnal themes. Always ensure the surface is clean and dry before proceeding to the next step.
Step 2: Cut the “Hello Fall” Vinyl Decal
Now it’s time to bring the “Hello Fall” mason jar design to life! Load your black adhesive vinyl into your Silhouette Cameo or preferred craft cutting machine. Open the free SVG file (downloaded from the link below) in your machine’s software, resize it as needed to fit your pallet sign, and send it to cut. Ensure your cut settings are appropriate for vinyl to get clean, crisp lines. Once the cutting is complete, carefully “weed” the excess vinyl away from your design. This involves removing all the vinyl that isn’t part of your mason jar and “Hello Fall” text, leaving only the desired graphic on the backing paper. Take your time with this step, especially around intricate details, to avoid tearing the design.
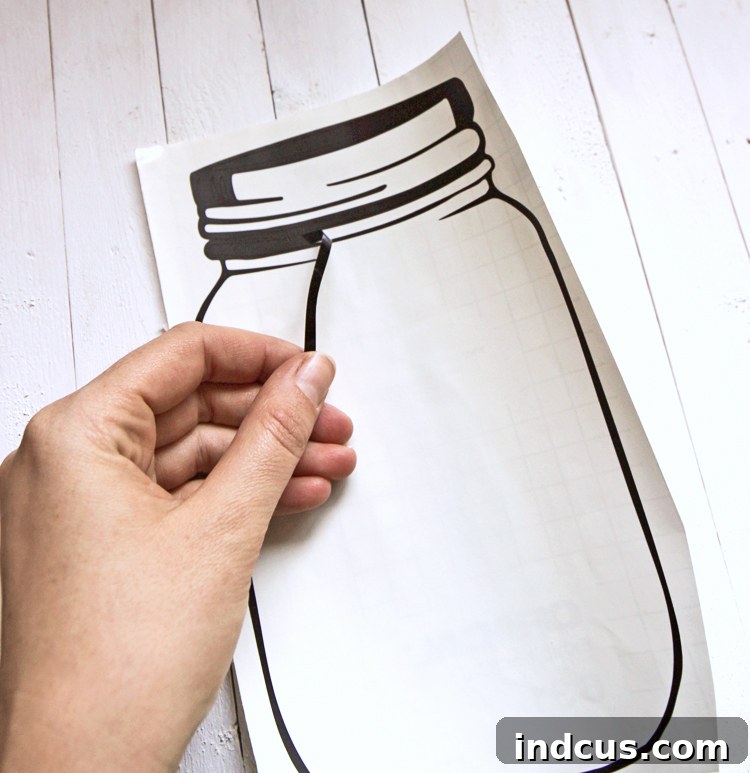
Step 3: Apply the Vinyl Design to the Wood Sign
With your vinyl design weeded, it’s time for application. Cut a piece of transfer tape slightly larger than your vinyl design. Carefully place the transfer tape over your weeded vinyl, pressing down firmly with a squeegee or a credit card to ensure the vinyl adheres well to the tape. Slowly peel the transfer tape (with the vinyl attached) off the vinyl’s backing paper. Position the vinyl design on your painted wood sign exactly where you want it. Once in place, press down firmly, again using a squeegee or credit card, to burnish the vinyl onto the wood. Work from the center outwards to prevent bubbles. Finally, gently peel back the transfer tape at a sharp angle, leaving the vinyl design perfectly adhered to your sign. If any part of the vinyl lifts, simply lay the transfer tape back down and burnish again.
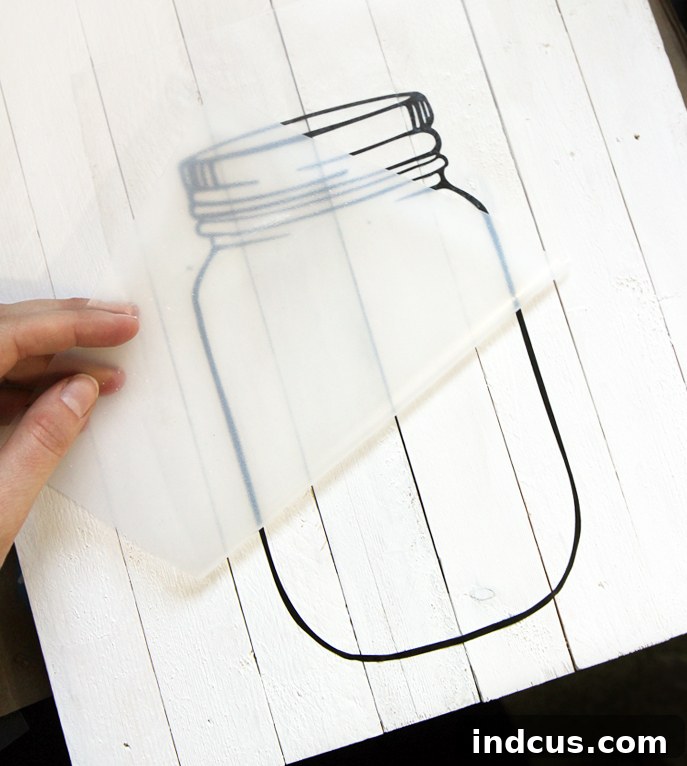
Step 4: Create Rolled Paper Flowers and Leaves
This step adds the beautiful three-dimensional element to your sign. Head over to the Silhouette Design Store (or a similar craft design marketplace) and download a few of your favorite rolled paper flower cut files. Choose a variety of styles and sizes to add depth to your arrangement. Using your Silhouette machine, cut these designs out of your assorted fall-colored cardstock. For the best results, use a variety of shades of orange, yellow, red, and brown. Once cut, begin rolling each flower. The general technique involves starting from the outside edge of the spiral and rolling inward tightly, using a quilling tool or tweezers to maintain control. Once rolled, release slightly to allow the petals to fan out naturally, then secure the base with a dab of hot glue. Repeat this process until you have a vibrant collection of flowers. Don’t forget to cut out some simple leaf shapes from green or brown cardstock to add a natural touch.
Here’s a visual guide for the basic rolling steps:
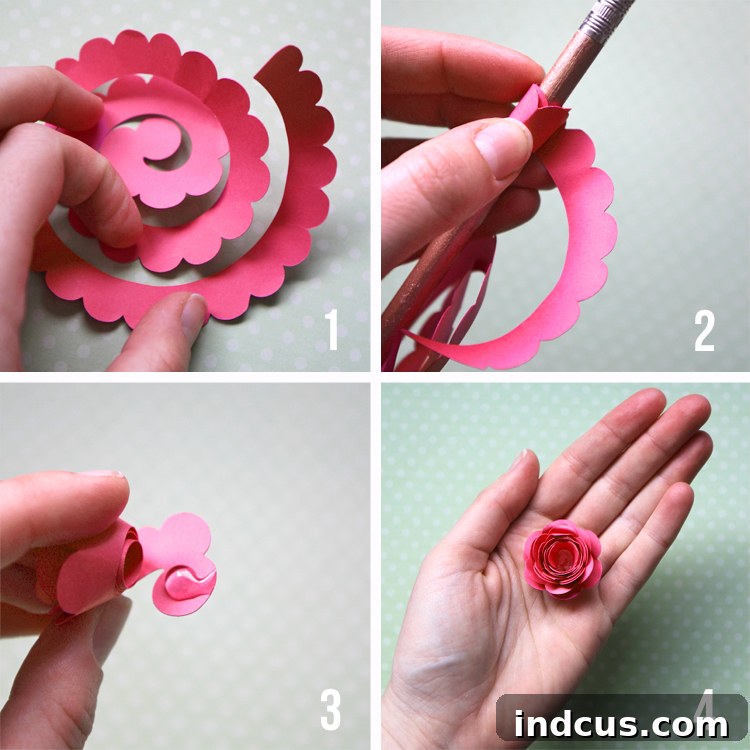
For more in-depth instructions and advanced techniques on creating these charming paper blooms, you can refer to this detailed post on how to make rolled paper flowers.
Step 5: Assemble Your Fall Floral Display
Now for the truly artistic part: arranging and gluing your paper flowers and leaves onto the sign. Before applying any glue, experiment with different arrangements. Place your rolled flowers and leaves inside the vinyl mason jar outline, playing with colors and sizes until you achieve a visually pleasing composition. Create clusters, vary heights, and ensure a balanced look. Once you’re satisfied with your layout, use your hot glue gun to securely attach each flower and leaf. A small dab of glue on the base of each flower is usually sufficient. Feel free to add other embellishments if desired, such as small faux berries, twine bows, or even tiny painted acorns, to enhance the autumnal theme. Stand back and admire your handiwork!
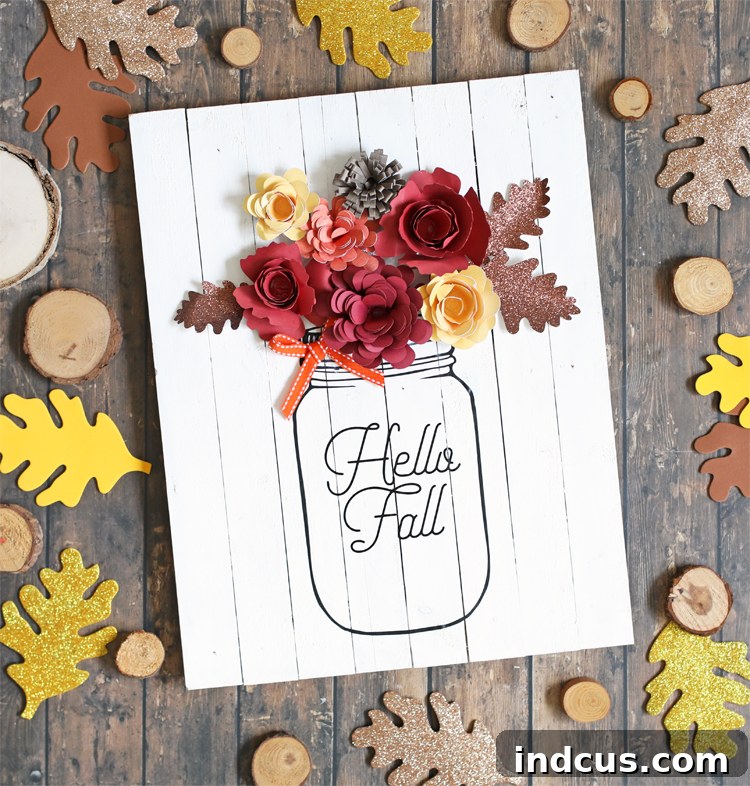
Tips for a Perfect Fall Sign
- Patience is Key: Don’t rush any step, especially when applying vinyl or arranging flowers. A steady hand and a bit of patience will yield the best results.
- Experiment with Colors: While classic fall colors are beautiful, don’t be afraid to experiment with slightly unconventional shades like muted blues or creams to add a unique twist to your decor.
- Layering for Dimension: When arranging your paper flowers, think about layering them. Place larger flowers at the base and smaller ones on top, or tuck leaves under and around the blooms to create a fuller, more dynamic look.
- Secure Adhesion: Ensure your hot glue gun is at the right temperature for a strong bond. Press each flower down firmly for a few seconds after applying glue to ensure it adheres well.
- Safety First: Always use caution when working with a hot glue gun to avoid burns.
Customization Ideas for Your Pallet Sign
One of the joys of DIY is the endless possibility for customization. Once you’ve mastered this “Hello Fall” sign, consider these ideas to expand your seasonal decor collection:
- Different Sayings: Instead of “Hello Fall,” try “Give Thanks,” “Pumpkin Spice & Everything Nice,” or “Autumn Blessings.” Simply update the text in your cutting machine software.
- Seasonal Themes: Adapt the concept for other holidays! Imagine a “Merry Christmas” sign with rolled paper poinsettias or a “Happy Easter” sign with pastel blooms and eggs.
- Varied Embellishments: Incorporate different elements like burlap ribbons, dried botanicals, small pinecones, or even tiny LED fairy lights for an evening glow.
- Paint Techniques: Explore different painting techniques for the background, such as ombre effects, stenciling, or a distressed antique finish, to give your sign a truly unique character.
Watch the Project Come Together
Sometimes, seeing is believing! For a quick visual guide, check out this video tutorial that brings all the steps to life:
(Video coming soon! In the meantime, follow the detailed instructions above.)
Download Your Free Hello Fall Mason Jar SVG File Here!
We hope you’re inspired to create your own “Hello Fall” pallet wood sign! This project is a wonderful way to welcome the autumn season into your home with a handcrafted touch. It’s perfect for adding rustic charm to your entryway, living room, or as a thoughtful handmade gift. Don’t forget to download your free SVG cut file, which makes the vinyl cutting process a breeze. Happy crafting, and enjoy the cozy warmth your new fall decor brings!
Loved this tutorial? Pin it for later and share with your crafting friends!