
A Cozy & Creative Christmas Home Tour: Budget-Friendly DIY Decorating Ideas
Welcome to my annual Christmas home tour! This year, I’m thrilled to invite you into my festive abode, where holiday cheer meets clever, budget-friendly design. My goal this season was to demonstrate that stunning Christmas decor doesn’t require a lavish budget. Instead, I focused on breathing new life into existing pieces, mixing them with a few thoughtful new additions, and infusing plenty of DIY charm. You’ll find a wealth of easily replicable ideas throughout this tour, designed to inspire your own holiday decorating endeavors. Get ready to transform your home with warmth, character, and a touch of handmade magic. Please note that I’ve included affiliate links for convenience, should you wish to explore any of the delightful finds for your own space.
Crafting a Festive Atmosphere: Living Room Delights
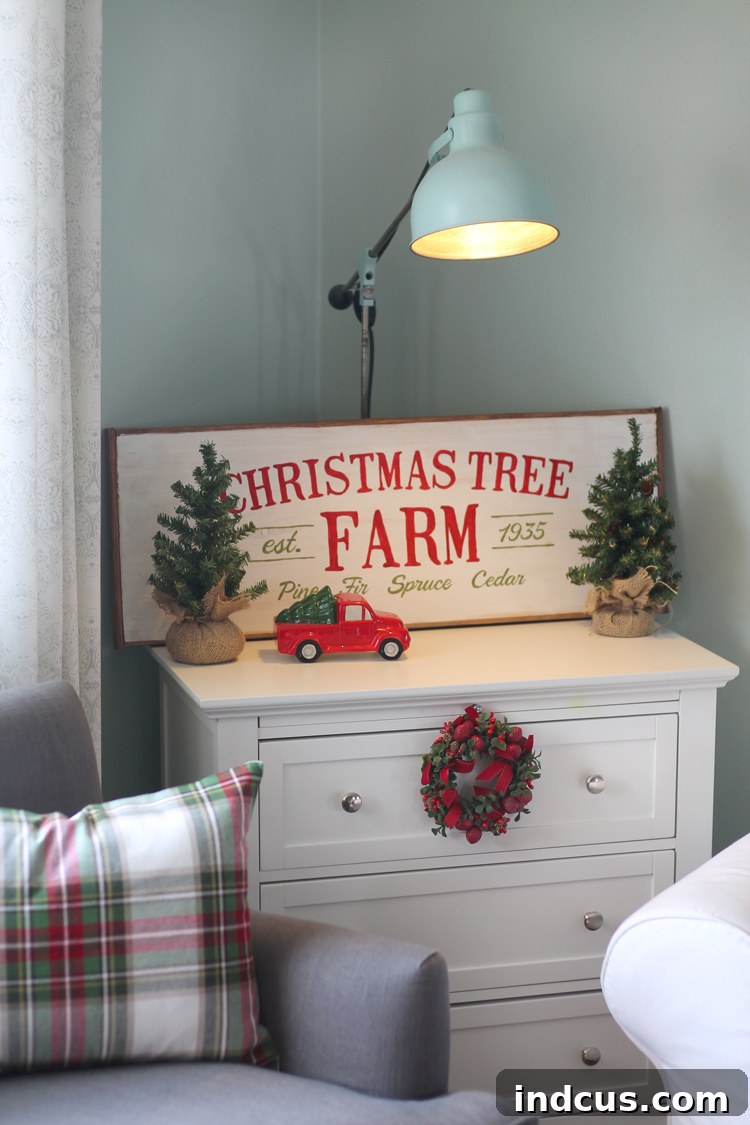
Our living room, a central hub for holiday gatherings, sets the tone for a welcoming Christmas. One of the first things you’ll notice is the “Christmas Tree Farm” wooden sign. This rustic piece, which I crafted last year (you can find the tutorial here), has found a new home upstairs this season, adding a touch of vintage appeal away from its previous spot above the fireplace. Its presence immediately evokes a nostalgic, winter wonderland feel, perfectly complementing the cozy aesthetic. Below it, a charming miniature red truck, a new and incredibly affordable find from Target at just $3, adds a pop of classic Christmas color and whimsy, completing this delightful vignette.
Vintage Charm: Ice Skates & Chalkboard Magic
Among all the new additions this year, my absolute favorite is undoubtedly this pair of vintage ice skates. I stumbled upon these treasures at a thrift store last summer, acquiring them for a mere $3, and knew instantly they were destined for Christmas greatness. The anticipation of integrating them into my holiday decor made their unveiling all the more special. To transform them into a unique focal point, I simply added a discreet screw to the back of my oversized chalkboard. The skate laces were looped effortlessly over the screw, allowing the skates to hang gracefully. I then filled them with a mix of fresh, fragrant greenery and some antique-inspired red ornament picks, creating a wonderfully rustic and surprisingly elegant display. This DIY decoration was not only incredibly simple to execute but also incredibly impactful, adding an authentic, old-world charm that I absolutely adore.
Pillow Power: DIY Textiles for a Cohesive Look
Textiles play a crucial role in creating a warm and inviting atmosphere, and my collection of DIY Christmas pillows made a triumphant return this year. The soft gray sweater pillow and the charming plaid deer pillow, both handmade with love, bring a personalized touch to our seating areas. You can find their respective tutorials here if you’re feeling crafty! To complement these, I also incorporated buffalo check pillow covers, which I sourced from Amazon for an incredible $5 each. These are the specific ones I purchased, and while they do take a bit of time to arrive, the unbeatable price makes them well worth the wait. They instantly elevate the festive feel of the room, adding that classic holiday pattern.
A panoramic view of the cohesive elements coming together:
The only truly new pillows introduced this year are this charming pair of plaid pillows, and they come with a fantastic DIY secret! I purchased plaid placemats from Target and ingeniously transformed them into decorative pillows. This hack is incredibly simple and cost-effective. You just need to carefully unpick a small section along one edge of the placemat, stuff it generously with pillow filling, and then hand-stitch the opening closed. Voilà! You’ve got an adorable, custom-looking pillow for just a few dollars, proving that creative solutions often lead to the most unique decor. It’s a trick I highly recommend trying for quick and easy holiday accents.
The Heart of the Home: Our Flocked Christmas Tree
Now, let’s talk about the absolute best part of any Christmas home tour – the tree! This year, I embarked on a fun and transformative project: flocking our artificial tree. If you have an older artificial tree that’s looking a bit tired or you simply crave a fresh, winter wonderland aesthetic, flocking is an excellent way to completely change its appearance and inject new life into your holiday decor without buying a brand new tree. It instantly gives the impression of freshly fallen snow, creating a magical, frosty ambiance.
DIY Tree Flocking: Tips for a Winter Wonderland Effect
For this project, I purchased this particular flocking product (the 2 lb. bag) from Amazon for about $25. This amount proved sufficient for a beautiful, light coating on our tree, creating a delicate, snow-kissed effect. While I initially aimed for a heavier application, stepping back revealed a charming, subtle frosted look. Next time, I might go a bit thicker to achieve a more intense snowdrift appearance, but I’m absolutely delighted with this year’s result.
The application process itself was surprisingly straightforward, though it does require a bit of preparation. First, generously spray the entire tree down with water until the branches are thoroughly damp. Then, transfer the flocking powder into a fine kitchen strainer. Over the wet branches, sift the flocking powder evenly, ensuring good coverage. Once all the flocking is applied, give the tree another gentle misting of water to help the powder adhere properly and set. A crucial tip: I highly recommend doing this outdoors or in a well-ventilated garage, as it can get quite messy! Also, if you have access to a garden hose with a spray nozzle set to mist, use it. The increased water volume and even spray would have made the flocking stick even better, and it would save your hands from getting tired from a small water bottle.
Ornaments & Accents: Building Layers of Beauty
Our flocked tree is adorned with a harmonious mix of decorations that create depth and visual interest. I incorporated two distinct types of ribbon to add texture and shimmer, allowing light to catch different surfaces. A delicate gold circle paper garland weaves through the branches, providing a continuous, ethereal shimmer. Clusters of vibrant red berries are strategically placed, offering crucial pops of traditional holiday color against the snowy backdrop. Fluffy white hydrangeas bring a soft, natural element, mimicking snowdrifts and adding fullness. Finally, unique white paper wreaths, meticulously cut using my Silhouette machine, add a personal, handcrafted touch that truly distinguishes our tree.
An Unexpected Tree Topper: The Sunburst Mirror
For a truly unique and memorable finish, I opted for an unexpected tree topper this year: a small sunburst mirror. This unconventional choice proved to be a stroke of genius, reflecting the tree’s lights and adding an incredible sparkle and modern elegance. It’s quickly become my absolute favorite feature of the entire tree, proving that sometimes the best decor decisions are those that break from tradition. When the lights are dimmed and the whole tree emanates a soft, magical glow, it truly makes me want to burst out singing “fa la la la la!” The entire ambiance is simply enchanting.
DIY Tree Stand: A Faux Barn Wood Box
Instead of a traditional tree skirt, I chose to house our Christmas tree in a custom-made wooden box this year. But here’s another secret: it’s *not* really wood! This ingenious DIY faux barn wood Christmas tree stand cost me a mere $4 to create and took just about an hour of my time. It provides a rustic, elevated base for the tree, perfectly complementing the cozy, vintage-inspired theme. You can find the full tutorial to make your own here. This project is a testament to how simple materials and a little creativity can result in high-impact decor.
Embracing the Spirit of DIY & Inexpensive Decor
This Christmas home tour serves as a wonderful reminder that creating a beautiful, festive environment doesn’t have to break the bank. By embracing DIY projects, reusing beloved decor in new ways, and carefully selecting a few affordable new pieces, you can achieve a truly personalized and heartwarming holiday display. Each element in our home, from the vintage ice skates to the handmade pillows and the meticulously flocked tree, tells a story of creativity and thoughtful design. It’s about infusing your personality into every corner and making your home feel uniquely yours for the holidays.
Looking Ahead: More Holiday Inspiration to Come!
Thank you for joining me on this journey through our Christmas-decorated home. I hope you’ve found plenty of inspiration to make your own holiday season merry and bright. Be sure to check back next week, as I’ll be sharing a second home tour featuring our downstairs decor. We’re venturing to the mountains this year to cut down our very first live tree, which I’m incredibly excited about! Plus, I’m trying something completely outside my usual comfort zone for the downstairs theme, so it promises to be an interesting reveal. Stay tuned for more holiday magic and decorating adventures!







