
Transform Any Wicker Basket: A Step-by-Step Guide to Sewing a Custom Fabric Liner
Are you ready to give an old basket new life? Learning how to sew a custom fabric basket liner is a fantastic way to personalize thrift store finds, organize your home, and add a touch of handmade charm to any space. Whether you’re refreshing a nursery, tidying up a craft room, or simply seeking a unique storage solution, a well-fitted liner can elevate a simple wicker basket into a stylish and functional accent. This comprehensive guide will walk you through creating a bespoke liner, ensuring a perfect fit for even the most uniquely shaped baskets.
My journey began with a charming discovery at a local thrift store – a sizable wicker basket, brimming with potential, despite its dated appearance. Priced at an unbelievable $1, it was destined to become a stylish organizer for nursery essentials. Measuring an impressive 20 inches across, its generous size was perfect for diapers and wipes, just waiting for a creative makeover.
The vision was clear: transform this unassuming find into a beautiful and practical piece. With a little imagination and some DIY magic, this basket was set for a stunning revival.
And voilà! The transformation was complete. A once overlooked basket now stands as a delightful and accessible storage solution, ready to hold all those tiny necessities with style.
Prepping Your Wicker Basket for Its Custom Liner
Before diving into the sewing process, the first crucial step is preparing your wicker basket. This involves not only cleaning but also customizing its exterior to match your décor. For my project, the basket received a vibrant update with Krylon’s Ivy Leaf spray paint – a color I absolutely adore for its fresh and natural appeal. Due to the basket’s considerable size and the intricate weave of wicker, it required a full can of spray paint to achieve thorough, even coverage. Patience is key during this stage; ensure each coat dries completely before applying the next, and work in a well-ventilated area.
Once the paint has cured and the basket is ready, it’s time to focus on the heart of this project: the fabric liner. I chose a lovely, thick piece of white woven fabric from my stash, a versatile material that promised both durability and a clean aesthetic. When selecting your fabric, consider factors like washability, colorfastness, and how well it drapes. Cotton, linen, or a durable blend are excellent choices for basket liners, offering both strength and ease of care. Always pre-wash your fabric to prevent shrinking after your liner is made.
Crafting Your Custom Pattern: The Draping Method for a Perfect Fit
Creating a perfectly fitting liner, especially for baskets with sloped sides or unique shapes, can seem daunting. Traditional measuring and pattern drafting might lead to complex angles and multiple fabric pieces. However, a brilliant technique I discovered simplifies this process immensely: the draping method. This approach allows the fabric to naturally conform to the basket’s contours, ensuring a custom fit with minimal fuss.
To begin, lay your chosen fabric flat, then carefully turn your wicker basket upside down onto the fabric. The goal here is to use the basket itself as your pattern guide. Center the basket on your fabric, ensuring you have ample material extending beyond all sides of the basket’s base. This excess fabric will form the sides of your liner, so be generous, allowing at least 4-6 inches (10-15 cm) beyond the base for the side panels and top hem/casing.
Next, begin to snugly pin the fabric around the base of the inverted basket, working your way up the sides. As you pin, gently smooth the fabric against the basket’s curves, creating natural folds at the corners. For baskets with significant slopes or pronounced curves, these folds will naturally form triangular pleats or darts. Pin these pleats tightly against the basket, essentially ‘sculpting’ the fabric to mirror the basket’s shape. This method eliminates the need for precise angle calculations, making it incredibly intuitive and effective.
I found this draping technique particularly advantageous for my large, sloped basket. It bypasses the complexities of geometric pattern making, allowing the fabric to guide the design. Once your fabric is fully pinned and taut around the basket, carefully remove the fabric, keeping all pins in place. You now have a custom pattern piece, ready for the sewing machine.
Sewing Your Basket Liner: From Pattern to Prototype
With your pinned fabric serving as a custom pattern, it’s time to bring your liner to life. Take the pinned fabric to your sewing machine. Carefully stitch along the lines created by your pins, sewing each of the corner seams. These seams will essentially create the basket’s unique shape. A standard stitch length is fine, but for added durability, you might consider reinforcing these seams with a second pass or using a serger if you have one.
Once stitched, you’ll notice small triangular flaps of excess fabric at these corners where the fabric was folded and pinned. These can now be trimmed away, leaving a clean seam allowance. Be sure to leave about a 1/2 inch (1.25 cm) seam allowance when trimming. This allowance gives you room for future adjustments and ensures the seams remain strong. Consider finishing these raw edges with a zigzag stitch or a serger to prevent fraying, especially if your fabric is prone to it.
After sewing and trimming, it’s crucial to test the fit. Turn your fabric liner right-side out and gently place it inside your basket. Observe how it sits. Does it hug the sides snugly? Are there any areas that seem too loose or too tight? For my basket, a slight adjustment was needed; I found that sewing the corner seams just a smidge tighter resulted in a much better, more tailored fit. Don’t be afraid to make these minor tweaks – they are what truly make a liner “custom.” It’s better to adjust now than to have a saggy liner later.
Once you’re satisfied with the fit, it’s time to address the top edge. With the liner still in the basket, or carefully marked, trim around the opening to achieve an even edge. This step is vital. Remember to leave plenty of excess fabric above the desired finished height of your liner. This extra material is essential for creating a fold-over edge that wraps neatly around the basket, as well as providing enough fabric for the elastic casing that will secure the liner in place. Aim to leave at least 2-3 inches (5-7.5 cm) above the basket’s rim.
The Importance of Elastic: Achieving a Snug Fit
For baskets with curved or sloped sides, incorporating elastic into the top edge of your liner is highly recommended. Elastic ensures that the liner stays snug against the basket’s contours, preventing it from slipping down or losing its shape. My basket, with its distinct curves, absolutely benefited from this feature, maintaining a crisp, tailored look. If, however, you’re crafting a liner for a perfectly square or rectangular container, elastic might not be as critical, and a simple hem or drawstring could suffice. For these straight-sided baskets, the structured shape of the fabric often holds its form without extra tension.
To prepare for the elastic, ensure your top edge trim leaves at least 2-3 inches (5-7.5 cm) of fabric above where you want the liner to sit inside the basket. This allowance will accommodate both the fold-over and the casing for the elastic. The width of your elastic will also influence how much allowance you need; generally, an elastic of 1/2 inch to 1 inch (1.25 cm to 2.5 cm) wide works well for most basket liners.
Navigating Handles: Customizing for Practicality
Many wicker baskets, including mine, come equipped with handles – a practical feature that requires careful consideration when designing your liner. To maintain the functionality of the handles, you’ll need to create openings in your fabric liner. With the liner inside the basket and fitted correctly, carefully mark the exact location and shape of the handle openings. You can use tailor’s chalk, a fabric pen, or even pins to outline these sections. Remove the liner and meticulously cut out these marked shapes. Aim for openings that are slightly larger than the handles themselves to allow for easy access and a finished edge, typically an extra 1/4 inch (0.6 cm) all around.
To give these raw edges a clean, professional finish, double-fold bias tape is your best friend. This versatile trim neatly encases the cut edges, preventing fraying and adding a polished look. Unfold one edge of the double-fold bias tape and align its raw edge with the raw edge of your handle opening. Stitch along the fold line, then wrap the bias tape around to the wrong side of the fabric and stitch it down, either by hand for an invisible finish or by machine for a quicker result. Apply the bias tape around the perimeter of each handle opening, stitching it securely in place. The key here is to complete the handle openings *before* you construct the main top edge casing for the elastic. This sequence allows the bias tape ends to be seamlessly tucked into the final top seam, resulting in a much neater and more integrated finish, rather than having bulky, exposed ends.
Creating the Elastic Casing and Finishing Touches
With the handle openings expertly finished, it’s time to create the casing that will house your elastic. First, press the top raw edge of your liner down by about 1/4 inch (0.6 cm) towards the wrong side of the fabric. Then, fold it down again, this time by approximately 1 inch (2.5 cm) – or wide enough to comfortably accommodate your chosen elastic – towards the wrong side. Press this second fold firmly to create a crisp channel. Stitch along the inner edge of this fold, leaving a small opening (about 1-2 inches or 2.5-5 cm) at the back of the liner. This opening will be used to thread your elastic through the casing.
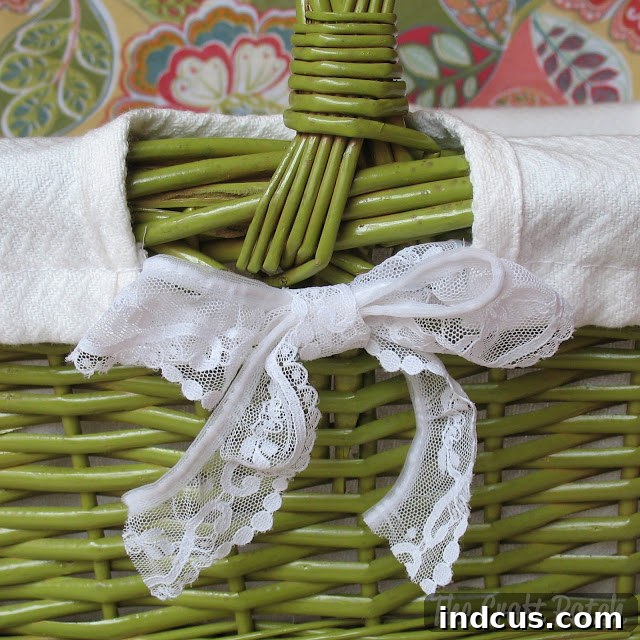
Using a safety pin attached to one end of your elastic, thread it through the casing. Guide the safety pin and elastic all the way around the perimeter until the elastic emerges from the opening. As you navigate the elastic around the perimeter, you’ll encounter the handle openings. Here’s a clever trick: at each handle opening, temporarily secure the elastic with a few stitches on either side of the opening. This prevents the elastic from retracting into the casing and ensures it stays taut across the handle gaps. Instead of having the elastic visible across the handle opening, which could look untidy, I opted for a decorative solution. I strung a piece of elegant lace across the opening, tying it into a charming bow. This not only keeps the elastic tight and the liner snug but also adds a beautiful, finished detail, enhancing the overall aesthetic.
Once the elastic is fully threaded and adjusted to achieve the desired snugness – test it in the basket to find the perfect tension – overlap the ends of the elastic by about 1 inch (2.5 cm) and stitch them together securely using a strong zigzag stitch. Then, carefully stitch the opening in the casing closed. Give your liner a final press, ensuring all seams are flat and crisp, and it’s ready to be placed into your beautifully transformed wicker basket.
Tips for Success and Creative Variations
- Fabric Choices: Experiment with different fabrics! Quilting cottons offer endless patterns and are easy to work with. Canvas or duck cloth provide extra durability for heavy items or high-traffic areas. Even laminated cottons can be used for liners that need to be wipeable (e.g., for plants, toys, or messy items).
- Alternative Closures: Instead of elastic, consider a drawstring casing for a more relaxed look, allowing you to tighten or loosen the liner as needed. Alternatively, add fabric ties at intervals around the top edge for a decorative touch that secures the liner with elegant bows.
- Adding Pockets: For extra organization, sew flat or pleated pockets onto the outside of your liner before assembling the main seams. These are perfect for small items like remote controls, crafting tools, baby essentials, or even reading glasses.
- Lining Square/Rectangular Baskets: For baskets with straight sides, the draping method still works, but you might find it easier to measure the base and side panels, then sew them together. Elastic may not be necessary; a simple folded hem will often suffice for a clean finish.
- Care and Maintenance: Since your liner is custom-made, it’s typically machine washable. This makes it incredibly practical and hygienic for nursery items, laundry, or any use where cleanliness is important. Refer to your fabric’s care instructions for specific washing temperatures.
The Rewarding Result: A Beautiful and Functional Custom Basket
I couldn’t be happier with the outcome of this little project. The joy of transforming an inexpensive thrift store find into a bespoke, functional piece for the nursery is immense. The total cost for this custom basket liner, considering I already had the paint, fabric, and lace, amounted to a mere $1 for the basket itself! Even if you were to purchase all the materials new, the entire project would likely come in around $5-$10, offering incredible value compared to store-bought options that often lack the perfect fit or personalized touch.
Creating a custom fabric basket liner is more than just a sewing project; it’s an act of mindful upcycling, personalizing your space, and embracing the satisfaction of handmade craftsmanship. This DIY venture is not only budget-friendly but also allows for endless creative expression. Whether you’re a seasoned sewer or a beginner looking for a rewarding weekend project, this guide provides all the steps to achieve truly beautiful and functional results. So, grab that forgotten basket, choose your favorite fabric, and embark on your own custom liner adventure!







