
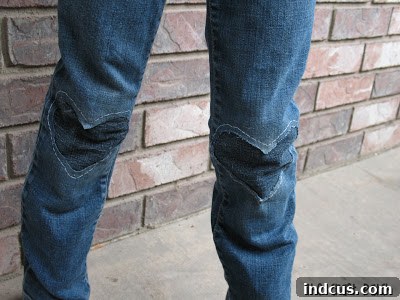
Ah, that familiar scenario! It’s that time of year again when your child’s favorite pair of jeans inevitably comes home with a glaring hole right at the knee. You might find yourself wondering what exactly they get up to at school or play that leads to such consistent denim destruction. The endless cycle of worn-out knees can be both frustrating and costly, leading many parents to simply toss the damaged garment and buy new.
However, what if we told you there’s a simple, creative, and incredibly cute way to not only mend those stubborn knee holes but also transform them into a unique fashion statement? Instead of a drab patch, imagine a vibrant, personalized design peeking through a perfectly mended knee. Over the years, I’ve experimented with numerous patching techniques, from basic iron-ons to intricate embroidery, and I’ve finally landed on a method that consistently delivers the most adorable and durable results. This approach not only saves those beloved jeans from the landfill but also adds a touch of personality that makes them even more special. It’s a fantastic way to embrace sustainability, save money, and unleash a little bit of your inner crafting genius.
Revive & Restyle: Your Ultimate Guide to Creative Jean Mending
Before we dive into the step-by-step process of transforming those tattered knees, let’s gather our essential supplies. One of the best aspects of this DIY project is that it requires only a few readily available materials, many of which you might already have around your home. This makes it an incredibly accessible and budget-friendly solution for tackling the endless battle against torn denim. Get ready to turn a frustrating wardrobe malfunction into a fun, rewarding crafting experience!
Materials Needed for Your DIY Jean Repair Project
- Jeans with Holes in the Knees: This is, of course, the star of our show! If you have active children, or even if you’ve had a minor mishap yourself, you likely have a few pairs of jeans eagerly awaiting a new lease on life. This method is particularly effective for holes that are around 1-3 inches in diameter, allowing enough space for your chosen design to shine.
- Extra Fabric (for the patch): The beauty of this technique lies in the contrasting or coordinating fabric you choose for the inner patch.
- Denim Scraps: My personal preference is often denim from an old pair of pants that I’ve earmarked for future upcycling projects. This creates a cohesive look and ensures durability, as denim is naturally robust. Look for denim in a similar weight and color to the jeans you’re mending, or choose a contrasting shade for a bolder statement.
- Printed Cottons: For a truly “cute” and personalized touch, consider sturdy printed cotton fabrics. Think whimsical patterns, bold stripes, or even a favorite character print for kids’ jeans. Just ensure the fabric is durable enough to withstand regular wear and washing.
- Flannel or Corduroy: These fabrics can add a nice texture and warmth, especially for fall and winter jeans.
- Upcycled Clothing: Don’t limit yourself to fabric scraps! An old shirt, a worn-out skirt, or even a sturdy tea towel can provide excellent material for your patches. The key is to select something that will hold up well to washing and wear.
- Fabric Glue: This is a crucial component for securely holding your inner patch in place before stitching, ensuring a neat and professional finish. I typically use Alene’s Fabric Fusion or a similar permanent fabric adhesive, mainly because it’s what I usually have on hand and it offers a strong, flexible bond. When selecting your fabric glue, look for one that is:
- Permanent: To ensure the patch stays put through washes.
- Washable: Essential for maintaining the patch’s integrity.
- Flexible: So the denim doesn’t feel stiff or uncomfortable after drying.
- Dries Clear: To avoid any visible residue.
- Thread: Your thread choice offers another opportunity for personalization and flair.
- Coordinating Color: For a subtle, seamless repair, choose a thread color that closely matches the original denim.
- Bright & Fun Color: To make your stitching a prominent design element, opt for a vibrant, contrasting color. This can really highlight your chosen shape and add a playful touch. Consider embroidery floss for a thicker, more visible stitch if you want to make a bold statement.
Optional but Recommended Tools:
- Sharp Fabric Scissors: For clean, precise cuts.
- Fabric Marker or Chalk: For tracing your design accurately.
- Sewing Machine: While hand stitching is possible, a sewing machine will make the stitching step much faster and more consistent.
- Pins: To temporarily secure the inner patch before gluing or stitching.
- Iron and Ironing Board: To press seams and ensure a flat surface for working.
Step-by-Step Instructions for Your Creative Jean Repair
Now that you have all your materials ready, let’s walk through the process of mending those jeans. This method combines the durability of an internal patch with the aesthetic appeal of a “reverse appliqué” technique, resulting in a repair that looks intentional and stylish rather than just functional.
Step 1: Choose and Trace Your Design onto the Denim
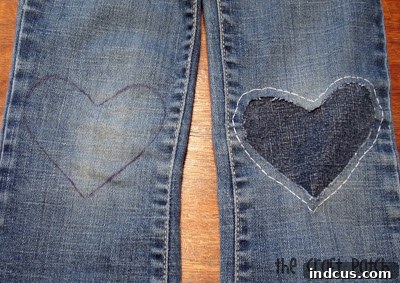
This is where the fun begins and your creativity comes into play! Lay the jeans flat and identify the exact area of the hole. Instead of simply covering the hole, we’re going to use it as a window for your chosen design. Using a fabric marker, tailor’s chalk, or even a regular pencil (on the wrong side of the fabric if you’re concerned about marks), trace your desired pattern directly onto the original denim, encircling the hole. Popular choices include:
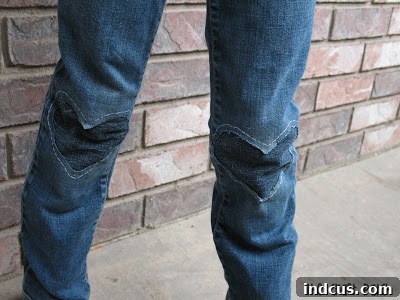
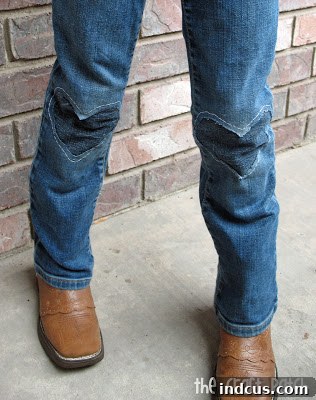
- Hearts: As pictured, a classic and adorable choice, especially for children’s jeans.
- Stars: Another playful and versatile option.
- Geometric Shapes: Squares, circles, triangles – simple yet modern.
- Abstract Shapes: Let your imagination run wild!
Ensure your design is slightly larger than the hole itself, creating a clear border around the damaged area. The precision of this initial tracing will contribute significantly to the final look of your patch, so take your time to make it neat and symmetrical. For perfectly symmetrical shapes, you can draw half your design on folded paper, cut it out, and then unfold to use as a template.
Step 2: Prepare the Inner Patch Fabric
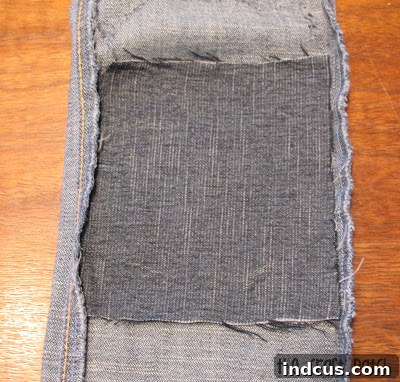
Take your chosen extra fabric (denim, cotton print, etc.) and cut out a generous square or rectangle. The key here is to make sure this piece of fabric is substantially larger than the design you traced in Step 1. It needs to completely cover your traced design with plenty of overlap on all sides – at least an inch or two beyond the design’s edges. This ensures ample surface area for the fabric glue and provides stability for the patch. Don’t worry about this piece being perfectly shaped; a simple square or rectangle is sufficient. This will be the “peek-through” fabric that shows through the hole in the original denim, so consider how its color or pattern will complement the jeans.
Step 3: Secure the Inner Patch with Fabric Glue
Turn the jeans inside out. Position your cut square/rectangle of extra fabric over the hole, ensuring it is centered behind your traced design and completely covers it. Now, apply a thin, continuous bead of fabric glue around the edges of this rectangular patch. It’s crucial to apply the glue only to the outer perimeter of the patch, where it will adhere to the original denim. Do NOT put glue in the middle of the rectangle. The central part of this fabric will eventually show through the front of the jeans, and you want that area to remain soft and flexible, not stiff with dried glue. Press the glued edges firmly onto the inside of the pant leg, making sure it lies flat and smooth. Allow the glue to dry completely according to the manufacturer’s instructions, which can take a few hours. This step is essential for holding the patch securely in place during the subsequent stitching process, preventing any shifting or puckering.
Step 4: Stitch Around Your Design for Reinforcement and Style
Once the fabric glue is thoroughly dry and the inner patch is firmly secured, it’s time to stitch! Turn the jeans right side out. Using your sewing machine (or by hand, if you prefer, with a sturdy needle), carefully stitch through both thicknesses of fabric – the original denim and the inner patch – around the design you drew in Step 1.
- Stitch Placement: Aim for a consistent line of stitches, leaving about 1/4 inch distance between your stitches and the traced line. This margin provides stability for the next cutting step and allows for a clean, professional edge.
- Stitch Type: A simple straight stitch is perfectly adequate, but you could also use a zigzag stitch for extra durability or a decorative stitch for added flair. Ensure your stitch length is appropriate for denim – not too short to avoid perforating the fabric excessively, and not too long to ensure a secure hold.
- Thread Choice: If you’ve chosen a contrasting thread color, this stitching line will become a prominent decorative element. If you’ve opted for a coordinating thread, it will provide strong reinforcement without drawing too much attention.
The stitching not only permanently secures the patch but also creates a defined border that will frame your design beautifully.
Step 5: The Crucial Cut – Revealing Your Design
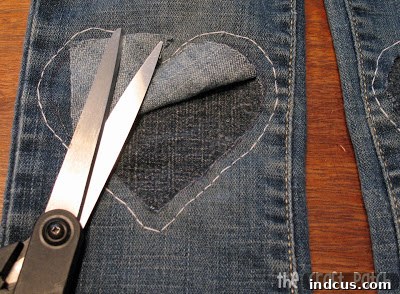
This is arguably the most critical step and requires careful precision. With the jeans still right side out, take a pair of very sharp fabric scissors. CAREFULLY cut along the line you drew in Step 1, creating the desired shape (e.g., the heart). The absolute most important instruction here is to ONLY cut through the top layer of fabric – that is, the original pant fabric. DO NOT cut through both layers of fabric! If you accidentally cut through the inner patch, you will defeat the entire purpose of this project and end up with a new, larger hole in the knee.
- Technique: To avoid cutting through both layers, you might find it helpful to gently pinch the top fabric layer away from the bottom patch fabric as you cut, or even use a small, sharp craft knife (with extreme caution and a protective surface underneath) for intricate curves. Work slowly, making small, deliberate cuts.
- Purpose: By cutting away the top layer, you are revealing the fabric of the inner patch, allowing it to “peek through” and form your design. This reverse appliqué effect is what makes this mending method so visually appealing and unique.
Does that make sense? This step transforms a functional patch into a decorative feature, so precision here is key to a beautiful outcome.
The Magic of Fraying: A Touch of Character
The jeans pictured in the final stages of this tutorial haven’t been washed yet. However, once they go through their first wash cycle (and subsequent washes), a wonderful transformation will occur. The raw edges of the denim around your cut-out design will begin to naturally fray, creating a soft, distressed border that adds even more character and a charming, worn-in look. This natural fraying effect enhances the “cuteness” factor and gives the patched area a perfectly imperfect, handcrafted appeal. It’s an intentional design element that celebrates the life of the garment and the mend itself.
Tips for a Professional and Durable Finish
- Wash Before Mending: Always wash and dry the jeans before you start patching. This pre-shrinks the fabric and ensures any existing dirt or oils won’t interfere with the glue or stitching.
- Test Your Glue: If you’re using a new brand of fabric glue, it’s always a good idea to test a small dab on a scrap of your patch fabric to ensure it dries clear and adheres well without stiffening too much.
- Pressing is Key: After gluing and stitching, a good press with an iron can help flatten the patch and give your repair a more professional, finished look.
- Reinforce High-Wear Areas: If the original hole was particularly large or in a high-stress area, consider adding a second line of stitching around your design for extra durability.
- Embrace Imperfection: Remember, this is a handmade repair! Small imperfections add to the charm and unique character of your mended jeans. Don’t strive for factory perfection, but rather for a sturdy and aesthetically pleasing result.
Beyond the Knee: Versatility of This Mending Method
While this tutorial specifically targets knee holes, the reverse appliqué method is incredibly versatile. You can apply this same technique to:
- Elbow Patches: Breathe new life into sweaters or jackets with worn elbows.
- Torn Pockets: Creatively repair or reinforce pocket areas.
- Decorative Embellishments: Use the technique on intact fabric to add unique designs to garments, bags, or home decor items.
The possibilities for personalization and extending the life of your textiles are truly endless with this creative mending approach.
Caring for Your Newly Patched Jeans
To ensure your beautifully mended jeans last as long as possible, follow these simple care instructions:
- Wash Cold: Always wash your jeans in cold water to prevent excessive shrinking and protect the fabric and glue.
- Gentle Cycle: A delicate or gentle cycle will be kinder to the patched area.
- Air Dry or Low Heat: Tumble drying on low heat or, even better, air drying, will help preserve the integrity of the patch and prevent the glue from breaking down over time.
- Turn Inside Out: Washing jeans inside out can also protect the exterior patch and reduce friction.
With proper care, your creatively mended jeans should withstand many adventures and washes.
A Sustainable and Stylish Choice
In a world increasingly focused on fast fashion, embracing garment repair is a powerful statement. Mending your children’s jeans, or your own, is not just about saving money; it’s about making a conscious choice for sustainability. It reduces textile waste, minimizes your environmental footprint, and teaches valuable skills. Plus, it results in a truly unique piece of clothing that carries a story and a personal touch.
Now, with this unique and charming method, you hopefully have a pair of pants that will not only withstand the rigorous demands of active kids but also remain a favorite until well into June, or even longer! Embrace the joy of creating something new from something old, and let those patched knees become a badge of honor for both your crafting skills and your child’s adventurous spirit.
Happy mending!







