
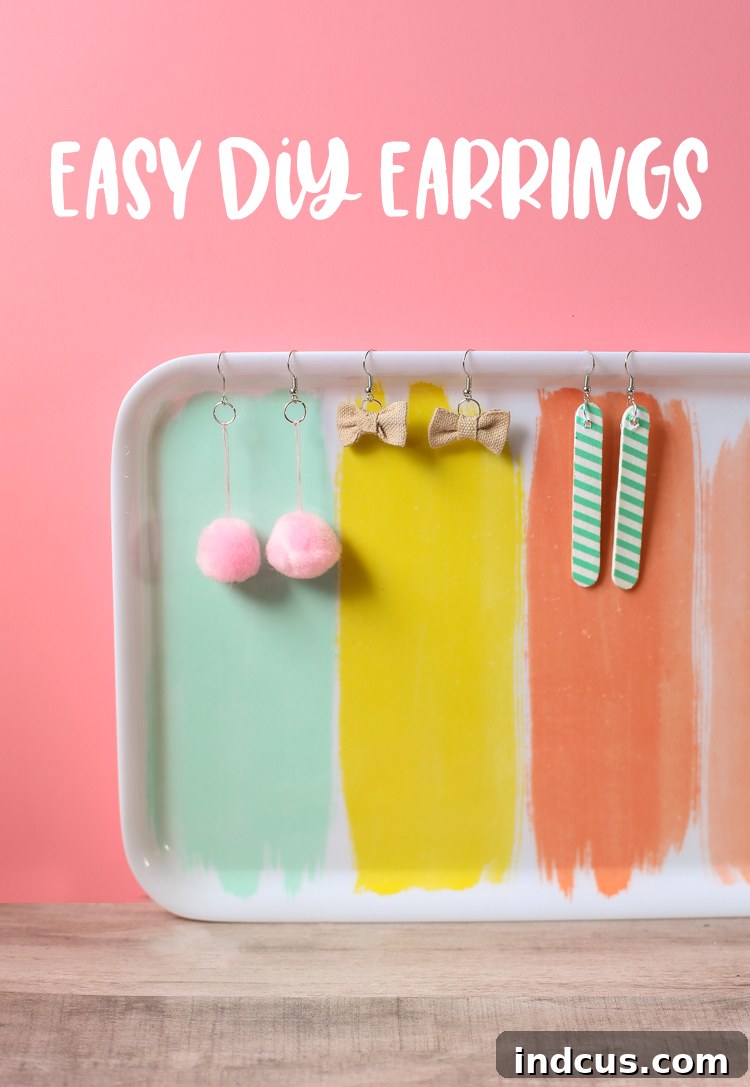
Craft Your Style: Easy & Unique DIY Earrings for a Personalized Wardrobe
There’s an undeniable charm in wearing something you’ve created with your own hands. In the realm of fashion accessories, nothing quite rivals the satisfaction and uniqueness of handmade jewelry, especially a pair of DIY earrings. For many, the idea of crafting their own accessories might seem daunting, but this comprehensive guide is here to demystify the process, turning you into a confident jewelry maker in no time. If you’ve been searching for a creative outlet that results in beautiful, wearable art, then embarking on your DIY earring journey is the perfect next step.
Today, we’re diving deep into the exciting world of custom earring design, focusing on three distinct and delightful styles: playful pom pom earrings, charming mini bow earrings, and surprisingly chic popsicle stick earrings. Each design offers a fantastic opportunity for personalization, allowing you to tailor colors, textures, and embellishments to perfectly match your aesthetic. Imagine effortlessly coordinating your accessories with every outfit, or crafting thoughtful, one-of-a-kind gifts for friends and family. This tutorial isn’t just about making earrings; it’s about unlocking your creative potential and adding a truly unique touch to your wardrobe.
The Allure of Handmade Jewelry: Why DIY Earrings?
In an era of mass-produced fashion, handmade items stand out as beacons of individuality and craftsmanship. Opting for DIY earrings offers a multitude of benefits that extend beyond simply acquiring a new accessory:
- Unleash Your Creativity: From selecting colors to mixing materials, every step is an opportunity for self-expression.
- Personalized Style: Create pieces that perfectly complement your wardrobe and personality, rather than settling for what’s available in stores.
- Budget-Friendly Fashion: Crafting your own jewelry can be significantly more economical than purchasing designer pieces, allowing you to build an extensive collection without breaking the bank.
- Unique Gifts: Handmade earrings make incredibly thoughtful and personal gifts that truly show you care.
- Mindful Crafting: The process of making can be incredibly therapeutic, offering a relaxing and rewarding escape from daily stresses.
- Sustainable Choice: By reusing materials or choosing sustainable options, you contribute to a more eco-conscious approach to fashion.
Whether you’re a seasoned crafter or a complete beginner, the joy of turning simple supplies into a stunning pair of earrings is an experience worth embracing. This guide aims to make that experience accessible, fun, and incredibly rewarding.
Gather Your Essential Tools & Materials for Earring Making
Before we embark on our creative journey, let’s ensure you have all the necessary supplies. The beauty of these DIY earring projects lies in their simplicity and the readily available nature of the materials. You can find almost everything you need at your local craft store, or conveniently order them online through the provided links. Having your workspace organized with these items will make the crafting process smooth and enjoyable.
- Fish Hook Earring Toppers (or French Hooks): These are the foundation of your dangle earrings, designed to comfortably sit in your earlobe. Available in various metals like silver, gold, rose gold, and bronze, they allow for further customization.
- Jump Rings: Small, open metal rings crucial for connecting different components of your earrings. Mastering the technique of opening and closing them correctly (twist, don’t pull apart!) is key to durable jewelry.
- Needle-Nosed Pliers: An indispensable tool for jewelry making. These pliers allow you to precisely open and close jump rings and manipulate other small components.
- Pom Poms: Available in a dazzling array of sizes, colors, and textures, these fuzzy spheres are perfect for creating playful and vibrant dangle earrings.
- Small Bows: You can purchase pre-made mini bows or easily create your own from ribbon scraps, offering endless possibilities for color and pattern.
- Mini Popsicle Sticks (Craft Sticks): These versatile wooden sticks serve as an unexpected yet fantastic base for unique and stylish earrings.
- Washi Tape: A decorative adhesive tape originating from Japan, known for its beautiful patterns and ease of use. It’s perfect for decorating popsicle sticks and adding a pop of color.
- Craft Glue (e.g., E6000 or strong adhesive): Essential for securely attaching elements like bows or ensuring your washi tape stays put.
- Scissors: For cutting ribbon, washi tape, or trimming popsicle sticks if desired.
- Small Drill Bit (optional, for popsicle sticks): A very tiny drill bit (e.g., 1/16 inch) if you prefer to drill a clean hole in the popsicle stick instead of piercing.
Mastering the Basics: Core Earring Assembly Steps
Before we delve into specific designs, understanding the fundamental process of assembling dangle earrings will be incredibly helpful. These four simple steps form the backbone of almost all the projects we’ll undertake:
- Prepare Your Earring Topper: Start with a fish hook earring topper. These usually have a small loop at the bottom ready for attachment.
- Attach a Jump Ring: Using your needle-nosed pliers, carefully open a jump ring by twisting its ends sideways (never pull them apart, as this distorts the shape). Thread it through the bottom loop of the fish hook.
- Create Your Decorative Element: This is where your creativity shines! Design or prepare the main decorative part of your earring – whether it’s a pom pom, a bow, or a decorated popsicle stick.
- Connect and Secure: Once your decorative element is ready, attach it to the open jump ring. Use your pliers to securely close the jump ring, ensuring there are no gaps for your creation to slip through. Voila! You’ve completed an earring!
Remember, the metal findings (fish hooks and jump rings) come in various finishes like silver, gold, rose gold, and bronze, allowing you to further personalize your creations. Don’t be afraid to mix and match or choose a metal that best complements your chosen decorative elements.
Three Easy DIY Earring Styles to Try Today
Now, let’s apply those fundamental steps to create three distinct and adorable earring styles. I’ve received countless compliments on these designs, proving that unique style doesn’t have to be complicated!
Style 1: Playful Pom Pom Dangle Earrings
These lightweight and vibrant earrings are incredibly fun to make and wear. They add a whimsical touch to any outfit!
- Select Your Pom Poms: Choose two matching pom poms. You can opt for a single color, multiple colors, or even varying sizes for a layered look.
- Prepare for Attachment: If your pom poms don’t have an existing loop, you can either gently push a jump ring directly through the fluffy fibers or, for a more secure hold, thread a piece of strong embroidery floss or thin wire through the center of the pom pom, tie it into a small loop, and then attach the jump ring to this loop.
- Connect to Jump Ring: Open a jump ring with your needle-nosed pliers and thread it through the loop on your pom pom (or directly through the pom pom itself if secure enough).
- Attach to Fish Hook: Still with the jump ring open, thread it through the bottom loop of a fish hook earring topper.
- Secure: Close the jump ring tightly with your pliers. Repeat for the second earring.
Style 2: Charming Mini Bow Earrings
Elegant and sweet, mini bow earrings are perfect for adding a touch of feminine charm. These are quick to assemble and yield beautiful results.
- Choose Your Bows: Select two identical small bows. You can buy pre-made craft bows or easily tie your own using narrow ribbon. If making your own, ensure they are symmetrical.
- Prepare for Attachment: Apply a tiny dab of strong craft glue to the back center of each bow to reinforce its shape and prevent fraying, if applicable. Let it dry completely.
- Connect to Jump Ring: Gently pierce a small hole through the back top center of each bow (where the knot is usually located) or find a natural gap. Open a jump ring and thread it through this hole or gap. Ensure the bow faces forward once attached.
- Attach to Fish Hook: With the jump ring still open, slide it onto the bottom loop of a fish hook earring topper.
- Secure: Close the jump ring firmly with your pliers. Make the second earring following the same steps.
Style 3: Chic Washi Tape Popsicle Stick Earrings
This is perhaps the most surprising yet incredibly stylish option! Transforming simple mini popsicle sticks into unique accessories is a testament to the power of creative crafting.
- Prepare Popsicle Sticks: Take two mini popsicle sticks. You can leave them as is, or use scissors to trim the ends into different shapes (e.g., pointed, rounded, or angled) for extra flair. Ensure they are matching in size and shape.
- Decorate with Washi Tape: Choose your favorite washi tape. Carefully wrap the tape around each popsicle stick, ensuring smooth application and no air bubbles. Trim any excess tape neatly. You can cover the entire stick, create stripes, or use multiple patterns. For added durability, you might apply a thin coat of clear craft sealant (like Mod Podge) over the washi tape once it’s applied, though this is optional.
- Create a Hole for Attachment: This step requires precision. You can carefully pierce a small hole near one end of each decorated popsicle stick using the tip of your needle-nosed pliers, or for a cleaner hole, use a tiny drill bit (e.g., 1/16 inch) and a hand drill. Ensure the hole is large enough for a jump ring but not so large that it weakens the stick. Make sure the hole is centered and at the desired top of the earring.
- Connect to Jump Ring: Open a jump ring and thread it through the hole you just created in the popsicle stick.
- Attach to Fish Hook: With the jump ring still open, hook it onto the bottom loop of a fish hook earring topper.
- Secure: Close the jump ring firmly. Repeat for the second earring.
Watch the Earring Tutorial Video
Sometimes, seeing the process in action makes all the difference! To provide an even clearer understanding of these steps and techniques, especially how to properly handle the tools and findings, please watch the comprehensive video tutorial below. It will visually guide you through each stage of making these beautiful DIY earrings.
Unleash Your Creativity: Advanced Customization Ideas
The beauty of DIY earrings lies in the boundless opportunities for customization. Once you’ve mastered the basic assembly, you can let your imagination run wild with these ideas:
- Pom Pom Variations:
- Layered Look: String several pom poms of different sizes or colors together on a single jump ring for a dramatic, tiered effect. Consider an ombre gradient or a vibrant rainbow.
- Mixed Textures: Combine pom poms with small beads, tassels, or even small charms for added interest.
- Fringe Fun: Attach small lengths of embroidery floss or yarn directly to the jump ring for a fringed pom pom earring.
- Bow Embellishments:
- Double the Bows: Add a second, slightly smaller bow cascading from the bottom of the first using an additional jump ring.
- Charm Accent: Attach a tiny charm (like a star, heart, or initial) to the center or bottom of your bow.
- Fabric Focus: Experiment with bows made from different fabrics like velvet, satin, lace, or even faux leather for varied textures and looks.
- Popsicle Stick Artistry:
- Glitter Galore: After applying washi tape, add a layer of Mod Podge and sprinkle glitter for a dazzling effect. Seal with another layer of Mod Podge or a clear sealant.
- Painted Masterpieces: Instead of washi tape, paint your popsicle sticks with acrylic paints. Experiment with solid colors, stripes, geometric patterns, or even miniature landscapes.
- Embroidery Floss Wrap: Wrap colorful embroidery floss tightly around the popsicle sticks, creating unique patterns and textures. Secure the ends with a tiny dot of glue.
- Decoupage Delights: Cut out small images from magazines, tissue paper, or specialized craft paper and adhere them to your popsicle sticks using decoupage glue.
- Wood Burning: For the more adventurous crafter, a wood-burning tool can add intricate designs or personalized monograms to plain popsicle sticks (exercise caution and follow safety guidelines).
- Mixing Metals & Materials: Don’t be afraid to combine silver findings with gold accents, or natural wooden beads with synthetic pom poms. The contrast often creates the most striking pieces.
- Beyond Dangles: While this tutorial focuses on dangle earrings, many of these decorative elements can be adapted for stud earrings or even necklace pendants.
The true magic of DIY jewelry making is that there are no strict rules. Feel free to mix and match elements from different styles, invent new combinations, and truly make each pair a reflection of your evolving creativity.
Tips for Successful Earring Making
- Organize Your Workspace: Keep your supplies neatly arranged. Small compartment boxes are great for jump rings, beads, and other tiny findings.
- Patience is Key: Especially when working with small components or intricate designs, take your time. Rushing can lead to frustration or mistakes.
- Practice with Pliers: Get comfortable opening and closing jump rings with your needle-nosed pliers. A good closure ensures your earrings won’t fall apart.
- Start Simple: If you’re new to jewelry making, begin with the most straightforward designs before moving on to more complex embellishments.
- Quality Materials Matter: While DIY is budget-friendly, investing in decent quality findings (like hypoallergenic fish hooks if you have sensitive ears) will ensure your earrings are comfortable and durable.
- Experiment Fearlessly: Don’t be afraid to try new combinations of colors, materials, and techniques. Some of the most stunning designs come from unexpected experiments!
Craft Your Own Custom Earrings: Your Journey Begins!
From the whimsical charm of pom pom earrings to the understated elegance of mini bows and the surprising sophistication of popsicle stick creations, the world of DIY earrings is rich with possibilities. We hope this comprehensive guide has not only shown you how easy it is to make your own unique accessories but also ignited a passion for handmade jewelry. Imagine the satisfaction of telling someone, “Thanks, I made them myself!”
So, gather your supplies, find a comfortable spot, and let your creativity flow. Whether you’re crafting for yourself, for gifts, or simply for the joy of making, these projects are sure to bring a smile to your face. We encourage you to share your beautiful creations! If you make a pair of earrings inspired by this tutorial, please send us a picture, and we’d love to feature your artistic endeavors on our social media platforms. Happy crafting!







