
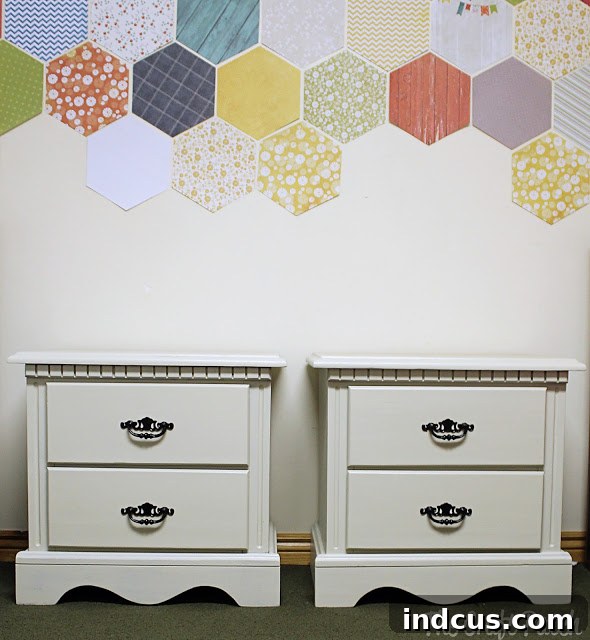
The exciting journey of transforming our home continues, with a particular focus on giving neglected spaces a new lease on life. My latest endeavor has centered on revitalizing the kiddos’ bedroom – a shared sanctuary for both my son and daughter. This presented a delightful challenge: crafting a decorating scheme that is perfectly gender-neutral, charming for both, and incredibly functional. The immediate culprits screaming for attention were two incredibly sad, ratty veneer nightstands. Honestly, their condition was beyond repair in my eyes – bubbling veneer, a horribly ultra-shiny yet peeling finish, and an overall appearance that was, frankly, an eyesore. I still kick myself for not capturing their “before” state; they truly were that nasty!
My initial vision was clear: a fresh coat of paint. I had stumbled upon a fantastic deal at the Habitat for Humanity ReStore – a creamy-colored paint, purchased for just a quarter! That place is an absolute treasure, truly the thrifter’s equivalent of a Home Depot. Having heard countless praises about how chalk paint magically adheres to virtually any surface without the tedious process of sanding, I decided this was my golden opportunity. Following a simple homemade chalk paint recipe, I enthusiastically embarked on painting these tired pieces, brimming with optimism for their impending transformation.
Breathing New Life into Old Furniture: The Nightstand Makeover Begins
Every home has those pieces of furniture that have seen better days. For us, it was a pair of nightstands in the kids’ room, desperately clinging to their past glory. They were not just old; they were a testament to wear and tear, showcasing the common issues associated with veneer furniture over time. The bubbling veneer hinted at moisture damage or adhesive failure, while the peeling, shiny finish screamed for a modern update. The goal was not just to paint them, but to integrate them seamlessly into a bright, inviting, and, most importantly, gender-neutral bedroom aesthetic. This mission required creativity, a bit of elbow grease, and a willingness to learn along the way.
The allure of DIY projects, especially those involving furniture upcycling, often lies in the promise of transforming something ordinary into something extraordinary. This project was no different. The decision to use chalk paint was influenced by numerous online tutorials touting its ease of use and minimal preparation requirements. It seemed like the perfect solution for a busy parent tackling a home renovation project. The affordability of the paint, sourced from a local ReStore, also added to the appeal, proving that beautiful home decor doesn’t always have to come with a hefty price tag. It’s about vision, resourcefulness, and a willingness to get your hands dirty.
The Initial Transformation: A Glimpse of Potential
With brushes in hand and a fresh batch of homemade chalk paint, the nightstands began their journey towards rejuvenation. The creamy hue promised a soft, inviting touch, perfect for a child’s bedroom. Complementing this, I opted to spray paint the existing hardware a sleek black, anticipating a subtle yet impactful contrast that would elevate the overall look. The process itself was straightforward, or so it seemed, applying several thin coats of paint to achieve an even finish. The immediate visual improvement was undeniable, sparking a sense of accomplishment and excitement for the completed room. Here they are, already looking significantly better, offering a little sneak peek into the wider bedroom project underway:
The hardware transformation was equally satisfying. Old, tarnished handles often betray the age of a furniture piece. A quick spray paint job can dramatically alter their appearance, giving them a modern edge without the cost of new replacements. It’s a simple trick that yields impressive results.
Before:
And after, a testament to the power of a simple, cost-effective update:
The Unforeseen Challenge: When DIY Doesn’t Go as Planned
Despite the visible improvements, the nightstands were not without their imperfections. The bubbling veneer, a persistent reminder of their past, still peeked through in certain areas. While the fresh coat of paint certainly softened its impact and made it less noticeable, it wasn’t completely eradicated. This is a common challenge when painting over damaged veneer; while paint can mask flaws, it rarely truly repairs them without more intensive prep work.
Initially, I was genuinely thrilled with the results. The nightstands looked so much better, injecting a fresh, clean aesthetic into the room. However, my excitement was short-lived. The crushing realization soon dawned upon me: chalk paint, for all its lauded versatility, is not a miracle worker. In my haste and eagerness to skip traditional prep work, I made a critical error. I should have taken the essential extra step of priming, especially given the slick, non-porous surface of the veneer. The paint, to my dismay, scratches off with just a fingernail! A truly dumb, dumb mistake, highlighting a common pitfall in DIY furniture painting.
My heart sank. I had visions of these nightstands looking beautiful for perhaps two days, if not less, under the daily rigors of a kids’ room. Doggone it! A significant craft fail, indeed. The question now looms large: What do I do? Is there a way to salvage these pieces, or are they destined for another round of despair? Uggh! This unexpected setback has turned a joyful DIY project into a perplexing problem, forcing a deeper dive into the nuances of furniture refinishing.
Understanding the Chalk Paint Conundrum: Why Prep Matters
The immediate disappointment of the scratching paint served as a harsh but valuable lesson. While chalk paint is indeed lauded for its excellent adhesion to many surfaces, it’s crucial to understand its limitations, especially when dealing with slick, non-porous materials like laminate or veneer that has a glossy finish. The “no sanding, no priming” rule isn’t universally applicable without potential consequences. Chalk paint, by nature, is porous and adheres best to surfaces it can slightly grip. On very smooth, sealed, or synthetic surfaces, a proper bonding primer is often the crucial bridge needed to create a strong, durable bond between the challenging surface and the paint layer.
My mistake was in overestimating the paint’s magical properties and underestimating the importance of surface preparation. Even with chalk paint, a thorough cleaning to remove grease and grime is paramount. For surfaces like the peeling, shiny veneer I was dealing with, a light scuff sand and a specialized bonding primer would have significantly improved adhesion and durability. This oversight led to a paint layer that sits *on* the surface rather than *bonding* with it, making it incredibly vulnerable to scratches and chips. It’s a common rookie error, often learned the hard way, but it underscores a fundamental principle of successful furniture refinishing: proper preparation is the foundation of a lasting finish.
Salvaging the Project: A Path Forward
Now, facing a DIY dilemma, the question isn’t just “What went wrong?” but more importantly, “How can I fix it?” There are several potential avenues to salvage these nightstands and ensure they withstand the playful chaos of a shared kids’ bedroom:
Option 1: The “Strip and Restart” Approach
This is often the most robust solution for poor paint adhesion. It would involve carefully removing the existing chalk paint. Depending on how easily it scratches off, this might be a relatively simple process of scraping or light sanding. Once the surface is clean and free of the poorly adhered paint, the critical steps would be:
- Surface Preparation: Lightly sand the veneer to create some “tooth” for the primer. Address any remaining bubbling veneer by carefully removing loose sections and using wood filler if necessary, then sanding smooth.
- Apply a Bonding Primer: This is the non-negotiable step. Use a high-quality bonding primer specifically designed for slick or difficult surfaces like laminate, veneer, or previously painted glossy surfaces. This primer creates a strong adhesive layer that the chalk paint can then truly grip onto.
- Repaint: Apply new coats of chalk paint over the properly primed surface.
- Seal with a Durable Topcoat: Once the paint is fully cured, apply a robust topcoat. For a kids’ room, a water-based polyurethane or a durable clear coat designed for high-traffic furniture would be ideal. Waxes, while popular with chalk paint, might not offer enough protection against daily wear and tear for this particular application.
Option 2: Attempt to Seal Over the Existing Paint (with caution)
This approach is riskier, as it attempts to “lock in” a poorly adhered paint layer. Applying a strong topcoat directly over the current scratching paint *might* provide some protection, but it won’t fix the underlying adhesion issue. If the paint is already peeling or chipping significantly, a topcoat might simply peel or chip along with it. This option is generally not recommended as a permanent fix for poor adhesion but might be a temporary band-aid if stripping isn’t an immediate option. If attempted, a tough, non-yellowing clear coat like a water-based polycrylic or polyurethane would be the best bet.
Option 3: Embrace and Enhance the “Distressed” Look
Given that the paint is already scratching, one could lean into this imperfection and intentionally distress the nightstands further. This involves strategically sanding or scraping areas to expose the underlying veneer, creating an aged, shabby-chic appearance. The crucial step *after* distressing is to apply a durable protective topcoat (as in Option 1) to seal in both the paint and the distressed areas, preventing further unintended chipping and ensuring the finish is stable. This might not be the pristine look I initially envisioned, but it could transform a “fail” into a charming, intentional design feature.
Option 4: Replace or Cover the Veneer Tops
For the bubbling veneer on the tops, if stripping and repainting isn’t enough, consider a more radical approach for just the tops. This could involve removing the damaged veneer entirely and applying new veneer, or even covering the tops with a durable material like contact paper designed for furniture, a custom-cut piece of laminate, or even a thin piece of wood or tempered glass. This would be a more involved process but would address the structural issue of the veneer itself.
Lessons Learned and the Future of DIY
This unexpected twist in my nightstand makeover project serves as a powerful reminder that DIY is often a journey of trial and error. Even with popular products like chalk paint, understanding the specific needs of your surface and material is paramount. The initial disappointment has quickly transformed into a valuable learning opportunity, reinforcing the importance of proper preparation, even when a product promises to bypass it.
The mission to create a beautiful, functional, and gender-neutral shared bedroom for my children continues. While these nightstands have presented an unforeseen hurdle, the spirit of upcycling and creating something unique remains strong. The beauty of DIY lies not just in the finished product, but in the process of learning, problem-solving, and adapting when things don’t go exactly as planned. Now, the big question remains: which salvage strategy will bring these nightstands back from the brink of “craft fail” and into a state of lasting beauty? I’m eager to hear from fellow DIY enthusiasts and learn from your experiences. What would you do in my shoes? Share your tips and tricks for salvaging a challenging furniture painting project!







