
Transforming Thrift Store Finds: A Vintage-Inspired DIY Art Makeover for Your Home
There’s a unique thrill that comes with discovering a hidden treasure, especially when it’s tucked away in the aisles of a local thrift shop. This week, during a quick dash before school pickup, I experienced that exhilarating moment firsthand. With just a few minutes to spare, I decided to pop into a neighborhood thrift store, hoping to stumble upon something interesting. Little did I know, I’d walk out with an entire armful of exciting finds! It had been a while since I’d enjoyed such luck, and the excitement was palpable. While I’ll be sharing the other fantastic scores in upcoming posts, today, I’m thrilled to unveil one particular item that underwent a remarkable transformation.
Upon first glance, you might be thinking, “What exactly is so exciting about that?” And honestly, I wouldn’t blame you. It certainly wasn’t my personal aesthetic, nor was it particularly inspiring in its original state. This canvas likely graced the walls of that thrift store for quite some time, overlooked by countless shoppers. However, I saw beyond its dated design. Its generous size – a substantial 22″x28″ – and an unbeatable price tag of just 99 cents immediately caught my attention. I was in search of a unique piece of art to complete the nursery, and this blank slate, despite its initial appearance, held immense potential. It was the perfect candidate for a creative DIY art makeover, ready to be reinvented into something truly special.
Conceiving the Vision: From Drab Canvas to Dream Decor
The first step in any successful DIY project is envisioning the end result. After a thorough cleaning, my initial move was to apply a solid base coat, opting for a sophisticated grayish-tan hue that would provide a neutral and elegant foundation for my design. This color choice wasn’t arbitrary; it was carefully selected to complement the existing color palette of the nursery, ensuring a cohesive and harmonious aesthetic once the project was complete.
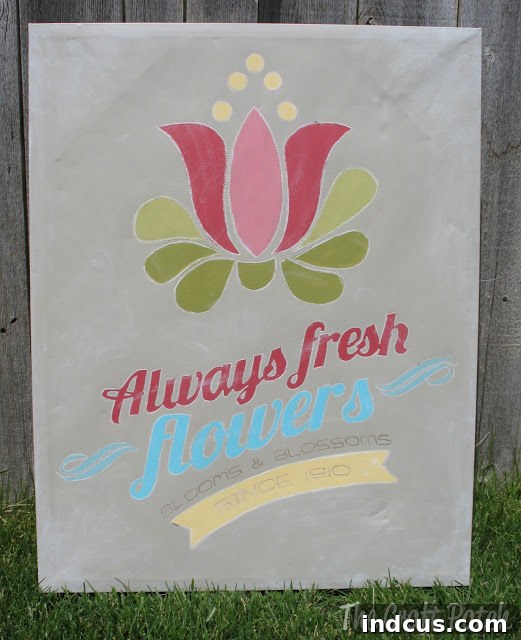
With the canvas prepped, my mind turned to the design. I decided to create a vintage poster-inspired flower shop advertisement. This concept resonated deeply with my love for classic typography, nostalgic aesthetics, and the charming simplicity of old-world signage. The idea was to infuse the nursery with a touch of timeless elegance and whimsical charm. I meticulously crafted the graphics in Photoshop, paying close attention to font choices, layout, and illustrative details that would evoke the feeling of a quaint, bustling flower market from yesteryear. Once satisfied with the digital design, I printed it out true-to-size, often requiring several sheets of paper to accommodate the large scale, and carefully taped them together to form my complete, life-sized template.
The Magic of Image Transfer: A Simple Yet Effective Technique
Now for the truly brilliant part – transferring the intricate design onto the canvas. This technique is a game-changer for anyone wanting to replicate detailed graphics without freehand drawing skills. My chosen method involves a simple household item: pastel chalk. I began by rubbing the entire back side of my printed graphic template with brown pastel chalk. The key here is to achieve an even, generous coating of chalk over all the areas where the design lines exist. This creates a transferable layer that will pick up your tracing efforts.
Once the back of the paper was sufficiently coated, I carefully positioned the template onto the prepared canvas, chalk-side down. It’s crucial to ensure the paper is firmly in place and won’t shift during the tracing process. With the printed side facing up, I took a sharp pencil and meticulously traced over every single line of my design. Applying steady, even pressure is important, as this pressure transfers the chalk from the back of the paper onto the canvas, creating a crisp outline. This process requires patience, but the results are incredibly rewarding.
And there it was: perfectly detailed outlines awaiting their splash of color! This image transfer technique truly delivered, providing clean and precise lines that would have been challenging to achieve by freehand. A crucial tip I learned is to choose a chalk color that you don’t mind seeing subtle hints of in your final piece, as some residual chalk might show through, particularly if you’re using lighter paint colors. For this project, the brown chalk blended seamlessly with the overall vintage aesthetic, adding to its authentic charm. This method is incredibly versatile and can be used for various DIY art projects, making complex designs accessible to everyone.
Bringing the Art to Life: Painting and Final Touches
With the outlines perfectly in place, the exciting phase of filling in the shapes began. I used a selection of craft paints, carefully choosing colors that aligned with the vintage flower shop theme while also complementing the nursery’s existing decor. Craft paints are excellent for this type of project due to their affordability, quick drying time, and wide range of available colors. I meticulously filled in each section, taking my time to ensure clean edges and even coverage. Layering colors and allowing each layer to dry thoroughly helps to create a professional finish.
To add that extra bit of oomph and make the design truly pop, I went back over all the outlines with white pastel chalk. This subtle yet impactful step created a soft, almost glowing edge around each element, giving the impression of an authentic, hand-painted sign. The white chalk provided a beautiful contrast against the painted sections and the grayish-tan background, enhancing the vintage appeal and adding depth to the artwork. This detailing stage is where the personality of the piece truly emerged, elevating it from a simple design to a captivating focal point.
Comparing it to the original, wouldn’t you agree the transformation is absolutely remarkable?! The journey from a discarded, unloved canvas to a vibrant, personalized piece of art is incredibly satisfying.
I am absolutely delighted with how this project turned out. I’ve always had a soft spot for vintage posters, and this piece perfectly captures that nostalgic vibe while effortlessly tying together all the delicate colors used throughout the nursery. That’s the true beauty and joy of DIY projects – the ability to bring your precise vision to life, creating something that perfectly matches your style and needs, something you simply can’t find off the shelf. This personalized artwork not only fills a space but also tells a story, making the nursery feel even more unique and heartfelt.
Tips for Your Own Thrift Store Art Upcycle Adventure
Inspired to embark on your own art transformation? Here are some essential tips to guide your journey:
- See Beyond the Surface: When browsing thrift stores, look past ugly frames or outdated images. Focus on the size, quality of the canvas or backing, and potential for repurposing. A sturdy frame or a good quality canvas is a goldmine, even if the existing art is terrible.
- Consider the Canvas Condition: Check for tears, significant dents, or severe warping. Small imperfections can often be fixed or painted over, but major damage might not be worth the effort.
- Brainstorm Your Vision: Before you even buy, consider what kind of art your home needs. Is it for a nursery, living room, or a kitchen nook? This will help you narrow down your search for suitable canvases and guide your design choices.
- Gather Your Tools: For a project like this, you’ll need:
- Acrylic craft paints in your chosen colors
- Paintbrushes of various sizes
- A base coat paint (e.g., house paint sample or gesso)
- Pastel chalk (the color you won’t mind seeing)
- A pencil for tracing
- A printed graphic (Photoshop, Canva, or a simple stencil)
- Painter’s tape or masking tape
- A clear sealer (optional, for durability)
- Embrace Imperfections: Part of the charm of DIY and upcycling is the unique, handmade quality. Don’t strive for machine-like perfection; a little character adds to the appeal.
- Patience is Key: Rushing through steps like base coat drying or chalk application can lead to a less-than-stellar outcome. Take your time, enjoy the process, and let each layer set properly.
- Budget-Friendly Decor: This method is incredibly cost-effective. Turning a 99-cent canvas into a custom piece of art is a testament to how far a small budget and a lot of creativity can go in personalizing your living space.
Beyond the Nursery: Applying Your New Skills
The image transfer technique and creative upcycling skills demonstrated here are not limited to nursery decor. Imagine transforming an old map into a personalized travel poster for your living room, or turning a bland piece of art into a charming kitchen sign. You could create unique gifts for friends and family, or even start a small side hustle selling your refreshed art pieces. The possibilities are truly endless once you understand how to harness the potential of a forgotten item and infuse it with new life and personal style.
On a final note, the grand nursery reveal is just around the corner! With only a few minor projects left to complete – including the crucial task of locating that elusive bag of screws to reassemble the crib – the dream space will soon be ready to share. This vintage flower market art piece will undoubtedly be one of its proudest adornments. So, go forth, explore your local thrift stores, and unleash your inner artist. You might be surprised at the incredible transformations you can achieve with a little vision and a lot of heart!







