
Stunning Armoire Makeover: Transforming a $5 Yard Sale Find into a Modern Masterpiece
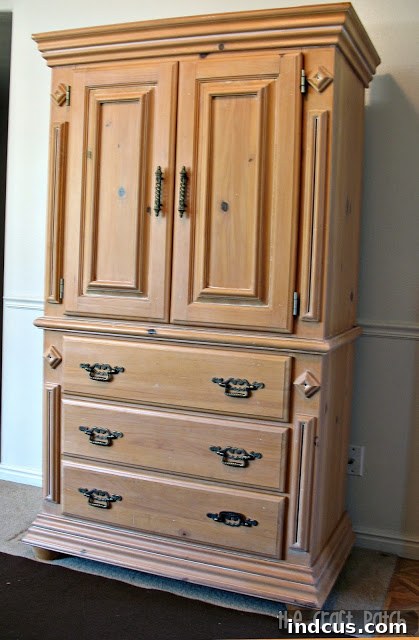
The excitement is almost unbearable – the long-awaited reveal of my latest furniture transformation project is finally here! This incredible armoire, a true diamond in the rough, has officially completed its journey from forgotten yard sale find to a cherished piece in my home. If you’ve been following along, you might remember its humble beginnings. For those new to the story, let’s take a trip down memory lane to see what it looked like when I first laid eyes on it, purchased for an unbelievable five dollars.
Indeed, it was a little worse for wear, undeniably sad, and certainly a product of a bygone era. The aesthetics were a challenge, but beneath the superficial layers of age and neglect, lay a crucial detail that sparked my vision: this piece was crafted from real, solid wood. In an age where particle board dominates, finding such quality for a mere $5 was nothing short of a miracle. That’s right, five whole dollars! This wasn’t just a purchase; it was an investment in potential, a testament to the power of upcycling and the incredible value hidden in pre-loved items.
Unlocking Potential: My Vision for a Modern Transformation
My goal for this armoire was clear: to strip away its dated elements and infuse it with a fresh, contemporary aesthetic that would seamlessly integrate into my living room. The first step in this revitalization involved a critical assessment of its existing features. The side panels featured decorative trim that felt heavy and old-fashioned. Removing this trim was paramount to achieving the sleek lines I envisioned. Once the trim was carefully detached, I meticulously patched any resulting holes, ensuring a smooth, uniform surface that would be ready for its new finish.
Beyond structural changes, the hardware played a pivotal role in dictating the armoire’s character. The original pulls were outdated and contributed significantly to its old-world charm, which was precisely what I wanted to move away from. Replacing them with modern, minimalist handles was a non-negotiable part of the plan. And finally, the color—a crisp, clean coat of white paint—was chosen to brighten the piece, make it feel more expansive, and provide a versatile foundation that would complement any decor style. With these strategic changes, I knew this armoire was destined for greatness.
The Transformation Journey: From Grungy to Gorgeous
The journey to transform this dated armoire into a modern showstopper was an exercise in patience and precision. Every step, from the initial cleaning to the final coat of paint, was executed with the vision of a sophisticated, updated piece in mind. Here’s a closer look at the key stages of this exciting DIY project:
- Preparation is Key: Before any major changes could take place, the armoire underwent a thorough cleaning to remove years of dust and grime. While not explicitly detailed in every makeover, a light sanding is often crucial to create a surface that paint can adhere to effectively. This ensures a durable and professional-looking finish.
- Stripping Away the Old: The decorative trim on the side panels was carefully removed. This process required a gentle touch to avoid damaging the underlying wood. The aim was to simplify the silhouette of the armoire, allowing its beautiful wooden structure to shine through in a more contemporary form.
- Seamless Patching: After removing the trim, small holes and imperfections were inevitable. High-quality wood filler was applied to these areas, carefully smoothed, and then sanded down once dry. This step is vital for achieving that coveted smooth, flawless surface that defines a high-end furniture finish.
- The Power of White Paint: Choosing white paint was a deliberate decision to infuse the armoire with a sense of brightness, modernity, and airiness. Multiple thin coats were applied, allowing adequate drying time between each. This layered approach prevents drips and ensures an even, opaque finish that truly transforms the piece, making it feel lighter and more spacious in any room. The meticulous painting process is what truly brought the armoire back to life, giving it a second chance at elegance.
- Hardware Upgrade: Perhaps one of the most impactful changes was the replacement of the old hardware. The original pulls were swapped for sleek, modern handles that instantly elevated the armoire’s style quotient. This small detail made a huge difference, completing the contemporary look.
And now, after all that hard work and meticulous attention to detail, she stands proudly in all her revitalized glory, a testament to the power of imagination and a little elbow grease:
The Details That Make the Difference: Modern Handles on a Budget
A key element in achieving this armoire’s stunning new look is undoubtedly the sleek, modern handles. They are clean, understated, and perfectly complement the crisp white paint, adding a touch of contemporary sophistication without overpowering the piece. I absolutely adore how they complete the transformation, making the armoire feel like a brand-new, high-end purchase rather than a budget find.
And here’s another tip for budget-savvy DIY enthusiasts: these beautiful handles were an incredible find! A six-pack cost only $7 at Target. Yes, you read that right – seven dollars! This just goes to show that you don’t need to spend a fortune to achieve a high-impact upgrade. Smart shopping for hardware can drastically alter the perception of a furniture piece, providing an expensive look without the hefty price tag. It’s details like these that truly define a successful budget makeover, combining style with affordability.
A Dramatic Transformation: Before and After
As dedicated fans of furniture makeovers, we all appreciate the power of a good before and after comparison. It’s the clearest way to visualize the journey and the incredible potential hidden within old, discarded pieces. Seeing these transformations side-by-side truly highlights the dramatic shift in style and functionality that a little creativity and effort can achieve. Prepare to be amazed by this stunning reveal!
Your Next DIY Furniture Project: Tips for Success
Inspired to tackle your own furniture makeover? Here are some essential tips to guide you on your journey to transforming old pieces into new treasures:
- Seek Out Solid Wood: Always prioritize pieces made from real wood. While they might look dated, their inherent quality means they can withstand sanding, painting, and modifications much better than veneer or particle board furniture.
- Don’t Fear the Ugly Duckling: Some of the best finds are the ones nobody else sees potential in. Look past the scratches, the outdated finish, or the broken hardware. Focus on the bones of the piece – its shape, size, and material.
- Plan Your Vision: Before you start, have a clear idea of what you want the finished piece to look like. Gather inspiration from magazines, Pinterest, or other blogs. This will help you choose colors, hardware, and techniques.
- Prioritize Preparation: Cleaning, sanding, and priming are non-negotiable steps. A smooth, clean surface is crucial for a professional-looking paint job that lasts. Don’t rush this stage!
- Invest in Good Quality Paint and Tools: You don’t need the most expensive products, but a decent quality paint and good brushes or rollers will make a significant difference in the finish and ease of application.
- Budget for Hardware: As demonstrated with my Target handles, new hardware can dramatically change the look of a piece. Set aside a small portion of your budget for stylish pulls, knobs, or hinges.
- Patience is a Virtue: DIY furniture makeovers often require multiple coats of paint and sufficient drying time. Rushing the process can lead to a less-than-perfect finish. Embrace the journey!
What’s Next for Our Home: A Living Room Reveal on the Horizon
With this incredible armoire project now triumphantly completed, it feels like a huge weight has been lifted and a significant step forward has been made in refreshing our living space. This piece now stands as a proud focal point, adding both beauty and functionality to the room. But the work isn’t entirely done yet!
I have one more exciting project underway for the living room, a final touch that will pull the entire space together. Once that last piece is finished and perfectly in place, I’ll be absolutely thrilled to share the grand reveal of our complete living room with all of you. Get ready for a full tour showcasing how all these DIY efforts and thoughtful decor choices have come together to create a cohesive, comfortable, and stylish haven.







