Create an Engaging DIY Alphabet Matching Book with Iron-On Vinyl and Felt for Preschoolers
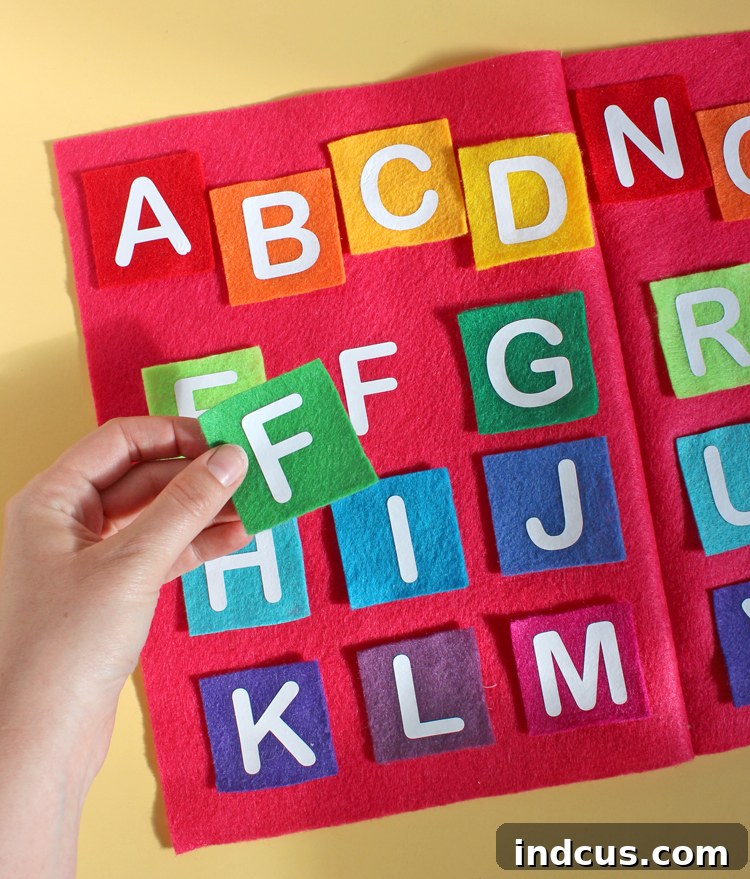
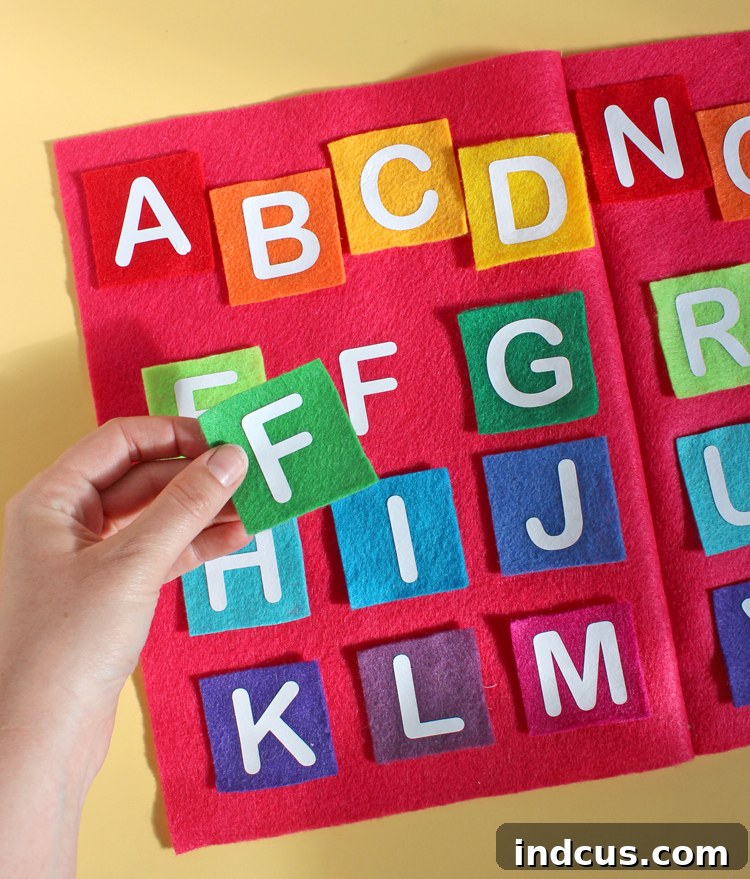
Are you searching for a vibrant, hands-on learning activity that will captivate your preschooler? Look no further! This delightful DIY alphabet matching book, crafted with soft felt and durable iron-on vinyl, is not just a project; it’s an educational adventure waiting to unfold. It’s an incredibly fun and colorful craft project that has become an absolute sensation in my home, proving to be a fantastic resource for early literacy development. The best part? It’s remarkably quick to assemble, and sewing is entirely optional, making it accessible for crafters of all skill levels. Whether you’re a parent, grandparent, or educator, you can easily create this cherished learning tool.
This interactive felt book is designed to help young children recognize letters, improve their fine motor skills, and foster a love for learning. By physically matching felt letter squares to their counterparts within the book, children engage multiple senses, enhancing memory and comprehension. This hands-on approach transcends traditional flashcards, offering a tactile and visual experience that makes learning the alphabet both effective and enjoyable. It’s a fantastic addition to any quiet time routine, travel bag, or homeschooling curriculum.
A special thank you to Expressions Vinyl for generously sponsoring this inspiring post. Please note that this article may contain affiliate links, which means I may earn a small commission at no extra cost to you if you make a purchase through them. These commissions help support the creation of more valuable content like this.
The ingenuity of this alphabet matching game lies in its simple yet effective design. Shaped like a charming book, it features individual felt letter squares that your child can effortlessly pick up and place onto the corresponding letters printed inside the book. This process not only reinforces letter recognition but also refines crucial hand-eye coordination and fine motor skills. The soft texture of the felt provides a gentle sensory experience, making each interaction pleasant and stimulating for little hands.
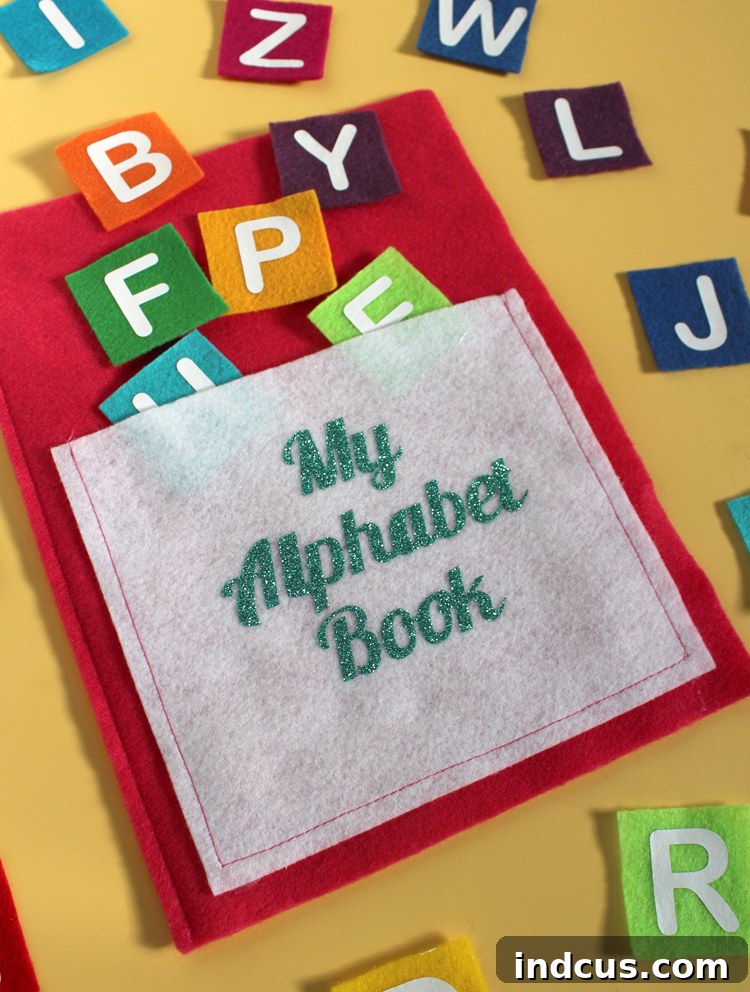
One of the most practical features of this DIY quiet book is its integrated storage solution. The front cover thoughtfully incorporates a convenient pocket, perfect for keeping all the individual letter squares neatly organized and contained. This eliminates the worry of lost pieces and encourages children to tidy up after playtime, fostering a sense of responsibility. The pocket also adds a delightful element of surprise and discovery each time they reach in to pull out a new letter to match.
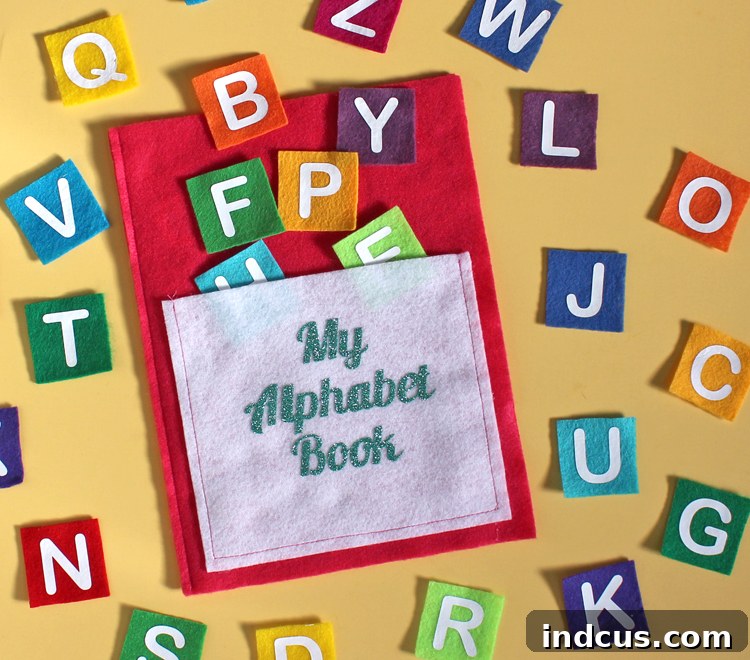
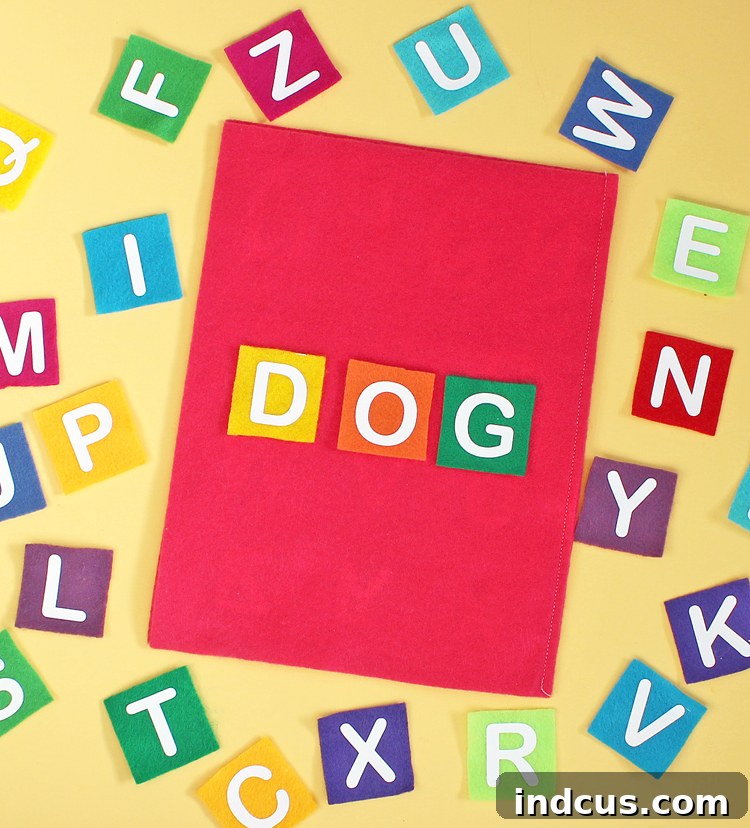
Beyond letter recognition, this alphabet activity book also offers a fantastic opportunity for early word building. The blank back page serves as an ideal canvas where your child can practice arranging the felt letters to form simple words. This encourages foundational phonics skills, imaginative play, and creative thinking, transforming the book into a versatile learning tool that grows with your child’s developing abilities. It’s a wonderful space for them to experiment with sounds and letter combinations, sparking their curiosity about language.
Isn’t it amazing how much learning can be packed into one adorable, handmade item? This project is truly a labor of love that yields significant educational rewards. Now that you’re excited about the possibilities, let me guide you through each step of the creation process. You’ll be surprised at how simple it is to bring this innovative educational toy to life, even if you’re new to crafting with heat transfer vinyl or felt. Let’s gather our supplies and start making a memorable learning experience for the little ones in your life!
Essential Materials for Your DIY Alphabet Activity Book
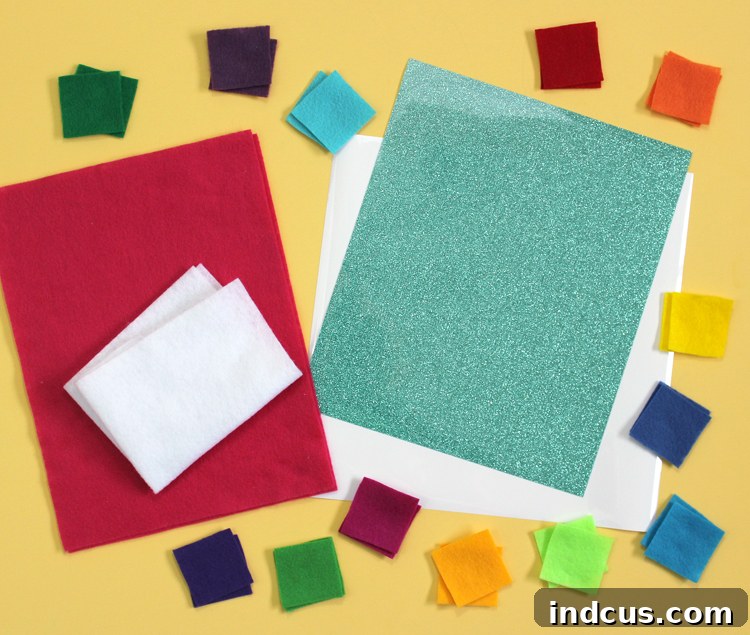
Before we embark on this exciting crafting journey, let’s ensure you have all the necessary supplies. Gathering everything beforehand will make the process smooth and enjoyable. Each material has been chosen for its durability, child-friendliness, and ease of use, ensuring your finished book is both long-lasting and effective.
- White Easy Weed Heat Transfer Vinyl (HTV): This is crucial for creating crisp, clear letters that will adhere beautifully to your felt. EasyWeed is known for its ease of cutting, weeding, and application, making it ideal for detailed designs like alphabet letters. You’ll need enough to cut two full sets of the alphabet.
- Glitter Heat Transfer Vinyl: A touch of sparkle for the book’s cover adds a captivating element. Glitter HTV is perfect for personalizing the front pocket with a title or your child’s name, making the book even more special and inviting.
- Two Matching Felt Sheets (approximately 9″ x 12″ each): These will form the main pages of your alphabet book. Choose colors that are vibrant and appealing to children. Felt is wonderfully soft, durable, and provides a perfect base for the HTV.
- One White Felt Scrap (approximately 6″ x 7″): This piece will be used to create the front pocket of your book, providing a contrasting background for your glitter vinyl design and a practical storage solution.
- Twenty-Six Felt Pieces Cut into 2″ x 2″ Squares: These will be your individual, movable letter tiles. Using a variety of bright colors for these squares will make the activity visually stimulating and help children differentiate between letters. Ensure your cuts are precise for a neat finish.
- A Silhouette or Cricut Cutting Machine: While not listed in the original, this is essential for precisely cutting the heat transfer vinyl. If you don’t have one, you might consider pre-cut iron-on letters, though customization will be limited.
- Iron or Heat Press: For applying the heat transfer vinyl securely to the felt.
- Teflon Sheet or Parchment Paper: To protect your iron and felt during the heat application process.
- Weeding Tool: Essential for removing excess vinyl after cutting.
- Fabric Glue or Hot Glue Gun (with glue sticks): For assembling the book pages and attaching the pocket, especially if you opt out of sewing.
- (Optional) Sewing Machine and Thread: For a more durable and professionally finished book binding and pocket edges.
Step 1: Designing and Cutting Your Alphabet Letters with Precision
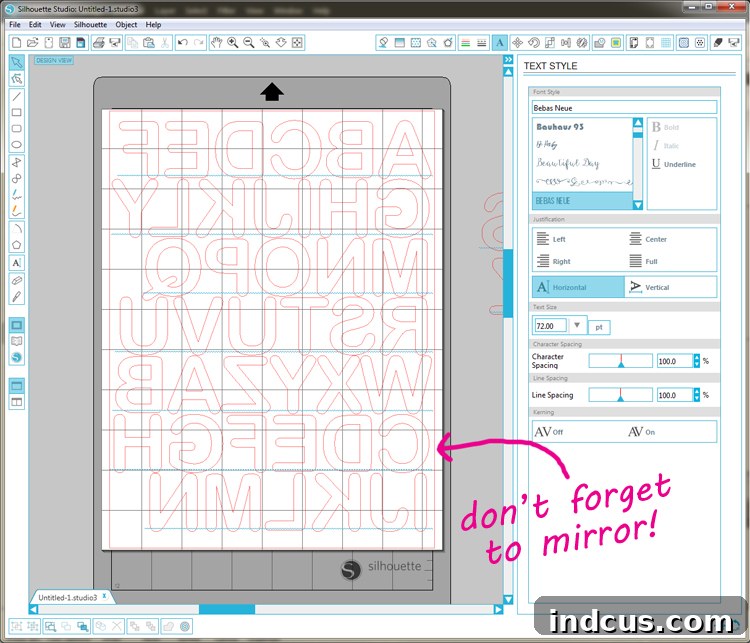
The first crucial step involves preparing your letter designs using a digital cutting machine software, such as Silhouette Design Studio or Cricut Design Space. Open your chosen software and select a clear, easy-to-read font suitable for young children. Type out the entire alphabet, from A to Z. Since you’ll need two sets of each letter – one for the movable felt squares and one for the book’s pages – duplicate your entire alphabet design. Carefully size each letter to fit comfortably within a two-inch square. A helpful hint here is to always double-check the width of the letter ‘W’, as it is typically the widest character and ensures consistency across all letters. Once sized, a critical step for heat transfer vinyl is to MIRROR all your letters. This reverses the image so that when it’s applied, it reads correctly. Finally, adjust your cut settings specifically for heat transfer vinyl. This usually involves a specific blade depth, force, and speed to achieve a clean cut without damaging the carrier sheet. Load your EasyWeed Heat Transfer Vinyl into your Silhouette or Cricut machine with the shiny side facing down, as this is the carrier sheet that protects your design. Then, let your machine work its magic, cutting out all your precise alphabet letters!
Step 2: Expertly Weeding Your Vinyl Designs for Flawless Letters
Once your cutting machine has completed its task, it’s time for the weeding process. This involves carefully removing all the excess vinyl that is not part of your letter designs. Using a weeding tool, gently lift and peel away the vinyl surrounding your mirrored letters, as well as any small inner pieces (like the centers of ‘A’, ‘B’, ‘D’, ‘O’, ‘P’, ‘Q’, ‘R’, etc.). The goal is to leave only your perfectly cut letters adhered to the clear, sticky backing paper. Take your time with this step, especially with intricate letters, to ensure clean edges and avoid accidentally peeling off parts of your design. Proper weeding ensures that your final iron-on letters will look crisp and professional on the felt. This meticulous removal process is vital for the overall aesthetic of your DIY alphabet book.

Your weeded vinyl designs should now clearly display each letter, perfectly reversed, on the transparent carrier sheet. They should appear something like this, ready for the next stage of preparation:
Step 3: Preparing Individual Letters for Application
With all your letters successfully weeded, the next step is to prepare them for individual transfer. Carefully cut apart each letter, ensuring you leave a small border of the clear backing paper around each one. This makes handling easier and prevents accidental overlapping or heat damage to adjacent letters during the ironing process. Precise cutting here will streamline your workflow in the subsequent steps, allowing for neat and accurate placement of each letter onto the felt pieces.
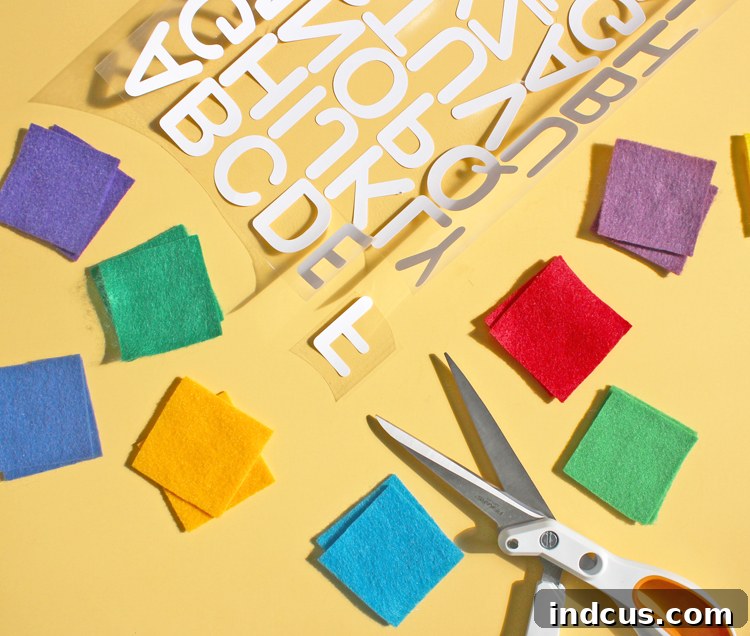
Step 4: Creating Your Movable Felt Letter Squares
Now you have two complete sets of alphabet letters. Take one set and set it aside for later use with the main book pages. With the other set, you will begin creating your individual, movable felt letter squares. Place one mirrored vinyl letter (still on its clear backing) onto the center of each of your pre-cut 2″ x 2″ felt squares. Arrange them carefully to ensure they are centered and straight. Once positioned, use a dry iron or heat press set to the recommended temperature for heat transfer vinyl (usually around 305°F/150°C). Apply firm, even pressure for about 10-15 seconds. Make sure to use a Teflon sheet or parchment paper between your iron and the clear carrier sheet to protect the vinyl and the felt from direct heat. This step permanently bonds the vinyl to the felt, creating durable and vibrant letter tiles for your child to manipulate.
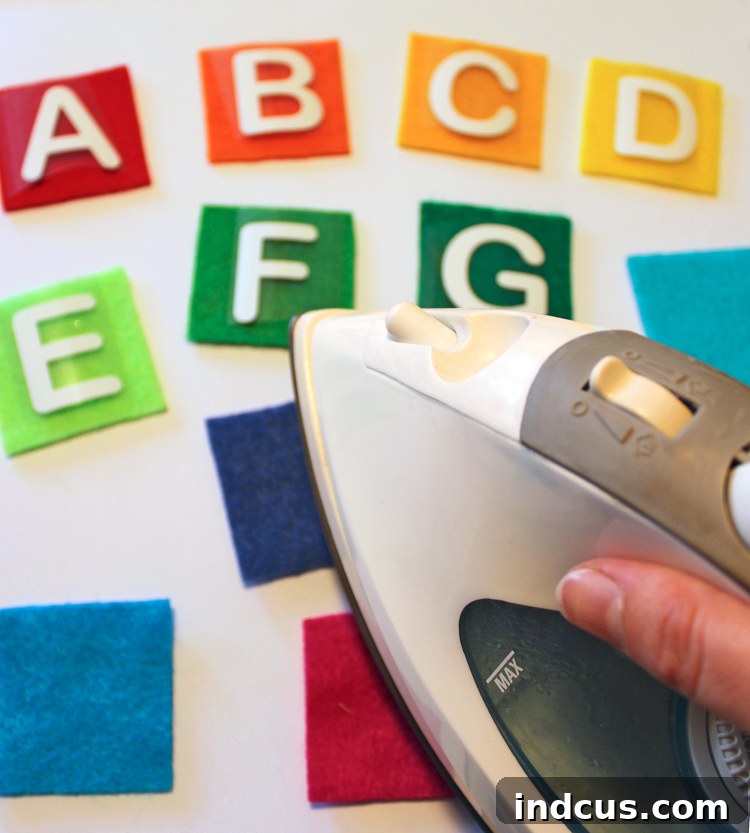
Step 5: Revealing Your Perfectly Transferred Letters
After applying heat and pressure, allow the felt squares to cool slightly. Depending on your specific heat transfer vinyl, you may be able to perform a “warm peel” or you might need a “cold peel.” Gently and slowly peel away the clear backing paper from each felt square. If the vinyl lifts with the backing, replace the paper and reapply heat for a few more seconds. When done correctly, the vinyl letters should be securely and smoothly adhered to the felt, leaving behind a crisp, professional-looking letter. This moment is always satisfying, seeing your designs come to life!
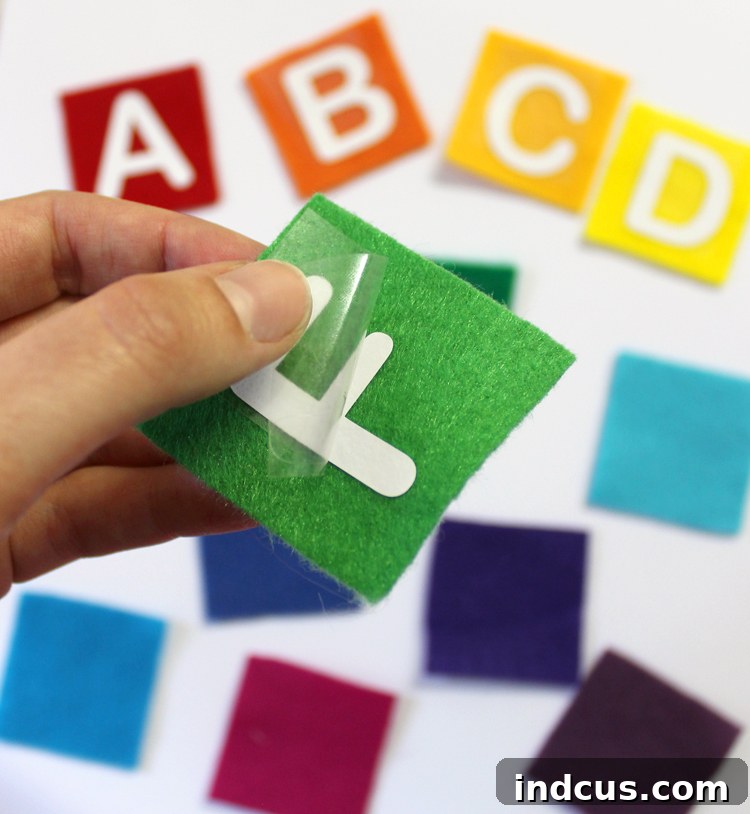
Step 6: Preparing the Main Book Pages with Letter Outlines
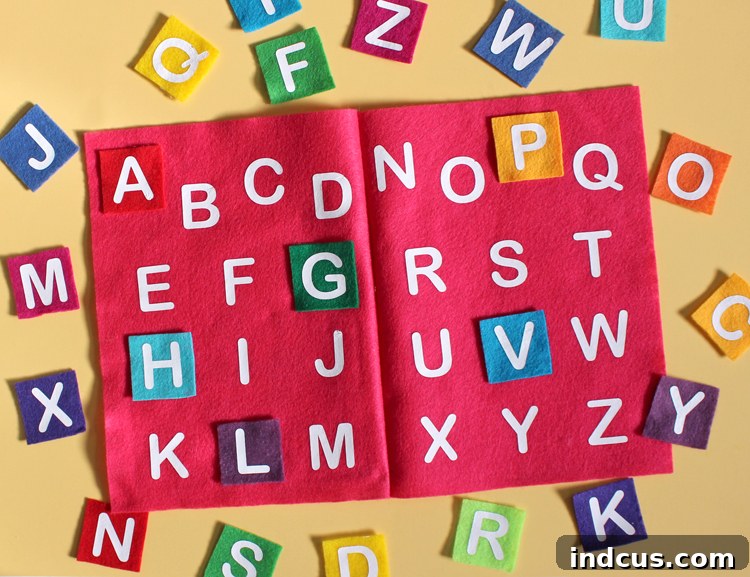
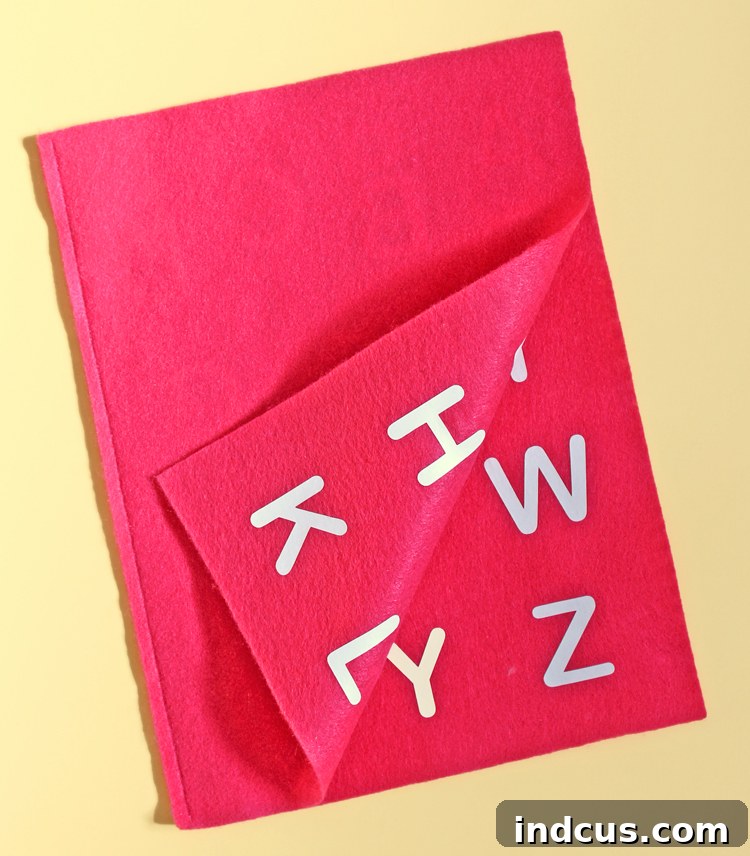
Now, take the remaining set of weeded alphabet letters (still on their clear backing) and your two full-sized felt sheets (approximately 9″ x 12″). Arrange the letters logically onto these felt sheets, creating the ‘pages’ of your book. You might place A-M on one sheet and N-Z on the other, or arrange them in rows of six or seven letters. Ensure there is enough space between each letter for children to easily match their felt squares without crowding. Once you are happy with the arrangement, iron each letter onto the felt sheets using the same heat and pressure technique as in Step 4. Remember to use a protective sheet. This step creates the stationary letter outlines within the book that your child will match the movable felt squares to, forming the core interactive element of the learning activity.
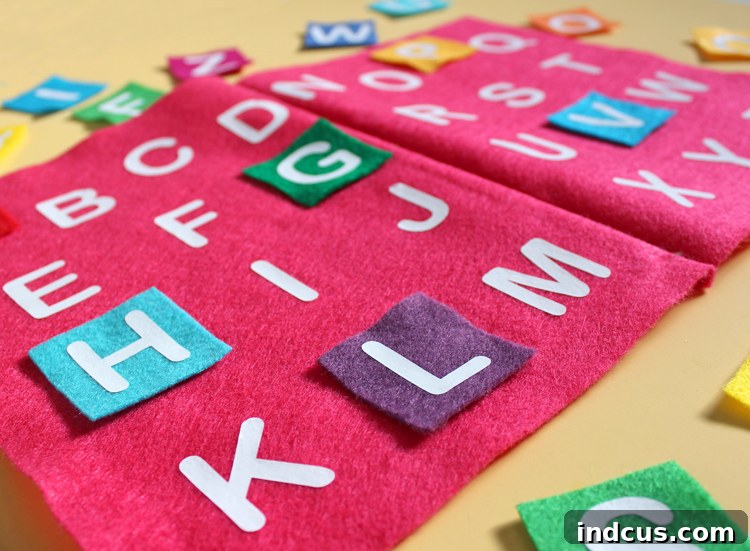
Step 7: Assembling the Book’s Structure
With both main felt sheets now adorned with letters, it’s time to assemble your book. Carefully sandwich the two sheets together, ensuring the lettered sides are facing each other (or arranged as you envision the open book). Align the edges perfectly. To create the book’s spine, you have two excellent options. For a sturdy and lasting finish, sew one of the longer edges together with your sewing machine. Use a straight stitch close to the edge. If you prefer a no-sew approach, or if you’re “sew-a-phobic” as many crafters are, a hot glue gun works wonderfully. Apply a thin, even bead of hot glue along one of the longer edges, pressing the two felt sheets together firmly until dry. Either method will create a durable and functional book binding, allowing the pages to open and close smoothly.
Step 8: Designing and Cutting Your Personalized Book Cover Title
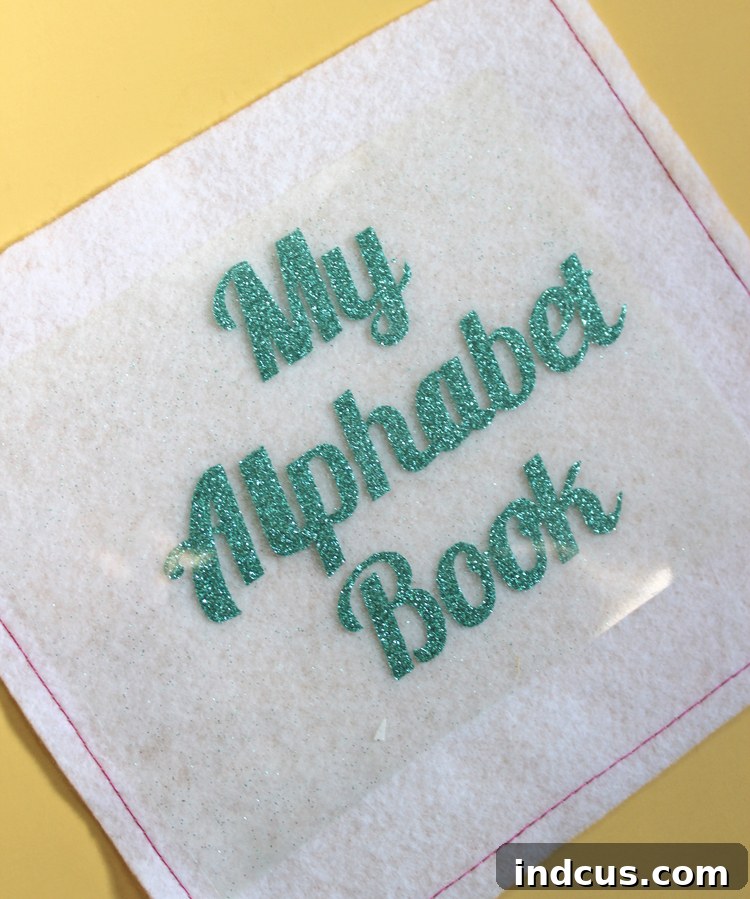
Now let’s add a personal touch to your book! Return to your Silhouette Design Studio or Cricut Design Space. This is where you’ll create the title for your book’s front pocket. I opted for “My Alphabet Book,” a simple and direct title, but this is a fantastic opportunity to customize the book. Consider adding your child’s name, such as “Emily’s Alphabet Adventure” or “Liam’s Letter Learning.” If you choose a cursive or script font for a more elegant look, remember to use the “weld” function in your design software. This combines overlapping letters into a single, continuous cut, preventing individual cuts within the cursive text. Crucially, as with all heat transfer vinyl, DON’T FORGET TO MIRROR YOUR IMAGE! Failing to mirror will result in backward text when applied. When using glitter heat transfer vinyl, specific cut settings are often required due to its thicker, textured nature. A good starting point for Silhouette machines is typically BLADE: 4, SPEED: 4, THICKNESS: 18, but it’s always wise to perform a test cut on a scrap piece of glitter vinyl first. Load your glitter heat transfer vinyl into the machine with the shiny side down (again, this is the carrier sheet), and then proceed to cut out your customized design.
Step 9: Crafting and Embellishing the Front Pocket
Once your glitter vinyl design is cut and weeded, it’s time to prepare the pocket piece. Take your white felt scrap, approximately 6″ x 7″, and if desired, trim the top edge with decorative scissors for a playful touch. Center your glitter vinyl words onto the front of this felt pocket piece. Iron the glitter words onto the felt using the recommended heat settings for glitter HTV, ensuring firm pressure and a protective sheet. Glitter vinyl often requires a bit more heat and pressure than standard HTV. After the vinyl is securely adhered and the backing is peeled away, you can add an optional decorative element. I chose to sew a neat line around the outer edges of my pocket, which adds a polished, finished look and extra durability. However, this sewing step is entirely optional; the pocket will function perfectly with just the ironed-on design.
Step 10: Securely Attaching the Functional Front Pocket
The final assembly step brings your alphabet book to life by adding the practical front pocket. Position your newly decorated felt pocket onto the front cover of your assembled book. To securely attach it while ensuring it remains a functional pocket, use a hot glue gun. Apply a thin but consistent bead of hot glue along the left, bottom, and right edges of the pocket. Be extremely careful and make sure you DO NOT apply any glue along the top edge of the pocket. If you glue the top, it will no longer be a pocket, just a decorative panel! Press the glued edges firmly onto the book cover and hold until the glue sets. This creates a secure pouch where your child can store all their movable felt letter squares, making the book neat, organized, and ready for countless hours of educational play.
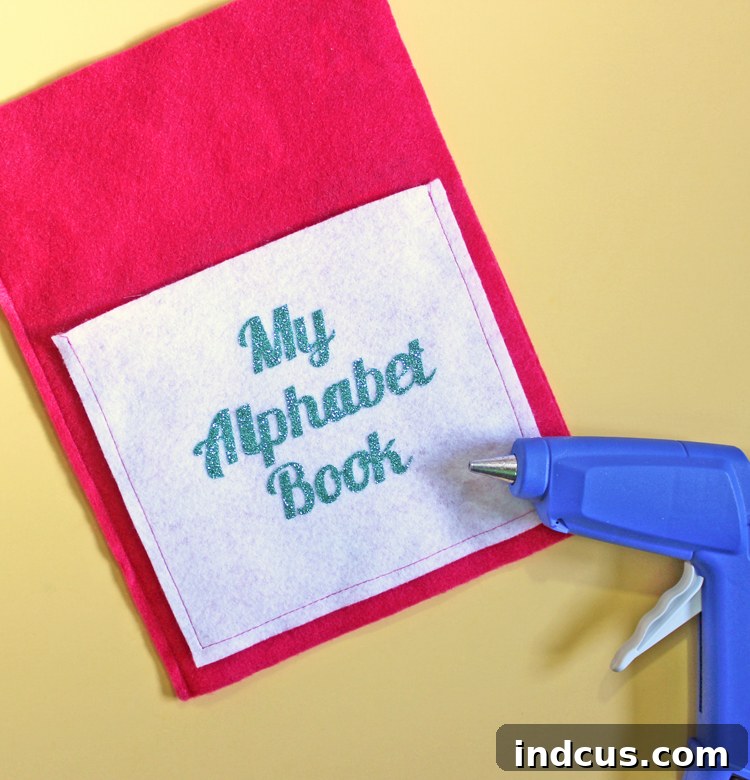
Congratulations! Your beautiful and educational DIY alphabet matching book is now complete and ready for action. You can now fill the front pocket with all of the colorful letter squares you created. This project is more than just a craft; it’s a valuable learning resource that offers hours of engaging and enriching play. Watch with joy as your preschooler explores the alphabet, builds confidence in letter recognition, and takes their first steps towards literacy, all thanks to your thoughtful handmade creation. Enjoy the priceless moments of learning and discovery this quiet book will bring!