
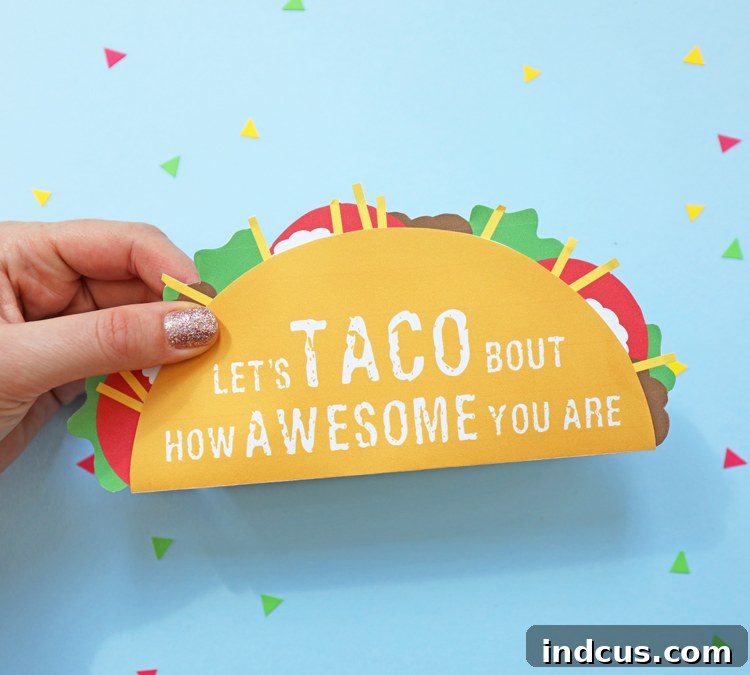
Free Printable Taco Gift Card Holder: A Creative Way to Give Money in Style
Finding the perfect gift can sometimes feel like a daunting task. You want to give something thoughtful, personal, and genuinely appreciated. Yet, for many recipients, especially those you might not know intimately or individuals who prefer flexibility, money or a gift card often emerges as the most practical and desired present. But who says practical has to be boring? Giving a gift card doesn’t have to be a dull transaction; it can be an opportunity to inject personality, humor, and a touch of handmade charm into your offering. This is where the magic of a creative gift card holder comes into play.
Imagine handing over a gift, and instead of a plain envelope, your loved one receives a whimsical taco that exclaims, “Let’s Taco ‘Bout How Awesome You Are!” That’s precisely the delightful experience this free printable taco gift card holder offers. It transforms a simple gift of money or a gift card into a memorable moment, proving that thoughtfulness isn’t just about the gift itself, but also about the presentation.
Why Choose a Taco-Themed Gift Card Holder?
The appeal of this unique taco card holder is multifaceted, making it an excellent choice for a variety of occasions and recipients:
- It’s Funny and Witty: The playful pun, “Let’s Taco ‘Bout How Awesome You Are!”, instantly brings a smile to anyone’s face. It’s a lighthearted way to show appreciation and celebrate someone special.
- It’s Unique and Memorable: Ditch the generic greeting cards and envelopes. A handmade taco holder stands out from the crowd, demonstrating extra effort and creativity. It’s not just a card; it’s a conversation starter.
- Who Doesn’t Love Tacos?!: Tacos are universally loved! This theme taps into a joyous and relatable food culture, bringing a sense of fun and approachability to your gift.
- Versatile for Any Occasion: Whether you’re searching for a standout graduation gift, a charming teacher appreciation gift, a quirky birthday gift for a teenager, or even a delightful surprise for a friend, this taco card fits perfectly. Its playful nature makes it suitable for almost any celebratory event where a little humor is welcome.
- Personalized Touch: Even though the gift inside might be practical, the effort of printing, cutting, and assembling this holder adds a valuable personal touch, showing that you invested time and care into their present.
- Budget-Friendly: As a free printable, this DIY project is incredibly cost-effective, allowing you to create a high-impact gift presentation without breaking the bank.
Perfect Occasions for Your Taco Gift Card Holder
This creative gift card holder is incredibly versatile, fitting a wide array of celebratory and appreciative moments. Here are just a few ideas where this taco card will be a hit:
Graduation Gift Ideas
Graduates, whether from high school or college, often appreciate money or gift cards as they embark on new chapters. A taco holder adds a celebratory and humorous twist to a practical gift, wishing them success with a smile.
Teacher Appreciation Gifts
Show your gratitude to an amazing teacher with a gift that’s as unique as they are. A gift card for coffee or school supplies tucked into this taco holder is a fantastic way to say “thank you” in a memorable way.
Birthday Gifts for Teens and Young Adults
Teenagers and young adults can be notoriously hard to shop for. They often prefer to choose their own gifts, making gift cards ideal. This taco card holder makes their birthday money feel less like a handout and more like a fun, personalized treat.
Thank You Gifts
Express your appreciation for a favor, kindness, or support. A small gift card for a meal or coffee, presented in this charming holder, is a thoughtful way to convey your thanks.
Host or Hostess Gifts
Attending a party or gathering? Skip the generic bottle of wine and present your host with a restaurant gift card in this playful holder. It’s sure to be a conversation starter!
Holiday Stocking Stuffers
During the festive season, these holders can add a burst of color and humor to a stocking. Perfect for tucking in a small gift card or a bit of holiday cash.
No matter the occasion, this taco gift card holder promises to deliver smiles and appreciation, making your gift truly stand out.
Materials You Will Need
Before you begin crafting your adorable taco gift card holder, gather these simple materials:
- White Cardstock: Essential for durability. Regular printer paper is too flimsy. Aim for a weight of 65lb (176 gsm) to 110lb (297 gsm) for the best results.
- Color Printer: To print the vibrant taco design. Ensure your printer has enough ink for clear, crisp colors.
- Scissors: Sharp scissors are key for clean cuts.
- Glue Stick or Liquid Glue: A glue stick is generally easier and less messy for paper crafts. If using liquid glue, choose one that dries clear and doesn’t warp paper.
- Your Gift: A gift card or folded money, ready to be placed inside!
- (Optional) Craft Knife and Cutting Mat: For exceptionally precise cuts, especially along the straight lines.
- (Optional) Scoring Tool and Ruler: To create a perfectly crisp fold line for the taco shell.
Having these items ready will ensure a smooth and enjoyable crafting experience.
Step-by-Step Guide to Making Your Taco Gift Card Holder
Making your own taco gift card holder is super easy and incredibly rewarding. Follow these simple steps, and you’ll have a fantastic, personalized gift ready in no time!
Step 1: Download and Print the Free File
The first step is to get your hands on the printable template. You’ll usually find a prompt to enter your email address to receive the download link. Once you have the file, open it on your computer.
Printing Tips:
- Use White Cardstock: As mentioned, this is crucial for the holder’s sturdiness. The cardstock will give your taco a professional and durable feel, ensuring it holds its shape and protects the gift inside.
- Printer Settings: Select “best quality” or “photo quality” in your printer settings to ensure the colors are vibrant and the lines are sharp. Also, make sure to print at “actual size” or “100%” scale to avoid distorting the dimensions of the taco pieces. You don’t want your taco to be too big or too small for a standard gift card!
Step 2: Precisely Cut Out the Taco Pieces
After printing, you’ll notice two distinct taco pieces on your cardstock: the taco shell (the yellow circular piece with the “Let’s Taco ‘Bout How Awesome You Are!” text) and the taco fillings (the colorful, layered half-circle piece). Now, it’s time to cut them out.
Cutting Tips:
- Follow the Lines Carefully: Take your time to cut along the outer edges of both pieces. Precision here makes a big difference in the final appearance of your taco.
- Identify the Faint Line: For the taco fillings piece, there’s a very faint straight line across the bottom. This line indicates where you need to cut. It’s designed to create a flat edge that will align perfectly with the folded taco shell. Using a ruler and a craft knife on a cutting mat can help achieve a perfectly straight cut, or simply use sharp scissors with a steady hand.
Step 3: Fold the Taco Shell
Next, take the yellow circular piece—this is your taco shell. You’ll see a faint white line running straight across the middle of the circle. This is your guide for folding.
Folding Instructions:
- Fold in Half: Carefully fold the yellow circle exactly in half along the white line.
- Color on the Outside: Ensure that the colorful “Let’s Taco ‘Bout How Awesome You Are!” side is on the outside of the fold, and the plain white inside of the cardstock forms the interior of your taco. This creates the classic taco shell look.
- Crease Neatly: Press firmly along the folded edge to create a crisp, clean crease. A scoring tool can be very helpful here to get a perfectly sharp fold.
Step 4: Assemble the Taco Fillings
Now it’s time to bring your taco to life by adding the delicious fillings!
Assembly Instructions:
- Identify the White Half-Circle: Look at the taco filling piece you cut out in Step 2. You’ll notice one side is colorful (the “fillings”), and the other half is plain white.
- Apply Glue: Apply glue evenly to the entire white half-circle part of the taco filling piece. Don’t be shy with the glue, but avoid over-saturating the paper. A glue stick is ideal for a clean application.
- Position and Press: Carefully align the glued white half-circle to the inside front of your folded taco shell. The flat bottom part of the fillings piece should line up precisely with the folded bottom of the taco shell. The colorful side of the fillings should face outwards, visible on the same side as the “Let’s Taco ‘Bout How Awesome You Are!” text.
- Secure Firmly: Press down firmly for a few seconds to ensure the glue adheres well. Allow the glue to dry completely before handling the card too much.
And just like that, you’ve completed the assembly of your cute taco gift card holder! It’s truly that simple. Print, cut, glue, and bam! You’ve got a personalized, adorable, and humorous holder ready to elevate your gift-giving game.
Adding Your Gift and Personalizing Your Message
Once your taco holder is assembled and the glue has dried, it’s time for the final touches:
- Insert Your Gift: Carefully slide your gift card or folded money into the pocket created by the taco fillings and shell. The design is perfect for holding standard-sized gift cards securely.
- Write a Sweet Message: The inside of the taco shell (the plain white part behind the fillings) offers a perfect spot to write a personal message. Reinforce the fun theme with witty phrases like:
- “Hope your day is nacho average day!”
- “You’re the queso my heart!”
- “Let’s get this party jalapeño!”
- “Taco ’bout a great friend!”
- Or simply a heartfelt “Thank you!” or “Happy Birthday!”
A thoughtful message elevates the gift from a simple card to a cherished keepsake.
Tips for a Professional Finish
To ensure your taco gift card holder looks its absolute best, consider these additional tips:
- High-Quality Cardstock: Investing in good quality cardstock (heavier weight) will prevent curling and give your holder a more premium feel.
- Sharp Tools: Use sharp scissors or a fresh blade in your craft knife for clean, precise edges. Dull tools can lead to jagged cuts.
- Scoring for Folds: For the crispest fold on your taco shell, use a scoring tool and a ruler along the fold line before you fold it. This creates a groove that makes folding much easier and neater.
- Even Glue Application: Apply glue evenly and thinly to avoid bumps or excess glue squeezing out. If using liquid glue, a thin bead along the edges can be sufficient.
- Allow Drying Time: Give your glue ample time to dry completely before handling or inserting the gift card. This prevents pieces from shifting and ensures a secure bond.
- Optional Embellishments: For an extra touch, you could add small embellishments like glitter glue accents, tiny pom-poms (for “sour cream”), or even a small ribbon bow. Keep it minimal to maintain the taco’s charm!
Frequently Asked Questions (FAQ) About the Taco Gift Card Holder
Here are answers to some common questions you might have about this fun DIY project:
Q: What type of paper is best for printing the taco holder?
A: We highly recommend using white cardstock, preferably 65lb (176 gsm) or heavier. Regular printer paper is too thin and won’t give your holder the necessary structure to hold a gift card securely.
Q: Can I resize the printable?
A: The printable is designed to fit a standard gift card perfectly when printed at “actual size” or “100% scale.” While you can attempt to resize it in your printer settings, be aware that it might affect the proportions and how well a gift card fits inside.
Q: What kind of glue should I use?
A: A good quality glue stick works wonderfully for this project as it’s clean and doesn’t warp the paper. All-purpose liquid craft glue that dries clear can also be used, but apply it sparingly to avoid excess moisture.
Q: Is the printable file really free?
A: Yes! This printable is offered as a free download. Typically, you’ll just need to provide your email address to receive the link to the file.
Q: How long does it take to make one taco gift card holder?
A: Once you have your materials, each holder can be assembled in under 10-15 minutes, making it a quick and easy craft project, even for multiple gifts!
Q: Can kids help make these?
A: Absolutely! This is a fantastic craft for older children and teens, especially with adult supervision for cutting. It’s a great way to involve them in creating thoughtful gifts.
Beyond the Gift Card: Creative Uses for Your Taco Holder
While designed primarily for gift cards or money, this adorable taco holder can also be used for other small, flat items:
- Small Notes or Letters: Write a sweet, encouraging note and tuck it inside.
- Photos: A small, wallet-sized photo could make a lovely surprise.
- Event Tickets: For concert or movie tickets, if they fit the dimensions.
- Tiny Trinkets: Any small, flat keepsake or token of appreciation can find a home here.
Taco Gift Card Video Tutorial
For those who prefer visual guidance, a video tutorial for this taco gift card holder is often available on the original blog. While we cannot embed the dynamic video player here, looking for “Taco Gift Card Holder tutorial” on YouTube or the original blog should provide you with a step-by-step visual demonstration, making the crafting process even easier to follow. Watching someone else assemble it can clarify any uncertainties and boost your confidence in creating your own perfect taco!
Who do you know that needs this funny card? Whether it’s a sibling, a friend, a colleague, or a teacher, this free printable taco-themed gift card holder is guaranteed to be a hit. It’s the perfect blend of practical gifting and heartfelt, handmade charm.
Ready to make someone’s day a little more awesome? Click here to get your free printable file and start crafting! Just enter your email address to receive the download link directly to your inbox. Give the gift of a smile, wrapped in a taco!







