
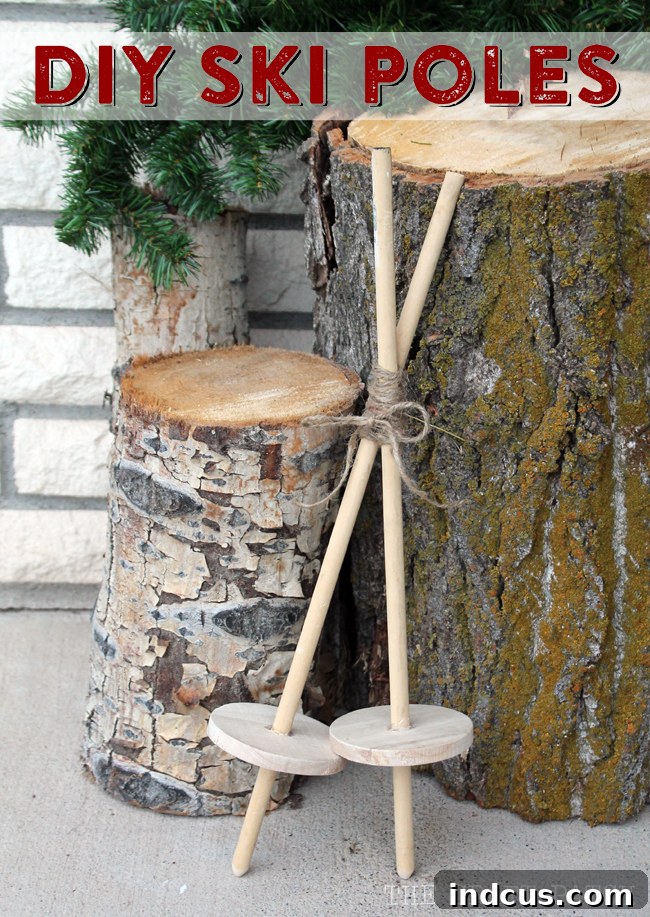
Have you ever stumbled upon a charming decor piece in a boutique only to be disheartened by its exorbitant price tag? That was precisely my experience with the most adorable mini wooden ski poles. They were perfect for adding a touch of rustic winter charm, but at $38, they felt more like a luxury than a simple decoration. Knowing I could replicate their appeal for a fraction of the cost, I embarked on a delightful DIY journey. The result? A set of handcrafted mini ski poles that cost me around $3 and took less than thirty minutes to create. This project is a testament to the magic of DIY – transforming an expensive inspiration into an affordable, personalized masterpiece. Join me as we craft these charming decorations, perfect for adorning your home throughout the winter season!
Craft Your Own Rustic Mini Wooden Ski Poles: An Affordable DIY Winter Decoration
Embrace the cozy spirit of winter and the festive cheer of Christmas with a truly unique, handmade decoration. These DIY mini wooden ski poles bring a touch of snowy elegance and rustic charm to any space, effortlessly enhancing your seasonal decor. Forget overpriced store-bought items; this simple craft project allows you to create stunning, personalized decorations without breaking the bank. It’s an ideal project for beginners, offering immense satisfaction with minimal effort and cost. Let’s dive into how you can easily craft these delightful winter accents.
Why Choose to DIY Your Mini Wooden Ski Poles?
The allure of handmade decor extends far beyond mere aesthetics. Opting for a DIY approach to create your mini wooden ski poles comes with a multitude of benefits:
- Significant Cost Savings: As highlighted, replicating a $38 boutique item for just $3 is incredibly satisfying. Crafting allows you to achieve a high-end look without the high-end price tag, freeing up your budget for other holiday festivities.
- Personalization and Unique Style: When you DIY, you’re not just making a decoration; you’re infusing it with your personal style. Choose your preferred wood finish, twine color, and any additional embellishments to create a piece that perfectly complements your existing decor theme, be it farmhouse, rustic, Scandinavian, or traditional Christmas.
- Sense of Accomplishment: There’s an undeniable joy and pride that comes from creating something beautiful with your own hands. This project is quick and straightforward, offering immediate gratification and a tangible reminder of your crafting skills.
- Perfect for Any Winter Theme: These mini ski poles aren’t just for Christmas; they transition beautifully through the entire winter season. Use them from late autumn through early spring to evoke a cozy, lodge-like atmosphere in your home.
- Eco-Friendly Option: By crafting your own decorations, you often have more control over the materials, potentially choosing sustainable or upcycled components, contributing to a more eco-conscious decorating strategy.
Essential Materials You’ll Need for Your Project
Gathering your materials is the first exciting step in any DIY adventure. For this project, the beauty lies in its simplicity and accessibility of supplies. Here’s a detailed list of what you’ll need:
- Wooden Dowel Rod (1/2 inch diameter): A single dowel rod, typically available in lengths like 36 or 48 inches at any craft or hardware store, will be sufficient for two mini ski poles. The 1/2-inch thickness provides a sturdy yet appropriately scaled look for miniature poles.
- Wooden Craft Circles or Ornaments: These will form the ‘baskets’ or ‘snow rings’ of your ski poles. I found pre-made wooden Christmas ornaments that were perfectly thick and sturdy. If you find thinner wooden circles (common in craft stores), simply glue two or three together with wood glue or hot glue to achieve the desired thickness and presence. Aim for circles roughly 2-3 inches in diameter for a balanced look.
- Twine: A small length of natural jute twine adds the perfect rustic touch for tying your ski poles together. You could also experiment with thin ribbon, raffia, or even baker’s twine for a different aesthetic.
- Hot Glue Sticks: Essential for quickly and securely attaching the wooden circles to the dowels.
- Optional Embellishments: Consider small decorative elements like miniature bells, faux pine sprigs, tiny bows, or even a light dusting of artificial snow to further personalize your creations.
Tools for the Job: Making Your Crafting Smooth and Safe
While this project is simple, having the right tools makes a significant difference in ease and precision:
- Saw: A hand saw, miter saw, or even a sturdy coping saw will work for cutting the wooden dowel. Always ensure you have a stable surface and follow proper safety precautions when using any cutting tool.
- Sander or Sandpaper: An electric sander (like an orbital or detail sander) is ideal for quickly shaping the tips, but medium-grit sandpaper (around 120-220 grit) will also work effectively for manual sanding.
- Drill and 1/2 Inch Drill Bit: A cordless or corded drill is needed to create the central hole in your wooden circles. Ensure you use a 1/2 inch drill bit to perfectly match the diameter of your dowel, allowing for a snug fit.
- Hot Glue Gun: A reliable hot glue gun is indispensable for quick and strong adhesion.
- Ruler or Measuring Tape and Pencil: For accurate marking and cutting of your dowel rod.
Step-by-Step Guide: Crafting Your Mini Wooden Ski Poles
Now, let’s get to the fun part – assembling your beautiful, rustic ski poles! Follow these straightforward steps for a flawless finish:
Step 1: Preparing Your Wooden Dowels
Begin by transforming your single dowel rod into two distinct ski poles.
- Measure and Cut: Using your ruler and pencil, measure the desired length for each ski pole. For mini decorative poles, a length of approximately 12 to 18 inches per pole is usually ideal, but you can adjust this based on your display intentions. Mark the center of your dowel and carefully cut it into two equal halves. Remember to wear appropriate safety gear, such as safety glasses, when using a saw.
- Shape the Tips: This step gives your poles their characteristic ski pole look. Using your electric sander or sandpaper, carefully sand one end of each dowel rod into a gentle point. You don’t need a razor-sharp tip, just enough of a taper to mimic the end of a ski pole. This also helps to smooth out any rough edges from cutting.
Step 2: Customizing Your Wooden Circles
The wooden circles will act as the “baskets” that prevent real ski poles from sinking too deep into the snow.
- Drill the Center Hole: Take one of your wooden craft circles. Carefully mark the exact center of the circle with a pencil. Using your drill and the 1/2 inch drill bit, slowly and steadily drill a hole directly through the center. It’s advisable to place a scrap piece of wood underneath your circle to prevent splintering the workbench or your circle as the drill bit exits. Repeat for the second wooden circle.
- Address Pre-Printed Ornaments (if applicable): If your wooden circles come with printed words or designs, as mine did, decide how you want to handle them. You can sand them off entirely for a clean slate, which is often quite easy with fine-grit sandpaper. Alternatively, you can simply ensure that the printed side faces downwards or inwards once assembled, effectively hiding the text without extra effort.
- Optional Pre-Treatment: If you plan to paint or stain your dowels or circles, now is an excellent time to do so, before assembly. This allows for even coverage and prevents getting paint on already glued parts. Let them dry completely according to the product instructions.
Step 3: Assembling the Ski Poles
Now it’s time to bring the two main components together.
- Attach the Circles: Take one of your prepared wooden dowels and one drilled wooden circle. Slide the dowel through the hole in the center of the wooden circle. Position the circle about 1-2 inches from the pointed tip of the dowel, mimicking where a ski pole basket would naturally sit.
- Secure with Hot Glue: Once the wooden circle is in the desired position, apply a generous amount of hot glue around the dowel where it meets both the top and bottom surfaces of the wooden circle. This will create a strong bond, ensuring the circle stays firmly in place. Allow the glue to cool and set completely for a secure attachment. Repeat this process for the second ski pole.
Step 4: Adding the Rustic Touch with Twine
The final step ties your two beautiful poles together, literally and aesthetically.
- Tie Them Together: Take a length of your chosen twine (about 18-24 inches should be sufficient). Align your two assembled mini ski poles side-by-side. Wrap the twine around both poles a few times near the top (the handle end) and tie a secure knot. You can leave the ends of the twine long or trim them neatly, depending on your preferred look. A simple bow or a decorative knot can add extra flair.
- Final Adjustments: Stand back and admire your work! Make any final adjustments to the positioning of the twine or the smoothness of the dowel tips.
Creative Ways to Display Your Handmade Mini Ski Poles
Once your charming mini wooden ski poles are complete, the possibilities for displaying them are endless! Here are some ideas to inspire your winter and holiday decorating:
- Front Porch or Entryway: Lean them against a festive planter, a welcoming wreath, or an old pair of ice skates to create an inviting winter vignette right at your doorstep. They pair wonderfully with other rustic elements like lanterns, pinecones, and evergreen garlands.
- Christmas Tree Ornament or Topper: For a smaller tree, a single pole or the tied pair can serve as a unique tree topper, adding a whimsical touch. For larger trees, hang them as oversized ornaments, especially if you create them in slightly smaller dimensions.
- Mantlepiece Magic: Arrange them on your fireplace mantle alongside stockings, candles, and winter greenery for a cozy, lodge-inspired feel.
- Shelf Styling: Tuck them into a bookcase or on open shelving, propped up against books or other seasonal decor items.
- Table Centerpiece: Incorporate them into a holiday tablescape. They can stand tall in a vase filled with faux snow or lay flat amidst a runner of evergreens and berries.
- Gift Enhancement: Attach them to a wrapped present or a gift basket for a truly unique and thoughtful presentation. They make a lovely host/hostess gift during the holiday season.
- Wreath Accent: Secure a single mini ski pole or the pair to a large winter wreath for an unexpected and delightful embellishment.
Personalization & Advanced Tips for Your Ski Pole Project
Take your mini wooden ski poles to the next level with these creative ideas:
- Paint or Stain the Wood: For a more refined or specific look, paint the dowels with white, silver, or a distressed antique white paint. Alternatively, use a wood stain to enhance the natural grain and achieve a richer, warmer tone.
- Add Miniature Accents: Hot glue tiny bells, snowflakes, or small faux pine sprigs to the wooden circles for extra detail and festive charm.
- Experiment with Twine and Ribbon: Instead of jute twine, try red and white baker’s twine for a candy cane effect, or use plaid ribbon for a classic rustic lodge aesthetic.
- Vary Pole Lengths: Create a set of three poles with varying lengths (e.g., 12, 14, and 16 inches) for an interesting visual dynamic when displayed together.
- Create “Bindings”: Cut small strips of felt or thin leather and wrap them around the top of the dowel, securing with hot glue, to mimic the look of ski bindings.
- Weatherproof for Outdoors: If you plan to display your poles outdoors, apply a clear, outdoor-grade sealant or varnish to protect the wood from moisture and UV damage.
Maintenance and Care for Lasting Beauty
These mini wooden ski poles are relatively low maintenance, but a few tips can help preserve their charm for many seasons:
- Indoor vs. Outdoor: As mentioned, if used outdoors, ensure they are properly sealed to protect against the elements. If left untreated, outdoor exposure can lead to warping, fading, or mildew.
- Cleaning: A light dusting with a soft cloth is usually all that’s needed to keep them clean. Avoid harsh chemicals that could damage the wood or any finishes.
- Storage: When the season ends, store your ski poles in a dry, cool place, preferably in a box to prevent them from getting scratched or damaged by other decorations.
Troubleshooting Common Issues
While this project is simple, here are a few common hiccups you might encounter and how to fix them:
- Dowel too tight for the hole: If the 1/2 inch dowel doesn’t quite fit the 1/2 inch drilled hole, gently sand the end of the dowel or slightly enlarge the hole with a rotary tool or by carefully re-drilling.
- Dowel too loose in the hole: If the dowel is wobbly, apply extra hot glue around the joint. For a more secure fix, use wood glue (allow ample drying time) in conjunction with hot glue, or wrap a thin strip of paper around the dowel before inserting it into the hole to create a tighter fit.
- Uneven Tips: If your sanded tips aren’t perfectly symmetrical, don’t worry! The rustic nature of this craft means slight imperfections add to its charm. You can always do a bit more sanding to refine them if it bothers you.
And there you have it! A beautiful, custom-made set of mini wooden ski poles, created with your own hands for a fraction of the cost of store-bought alternatives. This project truly embodies the spirit of crafting: creativity, affordability, and the immense satisfaction of transforming simple materials into something special. Whether they grace your front porch, adorn your Christmas tree, or add a touch of winter wonder to your mantle, these handmade decorations are sure to bring joy and a cozy, rustic feel to your home. We encourage you to share your creations and inspire others to embrace the wonderful world of DIY!







