
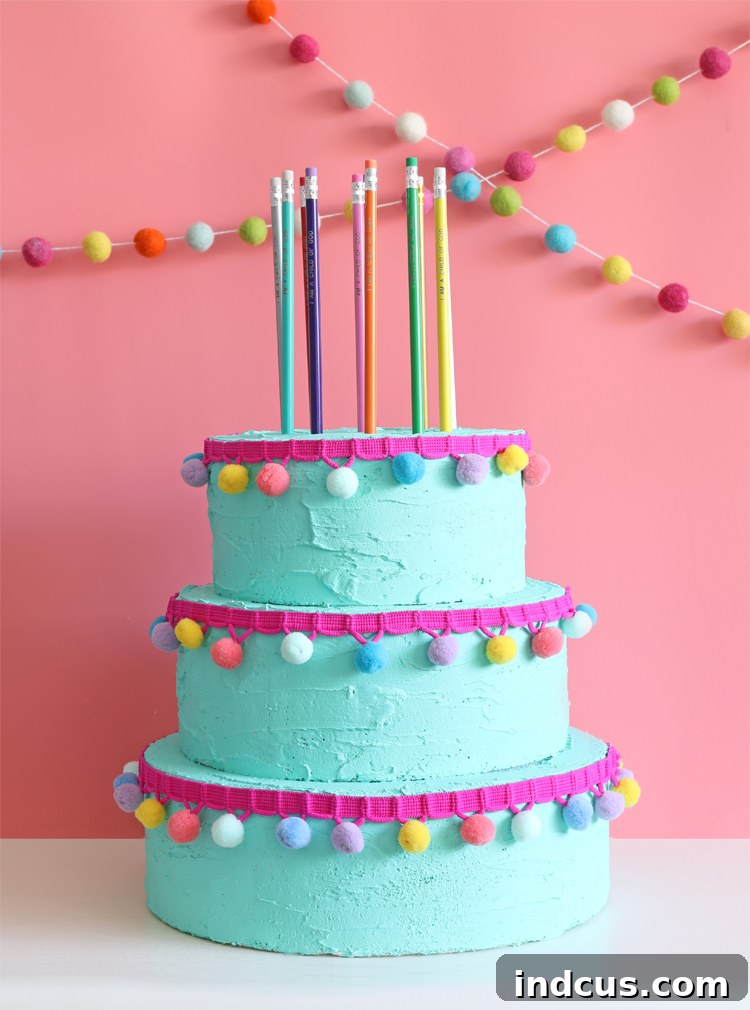
Elevate Classroom Birthdays: Crafting the Ultimate Giant Pencil Cake
Transforming ordinary classroom birthday celebrations into extraordinary, memorable events is easier and more fun than you might think! As an educator deeply involved in children’s activities, I’m always searching for innovative and heartwarming ways to make each child feel truly special on their big day. This pursuit led me to create an absolute showstopper: a giant, multi-tiered “cake” made entirely of foam, brilliantly adorned with a vibrant array of pencils instead of traditional candles. Imagine the sheer delight and wide smiles on the children’s faces when this magnificent creation is brought out! When it’s a child’s birthday, we’ll gather, sing a joyful birthday song, and then invite them to choose a personalized pencil from the cake. It’s not just a gift; it’s an experience, a moment of recognition that creates lasting happy memories.
This unique DIY project offers a fantastic, reusable solution for classroom or church primary birthday celebrations. It eliminates the need for perishable cakes, making it hygienic and convenient, while still delivering all the visual charm and excitement of a real celebratory confection. Plus, it provides a practical and cherished gift – a personalized pencil – that children can actually use and take home. This tutorial will guide you through every step of crafting your very own giant fake birthday cake. Get ready to unleash your creativity and bring a sprinkle of magic to your children’s special days!
Creating this impressive centerpiece is not only rewarding but also surprisingly straightforward. By following these detailed instructions, you’ll be able to construct a durable, eye-catching birthday prop that will serve your class or group for years to come. It’s a wonderful way to foster a sense of community and make every child feel valued and celebrated. This giant pencil cake isn’t just a craft; it’s a vehicle for joy, engagement, and a touch of educational fun.
To embark on this delightful crafting adventure, you will need the following essential supplies. These items are readily available at most major craft stores, ensuring you can gather everything with ease:
- FloraCraft 8″, 10″ and 12″ foam cake forms: These tiered foam dummies provide the perfect foundation for your cake, giving it an authentic multi-layered look and sturdy structure. Their varying sizes allow for a classic cake silhouette.
- FloraCraft Smooth Finish: This revolutionary product is a game-changer for foam projects. It creates a smooth, paintable surface by filling in the porous texture of the foam, making your fake cake look incredibly realistic – just like a beautifully frosted confection.
- Craft Paint: Choose your favorite color to bring your cake to life! Acrylic craft paints work wonderfully, offering a wide spectrum of hues to match any classroom theme or personal preference.
- Aleene’s Tacky Glue: An indispensable adhesive for crafting, particularly when working with foam. Its strong bond is perfect for securely stacking your cake tiers without causing damage, unlike hot glue which can melt Styrofoam.
- Hot Glue Gun and Glue Sticks: While not ideal for directly bonding foam, a hot glue gun is perfect for attaching decorative elements like trim securely and quickly.
- Pom Pom Trim: This playful trim adds a whimsical, festive touch to your cake, mimicking decorative frosting borders. Look for a vibrant color that complements your chosen paint shade.
You can find all of these fantastic items, from the foam forms to the vibrant paints and unique trims, at popular craft stores such as JOANN, Michaels, or Hobby Lobby. Their extensive selections ensure you’ll find exactly what you need to personalize your giant pencil cake.
Beyond the cake itself, the “candles” – the pencils – are a crucial element. I highly recommend the customized pencils from Oriental Trading. Personalization adds an extra layer of thoughtfulness and makes each child’s gift even more special. For my primary class, I chose the uplifting phrase “I Am A Child of God,” aligning with our yearly theme. These pencils were not only budget-friendly but also boasted excellent quality and appearance in person. Customizing them with a positive message or the name of your organization truly elevates the gift, making it a cherished keepsake for each child.
Now, let’s dive into the step-by-step process of bringing this magnificent giant pencil cake to life. Each step is designed to be straightforward, ensuring a smooth and enjoyable crafting experience that yields professional-looking results.
Step 1: Preparing Your Foam with FloraCraft Smooth Finish
The first and arguably most crucial step in creating a realistic-looking fake cake is to prepare your foam cake forms with FloraCraft Smooth Finish. This incredible product is specifically designed to fill in the tiny holes and rough textures inherent in Styrofoam, creating an incredibly smooth, paintable surface that truly mimics a professionally frosted cake. If you’ve never used it before, prepare to be amazed! For application, I found that a simple kitchen spatula works wonders. It allows for an even spread and helps create that desirable frosting-like texture. Apply a generous, even layer over the entire visible surface of each foam cake form. Don’t worry about perfection on the first pass; you can always add more if needed. To cover all three cake forms (focusing on the tops and sides that would be exposed once stacked), I used approximately two and a half jars of Smooth Finish. Allow ample drying time, typically several hours or overnight, until the surface is completely hard and smooth to the touch. This careful preparation ensures your cake has a flawless foundation for the next steps.
Step 2: Expertly Stacking and Securing Your Cake Tiers
Once your FloraCraft Smooth Finish has completely dried and cured, it’s time to assemble your cake tiers. Carefully stack the foam forms from largest at the bottom (12-inch) to smallest at the top (8-inch), ensuring they are perfectly centered. For gluing them together, Aleene’s Tacky Glue is your best friend. It forms a strong, durable bond and, crucially, does not melt Styrofoam, which hot glue unfortunately does. Apply a generous amount of Tacky Glue to the top surface of the larger tier before carefully placing the next smaller tier on top. Press down firmly for a few seconds to ensure good contact. Repeat this process for the final tier. Allow the glue to set and dry thoroughly, which may take a few hours. A secure bond is essential for the stability and longevity of your giant pencil cake, preventing any wobbling or separation during celebrations.
Step 3: Infusing Color with Craft Paint
With your tiers securely stacked, it’s time to bring your cake to life with a splash of color! Choose a craft paint in your desired shade. I opted for DecoArt Americana Sea Breeze, a lovely soft blue that evokes a calm, cheerful feeling, perfect for children. Using a paintbrush, apply an even coat of paint over all the Smooth Finish-covered surfaces. For optimal coverage and a vibrant, opaque finish, you may need to apply two coats, allowing the first coat to dry completely before applying the second. Ensure you cover all visible areas, paying attention to the edges and where the tiers meet. The Smooth Finish layer will make painting a breeze, resulting in a smooth, professional-looking surface that truly resembles a beautifully decorated birthday cake. Let the paint dry thoroughly before moving on to the next step.
Step 4: Adding Decorative Flair with Pom Pom Trim
Now for the decorative accents that truly make this cake pop! Once the paint is completely dry, you’ll use your hot glue gun to attach the pom-pom trim around the bottom edge of each cake tier. This step is where the Smooth Finish truly proves its worth again: because there’s a protective layer of Smooth Finish between the trim and the foam, the hot glue works perfectly without melting into the foam beneath. Apply a small bead of hot glue along the bottom edge of each tier, pressing the pom-pom trim firmly into place as you go. Work in manageable sections to ensure the glue doesn’t cool too quickly. The pom-pom trim adds a delightful, festive border, mimicking decorative frosting details and enhancing the cake’s whimsical charm. Take your time to ensure the trim is applied neatly and evenly for a polished finish.
Step 5: The Grand Finale – Incorporating the Pencils
This is the moment your fake cake transforms into the magnificent giant pencil cake! Using one sharpened pencil, carefully poke holes into the top surface of the uppermost cake tier. This sharpened pencil acts as a guide, creating clean pilot holes for the unsharpened pencils you’ll be giving to the children. The key here is consistency: ensure you push the sharpened pencil straight down, maintaining the same angle for each hole. Whatever angle you create the pilot hole at is the angle the gift pencils will sit once inserted, so aiming for a uniform, upright position will give your cake a neat and appealing look. Once all the pilot holes are made, gently insert the unsharpened, personalized pencils into each hole. Arrange them thoughtfully, perhaps in a spiral or a grid, to create an attractive display. The vibrant colors and personalized messages on the pencils will add the final, enchanting touch to your classroom birthday masterpiece.
What do you think of this fabulous creation? I can vividly picture the utter joy and astonishment on the children’s faces when this big, colorful, and utterly unique cake makes its appearance during our Sunday celebration. It’s more than just a gift-giving method; it’s an interactive and visually stunning centerpiece that amplifies the excitement of each child’s birthday. The anticipation of choosing a personalized pencil from this festive “cake” will be a memory they cherish. This project is not just about making a craft; it’s about crafting unforgettable moments and fostering a loving, celebratory atmosphere in the classroom or any children’s group.
This giant pencil cake truly embodies the spirit of fun and thoughtfulness. It’s durable, reusable, and endlessly customizable to suit any theme or occasion. Whether you’re a teacher, a church leader, or simply someone looking for a creative way to celebrate children, this DIY project offers immense satisfaction and brings boundless smiles. I am incredibly excited to introduce this wonderful tradition to our children and witness their reactions. It’s going to be so much fun, and I genuinely can’t wait to see the magic unfold!







