
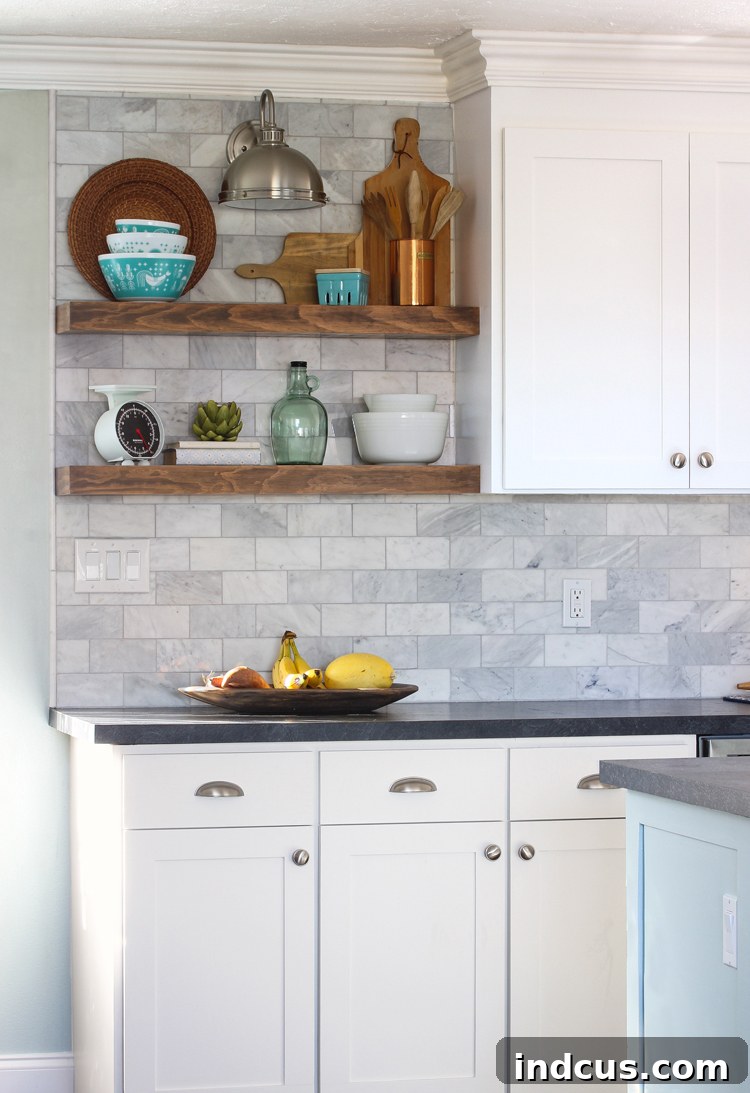
Discover the Ultimate Guide to Installing Robust Floating Shelves Over Your Tile Backsplash
Transforming a kitchen space often involves a blend of aesthetic appeal and functional design. One of the most sought-after features in modern kitchen remodels today is the addition of sleek, space-saving floating shelves, particularly when installed over a beautifully tiled backsplash. These elegant additions not only offer practical storage but also create a striking focal point, allowing you to display cherished items or keep frequently used essentials within easy reach. In our own kitchen renovation, the custom floating shelves we integrated above our stunning marble backsplash quickly became a highlight, drawing admiration and enhancing the overall ambiance of the room.
During our initial research into this project, we encountered a surprising lack of comprehensive information on the specific challenge of installing floating shelves over an existing or newly installed tile backsplash. Common questions arose: Should the shelves be built first, with tile cut around them? Or do you tile the wall completely and then attempt to drill through the delicate tile surface? These uncertainties underscored a need for a clear, reliable method. After extensive research, planning, and hands-on experimentation, we devised a robust installation technique designed to achieve several critical objectives:
- Unwavering Strength and Stability: Ensuring the shelves could bear substantial weight without sagging or wobbling.
- Secure Wall Stud Anchorage: Maximizing safety and load-bearing capacity by firmly fastening into the wall’s structural studs.
- Minimized Backsplash Damage Risk: Protecting the integrity and beauty of the tile by avoiding unnecessary drilling into finished surfaces.
If you’re contemplating a similar kitchen upgrade and wish to achieve a professional, durable result, we are excited to share the detailed, step-by-step process that made our floating shelves a success. This comprehensive guide will walk you through every critical aspect, from selecting the right hidden supports to crafting the shelves and applying the perfect finish, ensuring your project is both beautiful and built to last.
Essential Tools and Materials for Your Floating Shelf Project
Before diving into the installation process, gathering the right tools and materials is crucial for a smooth and successful project. Here’s a list of what you’ll likely need:
Tools:
- Stud finder
- Level
- Measuring tape and pencil
- Drill and various drill bits (including masonry bits if drilling through existing tile, though our method aims to avoid this)
- Circular saw or table saw
- Router (optional, for rabbeting joints)
- Clamps
- Sanding block or orbital sander with various grits of sandpaper (100, 150, 220, 400 grit)
- Paintbrushes or foam applicators for stain and finish
- Clean rags for wiping stain
Materials:
- Hidden/Blind Shelf Supports (e.g., Rockler blind shelf supports)
- Wood for shelf construction: 1×3 inch pine boards for edges, 1/4 inch birch plywood for top/bottom panels.
- Wood glue
- Wood screws (appropriate length for attaching supports to studs)
- Pre-stain wood conditioner
- Wood stain (e.g., Varathane Wood Stain in Briarsmoke, Rustoleum Dark Walnut)
- Wipe-on Polyurethane finish
- Tile and tiling supplies (if installing new backsplash simultaneously): tile adhesive, grout, spacers, trowel, tile cutter/wet saw.
Having these items ready will streamline your workflow and help you achieve professional results when installing your custom floating shelves.
Step 1: Strategically Install Hidden Shelf Supports into Wall Studs.
The foundation of any strong floating shelf installation lies in its support system, particularly when dealing with a tile backsplash. For this project, we opted for robust blind shelf supports, which provide an invisible yet exceptionally strong anchor point. The initial and most critical step is to accurately locate and secure these supports directly into the wall studs. Using a reliable stud finder, identify the exact vertical locations of your wall studs where you intend to place your shelves. This ensures maximum weight-bearing capacity and prevents the shelves from pulling away from the wall over time.
Once the studs are marked, meticulously measure and mark the desired horizontal placement and vertical height for your floating shelves. It’s crucial to ensure that the supports are level across the intended span of each shelf. As you can observe in the accompanying photograph, the horizontal spacing of our supports might appear off-center; this is because they were precisely aligned with the existing wall studs rather than arbitrary aesthetic placement. However, their vertical alignment and leveling were exact, which is paramount for a professional finish. Drill pilot holes and then securely fasten the blind shelf supports into the studs using appropriate wood screws. Confirm that each support is firmly attached and perfectly level before proceeding. This proactive approach, installing the supports *before* tiling, eliminates the need to drill through finished tile later, significantly reducing the risk of cracking, especially with delicate materials like marble.
Step 2: Expertly Install Your Tile Backsplash Around the Supports.
With the hidden shelf supports firmly anchored into the wall studs, the next phase involves installing your tile backsplash. This method, where tiling occurs *after* the supports are in place, offers a significant advantage: it entirely circumvents the challenging and risky process of drilling through cured tile. Attempting to drill into a finished tile backsplash, particularly fragile materials like marble, carries a high probability of chipping, cracking, or even shattering the tile. Marble, known for its beauty, is also notably softer and more brittle than ceramic or porcelain tiles, making this pre-installation strategy invaluable for protecting your investment.
Proceed with tiling your wall as usual, working around the protruding metal shelf brackets. When you reach the areas where the supports emerge, carefully measure and cut your tiles to fit snugly around each metal rod. Precision cutting is key here to achieve a seamless, professional look. A wet saw with a diamond blade is ideal for making clean, accurate cuts, especially for intricate shapes or when working with natural stone tiles. Take your time to ensure tight tolerances around the supports; this attention to detail will minimize grout lines and create a much more integrated appearance. As the images illustrate, the shelf brackets will visibly extend through the newly laid tile, ready to receive your custom-built shelves. This method not only safeguards your backsplash but also provides a clear, unencumbered pathway for the shelf installation.
Step 3: Crafting Your Custom Hollow Floating Shelves.
With the hidden supports and backsplash in place, it’s time to construct the shelves themselves. Our goal was to create substantial, “chunky” looking shelves that offered a robust aesthetic without being excessively heavy or prohibitively expensive if made from solid wood. The solution was to build hollow box shelves, which achieve the desired visual weight while remaining manageable. We primarily used 1×3 inch pine boards for the outer frame and 1/4 inch birch plywood for the top and bottom panels. This combination provides a strong, stable, and relatively lightweight structure.
Designing and Assembling the Hollow Box Structure:
- Cut the Frame Pieces: Begin by cutting the 1×3 pine boards to the precise length and depth of your desired shelves. These will form the front, back, and side edges of your hollow box.
- Rabbet Joints for Seamless Integration: To provide a secure and flush surface for the plywood panels, we rabbeted the top and bottom interior edges of the 1x3s. A router is excellent for this task, creating a small channel where the 1/4 inch plywood can sit perfectly. This technique not only strengthens the shelf’s construction but also creates a cleaner, more finished appearance, making the plywood seem an integral part of the frame rather than merely attached to the surface.
- Integrate Internal Cross Pieces: This is a crucial step for strength and drilling accuracy. Inside the hollow shelf, we added two additional cross pieces of solid wood. These internal supports serve two vital functions: they prevent the top and bottom plywood panels from bowing over time, and more importantly, they provide solid wood to drill into when attaching the shelf to the metal supports. Without these cross pieces, you would be drilling into the relatively thin plywood, which wouldn’t offer the necessary stability or anchorage.
- Assemble and Glue: Once all pieces are cut and rabbeted, dry-fit everything to ensure a perfect match. Then, apply a high-quality wood glue to all mating surfaces, particularly within the rabbet joints. Assemble the box, securing it with clamps overnight to allow the glue to fully cure. This step is critical for the structural integrity of your floating shelves.
Once we were completely satisfied with the precise fit of all components, we proceeded with gluing the plywood panels firmly into their rabbeted seats. This process ensures a robust and seamless connection. After applying the wood glue generously, we used multiple clamps to hold everything tightly in place, allowing the adhesive to cure thoroughly overnight. This extended clamping period is vital for achieving maximum strength and preventing any potential delamination or warping of the panels over time, ensuring your custom floating shelves are built to last.
Here’s a closer look at the back of the shelf, providing a clearer understanding of its internal construction and how the various wood pieces interlock to form a sturdy, hollow box. Notice the integration of the internal cross sections, which are key to the shelf’s strength and successful attachment.
Precision Drilling for a Perfect Fit:
Recall the internal cross sections within the shelves? These are indispensable. They provide a solid wood base for drilling, ensuring that the shelves slide onto the metal supports securely and precisely. Select a drill bit that is just slightly larger than the diameter of your metal support pegs. This slight increase in size allows for a snug but manageable fit, preventing the shelves from being too tight or too loose. Carefully mark the exact positions for drilling on the back of your shelves, aligning them perfectly with the hidden supports protruding from your tile backsplash. Using a drill press or a steady hand with a drill guide can help ensure the holes are perfectly straight and level. Any deviation here could result in shelves that don’t sit flush or level against the wall.
Step 4: The Art of Finishing – Sanding, Staining, and Sealing.
Once the shelves are structurally complete and the drill holes are ready, the transformation truly begins with the finishing process. This stage is where you imbue your custom shelves with character and protect them for years to come.
Achieving a Flawless Surface with Sanding:
Begin with a thorough sanding of all surfaces. Start with a medium-grit sandpaper (e.g., 100 or 120 grit) to remove any imperfections, glue residue, or rough spots. Gradually progress to finer grits (150, 220) to smooth the wood completely. For an exceptionally silky finish, we continued sanding up to 400 grit. This meticulous sanding ensures that the wood absorbs stain evenly and that the final surface is incredibly smooth to the touch.
Staining for Depth and Character:
Pine, while affordable and easy to work with, can sometimes absorb stain unevenly, leading to blotchy results. To combat this, always apply a pre-stain wood conditioner. This product helps to even out the wood’s porosity, ensuring a more uniform and professional stain application. After the conditioner dries according to manufacturer instructions, it’s time for the first layer of stain.
We applied a light coat of Varathane Wood Stain in the color ‘Briarsmoke.’ This particular shade imparts a beautiful, subtle greyed-out, weathered look that evokes a sense of rustic elegance. While stunning on its own, we desired a little more depth and complexity in the color. To achieve this, after the Briarsmoke coat had dried, we applied a super light, almost ‘dry-brushed’ coat of Rustoleum Dark Walnut stain. This second layer subtly enriched the grey tones, adding warmth and dimension without overpowering the initial weathered effect. The accompanying comparison photos vividly demonstrate how this layering technique creates a more nuanced and sophisticated finish compared to a single stain application.
Durable Protection with Polyurethane:
The final step in finishing is applying a protective topcoat. We opted for two coats of wipe-on Polyurethane. This type of finish is easy to apply, provides excellent durability against moisture and wear, and enhances the natural beauty of the stained wood. Apply thin, even coats, allowing sufficient drying time between each application as per the product’s instructions. Lightly sand with very fine grit sandpaper (e.g., 400 or 600 grit) between coats for an even smoother finish, then wipe clean before applying the next coat. The hardest part of this entire process was patiently waiting for the polyurethane to fully cure and dry, knowing that our beautiful custom floating shelves were almost ready to be installed and styled in our kitchen!
Step 5: Final Installation and Styling Your Floating Shelves.
With your beautifully crafted and finished shelves ready, the final step is their installation onto the hidden supports. Carefully align the pre-drilled holes in the back of your shelves with the metal rods protruding from your tile backsplash. Gently slide the shelves onto the supports, applying even pressure to ensure they seat fully and snugly against the wall. They should fit tightly, providing a seamless and sturdy appearance. Once both shelves are securely in place, double-check their level and stability. The internal cross pieces and the precise drilling should ensure they hold firmly and can bear the intended weight.
Now comes the truly rewarding part: styling your new floating shelves! These open shelves offer a fantastic opportunity to personalize your kitchen. Consider displaying a mix of decorative elements and practical items. For instance, you could arrange a collection of attractive ceramic bowls, a stack of your favorite cookbooks, small potted herbs for a touch of greenery, or unique art pieces that complement your kitchen’s aesthetic. Floating shelves are perfect for showcasing beautiful glassware, spices in elegant jars, or even small appliances you frequently use. Remember to balance visual appeal with functionality, creating a display that is both charming and useful. The addition of these sturdy, custom-built floating shelves over your tile backsplash will undoubtedly become a cherished feature in your kitchen, combining practical storage with sophisticated design.
See the full kitchen remodel reveal here!
Installing floating shelves over a tile backsplash doesn’t have to be an intimidating task. By following this detailed, step-by-step guide – from strategic support installation and careful tile work to custom shelf construction and meticulous finishing – you can achieve a durable, beautiful, and highly functional addition to your kitchen. Our method prioritizes strength by anchoring into wall studs, protects your delicate tile, and provides a clear pathway for creating stunning, custom floating shelves. The result is a seamless integration that enhances both the utility and aesthetic appeal of your space. We hope this comprehensive tutorial empowers you to confidently tackle your next kitchen renovation project and enjoy the beauty of your new, sturdy floating shelves!
Other Kitchen Remodel Posts:
DIY Marble Subway Tile Backsplash
Undermount Sink in Laminate Countertops
How To DIY Laminate Countertops
DIY Wood Floors and Kitchen Layout Change







