
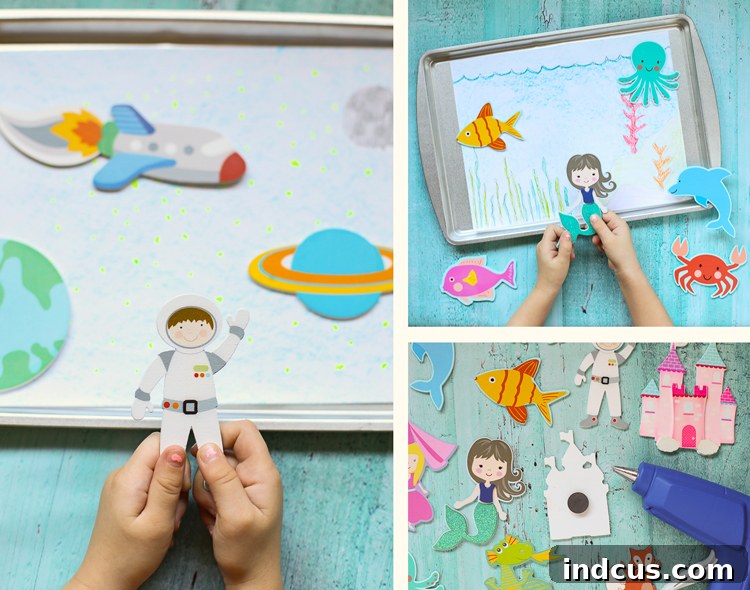
Unlock Imagination: Transform a Dollar Store Cookie Sheet into a DIY Magnetic Play Board for Endless Creative Fun
In today’s fast-paced, screen-dominated world, finding engaging, screen-free activities that genuinely capture a child’s imagination can feel like a monumental task for parents and caregivers. The endless quest for ways to foster creativity, encourage storytelling, and develop fine motor skills without resorting to digital devices is a common challenge. What if we told you that a simple, budget-friendly item from your local dollar store could become the foundation for hours of enriching, imaginative play? Get ready to discover how a humble cookie sheet can be transformed into a dynamic DIY magnetic play board, an inventive toy designed to spark joy and creativity in children of all ages.
The inspiration for this ingenious project struck during a casual stroll through the aisles of a craft store. Surrounded by an array of delightful wooden shapes – from whimsical animals and brave knights to cosmic astronauts and mythical mermaids – the potential for hands-on storytelling became clear. The vision was to create a tactile play experience that combined the charm of traditional toys with the versatility of a magnetic surface. The missing link? A simple, affordable base. Enter the dollar store cookie sheet. Its flat, metallic surface proved to be the perfect canvas for a custom magnetic scene board, offering a brilliant way for kids to bring their miniature worlds to life.
Why Create a DIY Magnetic Play Board? The Benefits of Hands-On, Imaginative Play
Beyond being an entertaining craft project, a DIY magnetic play board offers a wealth of developmental benefits for children. It’s more than just a toy; it’s a tool for growth and learning:
- Fosters Imagination and Storytelling: Children aren’t just playing with figures; they are actively designing their worlds. They concoct narratives, create dialogues, and develop plotlines, enhancing their creative thinking and verbal communication skills.
- Develops Fine Motor Skills: Manipulating small wooden shapes and magnets, drawing intricate background scenes, and positioning elements all contribute to the refinement of fine motor skills and hand-eye coordination.
- Promotes Screen-Free Engagement: In an era dominated by screens, this project offers a refreshing alternative that encourages children to engage with physical objects and their own minds, fostering a healthy balance in their daily activities.
- Boosts Artistic Expression: Designing the background scenes allows children to explore their artistic talents, experiment with colors, and translate their imaginative concepts into visual art. Each drawing becomes a unique masterpiece.
- Encourages Problem-Solving: Deciding where characters go, how scenes interact, and adapting to different background elements can subtly develop problem-solving abilities.
- Customizable and Reusable: The beauty of this DIY toy lies in its infinite possibilities. Backgrounds can be swapped out, new shapes can be added, and themes can evolve, ensuring the toy remains fresh and exciting for years to come. It’s a sustainable approach to play.
- Budget-Friendly Fun: Utilizing common household items and inexpensive dollar store finds makes this an accessible project for almost any family, proving that enriching play doesn’t have to break the bank.
- Portable Play: The compact nature of a cookie sheet makes these magnetic boards ideal for travel, keeping kids entertained during car rides, waiting rooms, or visits to family and friends.
Gather Your Materials: What You’ll Need for Your Magnetic Scene Board
One of the most appealing aspects of this project is its simplicity and the readily available nature of the materials. You likely have many of these items around your home already:
- A Dollar Store Cookie Sheet: This is the foundation of your magnetic play board. Any flat, metallic baking sheet will do. Ensure it’s clean and free of sharp edges.
- Assorted Wooden Shapes: These are available in a vast array of themes at craft stores (e.g., animals, people, vehicles, fantasy creatures). Choose shapes that will inspire your child’s interests.
- Craft Magnets: Small, flat disc magnets or even magnetic tape/sheets work perfectly. You’ll need one for each wooden shape.
- Hot Glue Gun and Glue Sticks: For securely attaching the magnets to the wooden shapes. Always supervise children when using a hot glue gun, or handle this step yourself. A strong craft glue can be an alternative, though it will require drying time.
- Paper: Standard printer paper, cardstock, or even construction paper will work for drawing the background scenes. Cardstock is recommended for durability.
- Drawing Supplies: Crayons, markers, colored pencils, or even paints will allow your children to create vibrant and detailed landscapes.
- Scissors: For trimming the paper to fit the cookie sheet.
- Tape: Masking tape, painter’s tape, or Scotch tape to secure the drawn backgrounds to the cookie sheet.
- Optional: Mod Podge or Laminating Sheets: For sealing and protecting the drawn backgrounds, making them more durable and reusable.
Step-by-Step Guide: Crafting Your Imaginative Magnetic Play Board
The process of creating these magnetic scene boards is delightfully straightforward, making it a perfect project to do with your children. Here’s how to bring your magnetic world to life:
- Step 1: Prepare Your Wooden Shapes and Magnets.
Unpack your chosen wooden shapes. Lay them out to visualize potential play scenarios. Take your craft magnets and decide which side will adhere best to the wood and which side will face the cookie sheet. If using magnetic tape, cut pieces to fit the back of your shapes.
- Step 2: Magnetize Your Wooden Shapes.
This is the quick and easy part! Using a hot glue gun (with adult supervision), apply a small dab of hot glue to the back of each wooden shape. Immediately press a magnet firmly into the glue. Hold for a few seconds to ensure a secure bond. Repeat for all your shapes. If using self-adhesive magnets, simply peel and stick. Allow any hot glue to cool completely before proceeding.
- Step 3: Design Your Background Scenes.
Now, it’s time for the true creative spark! Have your children draw various landscape backgrounds that complement their wooden shape sets. Encourage them to think about what kind of world each set of characters or objects would inhabit. For instance, if you have knights and castles, they might draw a rolling hillside with a distant fortress. If you have astronauts, a starry galaxy scene would be perfect. Measure your cookie sheet and cut paper to fit the exact dimensions, or slightly smaller if you prefer a border. This ensures a neat fit when taped down.
- Step 4: Secure the Scene to the Cookie Sheet.
Once the drawings are complete and vibrant, carefully tape the corners of each drawing to the cookie sheet. Using masking tape or painter’s tape allows for easy removal and swapping of scenes without damaging the paper or leaving residue on the cookie sheet. For added durability and to make backgrounds reusable, you might consider laminating the drawings or covering them with a thin layer of Mod Podge once they are dry. This protects them from wear and tear and makes them easy to wipe clean.
- Step 5: Let the Imaginative Play Begin!
And voila! Your simple, homemade toy that promotes endless creative play is ready. Watch as your children enthusiastically place their magnetized shapes onto their custom-drawn landscapes, weaving intricate stories and embarking on countless adventures. The ease of swapping out backgrounds means the play possibilities are virtually limitless.
Inspiring Scene Ideas for Your Magnetic Adventures
The beauty of this project lies in its versatility. Children can create any world they can imagine. Here are some popular and engaging scene ideas to get them started, expanding on the initial inspirations:
- The Fantasy Kingdom: Perfect for knights, dragons, princesses, and castles. Kids can draw a majestic hillside with a towering castle, a treacherous moat, or a magical forest on the horizon.
- Outer Space Adventure: Ideal for astronauts, rockets, planets, and alien creatures. A deep starry sky filled with distant galaxies, swirling nebulae, and colorful planets provides the perfect backdrop for intergalactic journeys.
- Woodland Wonders: A serene forest filled with trees, bushes, flowers, and charming woodland animals like foxes, bears, deer, and squirrels. Children can illustrate winding paths, hidden clearings, or cozy dens.
- Under the Sea Exploration: Mermaids, fish, dolphins, turtles, and even submarines can inhabit a vibrant underwater world. Think colorful coral reefs, swaying seaweed, mysterious shipwrecks, and shimmering ocean depths.
- Farm Life: A barn, tractors, cows, chickens, and pigs can populate a cheerful farm scene with fields, fences, and a bright blue sky.
- Dinosaur Land: Volcanoes, prehistoric plants, and ancient landscapes provide a thrilling home for various dinosaur shapes.
- Cityscape Adventures: Skyscrapers, roads, cars, and people can create a bustling urban environment for busy city life.
Encourage your children to think beyond these ideas and invent entirely new worlds and characters. The only limit is their imagination!
Tips for Enhancing Play and Durability
To maximize the fun and longevity of your DIY magnetic play board, consider these helpful tips:
- Laminate or Seal Backgrounds: As mentioned, laminating the drawn scenes or applying a coat of Mod Podge will protect them from spills, tears, and frequent handling, ensuring they last longer.
- Create a “Scene Library”: Store multiple drawn backgrounds in a folder or binder. This allows kids to easily swap out scenes and prevents boredom.
- Organize Shapes by Theme: Keep wooden shapes for specific themes (e.g., space, forest, ocean) in separate small pouches or containers. This makes it easier for children to set up their play scenarios without searching through a jumble of pieces.
- Encourage Storytelling Prompts: To deepen imaginative play, ask open-ended questions like, “What adventure is the knight on today?” or “What new creature did the astronaut discover?”
- Involve Kids in the Creation: Letting children participate in every step of the crafting process – from choosing shapes to drawing backgrounds – gives them a sense of ownership and pride in their toy.
- Expand Your Collection: Keep an eye out for new wooden shapes or magnetic items that can be added to your collection, continually refreshing the play experience.
Beyond the Cookie Sheet: Variations and Expansions
While the dollar store cookie sheet is a fantastic starting point, the concept of magnetic play can be adapted and expanded:
- Magnetic Whiteboards: Use a small magnetic whiteboard as a base. Children can draw directly on the board with dry-erase markers, allowing for even quicker scene changes and endless drawing opportunities.
- Large Metal Trays: For bigger, more elaborate scenes, consider using a larger metal serving tray or even the side of a filing cabinet.
- Fridge Play: Turn your refrigerator into a vertical play space! Magnetized shapes can create ever-changing scenes right in the kitchen.
- DIY Felt Boards: While not magnetic, felt boards offer a similar tactile, customizable play experience using felt shapes that stick to a felt background.
Conclusion: A Simple Craft, Limitless Adventures
In a world often saturated with complex electronic toys, the DIY magnetic play board stands out as a beacon of simple, profound fun. It’s a testament to the power of imagination and the value of hands-on creativity. With just a few inexpensive materials and a dash of ingenuity, you can transform an ordinary dollar store cookie sheet into a cherished toy that provides countless hours of screen-free entertainment, fosters essential developmental skills, and encourages the magical art of storytelling. So gather your supplies, invite your children to the craft table, and prepare to embark on a journey of limitless imaginative adventures. This isn’t just a craft project; it’s an investment in your child’s creative spirit.







