
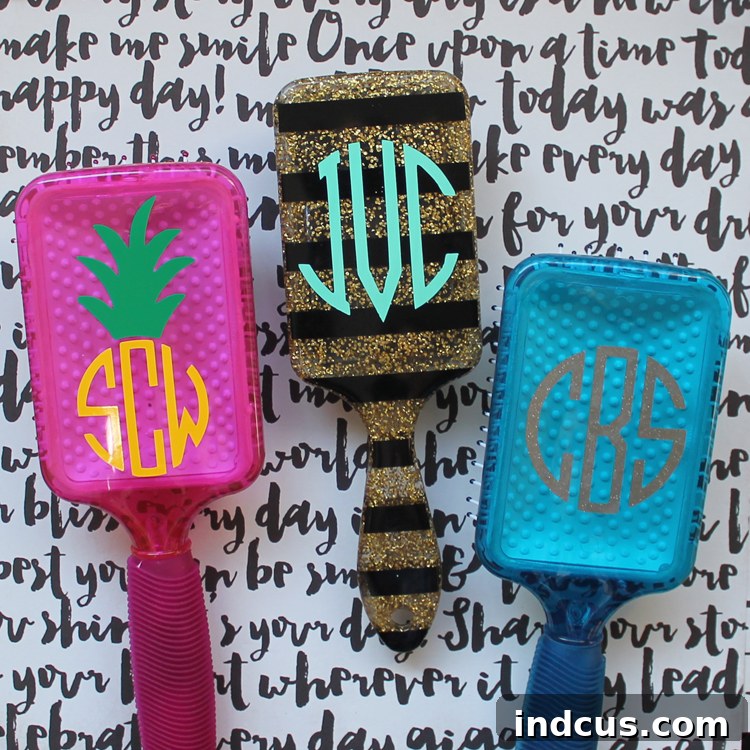
Crafting Thoughtful Gifts: DIY Personalized Monogrammed Hair Brushes with Your Silhouette
Welcome to a world where creativity meets personalization! Today, we’re diving into an exciting vinyl crafting project that promises to add a unique touch to your gift-giving. This project is a fantastic way to celebrate the launch of Alexis of Persia Lou’s new Craftsy Class, Silhouette Savvy: Venture into Vinyl. This brand-new online video course is an invaluable resource, guiding you through everything you need to know to confidently start cutting vinyl with your Silhouette machine. Whether you’re a seasoned crafter or just beginning your journey into the world of vinyl, this class offers expert insights and techniques to elevate your projects.
Unveiling the Perfect DIY Gift Idea: Monogrammed Hair Brushes
For our special vinyl project, we’ve crafted a delightful DIY Christmas gift idea that’s absolutely perfect for the tween or teen girls in your life to share with their friends. Imagine giving a vibrant, cheerful, and incredibly useful hairbrush, uniquely personalized with their monogram. These custom creations are not only practical but also deeply thoughtful, making them cherished presents for any occasion. Paired with our free printable hand-lettered gift tags, these monogrammed hair brushes become an unforgettable gesture of friendship and care. Personalized gifts consistently receive glowing reviews, and these bright, cheery, and useful brushes are sure to bring smiles.
Why Choose Permanent Vinyl for Your Craft Projects?
Before we dive into the creation process, let’s talk about materials. For this project, the choice of vinyl is crucial for durability and longevity. We highly recommend using permanent vinyl from Expressions Vinyl. Unlike temporary or removable vinyl, permanent vinyl is designed to withstand frequent use, moisture, and general wear and tear. This ensures that your beautiful monogram will never peel, crack, or fade, even if the hairbrush gets wet during daily grooming routines. Opting for high-quality permanent vinyl guarantees that your handmade gift will remain pristine and functional for years to come, preserving the thoughtful sentiment behind it.
Step-by-Step Guide: Crafting Your Monogrammed Hair Brush
Creating your own monogrammed hairbrush is a straightforward and rewarding process. Follow these detailed steps to achieve professional-looking results with your Silhouette machine.
1. Design Your Monogram in Silhouette Studio
The first step is bringing your personalized design to life. Open your Silhouette Studio software and begin crafting your desired monogram. If you’re new to monogram design or need some inspiration, a fantastic free resource is the monogram maker tool. This online tool allows you to input your initials and choose from a variety of elegant monogram styles. While you’ll need to sign up for a free membership to download your custom design, it’s a small step for a perfectly tailored look. Consider font choices, sizing, and placement to ensure your monogram fits beautifully on the hairbrush handle. Experiment with different layouts until you find the perfect aesthetic. Remember, a well-designed monogram sets the foundation for a stunning final product.
2. Load Vinyl Onto Your Cutting Mat
Once your design is finalized, it’s time to prepare your materials for cutting. Carefully place your sheet of permanent vinyl, color-side up, onto your Silhouette cutting mat. Ensure it adheres smoothly and securely to prevent any shifting during the cutting process. Proper adhesion is key to achieving a clean, precise cut. Gently press down on the vinyl to remove any air bubbles or wrinkles.
3. Adjust Silhouette Cut Settings for Vinyl
Before sending your design to the machine, it’s crucial to adjust your Silhouette’s cut settings specifically for vinyl. In Silhouette Studio, select “Vinyl” as your material type. The software will suggest recommended blade settings, force, and speed. Always perform a test cut on a small, inconspicuous corner of your vinyl sheet if you are unsure, especially when working with a new brand or type of vinyl. This will help you find the optimal settings to cut through the vinyl layer without cutting through the backing paper, ensuring a perfect “kiss cut.”
4. Cut Your Design with the Silhouette Machine
With your vinyl loaded and settings optimized, send your design to your Silhouette machine. Watch as your machine precisely cuts the intricate details of your monogram. The Silhouette is a powerful tool for crafting, renowned for its accuracy and ability to handle complex designs. Allow the machine to complete its work undisturbed, ensuring a clean and perfect cut. Once the cutting is complete, carefully unload the cutting mat from the machine.
5. Weed Excess Vinyl
Now comes the “weeding” process, which is surprisingly therapeutic. Weeding involves carefully removing all the excess vinyl that is not part of your design. Using a weeding tool (a hook or fine-tipped tweezers works best), gently peel away the surrounding vinyl, leaving only your monogrammed letters on the backing paper. Take your time, especially with intricate details, to ensure you don’t accidentally pull up parts of your design. This step truly reveals the beauty of your cut vinyl.
6. Apply Transfer Tape and Prepare for Application
To transfer your vinyl monogram cleanly onto the hairbrush, you’ll need transfer tape. Cut a piece of transfer tape slightly larger than your design and carefully lay it over the weeded vinyl. Use a scraper tool or a credit card to firmly burnish the transfer tape onto the vinyl, ensuring good adhesion. This step helps the vinyl stick to the transfer tape, allowing you to lift it off its original backing paper. Once sufficiently burnished, slowly peel off the backing paper, leaving your vinyl design adhered to the transfer tape.
7. Stick Vinyl to Hair Brush and Remove Transfer Tape
Position your vinyl design, still on the transfer tape, onto the desired spot on the hairbrush. Take your time to align it perfectly. Once placed, firmly press the vinyl onto the hairbrush, again using your scraper tool or credit card to burnish it thoroughly. Apply pressure evenly to ensure the permanent vinyl adheres well to the brush surface, especially important on slightly curved surfaces. After a minute or two of firm pressure, slowly and carefully peel back the transfer tape at a sharp angle. If any part of the vinyl doesn’t stick to the brush, simply lay the transfer tape back down and re-burnish that area. Voila! Your personalized monogrammed hairbrush is complete.
It’s truly that easy! The transformation from a plain hairbrush to a personalized masterpiece is incredibly satisfying. Monograms add a touch of classic elegance and individuality, making any item feel extra special. In our book, anything personalized instantly becomes a more thoughtful and cherished gift.
Showcasing Your Beautiful Creations
Witness the stunning results of your crafting efforts! These monogrammed hair brushes are not just gifts; they are small works of art, reflecting care and creativity.
The Perfect Finishing Touch: Free Printable Gift Tags
Every thoughtful gift deserves a charming presentation. To complement these delightful hair brushes, we’ve designed a set of fantastic, hand-lettered gift tags. These tags add an extra layer of personality and humor to your presents.
Featuring the witty phrase, “Don’t get your tinsel in a tangle,” these tags are sure to elicit a chuckle! We found them absolutely hilarious ourselves, and we know you’ll love using them too. They’re the ideal way to add a bit of holiday cheer and a personal touch to your gifts.
Download your free hand-lettered gift tags RIGHT HERE.
Explore More Vinyl Crafting Inspiration!
This monogrammed hairbrush project is just one example of the incredible versatility and fun that vinyl crafting offers. If you’re eager to discover even more creative ways to use your Silhouette machine and vinyl, you’re in for a treat! We’ve gathered an amazing collection of over 20 other vinyl projects from talented bloggers. Each idea is unique, inspiring, and sure to spark your imagination. Get ready to explore a treasure trove of crafting possibilities – we can’t wait to try them all!
Discover More Amazing Vinyl Crafts:
Hand Lettered Elf Food Groups T-Shirt – Pitter and Glink
Bring Wine Winter Socks – Tried & True
Hello My Name Is Personalized Newborn Onesie – Where the Smiles Have Been
Hakuna Moscato Wine Glass Decal – That’s What Che Said
Vinyl Christmas Countdown – Sugar Bee Crafts
Made with Love Vinyl Gift – A Girl and a Glue Gun
Merry Christmas Door Hanger – Minted Strawberry
Get Your Write On Pencil Holder – Delineate Your Dwelling
Thankful Jar – Kiki & Company
Gimme Some Sugar Hand-Lettered Dish Cloth – Persia Lou
DIY Elf Quote Christmas Pillows – A Kailo Chic Life
Giant Hello Sign Tutorial – Ginger Snap Crafts
DIY Diamond Trinket Dish – Maritza Alisa
DIY Baby Mobile – Sew What Alicia
DIY Framed Clipboard – Sisters What
Believe in Magic Christmas Banner – Happiness is Homemade
Chalk Style Snowflake Ornaments – Flamingo Toes
Merry Plate – One Artsy Mama
Feast Mode Thanksgiving T-Shirt – Dream a Little Bigger
DIY Christmas Star – Cutesy Crafts
O Holy Night Christmas Star – A Pumpkin and a Princess
Tis The Season Shadow Box – Practically Functional
A Special Thanks
We extend our sincere gratitude to Expressions Vinyl for generously providing the high-quality permanent vinyl that made this project possible. Their exceptional products ensure lasting beauty and durability for all your crafting endeavors. Don’t miss out on all these incredible vinyl crafts – there’s so much inspiration waiting for you!







