
Elevate Your Space: The Ultimate DIY Plastic Drawer Makeover for Style and Privacy
Plastic dresser drawers are a ubiquitous fixture in many homes – practical, affordable, and incredibly useful for organization. From college dorms to bustling family bathrooms, they offer quick storage solutions. However, their transparent nature often comes with a significant drawback: a constant visual clutter that exposes everything from toiletries to craft supplies. If you’ve ever cringed at guests getting an unsolicited peek at your personal items, or simply yearn for a more polished aesthetic, you’re not alone. This guide unveils a brilliantly simple, budget-friendly DIY hack that transforms those see-through storage units into stylish, private compartments.
Say goodbye to exposed clutter and hello to beautifully organized anonymity. This easy upgrade requires minimal effort, takes mere minutes, and dramatically enhances the look and feel of any room. We’re talking about a transformative touch that not only hides your essentials but also injects a personalized flair into your living space. Ready to turn those basic plastic drawers into chic storage marvels? Let’s dive into the details of this ingenious solution.
The Common Dilemma: Why Transparent Plastic Drawers Fall Short
While plastic storage drawers are champions of utility, their transparency is often a double-edged sword. On one hand, it allows for quick identification of contents, which can be helpful in a craft room or garage. On the other hand, it turns everyday items into a chaotic visual display that can detract from the overall aesthetics of a room. Imagine your bathroom, a sanctuary of relaxation, instantly becoming a showcase for cotton swabs, half-empty tubes, and less-than-glamorous personal hygiene products.
This lack of visual privacy is the primary reason many people dislike these otherwise functional storage units. Whether it’s in a bathroom, bedroom, home office, or even a child’s playroom, exposed items can make a space feel untidy, unorganized, and frankly, a little embarrassing. The goal of storage should be to contain and conceal, not to put everything on display. Our simple DIY solution addresses this fundamental flaw head-on, allowing you to enjoy the practicality of plastic drawers without sacrificing style or discretion.
The Geniusly Simple Solution: Cardstock Inserts
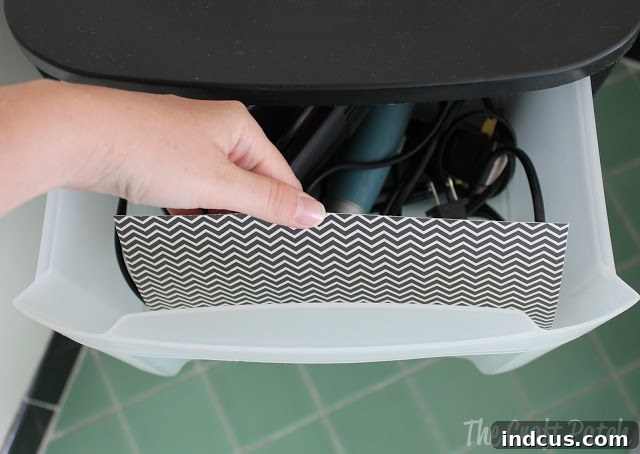
The core of this transformative project lies in a material you likely already have or can easily acquire: thick scrapbooking cardstock. The concept is disarmingly simple, yet the impact is profound. By cutting pieces of cardstock to the exact dimensions of your drawer fronts and inserting them, you instantly create an opaque barrier that conceals contents and elevates the visual appeal of the entire unit.
The beauty of this method is its sheer simplicity and versatility. There’s no complicated gluing, painting, or heavy-duty crafting involved. It’s a renter-friendly, commitment-free alteration that can be swapped out whenever your style evolves or your mood changes. This project takes the humble plastic drawer from an eyesore to an integral part of your room’s decor, all thanks to a bit of paper and creativity.
As you can see, the transformation begins with a simple, precise cut. The cardstock effortlessly slides into place, creating an instant facade that blocks the view into the drawer. It’s a quick fix that delivers major aesthetic dividends.
Step-by-Step Guide: Your DIY Plastic Drawer Privacy Project
This project is so straightforward, you’ll wonder why you hadn’t thought of it sooner. Here’s how to achieve a stylish and private plastic drawer system in minutes:
Materials You’ll Need:
- Plastic Dresser Drawers: The target of our makeover.
- Thick Scrapbooking Cardstock: Choose patterns, colors, or textures that complement your decor. The thicker the cardstock, the better it will hold its shape.
- Ruler or Measuring Tape: For accurate measurements.
- Scissors or Craft Knife: A craft knife and cutting mat will yield cleaner, straighter edges.
- Pencil: For marking your cuts.
- Optional: Laminator (for added durability), double-sided tape (for extra security).
The Transformation Process:
- Measure Your Drawer Fronts: Carefully measure the inside dimensions of the front panel of each drawer. You want the cardstock to fit snugly, so aim for precise measurements, perhaps even taking a millimeter or two off the height and width to ensure easy insertion without buckling.
- Mark and Cut the Cardstock: Using your ruler and pencil, transfer your measurements onto the back of your chosen cardstock. For the cleanest lines, use a craft knife and a cutting mat. If using scissors, take your time and cut slowly and steadily.
- Insert the Cardstock: Gently slide each cut piece of cardstock into the front of its respective drawer. The friction of the snug fit should hold it in place. If your drawers have a lip or groove, the cardstock should slot in perfectly.
- Assess and Adjust: Step back and admire your handiwork. If any pieces aren’t sitting right, trim them slightly until you achieve a perfect fit.
- Optional Durability Boost: If your drawers are in a high-traffic area, or exposed to moisture (like a bathroom), consider laminating your cardstock pieces before inserting them. This adds a protective layer, making them water-resistant and more durable. Alternatively, a few small pieces of double-sided tape applied to the edges of the cardstock before insertion can provide extra security, though often it’s not needed.
The Remarkable Difference: Before and After
The impact of this simple DIY is truly striking. What once looked like a cluttered, utilitarian storage unit is transformed into a clean, cohesive piece of furniture. The immediate visual improvement is undeniable.
Just look at the contrast! The “before” picture often showcases a jumble of items, creating visual noise. The “after” reveals a beautifully organized and calm space. This transformation isn’t just about hiding things; it’s about creating a more serene and aesthetically pleasing environment.
Beyond Privacy: Why This DIY Matters for Your Home
This plastic drawer makeover offers more than just hidden contents; it brings a multitude of benefits to your home:
- Enhanced Aesthetics: Elevate the look of inexpensive plastic storage, making it blend seamlessly with or even enhance your existing decor. Choose patterns and colors that reflect your personal style, turning a functional item into a decorative accent.
- Personalized Touch: This project allows for endless customization. From subtle textures to bold geometric prints, the choice of cardstock lets you express your creativity and personalize your space without a hefty investment.
- Improved Organization & Motivation: When your storage looks good, you’re more likely to keep it tidy. Knowing your items are neatly tucked away behind a stylish facade can be a strong motivator to maintain organization within the drawers themselves.
- Cost-Effective Solution: Instead of buying new, expensive storage furniture, you can rejuvenate your existing plastic drawers for the cost of a few sheets of cardstock. It’s an eco-friendly and budget-conscious way to upgrade your home.
- Flexibility and Adaptability: The non-permanent nature of this hack means you can easily change the cardstock inserts whenever you desire a fresh look, without damaging the drawers. This is perfect for seasonal decor changes or evolving tastes.
Expanding Your Options: Other Materials for Drawer Facades
While cardstock is a fantastic starting point, your creativity doesn’t have to stop there. Here are other materials you can consider for your plastic drawer makeover, each offering a unique look and feel:
- Adhesive Vinyl or Contact Paper: These come in an incredible array of patterns, colors, and textures (wood grain, marble, glitter). They are self-adhesive, providing a more permanent solution and often better durability, especially in high-moisture areas.
- Fabric: For a softer, textile-rich look, you could use stiffened fabric or fabric adhered with spray adhesive or Mod Podge to a thin piece of cardboard cut to size. This offers a cozy, unique aesthetic.
- Wallpaper Samples: Many home improvement stores offer free or inexpensive wallpaper samples. These often feature sophisticated patterns and textures that can instantly elevate the look of your drawers.
- Gift Wrap or Decorative Paper: For temporary or themed makeovers, high-quality gift wrap can be a fun and colorful option. Just ensure it’s thick enough not to be translucent.
- Printed Photos or Art: Personalize your drawers even further by printing out favorite photos, inspiring quotes, or digital art to insert. This is especially charming for kids’ rooms or craft spaces.
Tips for Longevity and Care of Your DIY Drawers
To ensure your newly upgraded plastic drawers stay looking fantastic, consider these tips:
- Lamination for High-Moisture Areas: As mentioned, if your drawers are in a bathroom or kitchen, laminating the cardstock is highly recommended. This protects against splashes and humidity, extending the life of your chosen design.
- Gentle Cleaning: For non-laminated inserts, gently wipe the drawer fronts with a dry or slightly damp cloth. Avoid harsh chemicals or excessive moisture that could warp or damage the paper.
- Securing Loose Inserts: If your cardstock isn’t perfectly snug, a few dots of removable glue stick or double-sided tape on the inside edges of the drawer can keep it firmly in place without making it permanent.
- Choosing the Right Cardstock Weight: Opt for heavier cardstock (e.g., 65lb/176gsm or higher) as it’s less prone to buckling or showing slight imperfections from the drawer behind it.
Where Can You Apply This Brilliant Hack?
This simple DIY isn’t just for bathrooms. Its versatility means you can apply it to plastic drawers in almost any room of your house:
- Bathrooms: Hide personal hygiene products, cleaning supplies, and general clutter.
- Craft Rooms/Studios: Keep various supplies organized and out of sight, maintaining a clean workspace.
- Home Offices: Conceal office supplies, cables, and documents for a more professional and uncluttered environment.
- Kids’ Playrooms/Bedrooms: Tame toy chaos and add a playful touch with colorful or themed cardstock.
- Garages/Utility Rooms: Even in these functional spaces, covering clear drawers can create a tidier look and protect contents from direct sunlight or dust.
- Kitchen Pantries: Conceal snacks, small gadgets, or cleaning supplies for a more streamlined pantry.
Final Thoughts: A Small Change, A Big Impact
This plastic drawer makeover is a testament to the power of simple DIY projects. With minimal time, effort, and expense, you can transform an often overlooked, utilitarian item into a stylish, private, and personalized piece of storage. No more cringing at exposed clutter; instead, you’ll enjoy a tidier, more aesthetically pleasing home environment.
So, gather your materials, pick your favorite cardstock, and give those plastic dresser drawers the upgrade they deserve. You’ll be amazed at the difference a few minutes and a little creativity can make. Share your own plastic drawer transformations – we’d love to see how you bring style and privacy to your storage solutions!







