
As the vibrant chaos of summer winds down and my children joyfully (and somewhat reluctantly) return to school, a familiar urge sweeps through our home. It’s that exhilarating post-summer energy that prompts a deep dive into cleaning, organizing, and redecorating each room, one by one. Can you relate to this desire for order and refresh after a whirlwind of activity? I’m incredibly excited to channel this energy into transforming our spaces, starting with a bathroom refresh that’s been on my mind.
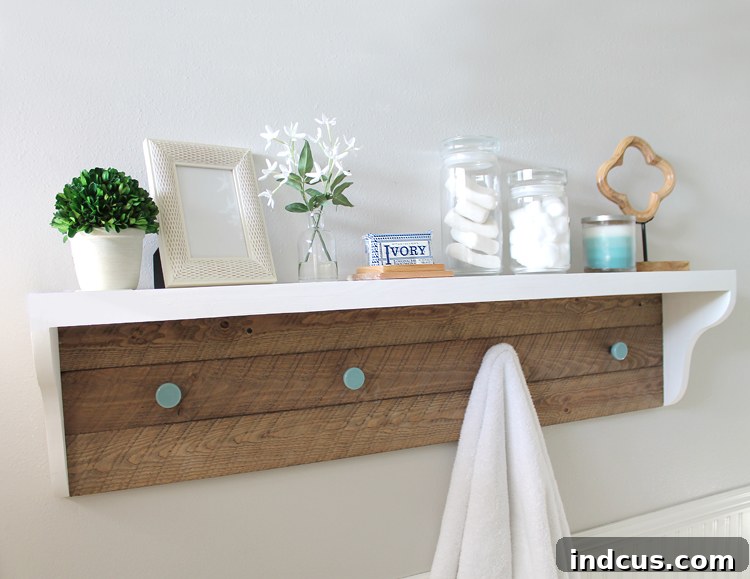
Today, I’m thrilled to share the detailed building plans for a charming farmhouse shelf that has become a stunning focal point in our recently revitalized bathroom. This DIY project perfectly encapsulates the rustic elegance and functional appeal of modern farmhouse style, bringing both character and much-needed storage to a previously overlooked space.
From Drab to Fab: Our Bathroom Transformation Journey
To truly appreciate the transformation, let’s take a nostalgic look back at this bathroom’s origins. When we first moved into our house, its condition was, to put it mildly, quite uninspiring. The space lacked personality and felt outdated, presenting a canvas ripe for change.
Womp womp. It was just… so… sad. The drab colors, lack of modern fixtures, and overall worn appearance made it a space we rarely enjoyed. We knew it needed more than just a superficial clean; it needed a complete personality overhaul to become a welcoming and functional part of our home.
Our initial efforts brought significant improvements. We built a custom mirror surround, breathing new life into the vanity area. The tile grout was meticulously refreshed, brightening the entire room. Simple yet impactful changes like swapping out old hardware for contemporary pieces and applying a fresh coat of paint dramatically lifted the room’s spirits. After these crucial updates, the bathroom began to truly shine:
So much better, right? The fresh paint, updated mirror, and clean lines created a much more inviting atmosphere. However, as life often dictates, even the best refreshes can encounter new challenges. Since that photo was taken, our energetic toddler decided the bath mat needed a splash of nail polish, and the giant decorative clock, a victim of enthusiastic play, lost a leg. I also realized that the beautiful blue shower curtain, while stylish, was too opaque, blocking essential natural light from the window and forcing us to keep it open constantly – a small annoyance that grew over time. Such is life with a busy family!
It was clear: it was time for another room refresh, a chance to infuse new energy and functionality into the space. Wouldn’t you agree that a little update goes a long way in keeping a home feeling vibrant?
Introducing the Star: Our DIY Farmhouse Shelf
I had been envisioning a rustic shelf for this bathroom for quite some time, a piece that would offer both practical storage and a charming design element. Fortunately, I have an incredibly talented “in-house carpenter” – my wonderful husband – who is always up for a challenge. Once again, I presented him with a “crazy idea,” and with his exceptional skill and ingenuity, he figured out exactly how to bring it to life. I truly did luck out in the husband department!
I absolutely adore how this farmhouse shelf turned out. Its weathered charm and sturdy construction perfectly embody farmhouse perfection, adding a touch of warmth and authenticity to the bathroom. The use of genuine barn wood is a key element that truly elevates its rustic appeal. Here’s a little close-up to appreciate the incredible texture and character of that amazing barn wood:
Our finished shelf measures a generous 46 inches long, providing ample space for decor and essentials. However, one of the greatest advantages of a DIY project like this is the complete freedom to customize. You can easily adjust the dimensions to suit the specific needs and space constraints of your own bathroom, making it a truly bespoke piece.
Detailed DIY Guide: Building Your Own Farmhouse Shelf
Ready to create your own functional and stylish farmhouse shelf? This project is rewarding and, with careful attention to detail, quite achievable. Here’s everything you’ll need and a comprehensive guide to help you through each step.
Materials Needed
Gathering the right materials is the first step towards a successful DIY project. We recommend sourcing quality pine for the main structure and authentic barn wood for that quintessential farmhouse look. Reclaimed barn wood adds unparalleled character, but new distressed wood can also work beautifully.
- 1″ x 8″ x 6′ pine board (for the top and side corbels)
- Two pieces of 1″ x 4″ x 8′ barn wood (for the front and back panel, and the base with hooks)
- Saw (a miter saw or circular saw for straight cuts)
- Jigsaw (essential for cutting the decorative curves)
- Belt sander (for smoothing edges and shaping curves precisely)
- Table saw (ideal for creating the rabbet joints, though a router can also be used)
- Wood glue (a strong, reliable wood adhesive)
- Clamps (essential for holding pieces together while glue dries)
- Screws and screwdriver/drill (for securing the pieces and mounting)
- Corbel template HERE (a helpful guide for consistent curves)
- Knobs or hooks (to be attached to the barn wood for hanging towels or decor)
Step-by-Step Construction: Crafting Your Farmhouse Shelf
Preparation & Initial Cuts
Begin by carefully cutting the 1″ x 8″ pine board and the 1″ x 4″ barn wood pieces to your desired length. For our shelf, we opted for a 46-inch length, which felt perfectly proportioned for our bathroom. If you plan for a significantly longer shelf, you may need to acquire additional wood to ensure structural integrity and aesthetic balance. Precision in these initial cuts will save time and ensure a professional finish down the line.
Crafting the Side Brackets & Rabbet Joints
Next, utilize the remaining portion of your 1″ x 8″ pine board to cut two identical side pieces that will form the decorative corbels and provide structural support. The exact length of these side pieces is critical and determined by the total height of the assembled shelf. For our design, this meant combining the nominal thickness of the 1″ x 8″ board (approximately 3/4″) with the combined width of three 1″ x 4″ pieces (each 3-1/2″ wide, totaling 10-1/2″). Therefore, the resulting length for each side piece was 11-1/4″. This calculation ensures a snug and robust fit for all components.
After cutting the side pieces to length, we moved on to creating rabbet joints along two edges of each side piece using a dado blade set on a table saw. The rabbet was cut to a depth of 3/8″ and a width of 3/4″. These joints are crucial as they create a recessed edge, allowing the front and back barn wood panels to sit flush and securely within the side supports, resulting in a cleaner finish and stronger construction. Exercise extreme caution during this step. A common but critical mistake is to cut both side pieces identically. Instead, these side pieces must be mirror images of each other. You need one “left-hand” and one “right-hand” side to ensure proper assembly, so double-check your cuts before proceeding.
Designing the Corbel Curves
The decorative curves on the side brackets, known as corbels, are key to achieving that classic farmhouse aesthetic. As you can see from the numerous pencil lines on the wood in our initial attempts, we experimented with several different designs before settling on a style that truly resonated with us. If you possess a French curve ruler or are confident in your freehand drawing skills, feel free to design your own unique curves! This allows for a truly personalized touch. However, if you prefer to save time and ensure a professional-looking result, we highly recommend using the printable template provided earlier in the materials list. Should you choose to design your own, it’s vital to remember two structural considerations: the curve must meet the bottom edge of the side piece with at least 3/4 of an inch of straight wood remaining, to accommodate the back pieces. Similarly, the front curve needs to leave at least 1-1/2″ of straight wood at the top to secure the front of the shelf.
Precision Cutting and Sanding
Once your curves are marked, it’s time to cut them out. When using a jigsaw, aim to cut just slightly outside your drawn line. A jigsaw, by nature, will leave a somewhat rough edge, which is perfectly normal. After the initial cut, switch to a belt sander to meticulously sand down to your precisely marked line. This step is crucial for achieving smooth, even, and professional-looking curves. (Quick tip: For perfect symmetry, clamp both side pieces together before sanding. This ensures that any adjustments you make are applied identically to both corbels, resulting in two perfectly matched curves.) When operating the belt sander, it’s often more effective to hold the sander stationary and carefully manipulate the wood against the sanding belt to refine the curve.
Assembly and Finishing Touches
These next pictures illustrate the final assembly process. Begin by applying a generous amount of wood glue to each joining edge. Then, carefully align and nail each piece into place. For a strong and lasting bond, ensure you use appropriate nails for your wood type and a pneumatic nailer if available, as it makes quick work of this step. Immediately wipe away any excess glue with a slightly damp rag. This prevents dried glue from interfering with your finish and ensures a clean aesthetic. Don’t worry if the damp rag slightly raises the wood grain; this can be easily remedied with a light sanding once the glue has fully cured.
Next, we decided to add a small, decorative lip to the front of the shelf for a more substantial and finished look. Using a scrap piece of wood, we cut a 3/4″ x 3/4″ strip, which was then glued and clamped to the front edge of the shelf. While this step isn’t strictly necessary for functionality, we felt that the thicker appearance added a touch of extra sophistication and truly completed the farmhouse aesthetic. Allow sufficient time for the glue to dry completely while the clamps hold the pieces firmly in place, ensuring a strong and seamless bond.
Finally, inspect your assembled shelf for any small holes, gaps, or imperfections. Use wood filler to patch these areas, creating a smooth, flawless surface. Once the filler is dry, perform a thorough finish sanding to achieve a silky-smooth texture, preparing the shelf for its final coat. For our farmhouse look, we chose a beautiful white chalk paint. Chalk paint is perfect for this style as it provides a matte, vintage finish and adheres wonderfully to wood without extensive prep work, making it an excellent choice for DIY enthusiasts.
A Happy Accident: The Shelf’s Versatile Orientation
Want to hear something amusing? We actually built this farmhouse shelf with the intention of hanging it in the opposite direction, envisioning it as a simple, elegant shelf like this:
I genuinely think it looks super cute this way, offering a sleek and minimalist storage solution. However, once it was fully constructed, we had a delightful “aha!” moment. We realized that by simply turning it upside down, we could attach decorative knobs or hooks to the barn wood panel. This brilliant revelation meant we could hang towels directly from the shelf, eliminating the need for a separate towel bar! So, we flipped it, added the hooks, and voilà! A happy accident indeed. I absolutely love when design evolves organically and leads to even better functionality. Ultimately, both orientations are charming, so you have the flexibility to choose whichever style and functionality best suits your needs and vision.
Completing the Farmhouse Bathroom Makeover
Mounting Your Shelf
Once your shelf is beautifully finished, it’s time for installation. To ensure maximum stability and safety, we securely screwed the shelf directly through the barn wood into the wall studs. Always locate your studs before mounting any heavy items to prevent potential damage and ensure the shelf can bear weight effectively. With the shelf proudly in place, the rest of the room was ready for its final touches to complete the cohesive farmhouse look.
Curating the Decor: From Shower Curtain to Accessories
Naturally, my next destination was Target, because, let’s be honest… Target undeniably equals cuteness, and I know you’ll agree! My decorating strategy began with finding the perfect shower curtain, allowing it to serve as the guiding inspiration for all subsequent decor choices. This method ensures a harmonious and well-coordinated aesthetic.
Can I just express my absolute adoration for this shower curtain? It truly embodies a charming, oversized vintage flour sack dish towel with its rustic texture and delightful fringe detailing. It brings a sense of nostalgic comfort and simple elegance, perfectly complementing the farmhouse vibe we aimed for. This curtain not only brightens the room by allowing more light to filter through but also adds a significant touch of character and style.
With a new, soft rug underfoot, elegant soap dispensers, and a selection of cute, thoughtfully chosen accessories, our bathroom is looking fantastic once again! The entire space feels fresh, inviting, and wonderfully cohesive. I truly can’t wait for those kids to be off to school so I can fully enjoy some peace and quiet in this beautifully refreshed sanctuary.
Clever Storage Solutions
I stumbled upon this charming wooden trough bowl in the dish aisle at Target – sometimes the best decor pieces are found in unexpected places! Isn’t it the perfect, most stylish way to keep spare rolls of toilet paper handy and accessible? I absolutely adore its rustic aesthetic and how seamlessly it integrates into the bathroom’s farmhouse theme, even if its original purpose was not for bathroom storage. It’s a wonderful example of creative repurposing to enhance both functionality and visual appeal.
So, there you have it! A bathroom that feels brand new, completely transformed without the need for any major, costly remodeling. What a relief that is! This refresh proves that thoughtful DIY projects and strategic decor updates can make a monumental difference. Now that the kids are settled back into school, what exciting home projects are you working on?







